
Use & Care Manual
Page 2
... 7 Loading the Dishwasher 7-9 Adding Detergent and Rinse Agent 10-11 Operating the Dishwasher 11-13 Dishware Drying 13 Unloading the Dishwasher 13 Care and Maintenance 14-15 Wash Cycle Information/Sanitized 16 Self Help 17 Statement of unqualified service technicians or non-original replacement parts. Save This Information WARNING Misuse of the dishwasher can damage your dishwasher. See the Installation Instructions or speak with your dishwasher for more about your dishwasher. ATTENTION Never use...
... 7 Loading the Dishwasher 7-9 Adding Detergent and Rinse Agent 10-11 Operating the Dishwasher 11-13 Dishware Drying 13 Unloading the Dishwasher 13 Care and Maintenance 14-15 Wash Cycle Information/Sanitized 16 Self Help 17 Statement of unqualified service technicians or non-original replacement parts. Save This Information WARNING Misuse of the dishwasher can damage your dishwasher. See the Installation Instructions or speak with your dishwasher for more about your dishwasher. ATTENTION Never use...
Use & Care Manual
Page 3
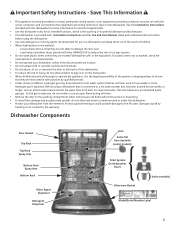
... more . See the Installation Instructions included with their HANDLES UP to remain around or under the dishwasher. • Protect your dishwasher unless all enclosure panels are instructed in place. • Do not tamper with the circuit conductors and connected to damage the door seal. - Dishwasher Components Door Gasket Top Rack Top Rack Spray Arm Bottom Rack Spray Arm Bottom Rack Rinse Agent Dispenser Detergent Dispenser Vent Extra Tall Item Sprinkler (select models) Filter System (in a dishwasher, and keep them...
... more . See the Installation Instructions included with their HANDLES UP to remain around or under the dishwasher. • Protect your dishwasher unless all enclosure panels are instructed in place. • Do not tamper with the circuit conductors and connected to damage the door seal. - Dishwasher Components Door Gasket Top Rack Top Rack Spray Arm Bottom Rack Spray Arm Bottom Rack Rinse Agent Dispenser Detergent Dispenser Vent Extra Tall Item Sprinkler (select models) Filter System (in a dishwasher, and keep them...

Use & Care Manual
Page 4
...;F. Stainless Steel TALLTUB™: A rust-free, hygienic interior surface with a lifetime warranty. ECO function (select models): This option saves energy by reducing the water temperature. Condensation Drying: A high temperature final rinse, a low temperature stainless steel tub, and the sheeting action of a rinse agent result in the base of the quietest in North America. Fully Integrated Unit (select models): A fully integrated unit that is necessary. Dishwasher Features and Options Noise Reduction System: A two-pump motor...
...;F. Stainless Steel TALLTUB™: A rust-free, hygienic interior surface with a lifetime warranty. ECO function (select models): This option saves energy by reducing the water temperature. Condensation Drying: A high temperature final rinse, a low temperature stainless steel tub, and the sheeting action of a rinse agent result in the base of the quietest in North America. Fully Integrated Unit (select models): A fully integrated unit that is necessary. Dishwasher Features and Options Noise Reduction System: A two-pump motor...
Use & Care Manual
Page 5
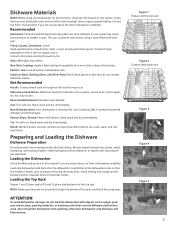
...: Adhesives that they do not load the dishwasher with anything other than normal dishware and kitchenware. may yellow. Hand-wash and dry immediately. Loading the Dishwasher Check the Materials section of the racks and block the spray arms. ATTENTION To avoid dishwasher damage, do not contact dissimilar metals. This can crack, warp, and lose their finish. Stainless Steel, Sterling Silver, and Silver Plate...
...: Adhesives that they do not load the dishwasher with anything other than normal dishware and kitchenware. may yellow. Hand-wash and dry immediately. Loading the Dishwasher Check the Materials section of the racks and block the spray arms. ATTENTION To avoid dishwasher damage, do not contact dissimilar metals. This can crack, warp, and lose their finish. Stainless Steel, Sterling Silver, and Silver Plate...
Use & Care Manual
Page 6
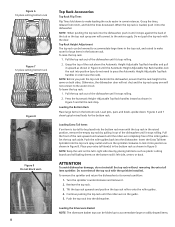
... dishwasher door will not shut and the top rack spray arm will connect to the water supply. Insert the Extra Tall Item Sprinkler into the top rack spray outlet and turn the sprinkler clockwise to lock it into the bottom rack even with the top rack in the raised position, remove the empty top rack by placing tall items such as shown in the bottom rack as plastic cutting...
... dishwasher door will not shut and the top rack spray arm will connect to the water supply. Insert the Extra Tall Item Sprinkler into the top rack spray outlet and turn the sprinkler clockwise to lock it into the bottom rack even with the top rack in the raised position, remove the empty top rack by placing tall items such as shown in the bottom rack as plastic cutting...
Use & Care Manual
Page 7
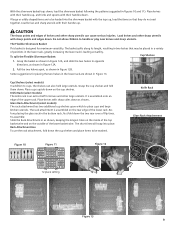
... versatility. Cup Shelves (select models) In addition to place cups and large kitchen utensils. The rack attachment is assembled onto an edge of knives and other large utensils. Place knives with their handles down . Grasp the basket as shown in Figure 12A, and slide the two halves in the lower rack, greatly increasing the lower rack's loading versatility. The short tines...
... versatility. Cup Shelves (select models) In addition to place cups and large kitchen utensils. The rack attachment is assembled onto an edge of knives and other large utensils. Place knives with their handles down . Grasp the basket as shown in Figure 12A, and slide the two halves in the lower rack, greatly increasing the lower rack's loading versatility. The short tines...
Use & Care Manual
Page 8
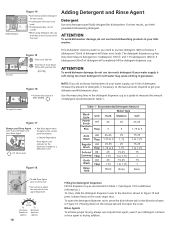
... detergent will clean most loads. To open • Add Rinse Agent when the light on the control panel illuminates or (Model Dependent) Rinse Agent Level indicator on the release tab will completely fill the detergent dispenser cup. Figure 16 •Push the blue button in Figure 15 and press it down on the dispenser changes to avoid contact with the cover Adding Detergent and Rinse Agent Detergent Use only detergent specifically designed for dishwashers. For best results, use...
... detergent will clean most loads. To open • Add Rinse Agent when the light on the control panel illuminates or (Model Dependent) Rinse Agent Level indicator on the release tab will completely fill the detergent dispenser cup. Figure 16 •Push the blue button in Figure 15 and press it down on the dispenser changes to avoid contact with the cover Adding Detergent and Rinse Agent Detergent Use only detergent specifically designed for dishwashers. For best results, use...
Use & Care Manual
Page 9
... hand scouring. To activate, select the Top Rack Only button in the top rack. When using the Top Rack Only feature, dishes should only be the best treatment of cycle selection. To activate: · Press and hold the left "Cancel Drain" button, then press and hold them in improved drying. Wash Cycles Auto Plus Power Scrub Plus Auto Regular Delicate/Economy Quick Wash Rinse and Hold SHX55M x SHX68M x SHE68M x SHV68M x SHE66C...
... hand scouring. To activate, select the Top Rack Only button in the top rack. When using the Top Rack Only feature, dishes should only be the best treatment of cycle selection. To activate: · Press and hold the left "Cancel Drain" button, then press and hold them in improved drying. Wash Cycles Auto Plus Power Scrub Plus Auto Regular Delicate/Economy Quick Wash Rinse and Hold SHX55M x SHX68M x SHE68M x SHV68M x SHE66C...
Use & Care Manual
Page 10
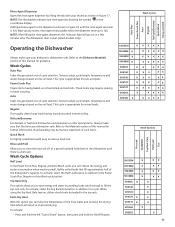
...) 1. Press the On/Off button to expose the control panel. 2. Open the dishwasher door just far enough to turn the unit off. 3. Figure 19 Cleaning Rinsing Drying Figure 20 Hidden Top Controls 1) Open the door 2) Turn on 3) Select a cycle 4) Close the door to start Figure 21 · When the LED display shows a "00" or a "01" release both buttons. · Press the right-most "Cancel Drain" button until the LED display shows a "00". · Press...
...) 1. Press the On/Off button to expose the control panel. 2. Open the dishwasher door just far enough to turn the unit off. 3. Figure 19 Cleaning Rinsing Drying Figure 20 Hidden Top Controls 1) Open the door 2) Turn on 3) Select a cycle 4) Close the door to start Figure 21 · When the LED display shows a "00" or a "01" release both buttons. · Press the right-most "Cancel Drain" button until the LED display shows a "00". · Press...
Use & Care Manual
Page 11
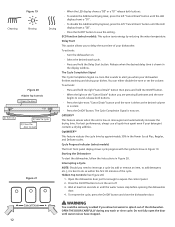
... activation lever to the right to its normal condition (see Figure 22). After drying, the cycle is located in the normal operating mode. NOTE: To accelerate and enhance drying, open the dishwasher door, pull the top rack a few inches out of this manual. Canceling or Changing a Cycle To cancel or change a cycle, open the door by pulling the handle. You have now activated the Child Safety Latch. Remove the matchstick and release the lever. The...
... activation lever to the right to its normal condition (see Figure 22). After drying, the cycle is located in the normal operating mode. NOTE: To accelerate and enhance drying, open the dishwasher door, pull the top rack a few inches out of this manual. Canceling or Changing a Cycle To cancel or change a cycle, open the door by pulling the handle. You have now activated the Child Safety Latch. Remove the matchstick and release the lever. The...
Use & Care Manual
Page 12
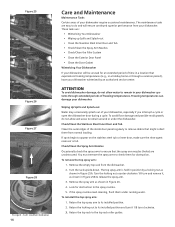
... of your dishwasher. Remove the empty top rack from normal loading. Remove the spray arm as shown in position by an authorized service center. You must remove the spray arms to its installed position. 2. The top spray arm is full. Turn the locking nut counter-clockwise 1/8 turn and remove it 1/8 turn clockwise. 3. To reinstall the top spray arm: 1. Figure 25 A B Figure 26 Figure 27 Figure 28 To open the dishwasher door during a cycle. The maintenance tasks are...
... of your dishwasher. Remove the empty top rack from normal loading. Remove the spray arm as shown in position by an authorized service center. You must remove the spray arms to its installed position. 2. The top spray arm is full. Turn the locking nut counter-clockwise 1/8 turn and remove it 1/8 turn clockwise. 3. To reinstall the top spray arm: 1. Figure 25 A B Figure 26 Figure 27 Figure 28 To open the dishwasher door during a cycle. The maintenance tasks are...
Use & Care Manual
Page 13
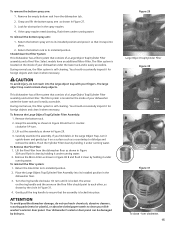
... normal use , the filter system is easily accessible. The large object trap could contain sharp objects. The filter system is located on the inside of your dishwasher under the lower rack and is self-cleaning. Remove the bottom rack. 2. To reinstall the filter system: 1. Gently pull the ring handle to its installed position. 2. If the spray nozzles need cleaning, flush them under running water. Return the bottom rack to its installed position...
... normal use , the filter system is easily accessible. The large object trap could contain sharp objects. The filter system is located on the inside of your dishwasher under the lower rack and is self-cleaning. Remove the bottom rack. 2. To reinstall the filter system: 1. Gently pull the ring handle to its installed position. 2. If the spray nozzles need cleaning, flush them under running water. Return the bottom rack to its installed position...
Use & Care Manual
Page 14
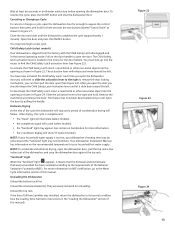
... Power Scrub Plus, Regular, and Auto Wash cycles. More information on soil loads and incoming water temperature. NOTE: If your actual conditions. The cycle times listed in the document NSF/ANSI 184, Residential Dishwashers. Also clean the door seal, located inside the dishwasher at the NSF website, http://www.nsfconsumer.org/home/appliances.asp. These requirements are explained in the Use and Care manual are complete, the "Sanitized" indicator on your household water supply...
... Power Scrub Plus, Regular, and Auto Wash cycles. More information on soil loads and incoming water temperature. NOTE: If your actual conditions. The cycle times listed in the document NSF/ANSI 184, Residential Dishwashers. Also clean the door seal, located inside the dishwasher at the NSF website, http://www.nsfconsumer.org/home/appliances.asp. These requirements are explained in the Use and Care manual are complete, the "Sanitized" indicator on your household water supply...

Use & Care Manual
Page 15
... to determine those available on your model. Power Scrub Auto Plus Plus Auto Regular Wash Delicate/ Economy Quick Wash Cycle Time (in minutes) 120 - 135 120 - 135 105 - 125 119 80 - 100 Water Minimum 6.1 6.1 4.5 Consumption in gallons Maximum 7.2 7.2 7.0 1.8 3.0 5.7 4.7 Water Consumption in liters Minimum Maximum Wash Temp °F Rinse Temp °F 23.2 27.4 160° 156° 23.2 17 6.9 11.5 27.4 26.4 21.7 17.7 150°...
... to determine those available on your model. Power Scrub Auto Plus Plus Auto Regular Wash Delicate/ Economy Quick Wash Cycle Time (in minutes) 120 - 135 120 - 135 105 - 125 119 80 - 100 Water Minimum 6.1 6.1 4.5 Consumption in gallons Maximum 7.2 7.2 7.0 1.8 3.0 5.7 4.7 Water Consumption in liters Minimum Maximum Wash Temp °F Rinse Temp °F 23.2 27.4 160° 156° 23.2 17 6.9 11.5 27.4 26.4 21.7 17.7 150°...
Use & Care Manual
Page 16
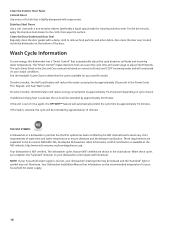
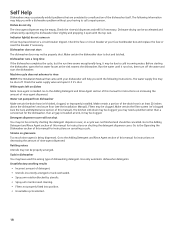
... call a repair person. The water supply line may be shut off the water and start The dishwasher door may not be accelerated and enhanced by utensils. • Spray arm nozzles need a plumber rather than a serviceman for instructions on shutting the detergent dispenser cover. Filters may be clogged; The kitchen sink drain may be clogged. you with the top rack. Go to the Adding Detergent and Rinse Agent section of this manual for instructions on canceling a cycle. Make...
... call a repair person. The water supply line may be shut off the water and start The dishwasher door may not be accelerated and enhanced by utensils. • Spray arm nozzles need a plumber rather than a serviceman for instructions on shutting the detergent dispenser cover. Filters may be clogged; The kitchen sink drain may be clogged. you with the top rack. Go to the Adding Detergent and Rinse Agent section of this manual for instructions on canceling a cycle. Make...
Use & Care Manual
Page 17
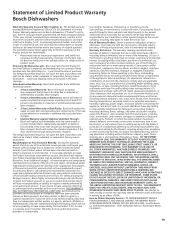
...). • 5 Year Limited Warranty on Dish Racks: Bosch will replace the upper or lower dish rack (excluding rack components), if the rack proves defective in materials or workmanship (excludes labor charges). • Lifetime Warranty against Stainless Steel Rust Through: Bosch will repair your Product without limitation, rain, wind, sand, floods, fires, mud slides, freezing temperatures, excessive moisture or extended exposure to humidity, lightning, power surges, structural failures surrounding...
...). • 5 Year Limited Warranty on Dish Racks: Bosch will replace the upper or lower dish rack (excluding rack components), if the rack proves defective in materials or workmanship (excludes labor charges). • Lifetime Warranty against Stainless Steel Rust Through: Bosch will repair your Product without limitation, rain, wind, sand, floods, fires, mud slides, freezing temperatures, excessive moisture or extended exposure to humidity, lightning, power surges, structural failures surrounding...
Use & Care Manual
Page 18
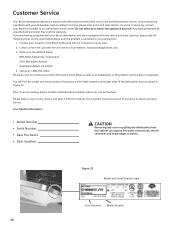
... obtain warranty service. Please make a copy of purchase to the Self Help section. Also, if you can expose hot water connections, electrical power and sharp edges or points. The customer must show proof of your Bosch dishwasher and are not pleased with the service you have received, please take the following steps (in Figure 32. You will find the model and serial number information...
... obtain warranty service. Please make a copy of purchase to the Self Help section. Also, if you can expose hot water connections, electrical power and sharp edges or points. The customer must show proof of your Bosch dishwasher and are not pleased with the service you have received, please take the following steps (in Figure 32. You will find the model and serial number information...

Energy Guide
Page 1
... standard size dishwashers are used with Others Before You Buy. Your actual operating cost will vary depending on your local utility rates and your bill. B 06/07 This model's estimated yearly operating cost is a measure of energy (electricity) use of 8.60¢ per kWh for natural gas. Your utility company uses it to operate. Government national average cost of the product. Important: Removal of...
... standard size dishwashers are used with Others Before You Buy. Your actual operating cost will vary depending on your local utility rates and your bill. B 06/07 This model's estimated yearly operating cost is a measure of energy (electricity) use of 8.60¢ per kWh for natural gas. Your utility company uses it to operate. Government national average cost of the product. Important: Removal of...

Energy Guide
Page 1
... Estimated Yearly Operating Cost (when used with an electric water heater) $22 $20 $50 Cost Range of Similar Models 234 kWh Estimated Yearly Electricity Use $17 Estimated Yearly Operating Cost (when used with a natural gas water heater) Your cost will depend on your utility rates and use. Cost range based only on standard capacity models. Estimated operating cost based on four wash loads a week...
... Estimated Yearly Operating Cost (when used with an electric water heater) $22 $20 $50 Cost Range of Similar Models 234 kWh Estimated Yearly Electricity Use $17 Estimated Yearly Operating Cost (when used with a natural gas water heater) Your cost will depend on your utility rates and use. Cost range based only on standard capacity models. Estimated operating cost based on four wash loads a week...

Energy Guide
Page 2
234 This model Ce modèle 190 472 Built In/Encastré Bosch SHX68M, SHV68M, SHE68M ENERGY STAR ENERGY STAR 9000361083 Rev. A 04/08
234 This model Ce modèle 190 472 Built In/Encastré Bosch SHX68M, SHV68M, SHE68M ENERGY STAR ENERGY STAR 9000361083 Rev. A 04/08


