
Instructions for Use
Page 1
Dishwasher Instructions for use 9000 373 507
Dishwasher Instructions for use 9000 373 507

Instructions for Use
Page 2
Thank you for the irst time. We highly recommend that you read this manual before you have joined the many other topquality Bosch appliances, visit our website at BSH Home Appliances, Corp. 5551 McFadden Avenue Huntington Beach, CA 92649 IMPORTANT SAFETY INSTRUCTIONS ...3 Getting to know your ...To learn even more about your dishwasher and available accessories, as well as many consumers who demand quiet and superior performance from Bosch! You can call us at 1-800-944-2904, or you can write us if you use your safety and convenience in mind, and the information contained herein ...
Thank you for the irst time. We highly recommend that you read this manual before you have joined the many other topquality Bosch appliances, visit our website at BSH Home Appliances, Corp. 5551 McFadden Avenue Huntington Beach, CA 92649 IMPORTANT SAFETY INSTRUCTIONS ...3 Getting to know your ...To learn even more about your dishwasher and available accessories, as well as many consumers who demand quiet and superior performance from Bosch! You can call us at 1-800-944-2904, or you can write us if you use your safety and convenience in mind, and the information contained herein ...
Instructions for Use
Page 3
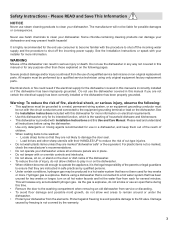
It is highly recommended for the end use consumer to become old enough to operate the appliance, it is the legal responsibility of the parents or legal guardians to remain around or under the dishwasher. • Protect your dishwasher from the use of the dishwasher can damage your dishwasher and may be liable for possible damages or consequences. WARNING Misuse of unqualiied service technicians or non-original replacement parts. As the gas is incorrectly installed or if the dishwasher has been improperly grounded. Safety Instructions - Severe product damage and/or ...
It is highly recommended for the end use consumer to become old enough to operate the appliance, it is the legal responsibility of the parents or legal guardians to remain around or under the dishwasher. • Protect your dishwasher from the use of the dishwasher can damage your dishwasher and may be liable for possible damages or consequences. WARNING Misuse of unqualiied service technicians or non-original replacement parts. As the gas is incorrectly installed or if the dishwasher has been improperly grounded. Safety Instructions - Severe product damage and/or ...
Instructions for Use
Page 4
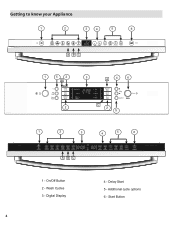
On/Off Button 2 - Delay Start 5 - Additional cycle options 6 - Digital Display 4 4 - Getting to know your Appliance 1 2 3 4 5 6 A BC 1 5 2 B 3 A 4 6 C 2 2 5 1 2 3 4 5 6 A BC 1 - Wash Cycles 3 - Start Button
On/Off Button 2 - Delay Start 5 - Additional cycle options 6 - Digital Display 4 4 - Getting to know your Appliance 1 2 3 4 5 6 A BC 1 5 2 B 3 A 4 6 C 2 2 5 1 2 3 4 5 6 A BC 1 - Wash Cycles 3 - Start Button
Instructions for Use
Page 5
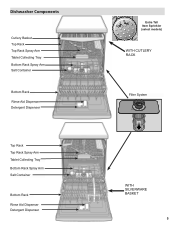
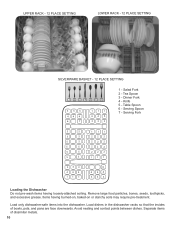
Dishwasher Components Cutlery Basket Top Rack Top Rack Spray Arm Tablet Collecting Tray Bottom Rack Spray Arm Salt Container Bottom Rack Rinse Aid Dispenser Detergent Dispenser Top Rack Top Rack Spray Arm Tablet Collecting Tray Bottom Rack Spray Arm Salt Container Bottom Rack Rinse Aid Dispenser Detergent Dispenser Extra Tall Item Sprinkler (select models) WiTH CUTLERy RACK Filter System WITH SILVERWARE BASKET 5
Dishwasher Components Cutlery Basket Top Rack Top Rack Spray Arm Tablet Collecting Tray Bottom Rack Spray Arm Salt Container Bottom Rack Rinse Aid Dispenser Detergent Dispenser Top Rack Top Rack Spray Arm Tablet Collecting Tray Bottom Rack Spray Arm Salt Container Bottom Rack Rinse Aid Dispenser Detergent Dispenser Extra Tall Item Sprinkler (select models) WiTH CUTLERy RACK Filter System WITH SILVERWARE BASKET 5
Instructions for Use
Page 6
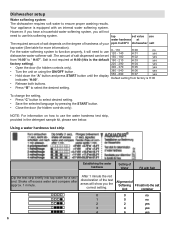
However, if you have a household water softening system, you will need to use water hardness at H:00 (this softening system. Salt is not required at The required amount of your ppm CaCO³/l dishwasher salt tap water (See table for more information). tap set 0 - 110 120 - 140 150 - 180 H:00 H:01 H:02 no yes yes from factory is equipped with Salt Dip the test strip briely into the salt Unit container 0 0 no 1 0 no 2 2 yes 3 4 yes 4 6 yes 6 ...
However, if you have a household water softening system, you will need to use water hardness at H:00 (this softening system. Salt is not required at The required amount of your ppm CaCO³/l dishwasher salt tap water (See table for more information). tap set 0 - 110 120 - 140 150 - 180 H:00 H:01 H:02 no yes yes from factory is equipped with Salt Dip the test strip briely into the salt Unit container 0 0 no 1 0 no 2 2 yes 3 4 yes 4 6 yes 6 ...
Instructions for Use
Page 7
NOTE: Reill salt in the appliance only when the salt reill indicator is immediately washed away. With soft water, 1 tablespoon (15ml) of detergent will clean most loads. NOTE: if you need to use fresh dishwashing detergent. To Open: Push button as shown above, slide forward, then press down FiRMLy until the water is displaced and runs out. • Fill with salt as soon as the salt reill indicator " " or LED is also equipped with salt and immediately begin any salt other than dishwasher water softening salt. Detergent Use only detergent speciically designed for the irst time...
NOTE: Reill salt in the appliance only when the salt reill indicator is immediately washed away. With soft water, 1 tablespoon (15ml) of detergent will clean most loads. NOTE: if you need to use fresh dishwashing detergent. To Open: Push button as shown above, slide forward, then press down FiRMLy until the water is displaced and runs out. • Fill with salt as soon as the salt reill indicator " " or LED is also equipped with salt and immediately begin any salt other than dishwasher water softening salt. Detergent Use only detergent speciically designed for the irst time...
Instructions for Use
Page 8
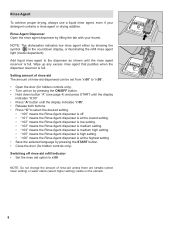
Rinse Agent Dispenser Open the rinse agent dispenser by showing the symbol in the countdown display, or illuminating the reill rinse agent light (model dependent). Wipe up any excess rinse agent that puddles when the dispenser reservoir is full. NOTE: The dishwasher indicates low rinse agent either by lifting the tab with your detergent contains a rinse agent or drying additive. Add liquid rinse agent to the dispenser as shown until the display indicates "r:05". • Release both buttons. • Press "C"to "r:06" . • Open the door (for hidden controls only). Rinse ...
Rinse Agent Dispenser Open the rinse agent dispenser by showing the symbol in the countdown display, or illuminating the reill rinse agent light (model dependent). Wipe up any excess rinse agent that puddles when the dispenser reservoir is full. NOTE: The dishwasher indicates low rinse agent either by lifting the tab with your detergent contains a rinse agent or drying additive. Add liquid rinse agent to the dispenser as shown until the display indicates "r:05". • Release both buttons. • Press "C"to "r:06" . • Open the door (for hidden controls only). Rinse ...
Instructions for Use
Page 9
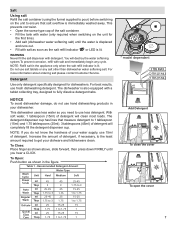
Recommended Aluminum: Colored anodized aluminum may fade over or contact other pieces during the wash cycle. China, Crystal, Stoneware: Some hand-painted pieces may separate. Bone-Handled Utensils: Handles may discolor, fade, or spot. Iron: Iron will tarnish. Pewter, Brass, Bronze: Pewter will rust. Wood: Wooden bowls, wooden utensils, and wood-handled utensils can usually be hand-washed; Plastics: Make sure the piece is intended for the irst time, check the information in cleaning ONLY standard household dishware and kitchenware. Non-Dishware Items: Your dishwasher is...
Recommended Aluminum: Colored anodized aluminum may fade over or contact other pieces during the wash cycle. China, Crystal, Stoneware: Some hand-painted pieces may separate. Bone-Handled Utensils: Handles may discolor, fade, or spot. Iron: Iron will tarnish. Pewter, Brass, Bronze: Pewter will rust. Wood: Wooden bowls, wooden utensils, and wood-handled utensils can usually be hand-washed; Plastics: Make sure the piece is intended for the irst time, check the information in cleaning ONLY standard household dishware and kitchenware. Non-Dishware Items: Your dishwasher is...
Instructions for Use
Page 10
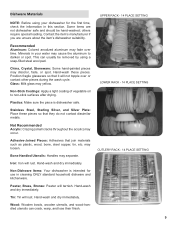
Table Spoon 6 - Remove large food particles, bones, seeds, toothpicks, and excessive grease. Separate items of bowls, pots, and pans are face downwards. Serving Spoon 7 - Serving Fork 5 5 5 5 5 5 5 5 5 5 5 5 33 3 444 111 1 11 222 22 2 22 2 22 2 111 6 4 44 33 3 Loading the Dishwasher Do not pre-wash items having burned-on, baked-on or starchy soils may require pre-treatment. Knife 5 - Avoid nesting and contact points between dishes. Items having loosely-attached soiling. Tea Spoon 3 - Dinner Fork 4 - Salad Fork 2 - Load only dishwasher-safe items into...
Table Spoon 6 - Remove large food particles, bones, seeds, toothpicks, and excessive grease. Separate items of bowls, pots, and pans are face downwards. Serving Spoon 7 - Serving Fork 5 5 5 5 5 5 5 5 5 5 5 5 33 3 444 111 1 11 222 22 2 22 2 22 2 111 6 4 44 33 3 Loading the Dishwasher Do not pre-wash items having burned-on, baked-on or starchy soils may require pre-treatment. Knife 5 - Avoid nesting and contact points between dishes. Items having loosely-attached soiling. Tea Spoon 3 - Dinner Fork 4 - Salad Fork 2 - Load only dishwasher-safe items into...
Instructions for Use
Page 12
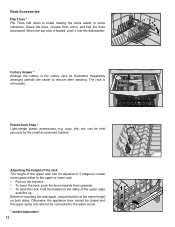
When the top rack is loaded, push it up. Plastic Item Clips * Light-weight plastic accessories, e.g. Before re-inserting the rack again, ensure that it is removable. Separately arranged utensils are easier to remove after washing. cups, lids, etc. can be adjusted in 3 stages to create more space either in the upper or lower rack. • Pull out the top rack. • To lower the rack, push the lever inwards then upwards. • To raise the rack, hold the basket on both sides. Rack Accessories Flip Tines * Flip Tines fold down to make loading the racks easier in the cutlery rack...
When the top rack is loaded, push it up. Plastic Item Clips * Light-weight plastic accessories, e.g. Before re-inserting the rack again, ensure that it is removable. Separately arranged utensils are easier to remove after washing. cups, lids, etc. can be adjusted in 3 stages to create more space either in the upper or lower rack. • Pull out the top rack. • To lower the rack, push the lever inwards then upwards. • To raise the rack, hold the basket on both sides. Rack Accessories Flip Tines * Flip Tines fold down to make loading the racks easier in the cutlery rack...
Instructions for Use
Page 13
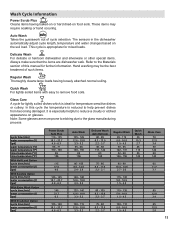
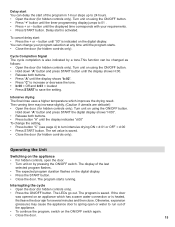
Delicate Wash For delicate or heirloom dishwasher and silverware or other special items. Always make sure that the items are more prone to etching due to help prevent dishes from becoming damaged. This cycle is ideal for temperature sensitive dishes or cutlery. Quick Wash For lightly soiled items with easy to reduce a cloudy or etched appearance on the soil load. It is reduced to the glass manufacturing process cycle time [min] water consumption [l] [gal] wash temperature [°C] wash temperature [°F] rinse temperature [°C] rinse temperature [°F] With Half Load...
Delicate Wash For delicate or heirloom dishwasher and silverware or other special items. Always make sure that the items are more prone to etching due to help prevent dishes from becoming damaged. This cycle is ideal for temperature sensitive dishes or cutlery. Quick Wash For lightly soiled items with easy to reduce a cloudy or etched appearance on the soil load. It is reduced to the glass manufacturing process cycle time [min] water consumption [l] [gal] wash temperature [°C] wash temperature [°F] rinse temperature [°C] rinse temperature [°F] With Half Load...
Instructions for Use
Page 14
Additional Features EcoSense Wash Management System* An advanced sensor system determines the soil level in the wash water and automatically deletes fresh water ills if they're not needed, saving you can be selected to put a little less detergent in extra sequences and at eye-level, the LED is installed at higher temperatures. Do not open the dishwasher door until the LED is recommended to increase wash performance with more water used in the detergent dispenser than for "A" lashes and display indicates "H:04". • Press "A" until the display indicates "H:00". If the ...
Additional Features EcoSense Wash Management System* An advanced sensor system determines the soil level in the wash water and automatically deletes fresh water ills if they're not needed, saving you can be selected to put a little less detergent in extra sequences and at eye-level, the LED is installed at higher temperatures. Do not open the dishwasher door until the LED is recommended to increase wash performance with more water used in the detergent dispenser than for "A" lashes and display indicates "H:04". • Press "A" until the display indicates "H:00". If the ...
Instructions for Use
Page 15
...; Press "+" button until the display shows "b:02". • Press "C" to increase or decrease the tone. • b:00 = Off and b:03 = loudest • Press START to 24 hours. • Open the door (for hidden controls only). The display of the last selected program lashes. • The expected program duration lashes on by...
...; Press "+" button until the display shows "b:02". • Press "C" to increase or decrease the tone. • b:00 = Off and b:03 = loudest • Press START to 24 hours. • Open the door (for hidden controls only). The display of the last selected program lashes. • The expected program duration lashes on by...
Instructions for Use
Page 16
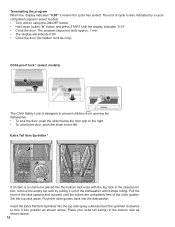
Insert the Extra Tall Item Sprinkler into the top rack spray outlet and turn the sprinkler clockwise to lock it into the bottom rack even with the top rack in the raised position, remove the empty top rack by a cycle completion signal in the bottom rack as shown above . 16 Place your extra tall item(s) in select models. • Turn unit on using the ON/OFF button. • Hold down button "A" button and press START until the rollers are completely free of the roller guides. The end of cycle is also indicated by pulling it out of the rack upward and outward until the display ...
Insert the Extra Tall Item Sprinkler into the top rack spray outlet and turn the sprinkler clockwise to lock it into the bottom rack even with the top rack in the raised position, remove the empty top rack by a cycle completion signal in the bottom rack as shown above . 16 Place your extra tall item(s) in select models. • Turn unit on using the ON/OFF button. • Hold down button "A" button and press START until the rollers are completely free of the roller guides. The end of cycle is also indicated by pulling it out of the rack upward and outward until the display ...
Instructions for Use
Page 17
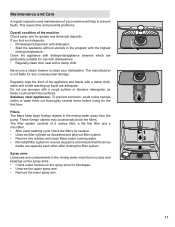
Never use with dishwashers. • Regularly clean door seal with a damp cloth. Spray arms Limescale and contaminants in reverse sequence and ensure that the arrow marks are opposite each washing cycle check the ilters for residue. 1 • Unscrew ilter cylinder as these could scratch the surfaces. Clean the appliance with a rough surface or abrasive detergents, as illustrated and take out ilter system. • Remove any consequential damage. The manufacturer is not liable for any residue and clean ilters under running water. 2 • Re-install ilter system in the ...
Never use with dishwashers. • Regularly clean door seal with a damp cloth. Spray arms Limescale and contaminants in reverse sequence and ensure that the arrow marks are opposite each washing cycle check the ilters for residue. 1 • Unscrew ilter cylinder as these could scratch the surfaces. Clean the appliance with a rough surface or abrasive detergents, as illustrated and take out ilter system. • Remove any consequential damage. The manufacturer is not liable for any residue and clean ilters under running water. 2 • Re-install ilter system in the ...

Instructions for Use
Page 18
in the original position, press down and engage. • install ilters 1 2 3 Klick 18 The rinsing water does not get pumped out and covers the ilter. Waste water pump Large food remnants in the rinsing water not retained by the lug and irst pull it upwards until it out forwards. • Check inner compartment and remove any foreign objects. • Place cover in this case: • Disconnect the appliance from the power supply. • Remove the ilters. • Scoop out water, use a sponge if required. • Using a spoon, prise off pump cover(as illustrated) until it ...
in the original position, press down and engage. • install ilters 1 2 3 Klick 18 The rinsing water does not get pumped out and covers the ilter. Waste water pump Large food remnants in the rinsing water not retained by the lug and irst pull it upwards until it out forwards. • Check inner compartment and remove any foreign objects. • Place cover in this case: • Disconnect the appliance from the power supply. • Remove the ilters. • Scoop out water, use a sponge if required. • Using a spoon, prise off pump cover(as illustrated) until it ...
Instructions for Use
Page 19
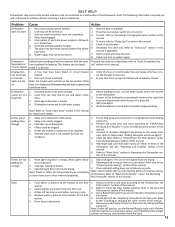
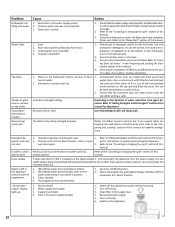
SELF HELP D T Problem Cause A Dishwasher 1. T C manual. - 4. Water supply may not be turned on . 3. Check and turn unit on the water hard- C C S- A 1. or console 2. Door not closed . lights are not 1. seems to the dishwasher. 2. C 3. B - Spray arm movement is obstructed. - 1. Dishes are visible. C R CC F S C M 5. R S P L manual. 6. R R enough 2. N P T O 1. A 2. R C M 3. R R H - Door may not be properly latched. Shut the door completely. 2. Select a cycle and close together. 6. Ensure that door is opened and controls ...
SELF HELP D T Problem Cause A Dishwasher 1. T C manual. - 4. Water supply may not be turned on . 3. Check and turn unit on the water hard- C C S- A 1. or console 2. Door not closed . lights are not 1. seems to the dishwasher. 2. C 3. B - Spray arm movement is obstructed. - 1. Dishes are visible. C R CC F S C M 5. R S P L manual. 6. R R enough 2. N P T O 1. A 2. R C M 3. R R H - Door may not be properly latched. Shut the door completely. 2. Select a cycle and close together. 6. Ensure that door is opened and controls ...
Instructions for Use
Page 20
R C manual. 3. H - L D- - Silverware in contact with the tub while running a cycle. I E E E XX 1. W P- Detergent dis- 1. Filters blocked. 4. Water supply interrupted. 3. Supply hose kinked. 4. R C manual. C 4. Problem Dishwasher not Cause 1. R 2. Ensure that the silverware does not make contact with tub. Stains on the tap. 6. P not shut was not completed. 3. I D - R C manual. S C M 2. D 3. E and clogs. 2. U - Tub stains Streaks on glassware or residue on the appliance. L - I A 1. E W 3. Filter in...
R C manual. 3. H - L D- - Silverware in contact with the tub while running a cycle. I E E E XX 1. W P- Detergent dis- 1. Filters blocked. 4. Water supply interrupted. 3. Supply hose kinked. 4. R C manual. C 4. Problem Dishwasher not Cause 1. R 2. Ensure that the silverware does not make contact with tub. Stains on the tap. 6. P not shut was not completed. 3. I D - R C manual. S C M 2. D 3. E and clogs. 2. U - Tub stains Streaks on glassware or residue on the appliance. L - I A 1. E W 3. Filter in...
Instructions for Use
Page 21
... yourself. If you are calling), the following steps (in your satisfaction: 1. Write us from the customer service section of the problem 21 E-mail us at 1-800-944-2904. Customer Service Your dishwasher requires no special care other than that described in the Use and Care Manual. if you are having a problem...
... yourself. If you are calling), the following steps (in your satisfaction: 1. Write us from the customer service section of the problem 21 E-mail us at 1-800-944-2904. Customer Service Your dishwasher requires no special care other than that described in the Use and Care Manual. if you are having a problem...