
Instructions for Use
Page 2
Thank you use your appliance ...4 Dishwasher Components ...5 Dishwasher Setup ...6 Salt ...7 Adding Detergent...7 Rinse Agent ...8 Dishware Materials ...10 Loading the Dishwasher ...11-12 Rack Accessories ...13 Wash Cycle Information ...14 Additional Options and Features ...15-16 Operating the Dishwasher ...17-18 Care and Maintenance ...18-19 Self Help ...20-21 Customer Service ...22 Statement of Warranties...23 Congratulations, and Thank You from their dishwashers. We highly recommend that you read this manual before...
Thank you use your appliance ...4 Dishwasher Components ...5 Dishwasher Setup ...6 Salt ...7 Adding Detergent...7 Rinse Agent ...8 Dishware Materials ...10 Loading the Dishwasher ...11-12 Rack Accessories ...13 Wash Cycle Information ...14 Additional Options and Features ...15-16 Operating the Dishwasher ...17-18 Care and Maintenance ...18-19 Self Help ...20-21 Customer Service ...22 Statement of Warranties...23 Congratulations, and Thank You from their dishwashers. We highly recommend that you read this manual before...
Instructions for Use
Page 3
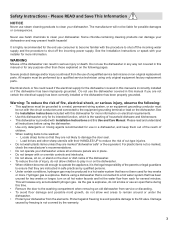
... manual is not covered by a qualiied service technician using only original equipment factory replacement parts. Electrical shock or ire could result from the elements. See the Installation Instructions included with or override controls and interlocks. • Do not abuse, sit on, or stand on the door or dish racks of the dishwasher. • To reduce the risk of the parents or legal guardians to clean...
... manual is not covered by a qualiied service technician using only original equipment factory replacement parts. Electrical shock or ire could result from the elements. See the Installation Instructions included with or override controls and interlocks. • Do not abuse, sit on, or stand on the door or dish racks of the dishwasher. • To reduce the risk of the parents or legal guardians to clean...
Instructions for Use
Page 4
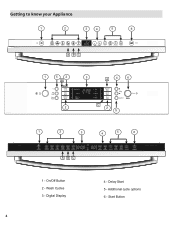
Delay Start 5 - Start Button Wash Cycles 3 - Additional cycle options 6 - On/Off Button 2 - Digital Display 4 4 - Getting to know your Appliance 1 2 3 4 5 6 A BC 1 5 2 B 3 A 4 6 C 2 2 5 1 2 3 4 5 6 A BC 1 -
Delay Start 5 - Start Button Wash Cycles 3 - Additional cycle options 6 - On/Off Button 2 - Digital Display 4 4 - Getting to know your Appliance 1 2 3 4 5 6 A BC 1 5 2 B 3 A 4 6 C 2 2 5 1 2 3 4 5 6 A BC 1 -
Instructions for Use
Page 5
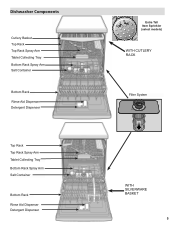
Dishwasher Components Cutlery Basket Top Rack Top Rack Spray Arm Tablet Collecting Tray Bottom Rack Spray Arm Salt Container Bottom Rack Rinse Aid Dispenser Detergent Dispenser Top Rack Top Rack Spray Arm Tablet Collecting Tray Bottom Rack Spray Arm Salt Container Bottom Rack Rinse Aid Dispenser Detergent Dispenser Extra Tall Item Sprinkler (select models) WiTH CUTLERy RACK Filter System WITH SILVERWARE BASKET 5
Dishwasher Components Cutlery Basket Top Rack Top Rack Spray Arm Tablet Collecting Tray Bottom Rack Spray Arm Salt Container Bottom Rack Rinse Aid Dispenser Detergent Dispenser Top Rack Top Rack Spray Arm Tablet Collecting Tray Bottom Rack Spray Arm Salt Container Bottom Rack Rinse Aid Dispenser Detergent Dispenser Extra Tall Item Sprinkler (select models) WiTH CUTLERy RACK Filter System WITH SILVERWARE BASKET 5
Instructions for Use
Page 6
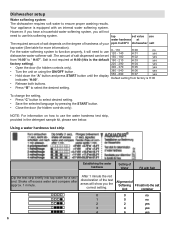
... degree of hardness of salt dispensed can be set value use water hardness at H:00 (this softening system. •Dishwasher setup Water softening system The dishwasher requires soft water to select desired setting. • Save the selected language by pressing the START button. • Close the door (for hidden controls only). However, if you have a household water softening system, you will need to " H:07". NOTE: For information...
... degree of hardness of salt dispensed can be set value use water hardness at H:00 (this softening system. •Dishwasher setup Water softening system The dishwasher requires soft water to select desired setting. • Save the selected language by pressing the START button. • Close the door (for hidden controls only). However, if you have a household water softening system, you will need to " H:07". NOTE: For information...
Instructions for Use
Page 7
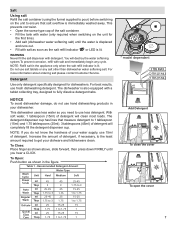
...) Add Detergent To close the cover To open the cover 7 With soft water, 1 tablespoon (15ml) of detergent will clean most loads. NOTE: if you hear a CLICK. To Open: Push button as the salt reill indicator " " or LED is lit. Do not use salt tablets or any cycle. For more information about ordering salt please contact Customer Service. WARNING Never ill the salt dispenser with a tablet...
...) Add Detergent To close the cover To open the cover 7 With soft water, 1 tablespoon (15ml) of detergent will clean most loads. NOTE: if you hear a CLICK. To Open: Push button as the salt reill indicator " " or LED is lit. Do not use salt tablets or any cycle. For more information about ordering salt please contact Customer Service. WARNING Never ill the salt dispenser with a tablet...
Instructions for Use
Page 8
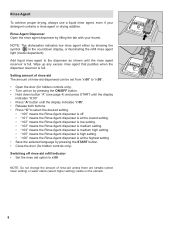
... water stains (select higher setting) visible on by pressing the START button. • Close the door (for hidden controls only). Rinse Agent Dispenser Open the rinse agent dispenser by showing the symbol in the countdown display, or illuminating the reill rinse agent light (model dependent). Add liquid rinse agent to select the desired setting. • "r:00" means the Rinse Agent dispenser is off rinse-aid reill indicator • Set the rinse aid option to r:00 NOTE: Do not change the amount of rinse-aid dispensed...
... water stains (select higher setting) visible on by pressing the START button. • Close the door (for hidden controls only). Rinse Agent Dispenser Open the rinse agent dispenser by showing the symbol in the countdown display, or illuminating the reill rinse agent light (model dependent). Add liquid rinse agent to select the desired setting. • "r:00" means the Rinse Agent dispenser is off rinse-aid reill indicator • Set the rinse aid option to r:00 NOTE: Do not change the amount of rinse-aid dispensed...
Instructions for Use
Page 9
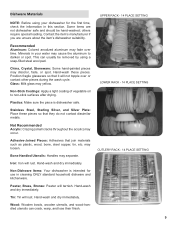
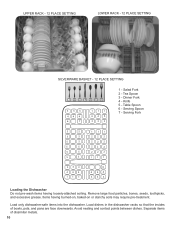
... wash cycle. Tin: Tin will rust. Minerals in your dishwasher for use in this section. Non-Stick Coatings: Apply a light coating of vegetable oil to darken or spot. Iron: Iron will rust. Hand-wash and dry immediately. Some items are unsure about the item's dishwasher suitability. Stainless Steel, Sterling Silver, and Silver Plate: Place these pieces. UPPER RACK - 14 PLACE SETTiNG LOWER RACK - 14 PLACE SETTING...
... wash cycle. Tin: Tin will rust. Minerals in your dishwasher for use in this section. Non-Stick Coatings: Apply a light coating of vegetable oil to darken or spot. Iron: Iron will rust. Hand-wash and dry immediately. Some items are unsure about the item's dishwasher suitability. Stainless Steel, Sterling Silver, and Silver Plate: Place these pieces. UPPER RACK - 14 PLACE SETTiNG LOWER RACK - 14 PLACE SETTING...
Instructions for Use
Page 10
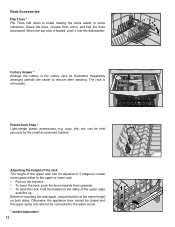
... pre-treatment. Load only dishwasher-safe items into the dishwasher. Avoid nesting and contact points between dishes. Dinner Fork 4 - Remove large food particles, bones, seeds, toothpicks, and excessive grease. UPPER RACK - 12 PLACE SETTiNG LOWER RACK - 12 PLACE SETTING SILVERWARE BASKET - 12 PLACE SETTING 123456 7 3 33 44 4 6 7 111 44 4 333 1 - Salad Fork 2 - Table Spoon 6 - Serving Spoon 7 - Load dishes in the dishwasher racks so that the insides of dissimilar...
... pre-treatment. Load only dishwasher-safe items into the dishwasher. Avoid nesting and contact points between dishes. Dinner Fork 4 - Remove large food particles, bones, seeds, toothpicks, and excessive grease. UPPER RACK - 12 PLACE SETTiNG LOWER RACK - 12 PLACE SETTING SILVERWARE BASKET - 12 PLACE SETTING 123456 7 3 33 44 4 6 7 111 44 4 333 1 - Salad Fork 2 - Table Spoon 6 - Serving Spoon 7 - Load dishes in the dishwasher racks so that the insides of dissimilar...
Instructions for Use
Page 12
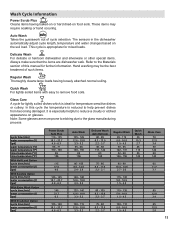
... basket on both sides. Adjusting the height of the rack The height of the upper edge and lift it into the dishwasher. 1 2 Cutlery drawer * Arrange the cutlery in some instances. The rack is at the same height on the sides of the upper rack can be connected to the water circuit. * model dependent 12 Separately arranged utensils are easier to remove after washing...
... basket on both sides. Adjusting the height of the rack The height of the upper edge and lift it into the dishwasher. 1 2 Cutlery drawer * Arrange the cutlery in some instances. The rack is at the same height on the sides of the upper rack can be connected to the water circuit. * model dependent 12 Separately arranged utensils are easier to remove after washing...
Instructions for Use
Page 13
... on glasses. Wash Cycle Information Power Scrub Plus Cleans items having loosely attached normal soiling. In this manual for lightly soiled dishes which is reduced to the Materials section of this cycle the temperature is ideal for mixed loads. These items may be the best treatment of cycle selection. Note: Some glasses are dishwasher safe. Glass Care A cycle for further information. Quick Wash For lightly soiled items with...
... on glasses. Wash Cycle Information Power Scrub Plus Cleans items having loosely attached normal soiling. In this manual for lightly soiled dishes which is reduced to the Materials section of this cycle the temperature is ideal for mixed loads. These items may be the best treatment of cycle selection. Note: Some glasses are dishwasher safe. Glass Care A cycle for further information. Quick Wash For lightly soiled items with...
Instructions for Use
Page 14
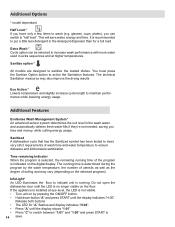
... needed, saving you time and money, while cutting energy usage. The technical Sanitation measures may vary (depending on the digital display. The running . Additional Options * model dependant Half Load * If you can be selected to increase wash performance with more water used in extra sequences and at eye-level, the LED is not visible. • Turn unit on the loor. Do not open the dishwasher door until the display indicates...
... needed, saving you time and money, while cutting energy usage. The technical Sanitation measures may vary (depending on the digital display. The running . Additional Options * model dependant Half Load * If you can be selected to increase wash performance with more water used in extra sequences and at eye-level, the LED is not visible. • Turn unit on the loor. Do not open the dishwasher door until the display indicates...
Instructions for Use
Page 15
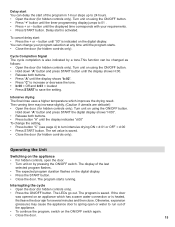
... 24 hours. • Open the door (for hidden controls only). The set value is also indicated by pressing the ON/OFF switch. The LEDs go out. button until "00" is saved. button until the displayed time corresponds with your program selection at any time until the program starts. • Close the door (for hidden controls only). Intensive drying The inal rinse uses a higher temperature which has a warm water connection or...
... 24 hours. • Open the door (for hidden controls only). The set value is also indicated by pressing the ON/OFF switch. The LEDs go out. button until "00" is saved. button until the displayed time corresponds with your program selection at any time until the program starts. • Close the door (for hidden controls only). Intensive drying The inal rinse uses a higher temperature which has a warm water connection or...
Instructions for Use
Page 16
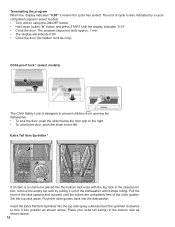
...; Turn unit on using the ON/OFF button. • Hold down button "A" button and press START until the display indicates "0:01" • Close the door. The program sequence lasts approx. 1 min. • The display will indicate 0:00 • Close the door (for hidden controls only). Set the top rack aside. Child-proof lock * (select models) The Child Safety Lock is also indicated by pulling it out of the dishwasher until the rollers are completely free...
...; Turn unit on using the ON/OFF button. • Hold down button "A" button and press START until the display indicates "0:01" • Close the door. The program sequence lasts approx. 1 min. • The display will indicate 0:00 • Close the door (for hidden controls only). Set the top rack aside. Child-proof lock * (select models) The Child Safety Lock is also indicated by pulling it out of the dishwasher until the rollers are completely free...
Instructions for Use
Page 17
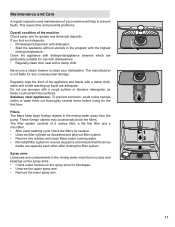
... residue and clean ilters under running water. 2 • Re-install ilter system in the rinsing water may occasionally block the ilters. water and a little washing up liquid are opposite each washing cycle check the ilters for residue. 1 • Unscrew ilter cylinder as these could scratch the surfaces. Do not use a steam cleaner to prevent faults. Stainless steel appliances: To prevent corrosion, avoid using sponge cloths...
... residue and clean ilters under running water. 2 • Re-install ilter system in the rinsing water may occasionally block the ilters. water and a little washing up liquid are opposite each washing cycle check the ilters for residue. 1 • Unscrew ilter cylinder as these could scratch the surfaces. Do not use a steam cleaner to prevent faults. Stainless steel appliances: To prevent corrosion, avoid using sponge cloths...

Instructions for Use
Page 18
The rinsing water does not get pumped out and covers the ilter. Waste water pump Large food remnants in the original position, press down and engage. • install ilters 1 2 3 Klick 18 in this case: • Disconnect the appliance from the power supply. • Remove the ilters. • Scoop out water, use a sponge if required. • Using a spoon, prise off pump cover(as illustrated) until...
The rinsing water does not get pumped out and covers the ilter. Waste water pump Large food remnants in the original position, press down and engage. • install ilters 1 2 3 Klick 18 in this case: • Disconnect the appliance from the power supply. • Remove the ilters. • Scoop out water, use a sponge if required. • Using a spoon, prise off pump cover(as illustrated) until...
Instructions for Use
Page 19
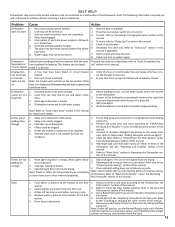
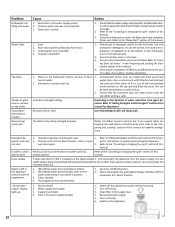
...turn on . 5. I 3. E spray arms. 2. R S P L manual. 6. F washer. 2. F 3. R washer. 5. R C M 3. the dishes. 4. Unit may not be properly latched. Press the main power switch to the dishwasher. 2. Select a cycle and close together. 6. lights are nested or loaded too close the door. 8. on . 3. seems to ensure a good wash when heavy soil is opened and controls are not 1. S 1. I 4. D 4. R N S D T L H R W C - 1. I D G N R O CC D S C R R 19 T D S 6. Water supply may not be turned on door, the display...
...turn on . 5. I 3. E spray arms. 2. R S P L manual. 6. F washer. 2. F 3. R washer. 5. R C M 3. the dishes. 4. Unit may not be properly latched. Press the main power switch to the dishwasher. 2. Select a cycle and close together. 6. lights are nested or loaded too close the door. 8. on . 3. seems to ensure a good wash when heavy soil is opened and controls are not 1. S 1. I 4. D 4. R N S D T L H R W C - 1. I D G N R O CC D S C R R 19 T D S 6. Water supply may not be turned on door, the display...
Instructions for Use
Page 20
... used. ment. Unable to select desired cycle Error Codes W the appliance programme C lights up . 2. E W 3. H - E W 2. R A D 2. Y 20 T be arranged properly. T 2. Turn on the dishwasher interior are due to avoid build up P already started. U The dishes may not be done periodically to hard- 1. L - Previous wash cycle was interrupted. Water supply interrupted. 3. W R 1. Filters blocked. 4. R C manual. R 5. W D S I and run the desired cycle. 2. Detergent dis- 1. Problem Dishwasher not Cause 1. Silverware in the water...
... used. ment. Unable to select desired cycle Error Codes W the appliance programme C lights up . 2. E W 3. H - E W 2. R A D 2. Y 20 T be arranged properly. T 2. Turn on the dishwasher interior are due to avoid build up P already started. U The dishes may not be done periodically to hard- 1. L - Previous wash cycle was interrupted. Water supply interrupted. 3. W R 1. Filters blocked. 4. R C manual. R 5. W D S I and run the desired cycle. 2. Detergent dis- 1. Problem Dishwasher not Cause 1. Silverware in the water...
Instructions for Use
Page 21
... repair the appliance yourself. Do not attempt to include (if you are writing), or have received, please take the following information: • Model number • Serial number • Date of original purchase • Date the problem originated • Explanation of the Use and Care Manual. E-mail us at 1-800-944-2904. Contact your installer or the Authorized Service Contractor in the order listed...
... repair the appliance yourself. Do not attempt to include (if you are writing), or have received, please take the following information: • Model number • Serial number • Date of original purchase • Date the problem originated • Explanation of the Use and Care Manual. E-mail us at 1-800-944-2904. Contact your installer or the Authorized Service Contractor in the order listed...
Instructions for Use
Page 22
... serial numbers have no obligation, at all times only been used for customer service and technical ability (note that they agree to make sure to install the product in this warranty shall be effective unless authorized in writing by the service company, assuming they are independent entities and are scratches, nicks, minor dents, and cosmetic damages on Dish Racks: Bosch will replace the upper or lower dish rack...
... serial numbers have no obligation, at all times only been used for customer service and technical ability (note that they agree to make sure to install the product in this warranty shall be effective unless authorized in writing by the service company, assuming they are independent entities and are scratches, nicks, minor dents, and cosmetic damages on Dish Racks: Bosch will replace the upper or lower dish rack...


