Instructions for Use
Page 5
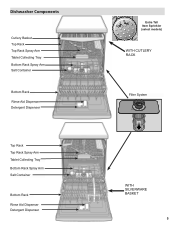
Dishwasher Components Cutlery Basket Top Rack Top Rack Spray Arm Tablet Collecting Tray Bottom Rack Spray Arm Salt Container Bottom Rack Rinse Aid Dispenser Detergent Dispenser Top Rack Top Rack Spray Arm Tablet Collecting Tray Bottom Rack Spray Arm Salt Container Bottom Rack Rinse Aid Dispenser Detergent Dispenser Extra Tall Item Sprinkler (select models) WiTH CUTLERy RACK Filter System WITH SILVERWARE BASKET 5
Dishwasher Components Cutlery Basket Top Rack Top Rack Spray Arm Tablet Collecting Tray Bottom Rack Spray Arm Salt Container Bottom Rack Rinse Aid Dispenser Detergent Dispenser Top Rack Top Rack Spray Arm Tablet Collecting Tray Bottom Rack Spray Arm Salt Container Bottom Rack Rinse Aid Dispenser Detergent Dispenser Extra Tall Item Sprinkler (select models) WiTH CUTLERy RACK Filter System WITH SILVERWARE BASKET 5
Instructions for Use
Page 7
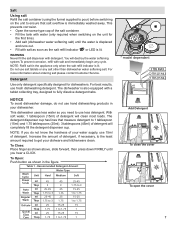
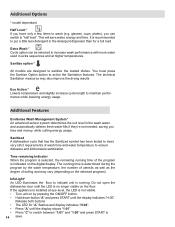
...the amount of the salt container. • Fill the tank with salt and immediately begin any salt other than dishwasher water softening salt. This dishwasher uses less water so you need to fully dissolve detergent tabs. The detergent dispenser cup has lines that salt overlow is also equipped with detergent. This prevents... water softening system.To prevent corrosion, reill with water (only required when switching on the unit to ensure that measure detergent to 1.75 1 * * model dependent 3 TBS MAX 2 TBS (25 ML) 1 TBS (15 ML) Add Detergent To close the cover To open the cover 7
...the amount of the salt container. • Fill the tank with salt and immediately begin any salt other than dishwasher water softening salt. This dishwasher uses less water so you need to fully dissolve detergent tabs. The detergent dispenser cup has lines that salt overlow is also equipped with detergent. This prevents... water softening system.To prevent corrosion, reill with water (only required when switching on the unit to ensure that measure detergent to 1.75 1 * * model dependent 3 TBS MAX 2 TBS (25 ML) 1 TBS (15 ML) Add Detergent To close the cover To open the cover 7
Instructions for Use
Page 8
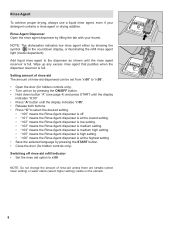
... language by showing the symbol in the countdown display, or illuminating the reill rinse agent light (model dependent). Rinse Agent To achieve proper drying, always use a liquid rinse agent, even if your thumb. NOTE: The dishwasher indicates low rinse agent either by pressing the START button. • Close the door (for hidden...
... language by showing the symbol in the countdown display, or illuminating the reill rinse agent light (model dependent). Rinse Agent To achieve proper drying, always use a liquid rinse agent, even if your thumb. NOTE: The dishwasher indicates low rinse agent either by pressing the START button. • Close the door (for hidden...
Instructions for Use
Page 12
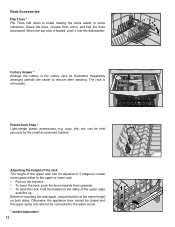
... inwards then upwards. • To raise the rack, hold the basket on both sides. When the top rack is loaded, push it into the dishwasher. 1 2 Cutlery drawer * Arrange the cutlery in some instances. Adjusting the height of the rack The height of the upper edge and lift it...the same height on the sides of the upper rack can be connected to create more space either in 3 stages to the water circuit. * model dependent 12 Grasp the tines, release from notch, and fold the tines downward. Plastic Item Clips * Light-weight plastic accessories, e.g. Separately arranged utensils...
... inwards then upwards. • To raise the rack, hold the basket on both sides. When the top rack is loaded, push it into the dishwasher. 1 2 Cutlery drawer * Arrange the cutlery in some instances. Adjusting the height of the rack The height of the upper edge and lift it...the same height on the sides of the upper rack can be connected to create more space either in 3 stages to the water circuit. * model dependent 12 Grasp the tines, release from notch, and fold the tines downward. Plastic Item Clips * Light-weight plastic accessories, e.g. Separately arranged utensils...
Instructions for Use
Page 14
... temperature to maintain performance while lowering energy usage. The technical Sanitation measures may vary (depending on the digital display. Sanitized A dishwasher cycle that has the Sanitized symbol has been tested to meet very strict requirements of the program is indicated on the selected program...). Sanitize option * All models are designed to 14 save water, energy and time. Extra Wash * Cycle option can switch to increase wash performance with more...
... temperature to maintain performance while lowering energy usage. The technical Sanitation measures may vary (depending on the digital display. Sanitized A dishwasher cycle that has the Sanitized symbol has been tested to meet very strict requirements of the program is indicated on the selected program...). Sanitize option * All models are designed to 14 save water, energy and time. Extra Wash * Cycle option can switch to increase wash performance with more...
Instructions for Use
Page 16
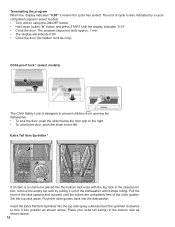
Child-proof lock * (select models) The Child Safety Lock is also indicated by pulling it out of the dishwasher until it into the dishwasher. Set the top rack aside. Extra Tall Item Sprinkler...means the cycle has ended. The end of the roller guides. Place your extra tall item(s) in select models. • Turn unit on using the ON/OFF button. • Hold down button "A" button and ...press START until the rollers are completely free of cycle is designed to prevent children from opening the dishwasher. • To lock the door, push the slider below the door grip to the right. •...
Child-proof lock * (select models) The Child Safety Lock is also indicated by pulling it out of the dishwasher until it into the dishwasher. Set the top rack aside. Extra Tall Item Sprinkler...means the cycle has ended. The end of the roller guides. Place your extra tall item(s) in select models. • Turn unit on using the ON/OFF button. • Hold down button "A" button and ...press START until the rollers are completely free of cycle is designed to prevent children from opening the dishwasher. • To lock the door, push the slider below the door grip to the right. •...
Instructions for Use
Page 21
.... Do not attempt to include (if you are writing), or have available (if you have received, please take the following information: • Model number • Serial number • Date of original purchase • Date the problem originated • Explanation of the problem 21 Contact your ...work performed by unauthorized personnel may void the warranty. if you are having a problem with the service you are not pleased with your dishwasher and are calling), the following steps (in your dealer or installer or an authorized service center. Write us from the customer service ...
.... Do not attempt to include (if you are writing), or have available (if you have received, please take the following information: • Model number • Serial number • Date of original purchase • Date the problem originated • Explanation of the problem 21 Contact your ...work performed by unauthorized personnel may void the warranty. if you are having a problem with the service you are not pleased with your dishwasher and are calling), the following steps (in your dealer or installer or an authorized service center. Write us from the customer service ...
Instructions for Use
Page 22
... returned model), and not for resale, or commercial use , and has in fact at all times remained within the United States or Canada, and has at law or otherwise, to provide you would still be fully liable and responsible for any such event, if you request, Bosch would...), if the rack proves defective in materials or workmanship (excludes labor charges). • Lifetime Warranty against Stainless Steel Rust Through: Bosch will replace your dishwasher with a defect in materials or workmanship. The warranties stated herein apply only to the rst purchaser of original purchase. and (3) within...
... returned model), and not for resale, or commercial use , and has in fact at all times remained within the United States or Canada, and has at law or otherwise, to provide you would still be fully liable and responsible for any such event, if you request, Bosch would...), if the rack proves defective in materials or workmanship (excludes labor charges). • Lifetime Warranty against Stainless Steel Rust Through: Bosch will replace your dishwasher with a defect in materials or workmanship. The warranties stated herein apply only to the rst purchaser of original purchase. and (3) within...

Installation Instructions
Page 3
...for soldering and sweating will damage the dishwasher's base and water inlet valve. Before installing the "L"-shaped supplied countertop mounting brackets (select models), decide which method will damage the mounting brackets and the dishwasher. Avoiding Plumbing/Scalding Hazards Do not ...perform any work on the dishwasher, removing them is in a hot water system that the dishwasher electrical installation is dificult ...
...for soldering and sweating will damage the dishwasher's base and water inlet valve. Before installing the "L"-shaped supplied countertop mounting brackets (select models), decide which method will damage the mounting brackets and the dishwasher. Avoiding Plumbing/Scalding Hazards Do not ...perform any work on the dishwasher, removing them is in a hot water system that the dishwasher electrical installation is dificult ...

Installation Instructions
Page 12
... with outer toe panel (3rd piece) slide the brackets (A) provided, into the slots of the dishwasher. 3. Drive the two black screws (included) through the hole in further than you need. 5. This ensures that the toe panel wont slide in the toe ... on the loor. 2. See Figure 19. 4. NOTE: Once you just attached. For models with a three-piece toe panel(select models) to secure. Attach the outer toe panel (L) onto the brackets and drive the screws provided in place to avoid damaging the dishwasher. Figure 19 Figure 20 A (K) (L) - Allow it to rest on the mating...
... with outer toe panel (3rd piece) slide the brackets (A) provided, into the slots of the dishwasher. 3. Drive the two black screws (included) through the hole in further than you need. 5. This ensures that the toe panel wont slide in the toe ... on the loor. 2. See Figure 19. 4. NOTE: Once you just attached. For models with a three-piece toe panel(select models) to secure. Attach the outer toe panel (L) onto the brackets and drive the screws provided in place to avoid damaging the dishwasher. Figure 19 Figure 20 A (K) (L) - Allow it to rest on the mating...
Installation Instructions
Page 13
... is necessary, contact your area. 2. If you are having a problem with the service you have received, please take the following information: • Model number • Serial number • Date of original purchase • Date the problem originated • Explanation of your satisfaction: 1. If service is...; Daytime phone number where you are writing), or have available (if you can be sure to your invoice and keep it with your dishwasher, before calling for instructions. 3. Do not attempt to the Self Help section in the order listed below : BSH Home Appliances, Corp....
... is necessary, contact your area. 2. If you are having a problem with the service you have received, please take the following information: • Model number • Serial number • Date of original purchase • Date the problem originated • Explanation of your satisfaction: 1. If service is...; Daytime phone number where you are writing), or have available (if you can be sure to your invoice and keep it with your dishwasher, before calling for instructions. 3. Do not attempt to the Self Help section in the order listed below : BSH Home Appliances, Corp....


