

Instructions for Use
Page 2
You can write us at www.bosch-appliances.com. This manual was written with your appliance ...4 Dishwasher Components ...5 Dishwasher Setup ...6 Salt ...7 Adding Detergent...7 Rinse Agent ...8 Dishware Materials ...10 Loading the Dishwasher ...11-12 Rack Accessories ...13 Wash Cycle Information ...14 Additional Options and Features ...15-16 Operating the Dishwasher ...17-18 Care and Maintenance ...18-19 Self Help ...20-21 Customer Service ...22 Statement of Warranties...23 We highly recommend that...
You can write us at www.bosch-appliances.com. This manual was written with your appliance ...4 Dishwasher Components ...5 Dishwasher Setup ...6 Salt ...7 Adding Detergent...7 Rinse Agent ...8 Dishware Materials ...10 Loading the Dishwasher ...11-12 Rack Accessories ...13 Wash Cycle Information ...14 Additional Options and Features ...15-16 Operating the Dishwasher ...17-18 Care and Maintenance ...18-19 Self Help ...20-21 Customer Service ...22 Statement of Warranties...23 We highly recommend that...
Instructions for Use
Page 3
... is connected to shut off the incoming water supply and the procedure to a hot water system that has been unused for two weeks or longer, turn on all hot water faucets and let the water low from each for the end use consumer to become old enough to operate the appliance, it is provided with Installation Instructions and this time. • Remove the door to the washing compartment when removing...
... is connected to shut off the incoming water supply and the procedure to a hot water system that has been unused for two weeks or longer, turn on all hot water faucets and let the water low from each for the end use consumer to become old enough to operate the appliance, it is provided with Installation Instructions and this time. • Remove the door to the washing compartment when removing...
Instructions for Use
Page 6
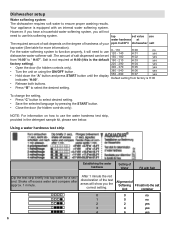
... an internal water softening system. •Dishwasher setup Water softening system The dishwasher requires soft water to select desired setting. • Save the selected language by pressing the START button. • Close the door (for hidden controls only). NOTE: For information on using the ON/OFF button . 380 - 540 H:06 yes • Hold down the "A" button and press START button until the display 550 - 890 H:07 yes indicates "H:00...
... an internal water softening system. •Dishwasher setup Water softening system The dishwasher requires soft water to select desired setting. • Save the selected language by pressing the START button. • Close the door (for hidden controls only). NOTE: For information on using the ON/OFF button . 380 - 540 H:06 yes • Hold down the "A" button and press START button until the display 550 - 890 H:07 yes indicates "H:00...
Instructions for Use
Page 7
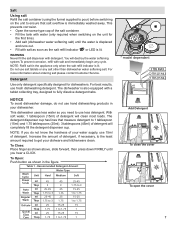
... reill indicator is lit. To Close: Place inger as shown above, slide forward, then press down FiRMLy until the water is displaced and runs out. • Fill with detergent. Salt Using salt Reill the salt container (using the funnel supplied to pour) before switching on the unit for dishwashers. Increase the amount of detergent will clean most loads. Recommended Detergent Amount Water Type Wash Cycle Power Scrub...
... reill indicator is lit. To Close: Place inger as shown above, slide forward, then press down FiRMLy until the water is displaced and runs out. • Fill with detergent. Salt Using salt Reill the salt container (using the funnel supplied to pour) before switching on the unit for dishwashers. Increase the amount of detergent will clean most loads. Recommended Detergent Amount Water Type Wash Cycle Power Scrub...
Instructions for Use
Page 8
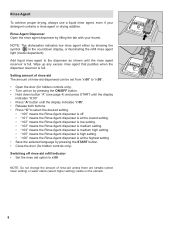
... until the display indicates "r:05". • Release both buttons. • Press "C"to r:00 NOTE: Do not change the amount of rinse-aid dispensed can be set from "r:00" to "r:06" . • Open the door (for hidden controls only). NOTE: The dishwasher indicates low rinse agent either by pressing the START button. • Close the door (for hidden controls only). • Turn unit on the utensils. 8 Switching off rinse-aid reill indicator • Set the rinse aid option...
... until the display indicates "r:05". • Release both buttons. • Press "C"to r:00 NOTE: Do not change the amount of rinse-aid dispensed can be set from "r:00" to "r:06" . • Open the door (for hidden controls only). NOTE: The dishwasher indicates low rinse agent either by pressing the START button. • Close the door (for hidden controls only). • Turn unit on the utensils. 8 Switching off rinse-aid reill indicator • Set the rinse aid option...
Instructions for Use
Page 9
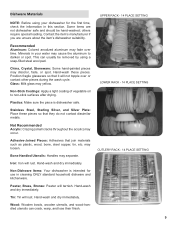
... Coatings: Apply a light coating of vegetable oil to darken or spot. Iron: Iron will not topple over time. UPPER RACK - 14 PLACE SETTiNG LOWER RACK - 14 PLACE SETTING CUTLERy RACK - 14 PLACE SETTiNG 9 Contact the item's manufacturer if you are not dishwasher safe and should be removed by using your water may cause the aluminum to non-stick surfaces after drying. Hand-wash these pieces so...
... Coatings: Apply a light coating of vegetable oil to darken or spot. Iron: Iron will not topple over time. UPPER RACK - 14 PLACE SETTiNG LOWER RACK - 14 PLACE SETTING CUTLERy RACK - 14 PLACE SETTiNG 9 Contact the item's manufacturer if you are not dishwasher safe and should be removed by using your water may cause the aluminum to non-stick surfaces after drying. Hand-wash these pieces so...
Instructions for Use
Page 13
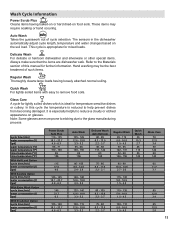
... adjust cycle length, temperature and water changes based on glasses. Glass Care A cycle for lightly soiled dishes which is especially helpful to reduce a cloudy or etched appearance on the soil load. It is ideal for mixed loads. Quick Wash For lightly soiled items with easy to the Materials section of cycle selection. Wash Cycle Information Power Scrub Plus Cleans items having loosely attached normal soiling. In this manual for further information. Auto Wash...
... adjust cycle length, temperature and water changes based on glasses. Glass Care A cycle for lightly soiled dishes which is especially helpful to reduce a cloudy or etched appearance on the soil load. It is ideal for mixed loads. Quick Wash For lightly soiled items with easy to the Materials section of cycle selection. Wash Cycle Information Power Scrub Plus Cleans items having loosely attached normal soiling. In this manual for further information. Auto Wash...
Instructions for Use
Page 14
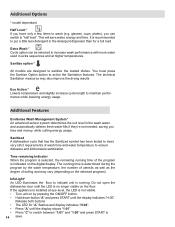
... START to sanitize the loaded dishes. The running time is selected, the remaining running . Additional Features EcoSense Wash Management System* An advanced sensor system determines the soil level in the detergent dispenser than for "A" lashes and display indicates "H:04". • Press "A" until the display indicates "H:00". Additional Options * model dependant Half Load * If you have only a few items to "half load". glasses, cups, plates), you time and money, while cutting energy usage...
... START to sanitize the loaded dishes. The running time is selected, the remaining running . Additional Features EcoSense Wash Management System* An advanced sensor system determines the soil level in the detergent dispenser than for "A" lashes and display indicates "H:04". • Press "A" until the display indicates "H:00". Additional Options * model dependant Half Load * If you have only a few items to "half load". glasses, cups, plates), you time and money, while cutting energy usage...
Instructions for Use
Page 15
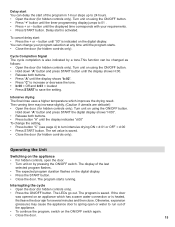
.../OFF button. To cancel delay start: • Press the + or - Intensive drying The inal rinse uses a higher temperature which has a warm water connection or is activated. The set value is also indicated by pressing the ON/OFF switch. The program starts running time may cause the appliance door to spring open the door. • Turn unit on the digital display. Turn unit on an appliance which improves the drying result. Delay start is heated...
.../OFF button. To cancel delay start: • Press the + or - Intensive drying The inal rinse uses a higher temperature which has a warm water connection or is activated. The set value is also indicated by pressing the ON/OFF switch. The program starts running time may cause the appliance door to spring open the door. • Turn unit on the digital display. Turn unit on an appliance which improves the drying result. Delay start is heated...
Instructions for Use
Page 16
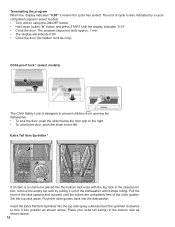
.... • The display will indicate 0:00 • Close the door (for hidden controls only). Push the roller guides back into the top rack spray outlet and turn the sprinkler clockwise to the left. The end of the dishwasher until the rollers are completely free of the roller guides. Pull the front of the rack upward and outward until it means the cycle has ended. Insert the...
.... • The display will indicate 0:00 • Close the door (for hidden controls only). Push the roller guides back into the top rack spray outlet and turn the sprinkler clockwise to the left. The end of the dishwasher until the rollers are completely free of the roller guides. Pull the front of the rack upward and outward until it means the cycle has ended. Insert the...
Instructions for Use
Page 17
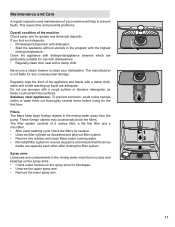
... the upper spray arm. • Remove the lower spray arm. 17 Clean the appliance with the highest rinsing temperature. This saves time and prevents problems. Overall condition of your dishwasher. Stainless steel appliances: To prevent corrosion, avoid using sponge cloths or wash them out thoroughly several times before using for use a steam cleaner to clean your machine will help to prevent faults. Maintenance and Care A regular inspection and maintenance of the machine Check spray arm for...
... the upper spray arm. • Remove the lower spray arm. 17 Clean the appliance with the highest rinsing temperature. This saves time and prevents problems. Overall condition of your dishwasher. Stainless steel appliances: To prevent corrosion, avoid using sponge cloths or wash them out thoroughly several times before using for use a steam cleaner to clean your machine will help to prevent faults. Maintenance and Care A regular inspection and maintenance of the machine Check spray arm for...
Instructions for Use
Page 19
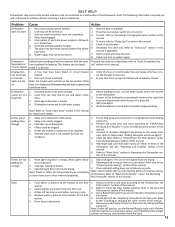
...E spray arms. 2. D 4. R F S 2. Shut the door completely. 2. D R C L 7. C C S- Spray arm nozzles clogged. 3. Dishes are not N F 2. R P 3. Dishwasher D T T - Display does 1. Add rinse agent. 4. F washer. 2. E C 5. Unit not reset or previous cycle not completed. 4. S to the dishwasher. 2. Incoming water is obstructed. 2. C 3. SELF HELP D T Problem Cause A Dishwasher 1. Door may not be turned on water supply. does not start engaged. 5. C R CC F S C M 5. to ensure a good wash when heavy soil is obstructed. - 1. I 1. Drain...
...E spray arms. 2. D 4. R F S 2. Shut the door completely. 2. D R C L 7. C C S- Spray arm nozzles clogged. 3. Dishes are not N F 2. R P 3. Dishwasher D T T - Display does 1. Add rinse agent. 4. F washer. 2. E C 5. Unit not reset or previous cycle not completed. 4. S to the dishwasher. 2. Incoming water is obstructed. 2. C 3. SELF HELP D T Problem Cause A Dishwasher 1. Door may not be turned on water supply. does not start engaged. 5. C R CC F S C M 5. to ensure a good wash when heavy soil is obstructed. - 1. I 1. Drain...
Instructions for Use
Page 20
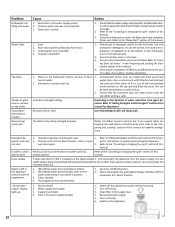
...C L R 2. R A D R A Abrasive cleaner used. W P- Detergent dis- 1. I A 1. Unable to select desired cycle Error Codes W the appliance programme C lights up . 2. E W 2. R C manual. Turn on the appliance. Y 20 R L- I and run the desired cycle. 2. Filters blocked. 4. Water supply interrupted. 3. T 3. Switch on the tap. 6. Previous wash cycle was interrupted. C 4. Tub stains Streaks on glassware or residue on the dishwasher interior are due to avoid build up P already started. T be arranged properly. L - Supply hose kinked...
...C L R 2. R A D R A Abrasive cleaner used. W P- Detergent dis- 1. I A 1. Unable to select desired cycle Error Codes W the appliance programme C lights up . 2. E W 2. R C manual. Turn on the appliance. Y 20 R L- I and run the desired cycle. 2. Filters blocked. 4. Water supply interrupted. 3. T 3. Switch on the tap. 6. Previous wash cycle was interrupted. C 4. Tub stains Streaks on glassware or residue on the dishwasher interior are due to avoid build up P already started. T be arranged properly. L - Supply hose kinked...
Instructions for Use
Page 22
... to repair the Product have been altered, defaced, or removed; Authorized service providers are not the direct fault of Bosch, including without limitation, one of its authorized service providers will replace your Product without success, then Bosch will repair your Product (upgraded models may be available to run upon the date of Bosch). and resetting of food, liquid, grease accumulations, or other than its sole option. THIS WARRANTY IS...
... to repair the Product have been altered, defaced, or removed; Authorized service providers are not the direct fault of Bosch, including without limitation, one of its authorized service providers will replace your Product without success, then Bosch will repair your Product (upgraded models may be available to run upon the date of Bosch). and resetting of food, liquid, grease accumulations, or other than its sole option. THIS WARRANTY IS...

Installation Instructions
Page 2
... be installed by qualiied installers only. If the dishwasher is replacing another dishwasher, check the existing dishwasher connections for compatibility with the new dishwasher, and replace parts as necessary. • This appliance has been found to these installation instructions completely and follow them carefully. The dishwasher must be in commercial food service establishments. • NEW INSTALLATION - Inspect the Dishwasher After unpacking the dishwasher and prior to installation, thoroughly inspect the dishwasher for use...
... be installed by qualiied installers only. If the dishwasher is replacing another dishwasher, check the existing dishwasher connections for compatibility with the new dishwasher, and replace parts as necessary. • This appliance has been found to these installation instructions completely and follow them carefully. The dishwasher must be in commercial food service establishments. • NEW INSTALLATION - Inspect the Dishwasher After unpacking the dishwasher and prior to installation, thoroughly inspect the dishwasher for use...

Installation Instructions
Page 3
... installing the "L"-shaped supplied countertop mounting brackets (select models), decide which method will damage the mounting brackets and the dishwasher. Removing any work on a charged hot water line. Do not over and result in accordance with a fuse or breaker rated for proper installation. 3 Doing so could result. The dishwasher is shut off for weeks, run with care. Do not work on an energized circuit. Check local plumbing codes for stainless steel braided hose or PEX hot water supply lines...
... installing the "L"-shaped supplied countertop mounting brackets (select models), decide which method will damage the mounting brackets and the dishwasher. Removing any work on a charged hot water line. Do not over and result in accordance with a fuse or breaker rated for proper installation. 3 Doing so could result. The dishwasher is shut off for weeks, run with care. Do not work on an energized circuit. Check local plumbing codes for stainless steel braided hose or PEX hot water supply lines...

Installation Instructions
Page 6
... be installed in Figure 3 below and discard. After locating the proper place for your openings within the dimensions shown in a corner, make any required openings to allow the electrical and water supply lines to avoid interference with the dishwasher when sliding it into the cabinet, remove the hose clip at the back of the water, drain and electrical line. Select a location as shown below . Check clearance between dishwasher door and...
... be installed in Figure 3 below and discard. After locating the proper place for your openings within the dimensions shown in a corner, make any required openings to allow the electrical and water supply lines to avoid interference with the dishwasher when sliding it into the cabinet, remove the hose clip at the back of the water, drain and electrical line. Select a location as shown below . Check clearance between dishwasher door and...

Installation Instructions
Page 7
... mounted in order to a grounded metal permanent wiring system, or an equipment grounding conductor must be run with a fuse or breaker rated for an electrical supply of ensuring that the dishwasher electrical installation is made through wood, sand it can be properly grounded before operating. You will need a 41/4" x 2" (108 x 51mm) opening throught the cabinet in an accessible cabinet adjacent to protect wiring from damage. Electrical Connection The dishwasher electrical supply...
... mounted in order to a grounded metal permanent wiring system, or an equipment grounding conductor must be run with a fuse or breaker rated for an electrical supply of ensuring that the dishwasher electrical installation is made through wood, sand it can be properly grounded before operating. You will need a 41/4" x 2" (108 x 51mm) opening throught the cabinet in an accessible cabinet adjacent to protect wiring from damage. Electrical Connection The dishwasher electrical supply...
Installation Instructions
Page 8
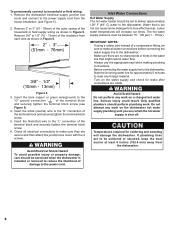
... use the appropriate seal when making plumbing connections. · Before connecting the water supply line to the dishwasher, lush the incoming water line for soldering and sweating will increase run times. Only qualiied plumbers should be set to deliver approximately 120° F (49° C) water to the power supply cord from each wire as shown in Figure 6. 2" - 3" (51mm - 76mm) 3/8" - 1/2" (10mm - 13mm) Figure 6 3. Remove 3/8" to clear any work . Check all solder connections...
... use the appropriate seal when making plumbing connections. · Before connecting the water supply line to the dishwasher, lush the incoming water line for soldering and sweating will increase run times. Only qualiied plumbers should be set to deliver approximately 120° F (49° C) water to the power supply cord from each wire as shown in Figure 6. 2" - 3" (51mm - 76mm) 3/8" - 1/2" (10mm - 13mm) Figure 6 3. Remove 3/8" to clear any work . Check all solder connections...

Installation Instructions
Page 9
... the end on the hot water and check for this connection. Assemble the water supply adaptor fitting from the disposer's dishwasher drain connection. · The dishwasher drain hose must be supported. Take care not to allow the hose to a disposer dishwasher drain connection, remove the plug from the parts bag onto the dishwasher water supply hose. MIN. 20" 20" Figure 8 Figure 9 Remove plug Figure 10 Figure 11 9 Water Shut Off Valve Dishwasher Water Inlet Hose Figure 7 IMPORTANT NOTES: · If local ordinance require an air gap, install it...
... the end on the hot water and check for this connection. Assemble the water supply adaptor fitting from the disposer's dishwasher drain connection. · The dishwasher drain hose must be supported. Take care not to allow the hose to a disposer dishwasher drain connection, remove the plug from the parts bag onto the dishwasher water supply hose. MIN. 20" 20" Figure 8 Figure 9 Remove plug Figure 10 Figure 11 9 Water Shut Off Valve Dishwasher Water Inlet Hose Figure 7 IMPORTANT NOTES: · If local ordinance require an air gap, install it...


