
Use and Care Manual
Page 3
Loading the Dishware 8 5. Dishwasher Features & Options 16 9. Care & Maintenance 21-22 12. Dishwasher Components 6 3. Dishwasher Features 7 4. Warranty Information 27 3 Rack Accessories 9-10 6. Adding Detergent & Rinse Agent 14-15 8. Wash Cycle Information 17 10. Operating the Dishwasher 18-20 11. Self Help 23-25 13. Important Safety Instructions 4-5 2. Loading the Silverware Basket 11-13 7. Customer Service Information 26 14. Table of Contents 1.
Loading the Dishware 8 5. Dishwasher Features & Options 16 9. Care & Maintenance 21-22 12. Dishwasher Components 6 3. Dishwasher Features 7 4. Warranty Information 27 3 Rack Accessories 9-10 6. Adding Detergent & Rinse Agent 14-15 8. Wash Cycle Information 17 10. Operating the Dishwasher 18-20 11. Self Help 23-25 13. Important Safety Instructions 4-5 2. Loading the Silverware Basket 11-13 7. Customer Service Information 26 14. Table of Contents 1.
Use and Care Manual
Page 4
... dishwasher covered in this manual is highly recommended for more information. 4 All repairs must be liable for the possible damages or consequences. ■ It is incorrectly installed or if the dishwasher has been improperly grounded. NOTICE Never use harsh chemicals to clean your installer for the end user to become familiar with the procedure to shut off the incoming power supply. See the installation Instructions...
... dishwasher covered in this manual is highly recommended for more information. 4 All repairs must be liable for the possible damages or consequences. ■ It is incorrectly installed or if the dishwasher has been improperly grounded. NOTICE Never use harsh chemicals to clean your installer for the end user to become familiar with the procedure to shut off the incoming power supply. See the installation Instructions...
Use and Care Manual
Page 5
... wiring system, or an equipment grounding conductor must be washed: a. Use this time. 10. For plastic items not so marked, check the manufacturer's recommendations. When children become old enough to the equipment grounding terminal or lead on the dishwasher. Protect your dishwasher unless all hot water faucets and let the water flow from the elements. Use only detergents or rinsing agents recommended for use an open...
... wiring system, or an equipment grounding conductor must be washed: a. Use this time. 10. For plastic items not so marked, check the manufacturer's recommendations. When children become old enough to the equipment grounding terminal or lead on the dishwasher. Protect your dishwasher unless all hot water faucets and let the water flow from the elements. Use only detergents or rinsing agents recommended for use an open...
Use and Care Manual
Page 7
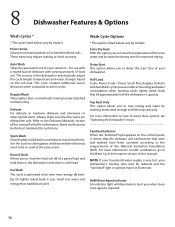
...: Multiple filters ensure distribution of clean water and protect the main pump and the drain pump from foreign material. * Delay Start: This option allows you to delay the start time of your dishwasher. * Upper Rack & Lower Rack Flip Tines: Increase the rack flexibility to accommodate larger/taller items. * Half Load: Reduces the energy and water consumption when washing small, lightly soiled loads. * Extra Dry Heat: Raises the temperature of the rinse water and increases the drying time which will...
...: Multiple filters ensure distribution of clean water and protect the main pump and the drain pump from foreign material. * Delay Start: This option allows you to delay the start time of your dishwasher. * Upper Rack & Lower Rack Flip Tines: Increase the rack flexibility to accommodate larger/taller items. * Half Load: Reduces the energy and water consumption when washing small, lightly soiled loads. * Extra Dry Heat: Raises the temperature of the rinse water and increases the drying time which will...

Use and Care Manual
Page 8
... spray arms. Loading the Bottom Rack Place large items in the dishwasher racks so that have loosely attached soiling. Load pots, pans and bowls upside down. Refer to the water supply at the back of the tub. 4 Loading the Dishware Do not pre-wash items that the insides of bowls, pots and pans are facing the spray arms. Avoid nesting and contact points between dishes...
... spray arms. Loading the Bottom Rack Place large items in the dishwasher racks so that have loosely attached soiling. Load pots, pans and bowls upside down. Refer to the water supply at the back of the tub. 4 Loading the Dishware Do not pre-wash items that the insides of bowls, pots and pans are facing the spray arms. Avoid nesting and contact points between dishes...

Use and Care Manual
Page 10
... block vent The racks on select models consist of the roller guides. To remove the sprinkler and return the dishwasher to its normal condition: • Turn the sprinkler counterclockwise and remove it. 10 Remove the empty rack by pulling it out of the dishwasher until the rollers are completely free of tines that it into the top rack spray outlet and turn the sprinkler clockwise to lock...
... block vent The racks on select models consist of the roller guides. To remove the sprinkler and return the dishwasher to its normal condition: • Turn the sprinkler counterclockwise and remove it. 10 Remove the empty rack by pulling it out of the dishwasher until the rollers are completely free of tines that it into the top rack spray outlet and turn the sprinkler clockwise to lock...

Use and Care Manual
Page 11
... with their handles up with water during the wash cycle. WARNING The sharp points and edges of knives and other set of the lower rack. The basket lid can be folded up , load the items so that they do not nest together. The Standard Silverware Basket The standard silverware basket (select models) fits in the back of rollers on the roller guides, as...
... with their handles up with water during the wash cycle. WARNING The sharp points and edges of knives and other set of the lower rack. The basket lid can be folded up , load the items so that they do not nest together. The Standard Silverware Basket The standard silverware basket (select models) fits in the back of rollers on the roller guides, as...

Use and Care Manual
Page 14
... in your detergent contains a rinse agent or drying additive. Use the measuring lines in the detergent dispenser cup as a guide to measure the amount of detergent will clean most loads. Add liquid rinse agent to the dispenser until the rinse agent reservoir is shut. NOTE: If you need to use too much detergent in soft water may cause etching in the Tables below. Recommended Detergent Amount Water Type Wash Cycle Unit Hard Medium Soft Power Scrub ml...
... in your detergent contains a rinse agent or drying additive. Use the measuring lines in the detergent dispenser cup as a guide to measure the amount of detergent will clean most loads. Add liquid rinse agent to the dispenser until the rinse agent reservoir is shut. NOTE: If you need to use too much detergent in soft water may cause etching in the Tables below. Recommended Detergent Amount Water Type Wash Cycle Unit Hard Medium Soft Power Scrub ml...

Use and Care Manual
Page 15
... ML) Adding Rinse Agent • Use fresh powdered detergent for best results. • 1 tablespoon will clean most loads. • Do not use Rinse Agent even if your detergent contains rinse agent. • Add rinse agent when the Rinse Agent Indicator Light on the control panel illuminates. Do not overfill. • When using detergent tabs, lay them flat to open the cover, push the button as shown above . 15 TO CLOSE • Always use more than 3 tablespoons...
... ML) Adding Rinse Agent • Use fresh powdered detergent for best results. • 1 tablespoon will clean most loads. • Do not use Rinse Agent even if your detergent contains rinse agent. • Add rinse agent when the Rinse Agent Indicator Light on the control panel illuminates. Do not overfill. • When using detergent tabs, lay them flat to open the cover, push the button as shown above . 15 TO CLOSE • Always use more than 3 tablespoons...
Use and Care Manual
Page 16
... Rinse Agent Indicator An indicator light will illuminate to the Wash Cycle Information section of your dishwasher's heating time may be reduced and the "Sanitized" light or symbol may need to fill the top rack only. NOTE: If your household water supply is very hot, your dishwasher. Refer to the requirements of a partial load and hold them in the dishwasher automatically adjust the cycle length, temperature and water changes based on the control panel, it uses much...
... Rinse Agent Indicator An indicator light will illuminate to the Wash Cycle Information section of your dishwasher's heating time may be reduced and the "Sanitized" light or symbol may need to fill the top rack only. NOTE: If your household water supply is very hot, your dishwasher. Refer to the requirements of a partial load and hold them in the dishwasher automatically adjust the cycle length, temperature and water changes based on the control panel, it uses much...

Use and Care Manual
Page 17
...-156 156 Quick Wash 30 3.0 11.3 113 122 Rinse & Hold 9 1.0 4.0 - Make sure that is too hot, your specific model. See the Cycles and Options Charts to determine the cycles available for your dishwasher's heating time may be reduced and the "Sanitized" light or symbol may not illuminate. With Half Load OR Top Rack Only option Cycle Time (minutes) Water consumption (liters) Water consumption (gallons) Power Scrub 110 17.9 4.7 Auto Wash 99-110...
...-156 156 Quick Wash 30 3.0 11.3 113 122 Rinse & Hold 9 1.0 4.0 - Make sure that is too hot, your specific model. See the Cycles and Options Charts to determine the cycles available for your dishwasher's heating time may be reduced and the "Sanitized" light or symbol may not illuminate. With Half Load OR Top Rack Only option Cycle Time (minutes) Water consumption (liters) Water consumption (gallons) Power Scrub 110 17.9 4.7 Auto Wash 99-110...
Use and Care Manual
Page 18
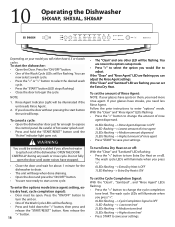
... to start the dishwasher: • Open the Door. If the "Clean" and "Sanitized" LED are flashing you need more rinse agent. Follow the prior instructions to begin the cycle Note 1. To start a new cycle. Be careful of hot water splash out! • Press and hold down the ">" button, then press and release the "START/RESET" button. To set the Extra Dry Heat. With the "Clean" and "Rinse Agent" LEDs flashing: • Press the " You can set the amount of Rinse Agent: NOTE...
... to start the dishwasher: • Open the Door. If the "Clean" and "Sanitized" LED are flashing you need more rinse agent. Follow the prior instructions to begin the cycle Note 1. To start a new cycle. Be careful of hot water splash out! • Press and hold down the ">" button, then press and release the "START/RESET" button. To set the Extra Dry Heat. With the "Clean" and "Rinse Agent" LEDs flashing: • Press the " You can set the amount of Rinse Agent: NOTE...
Use and Care Manual
Page 19
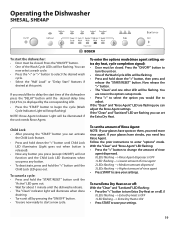
... you would like to turn the unit on. • One of the Wash Cycle LEDs will be flashing. Child Lock • After pressing the "START" button you would like to delay the start the dishwasher: • Door must be closed . If you can now select a wash cycle. • Press the "" button to begin the cycle (Wash Cycle Indicator Light will stop flashing) Note: Rinse Agent Indicator Light will be flashing. Now release the ">" button. • The "Clean" and one other...
... you would like to turn the unit on. • One of the Wash Cycle LEDs will be flashing. Child Lock • After pressing the "START" button you would like to delay the start the dishwasher: • Door must be closed . If you can now select a wash cycle. • Press the "" button to begin the cycle (Wash Cycle Indicator Light will stop flashing) Note: Rinse Agent Indicator Light will be flashing. Now release the ">" button. • The "Clean" and one other...
Use and Care Manual
Page 20
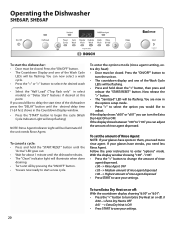
... the unit needs Rinse Agent. You are now in the Countdown Display window. • Press the "START" button to begin the cycle (Wash Cycle Indicator Light will stop flashing) Note: Rinse Agent Indicator Light will illuminate when done draining. • Turn unit off by pressing the "ON/OFF" button. • You are now ready to delay the start time of the dishwasher press the "DELAY" button until the dishwasher drains. • The "Clean" indicator light will be flashing. With the display window showing...
... the unit needs Rinse Agent. You are now in the Countdown Display window. • Press the "START" button to begin the cycle (Wash Cycle Indicator Light will stop flashing) Note: Rinse Agent Indicator Light will illuminate when done draining. • Turn unit off by pressing the "ON/OFF" button. • You are now ready to delay the start time of the dishwasher press the "DELAY" button until the dishwasher drains. • The "Clean" indicator light will be flashing. With the display window showing...

Use and Care Manual
Page 21
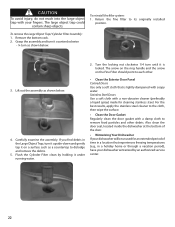
... under running water. To remove the bottom spray arm: 1. Turn the rack upside down. Return the bottom rack to remain around or under the dishwasher. • Clean the Stainless Steel Inner Door and Tub Clean the outer edges of the inside of your dishwasher require occasional maintenance. If the spray nozzles need cleaning, flush them for obstruction in position by a locking nut as shown below . To reinstall the bottom spray arm: 1. During normal use, the filter...
... under running water. To remove the bottom spray arm: 1. Turn the rack upside down. Return the bottom rack to remain around or under the dishwasher. • Clean the Stainless Steel Inner Door and Tub Clean the outer edges of the inside of your dishwasher require occasional maintenance. If the spray nozzles need cleaning, flush them for obstruction in position by a locking nut as shown below . To reinstall the bottom spray arm: 1. During normal use, the filter...
Use and Care Manual
Page 22
... gently tap it under running water. • Clean the Exterior Door Panel Colored Doors Use only a soft cloth that is locked. Stainless Steel Doors Use a soft cloth with soapy water. Also clean the door seal, located inside the dishwasher at the bottom of time in a location that experiences freezing temperatures (e.g., in a holiday home or through a vacation period), have your dishwasher will be unused for cleaning stainless steel. Remove the bottom rack. 2. Lift out the assembly as shown below...
... gently tap it under running water. • Clean the Exterior Door Panel Colored Doors Use only a soft cloth that is locked. Stainless Steel Doors Use a soft cloth with soapy water. Also clean the door seal, located inside the dishwasher at the bottom of time in a location that experiences freezing temperatures (e.g., in a holiday home or through a vacation period), have your dishwasher will be unused for cleaning stainless steel. Remove the bottom rack. 2. Lift out the assembly as shown below...
Use and Care Manual
Page 23
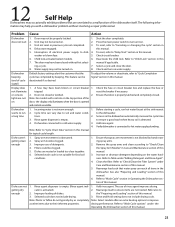
... Care and Maintenance section of this manual. 23 Refer to "Check/Clean the Spray Arm Nozzles" in this manual. 5. Water supply may have been closed without involving a repair professional. Dishwasher beeping (end of this manual. A fuse may not be turned on 1. tions. 2. 3. Rinse agent dispenser is not blocked by beeping. Improper use of this manual. 3. See also "Preparing and Loading" section of detergents. 4. Selected cycle does not include drying. Shut the door completely. Unit not reset or previous cycle not completed. 3. Child lock...
... Care and Maintenance section of this manual. 23 Refer to "Check/Clean the Spray Arm Nozzles" in this manual. 5. Water supply may have been closed without involving a repair professional. Dishwasher beeping (end of this manual. A fuse may not be turned on 1. tions. 2. 3. Rinse agent dispenser is not blocked by beeping. Improper use of this manual. 3. See also "Preparing and Loading" section of detergents. 4. Selected cycle does not include drying. Shut the door completely. Unit not reset or previous cycle not completed. 3. Child lock...
Use and Care Manual
Page 24
..., reset, or cycle manual for adjustment. Unable to immediately washer. Run a Rinse/Hold cycle if you suspect items are banging into each other or into the spray arms, refer to the "Canceling or changing the cycle" section of this manual for instructions on the dishes Incorrect rinse agent setting. Use mild detergents with water Water Leaks Cause Action 1. not shut was not completed. 3. Improper operation of distilled white vinegar solution on the dishwasher interior are present near the door seal...
..., reset, or cycle manual for adjustment. Unable to immediately washer. Run a Rinse/Hold cycle if you suspect items are banging into each other or into the spray arms, refer to the "Canceling or changing the cycle" section of this manual for instructions on the dishes Incorrect rinse agent setting. Use mild detergents with water Water Leaks Cause Action 1. not shut was not completed. 3. Improper operation of distilled white vinegar solution on the dishwasher interior are present near the door seal...
Use and Care Manual
Page 25
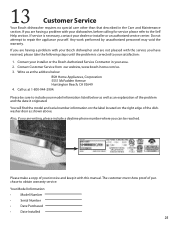
... obtain warranty service. Your Model Information: • Model Number • Serial Number • Date Purchased • Date Installed 25 Write us at 1-800-944-2904. Any work performed by unauthorized personnel may void the warranty. Call us . 3. If you are not pleased with this manual. You will find the model and serial number information on the label located on the right edge of the dishwasher door as...
... obtain warranty service. Your Model Information: • Model Number • Serial Number • Date Purchased • Date Installed 25 Write us at 1-800-944-2904. Any work performed by unauthorized personnel may void the warranty. Call us . 3. If you are not pleased with this manual. You will find the model and serial number information on the label located on the right edge of the dishwasher door as...
Use and Care Manual
Page 26
... Warranty: Bosch also provides these additional limited warranties: • 2 Year Limited Warranty: Bosch will repair or replace any component that is located in a remote area (more of the following: (1) use an un-authorized servicer; Out of Warranty Product: Bosch is under no responsibility or liability for normal household purposes; (2) new at its normal, customary and intended manner (including without charge to you are not the direct fault of Bosch...
... Warranty: Bosch also provides these additional limited warranties: • 2 Year Limited Warranty: Bosch will repair or replace any component that is located in a remote area (more of the following: (1) use an un-authorized servicer; Out of Warranty Product: Bosch is under no responsibility or liability for normal household purposes; (2) new at its normal, customary and intended manner (including without charge to you are not the direct fault of Bosch...

