
Installation Instructions
Page 3
... electrical connections. This appliance must be connected to a dishwasher-dedicated, properly grounded electrical circuit with care. All plumbing should perform plumbing work . When opening . Do not work on the dishwasher electric supply circuit until it is de-energized. Do not use the dishwasher until you are properly made. Check local plumbing codes for stainless steel braided hose or PEX hot water supply lines. Do not attempt any work on an uninstalled dishwasher, carefully open the door while supporting...
... electrical connections. This appliance must be connected to a dishwasher-dedicated, properly grounded electrical circuit with care. All plumbing should perform plumbing work . When opening . Do not work on the dishwasher electric supply circuit until it is de-energized. Do not use the dishwasher until you are properly made. Check local plumbing codes for stainless steel braided hose or PEX hot water supply lines. Do not attempt any work on an uninstalled dishwasher, carefully open the door while supporting...

Installation Instructions
Page 15
...plus tard. Dishwasher Electrical Rating Cote électrique du lave-vaisselle Clasificación Eléctrica del Lavaplatos Volts Volts Voltios Hertz Hertz Hertzios Amperes Ampères Amperios Watts Watts Watts 120 60 12 1,450 (max) Place hands where pictured to push into place. Coil excess drain hose... de desagüe con seguridad debajo del fregadero. Guide the water line and drain hose toward the sink, and electric line through the proper channel. Orienter le tuyau d'alimentation en eau et le tuyau de vidange en direction de l'évier et placer correctement e câ...
...plus tard. Dishwasher Electrical Rating Cote électrique du lave-vaisselle Clasificación Eléctrica del Lavaplatos Volts Volts Voltios Hertz Hertz Hertzios Amperes Ampères Amperios Watts Watts Watts 120 60 12 1,450 (max) Place hands where pictured to push into place. Coil excess drain hose... de desagüe con seguridad debajo del fregadero. Guide the water line and drain hose toward the sink, and electric line through the proper channel. Orienter le tuyau d'alimentation en eau et le tuyau de vidange en direction de l'évier et placer correctement e câ...
Instructions for Use
Page 3
... 92649 Table of Contents Important Safety Instructions 2-3 Dishwasher Components 4-5 Dishwasher Features and Materials 6 Loading the Dishwasher 7-8 Loading the Silverware Basket 8-9 Rack Accessories 10-11 Adding Detergent and Rinse Aid 12-13 Dishwasher Cycles and Options 14 Wash Cycle Information 14 Operating the Dishwasher 15 Care and Maintenance 16-17 Self Help 18-19 Customer Service 20 Warranty Information 21 This manual was written with your dishwasher for selecting a Bosch dishwasher. Congratulations and thank you from their...
... 92649 Table of Contents Important Safety Instructions 2-3 Dishwasher Components 4-5 Dishwasher Features and Materials 6 Loading the Dishwasher 7-8 Loading the Silverware Basket 8-9 Rack Accessories 10-11 Adding Detergent and Rinse Aid 12-13 Dishwasher Cycles and Options 14 Wash Cycle Information 14 Operating the Dishwasher 15 Care and Maintenance 16-17 Self Help 18-19 Customer Service 20 Warranty Information 21 This manual was written with your dishwasher for selecting a Bosch dishwasher. Congratulations and thank you from their...
Instructions for Use
Page 4
Electrical shock or fire could result from the use steam cleaning products to clean your installer for the end user to become familiar with the procedure to shut off the incoming power supply. See the Installation Instructions or contact your dishwasher. All repairs must be liable for any way not covered in the following pages. IMPORTANT SAFETY INSTRUCTIONS: Please READ and SAVE this manual is highly recommended for...
Electrical shock or fire could result from the use steam cleaning products to clean your installer for the end user to become familiar with the procedure to shut off the incoming power supply. See the Installation Instructions or contact your dishwasher. All repairs must be liable for any way not covered in the following pages. IMPORTANT SAFETY INSTRUCTIONS: Please READ and SAVE this manual is highly recommended for...
Instructions for Use
Page 5
... and understand all hot water faucets and let the water flow from the elements. Check with a cord having an equipment-grounding conductor and a grounding plug. Do not modify the plug provided with Installation Instructions and this time. 10 Remove the dishwasher door to the washing compartment when removing an old dishwasher for several minutes. Before using the dishwasher. 2 This appliance must be grounded to a metal, permanent wiring system, or...
... and understand all hot water faucets and let the water flow from the elements. Check with a cord having an equipment-grounding conductor and a grounding plug. Do not modify the plug provided with Installation Instructions and this time. 10 Remove the dishwasher door to the washing compartment when removing an old dishwasher for several minutes. Before using the dishwasher. 2 This appliance must be grounded to a metal, permanent wiring system, or...
Instructions for Use
Page 7
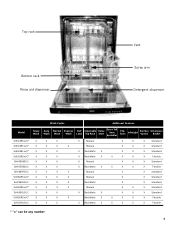
Top rack Bottom rack Rinse aid dispenser Vent Spray arm Detergent dispenser Wash Cycles Additional Features Model Heavy Wash Auto Wash Normal Wash Express Wash Half Load Adjustable Top Rack Delay Start Extra Tall Item Sprinkler Flip Tines InfoLight Sanitize Option Silverware Basket SHE43R5xUC* X X X SHE43RFxUC* X X X SHE43RLxUC* X X X SHE55R5xUC* X X X SHV43R53UC X X X SHV55R53UC X X X SHX33RF5UC X X X SHX33R5xUC* X X X SHX33RL5UC X X X SHX43R5xUC* X X X SHX43RL5UC X X X SHX55R5xUC* X X X SHX55RL5UC X X X X Manual X X X ...
Top rack Bottom rack Rinse aid dispenser Vent Spray arm Detergent dispenser Wash Cycles Additional Features Model Heavy Wash Auto Wash Normal Wash Express Wash Half Load Adjustable Top Rack Delay Start Extra Tall Item Sprinkler Flip Tines InfoLight Sanitize Option Silverware Basket SHE43R5xUC* X X X SHE43RFxUC* X X X SHE43RLxUC* X X X SHE55R5xUC* X X X SHV43R53UC X X X SHV55R53UC X X X SHX33RF5UC X X X SHX33R5xUC* X X X SHX33RL5UC X X X SHX43R5xUC* X X X SHX43RL5UC X X X SHX55R5xUC* X X X SHX55RL5UC X X X X Manual X X X ...

Instructions for Use
Page 8
... the wash cycle. Noise Reduction System: uses Suspension Motor™, a two-pump motor system, and insulation to ensure distribution of clean water and protect the main pump and the drain pump from foreign material. Nylon Coated Racks: eliminates cuts and nicks and have a five year warranty. Model dependent features: Delay Start: Delay the start option. Dishware Materials Note: Before using the delay start time of the quietest in contact with wooden handles can only be removed...
... the wash cycle. Noise Reduction System: uses Suspension Motor™, a two-pump motor system, and insulation to ensure distribution of clean water and protect the main pump and the drain pump from foreign material. Nylon Coated Racks: eliminates cuts and nicks and have a five year warranty. Model dependent features: Delay Start: Delay the start option. Dishware Materials Note: Before using the delay start time of the quietest in contact with wooden handles can only be removed...

Instructions for Use
Page 9
.... Load dishes in the dishwasher racks so the insides of the dishwasher. Remove all food particles, bones, toothpicks and excessive grease. NOTICE To avoid dishwasher damage, do not protrude through the bottom of the racks and block the spray arms. Note: When pushing the top rack into the dishwasher. Flexible Silverware Basket (10 place settings) Top Rack Bottom Rack 7 Next, unload the silverware basket followed by the top rack. Loading...
.... Load dishes in the dishwasher racks so the insides of the dishwasher. Remove all food particles, bones, toothpicks and excessive grease. NOTICE To avoid dishwasher damage, do not protrude through the bottom of the racks and block the spray arms. Note: When pushing the top rack into the dishwasher. Flexible Silverware Basket (10 place settings) Top Rack Bottom Rack 7 Next, unload the silverware basket followed by the top rack. Loading...

Instructions for Use
Page 12
... show in Figure 3. Set the top rack aside. Push folding tine downward to desired position as plastic cutting boards and tall baking sheets on the bottom rack's left side or center. Figure 1 Do not block vent Figure 2 Manual Adjustable Upper Rack (model dependent) Remove the empty upper rack by pulling it out of the dishwasher until it stops. Rack Accessories Extra Tall Item Sprinkler (model dependent) If an...
... show in Figure 3. Set the top rack aside. Push folding tine downward to desired position as plastic cutting boards and tall baking sheets on the bottom rack's left side or center. Figure 1 Do not block vent Figure 2 Manual Adjustable Upper Rack (model dependent) Remove the empty upper rack by pulling it out of the dishwasher until it stops. Rack Accessories Extra Tall Item Sprinkler (model dependent) If an...

Instructions for Use
Page 13
... on both sides. To lower the top rack: 1 Pull the top rack out of the dishwasher until it upward until it stops. 2 Grasp the top of the dishwasher until the handles lock the rack into the dishwasher, ensure the rack height is not the same on both sides, the dishwasher door will not shut and the top rack spray arm will not connect to accommodate large items in...
... on both sides. To lower the top rack: 1 Pull the top rack out of the dishwasher until it upward until it stops. 2 Grasp the top of the dishwasher until the handles lock the rack into the dishwasher, ensure the rack height is not the same on both sides, the dishwasher door will not shut and the top rack spray arm will not connect to accommodate large items in...

Instructions for Use
Page 14
... 8. • Cover will clean most loads. NOTICE To avoid dishwasher damage, do not use fresh powdered dishwashing detergent. To Open • Push the blue button inward (not down firmly until it clicks. Adding Detergent and Rinse Aid Detergent Use only detergent specifically designed for dishwashers. To Close • Place finger as shown in your kitchenware clean. This dishwasher uses less water, therefore, less detergent is soft. The detergent dispenser cup has lines that measure deter-
... 8. • Cover will clean most loads. NOTICE To avoid dishwasher damage, do not use fresh powdered dishwashing detergent. To Open • Push the blue button inward (not down firmly until it clicks. Adding Detergent and Rinse Aid Detergent Use only detergent specifically designed for dishwashers. To Close • Place finger as shown in your kitchenware clean. This dishwasher uses less water, therefore, less detergent is soft. The detergent dispenser cup has lines that measure deter-
Instructions for Use
Page 16
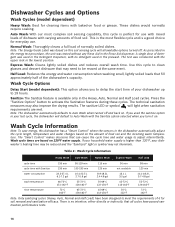
... intention, either directly or indirectly, that can cause the cycle time and water usage to delay the start time of 6 for cleaning items with the Sanitize option selected when you turn it on . washer's heating time may be reused at the same event. Dishwasher Cycles and Options Wash Cycles (model dependent) Heavy Wash: Best for soil removal and sanitization efficacy. Use this dishwasher has a "Smart Control" where the sensors in the prewash. Wash Cycle Options Delay Start (model dependent): This...
... intention, either directly or indirectly, that can cause the cycle time and water usage to delay the start time of 6 for cleaning items with the Sanitize option selected when you turn it on . washer's heating time may be reused at the same event. Dishwasher Cycles and Options Wash Cycles (model dependent) Heavy Wash: Best for soil removal and sanitization efficacy. Use this dishwasher has a "Smart Control" where the sensors in the prewash. Wash Cycle Options Delay Start (model dependent): This...

Instructions for Use
Page 17
... water noises have stopped. Cancel a cycle: 1 Open the dishwasher door just far enough to disable the tone or adjust the volume. You may splash out. 2 Press and hold the Delay Start button. play window. 4 Close the door to begin the cycle. Interrupt a cycle: 1 Open the dishwasher door just far enough to expose the controls panel. WARNING You could be seriously scalded if you when a cycle completes and the dishwasher has waashed and dried the dishes. Operating...
... water noises have stopped. Cancel a cycle: 1 Open the dishwasher door just far enough to disable the tone or adjust the volume. You may splash out. 2 Press and hold the Delay Start button. play window. 4 Close the door to begin the cycle. Interrupt a cycle: 1 Open the dishwasher door just far enough to expose the controls panel. WARNING You could be seriously scalded if you when a cycle completes and the dishwasher has waashed and dried the dishes. Operating...
Instructions for Use
Page 18
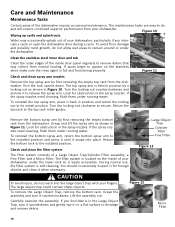
... continued superior performance from normal loading. Turn the locking nut clockwise to appear on the inside door panel regularly to release the spray arm. Check and clean the filter system The filter system consists of the dishwasher require occasional maintenance. The filter system is located on the stainless steel, make sure the rinse agent is held in position by a locking nut as shown in Figure 11. During normal use, the filter system is easily...
... continued superior performance from normal loading. Turn the locking nut clockwise to appear on the inside door panel regularly to release the spray arm. Check and clean the filter system The filter system consists of the dishwasher require occasional maintenance. The filter system is located on the stainless steel, make sure the rinse agent is held in position by a locking nut as shown in Figure 11. During normal use, the filter system is easily...

Instructions for Use
Page 19
... is locked. Stainless steel doors: use only a soft cloth dampened with a non-abrasive cleaner (preferably a liquid spray) made for more than 1 month. 17 Remove the Micro Filter as shown in a location that experiences freezing temperatures (holiday home or through a vacation period), have your dishwasher winterized by holding them under running water. Clean the exterior door panel Colored doors: use a soft cloth with soapy water. Turn your household water supply to remove food...
... is locked. Stainless steel doors: use only a soft cloth dampened with a non-abrasive cleaner (preferably a liquid spray) made for more than 1 month. 17 Remove the Micro Filter as shown in a location that experiences freezing temperatures (holiday home or through a vacation period), have your dishwasher winterized by holding them under running water. Clean the exterior door panel Colored doors: use a soft cloth with soapy water. Turn your household water supply to remove food...

Instructions for Use
Page 20
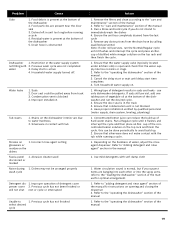
... detergent depending on water supply 1. Refer to "Delay Start" section in this manual 5. To reset, refer to "Cancelling a Cycle" in the dishwasher automatically increase the cycle time to the "care and maintenance" section of the manual 1. Remove the spray arms and clean according to ensure a good wash when heavy soil is not blocked by beeping. Add rinse agent - Rinse and Hold setting does not include drying Note: Select models offer an extra heating option to hot water supply plumbing 1. Default factory settings...
... detergent depending on water supply 1. Refer to "Delay Start" section in this manual 5. To reset, refer to "Cancelling a Cycle" in the dishwasher automatically increase the cycle time to the "care and maintenance" section of the manual 1. Remove the spray arms and clean according to ensure a good wash when heavy soil is not blocked by beeping. Add rinse agent - Rinse and Hold setting does not include drying Note: Select models offer an extra heating option to hot water supply plumbing 1. Default factory settings...
Instructions for Use
Page 21
... rinse agent" section in suds and leaks - Remove any obstructions from the drain hose by qualified personnel (water supply, drain system, leveling, plumbing) 1. use only dishwasher detergents. this can reduce the build up . 2. Refer to 1. Improper installation Tub stains 1. Abrasive cleaner used discolored or marked Noise during 1. Previous cycle has not been finished or will not shut rest or cycle or interrupted Unable to the "operating the dishwasher" section of water, adjust the rinse agent dispenser. Run a Rinse...
... rinse agent" section in suds and leaks - Remove any obstructions from the drain hose by qualified personnel (water supply, drain system, leveling, plumbing) 1. use only dishwasher detergents. this can reduce the build up . 2. Refer to 1. Improper installation Tub stains 1. Abrasive cleaner used discolored or marked Noise during 1. Previous cycle has not been finished or will not shut rest or cycle or interrupted Unable to the "operating the dishwasher" section of water, adjust the rinse agent dispenser. Run a Rinse...

Instructions for Use
Page 22
...problem with this manual. If you are having a problem with your Bosch dishwasher and are writing, please include a daytime phone number where you have received, please take the following steps until the problem is corrected to the Self Help section of the manual. Any work performed by the Good Housekeeping Seal. The limited warranty... model and serial number information on the label located on the edge of the manual. Do not attempt to obtain warranty service. You will replace the product or refund the purchase price. Customer Service Your Bosch dishwasher requires no special care ...
...problem with this manual. If you are having a problem with your Bosch dishwasher and are writing, please include a daytime phone number where you have received, please take the following steps until the problem is corrected to the Self Help section of the manual. Any work performed by the Good Housekeeping Seal. The limited warranty... model and serial number information on the label located on the edge of the manual. Do not attempt to obtain warranty service. You will replace the product or refund the purchase price. Customer Service Your Bosch dishwasher requires no special care ...
Instructions for Use
Page 23
... Product was purchased: (1) for repairs or work on Dish Racks: Bosch will replace the upper or lower dish rack (excluding rack components), if the rack proves defective in materials or workmanship (excludes labor charges). • Lifetime Warranty against Stainless Steel Rust Through: Bosch will replace the stainless steel door if the door should rust through (excludes labor charges). • Bosch will replace your Product (upgraded models may be stalled, tolled, extended, or suspended, for the Product, including all times...
... Product was purchased: (1) for repairs or work on Dish Racks: Bosch will replace the upper or lower dish rack (excluding rack components), if the rack proves defective in materials or workmanship (excludes labor charges). • Lifetime Warranty against Stainless Steel Rust Through: Bosch will replace the stainless steel door if the door should rust through (excludes labor charges). • Bosch will replace your Product (upgraded models may be stalled, tolled, extended, or suspended, for the Product, including all times...
Short Instructions
Page 1
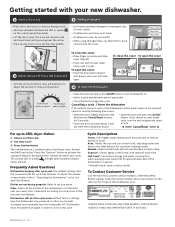
... cleaning results Normal: Cleans normal loads with loosely attached, normal soiling Express*: Cleans lightly soiled loads with the cover. 3 Tbsp. Before calling, locate the model number and serial number on the label on after cycle end: The default settings alert the consumer that fill approximately half of the dishwasher's capacity * Available wash cycles vary by following these steps. --Open the door slightly and press and hold the two Cancel/Reset buttons for best drying 2 Adjust Amount of Rinse Aid Dispensed --Turn...
... cleaning results Normal: Cleans normal loads with loosely attached, normal soiling Express*: Cleans lightly soiled loads with the cover. 3 Tbsp. Before calling, locate the model number and serial number on the label on after cycle end: The default settings alert the consumer that fill approximately half of the dishwasher's capacity * Available wash cycles vary by following these steps. --Open the door slightly and press and hold the two Cancel/Reset buttons for best drying 2 Adjust Amount of Rinse Aid Dispensed --Turn...


