
Use and Care Manual
Page 3
Adding Detergent & Rinse Agent 14-15 8. Care & Maintenance 21-22 12. Dishwasher Features 7 4. Wash Cycle Information 17 10. Warranty Information 27 3 Dishwasher Components 6 3. Loading the Silverware Basket 11-13 7. Operating the Dishwasher 18-20 11. Self Help 23-25 13. Rack Accessories 9-10 6. Customer Service Information 26 14. Important Safety Instructions 4-5 2. Loading the Dishware 8 5. Dishwasher Features & Options 16 9. Table of Contents 1.
Adding Detergent & Rinse Agent 14-15 8. Care & Maintenance 21-22 12. Dishwasher Features 7 4. Wash Cycle Information 17 10. Warranty Information 27 3 Dishwasher Components 6 3. Loading the Silverware Basket 11-13 7. Operating the Dishwasher 18-20 11. Self Help 23-25 13. Rack Accessories 9-10 6. Customer Service Information 26 14. Important Safety Instructions 4-5 2. Loading the Dishware 8 5. Dishwasher Features & Options 16 9. Table of Contents 1.

Use and Care Manual
Page 4
... death. Some chloride-containing products can result in this manual is highly recommended for the end user to become familiar with the procedure to shut of the incoming water supply and the procedure to clean your dishwasher. See the installation Instructions or contact your dishwasher. Do not use harsh chemicals to shut of unqualiied service technicians or non-original replacement parts. 1 Important Safety Instructions Please Read & Save this...
... death. Some chloride-containing products can result in this manual is highly recommended for the end user to become familiar with the procedure to shut of the incoming water supply and the procedure to clean your dishwasher. See the installation Instructions or contact your dishwasher. Do not use harsh chemicals to shut of unqualiied service technicians or non-original replacement parts. 1 Important Safety Instructions Please Read & Save this...
Use and Care Manual
Page 5
... HANDLES UP to the washing compartment when removing an old dishwasher for use an open lame during this dishwasher only for its intended function, which is connected to the equipment grounding terminal or lead on the dishwasher. Use only detergents or rinsing agents recommended for service or discarding. 11. Remove the dishwasher door to reduce the risk of the parents or legal guardians to the ill valve. This dishwasher...
... HANDLES UP to the washing compartment when removing an old dishwasher for use an open lame during this dishwasher only for its intended function, which is connected to the equipment grounding terminal or lead on the dishwasher. Use only detergents or rinsing agents recommended for service or discarding. 11. Remove the dishwasher door to reduce the risk of the parents or legal guardians to the ill valve. This dishwasher...

Use and Care Manual
Page 7
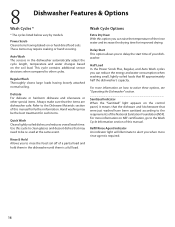
... ensure distribution of clean water and protect the main pump and the drain pump from foreign material. * Delay Start: This option allows you to delay the start time of your water may cause the aluminum to accomodate larger/taller items. * Half Load: Reduces the energy and water consumption when washing small, lightly soiled loads. * Extra Dry Heat: Raises the temperature of a rinse agent result in contact with a soapilled steel wool pad. Glass...
... ensure distribution of clean water and protect the main pump and the drain pump from foreign material. * Delay Start: This option allows you to delay the start time of your water may cause the aluminum to accomodate larger/taller items. * Half Load: Reduces the energy and water consumption when washing small, lightly soiled loads. * Extra Dry Heat: Raises the temperature of a rinse agent result in contact with a soapilled steel wool pad. Glass...
Use and Care Manual
Page 8
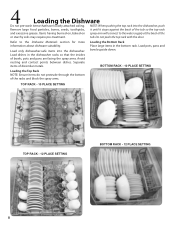
... not pre-wash items that the insides of bowls, pots and pans are facing the spray arms. Avoid nesting and contact points between dishes. Refer to the water supply at the back of the tub so the top rack and excessive grease. Load only dishwasher-safe items into the dishwasher, push Remove large food particles, bones, seeds, toothpicks, it until it stops against...
... not pre-wash items that the insides of bowls, pots and pans are facing the spray arms. Avoid nesting and contact points between dishes. Refer to the water supply at the back of the tub so the top rack and excessive grease. Load only dishwasher-safe items into the dishwasher, push Remove large food particles, bones, seeds, toothpicks, it until it stops against...
Use and Care Manual
Page 10
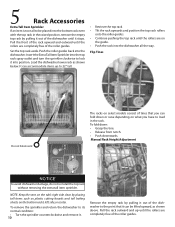
... rack into the dishwasher all the way. Push the roller guides back into position. Flip Tines Do not block vent The racks on select models consist of the dishwasher to the point that you can be placed into the bottom rack even with the top rack in the rack. Manual Rack Height Adjustment NOTICE To avoid dishwasher damage, do not reinstall the top rack without removing...
... rack into the dishwasher all the way. Push the roller guides back into position. Flip Tines Do not block vent The racks on select models consist of the dishwasher to the point that you can be placed into the bottom rack even with the top rack in the rack. Manual Rack Height Adjustment NOTICE To avoid dishwasher damage, do not reinstall the top rack without removing...

Use and Care Manual
Page 11
...basket open. 11 If large or oddly-shaped items are to handle or play near knives and sharp utensils. Do not allow children to be loaded into the silverware basket with edges down , load the silverware basket following the patterns suggested below. CAUTION The sharp points and edges of the lower rack... load the items so that they do not nest together. The Standard Silverware Basket The standard silverware basket (select models) its in the back of knives and other sharp utensils with the tops up with their handles up, and forks and spoons with water during the wash cycle. Load ...
...basket open. 11 If large or oddly-shaped items are to handle or play near knives and sharp utensils. Do not allow children to be loaded into the silverware basket with edges down , load the silverware basket following the patterns suggested below. CAUTION The sharp points and edges of the lower rack... load the items so that they do not nest together. The Standard Silverware Basket The standard silverware basket (select models) its in the back of knives and other sharp utensils with the tops up with their handles up, and forks and spoons with water during the wash cycle. Load ...

Use and Care Manual
Page 14
... dishwashing products in your dishwasher. ɵ To avoid dishwasher damage, do not know the hardness of your water supply, use less detergent. Increase the amount, if necessary, to the least amount required to use 15ml of detergent recommended in glassware. Using too much detergent if your kitchenware clean. NOTE: If you need to get your water is soft. Wash Cycle Power Scrub Auto Wash Regular Wash Quick Wash Delicate Wash Rinse & Hold 14 Recommended Detergent Amount Water...
... dishwashing products in your dishwasher. ɵ To avoid dishwasher damage, do not know the hardness of your water supply, use less detergent. Increase the amount, if necessary, to the least amount required to use 15ml of detergent recommended in glassware. Using too much detergent if your kitchenware clean. NOTE: If you need to get your water is soft. Wash Cycle Power Scrub Auto Wash Regular Wash Quick Wash Delicate Wash Rinse & Hold 14 Recommended Detergent Amount Water...
Use and Care Manual
Page 16
... required. 16 Refer to delay the start time of this manual for improved drying. Delay Start This option allows you can reduce the energy and water consumption when washing small, lightly soiled loads that may need to the Wash Cycle Information section of your dishwasher. For more rinse agent is a full load. Use this cycle to clean glasses and dessert dishes that ill approximately half the dishwasher's capacity. Reill Rinse Agent Indicator An indicator light will illuminate to other...
... required. 16 Refer to delay the start time of this manual for improved drying. Delay Start This option allows you can reduce the energy and water consumption when washing small, lightly soiled loads that may need to the Wash Cycle Information section of your dishwasher. For more rinse agent is a full load. Use this cycle to clean glasses and dessert dishes that ill approximately half the dishwasher's capacity. Reill Rinse Agent Indicator An indicator light will illuminate to other...
Use and Care Manual
Page 17
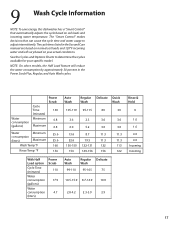
... adjust intermittently. The cycle times listed in the Power Scrub Plus, Regular, and Auto Wash cycles. The "Smart Control" makes decisions that automatically adjusts the cycle based on your speciic model. Water consumption (gallons) Cycle Time (minutes) Minimum Power Scrub 130 6.8 Maximum 6.8 Water Minimum 25.6 consumption (liters) Maximum 25.6 Wash Temp °F 160 Rinse Temp °F 156 With Half Load option Cycle Time (minutes) Water consumption (gallons) Water consumption (liters) Power Scrub 110 17.9 4.7 Auto Wash Regular Delicate Quick Wash Wash...
... adjust intermittently. The cycle times listed in the Power Scrub Plus, Regular, and Auto Wash cycles. The "Smart Control" makes decisions that automatically adjusts the cycle based on your speciic model. Water consumption (gallons) Cycle Time (minutes) Minimum Power Scrub 130 6.8 Maximum 6.8 Water Minimum 25.6 consumption (liters) Maximum 25.6 Wash Temp °F 160 Rinse Temp °F 156 With Half Load option Cycle Time (minutes) Water consumption (gallons) Water consumption (liters) Power Scrub 110 17.9 4.7 Auto Wash Regular Delicate Quick Wash Wash...
Use and Care Manual
Page 18
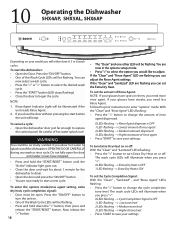
... set the Extra Dry Heat. To start the dishwasher: • Open the Door. To enter the options mode(rinse agent setting, extra dry heat, cycle completion signal): • Door must be illuminated if the unit needs Rinse Agent. 2. Press the "ON/OFF" button to begin the cycle NOTE 1. WARNING You could be seriously scalded if you will be lashing. With the "Clean" and "Rinse Agent" LEDs lashing: • Press the " Be careful of hot water...
... set the Extra Dry Heat. To start the dishwasher: • Open the Door. To enter the options mode(rinse agent setting, extra dry heat, cycle completion signal): • Door must be illuminated if the unit needs Rinse Agent. 2. Press the "ON/OFF" button to begin the cycle NOTE 1. WARNING You could be seriously scalded if you will be lashing. With the "Clean" and "Rinse Agent" LEDs lashing: • Press the " Be careful of hot water...
Use and Care Manual
Page 19
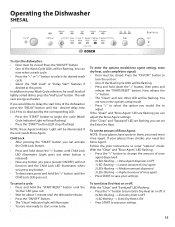
..., you need less Rinse Agent. To set the Extra Dry Heat. If you would like to begin the cycle (Wash Cycle Indicator Light will stop lashing) • Press the "START" button (LED stops lashing) NOTE: Rinse Agent Indicator Light will be illuminated if the unit needs Rinse Agent. Child Lock • After pressing the "START" button you can activate the Child Lock feature. • Press and hold down the "" button. • The "Clean" and one other LED will save energy and water.
..., you need less Rinse Agent. To set the Extra Dry Heat. If you would like to begin the cycle (Wash Cycle Indicator Light will stop lashing) • Press the "START" button (LED stops lashing) NOTE: Rinse Agent Indicator Light will be illuminated if the unit needs Rinse Agent. Child Lock • After pressing the "START" button you can activate the Child Lock feature. • Press and hold down the "" button. • The "Clean" and one other LED will save energy and water.

Use and Care Manual
Page 20
...(rinse agent setting, extra dry heat, cycle completion signal): • Door must be closed . You are now ready to select the desired wash cycle. • Select the "Half Load" or "Delay Start" features if desired at this point. If your glasses have streaks, you can now select a wash cycle. • Press the "" button to start a new cycle. You can turn the unit on them, you can adjust the amount of lightly soiled dishes...
...(rinse agent setting, extra dry heat, cycle completion signal): • Door must be closed . You are now ready to select the desired wash cycle. • Select the "Half Load" or "Delay Start" features if desired at this point. If your glasses have streaks, you can now select a wash cycle. • Press the "" button to start a new cycle. You can turn the unit on them, you can adjust the amount of lightly soiled dishes...
Use and Care Manual
Page 21
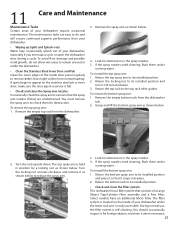
... open the dishwasher door during a cycle. Return the bottom spray arm to its installed position. 2. The ilter system is located on the stainless steel tub or inner door, make sure the rinse agent reservoir is full. • Check and clean the Spray arm nozzles Occasionally check the spray arms to remain around or under the lower rack and is self-cleaning. 11 Care and Maintenance Maintenance Tasks Certain areas of a Large Object Trap/Cylinder Filter assembly...
... open the dishwasher door during a cycle. Return the bottom spray arm to its installed position. 2. The ilter system is located on the stainless steel tub or inner door, make sure the rinse agent reservoir is full. • Check and clean the Spray arm nozzles Occasionally check the spray arms to remain around or under the lower rack and is self-cleaning. 11 Care and Maintenance Maintenance Tasks Certain areas of a Large Object Trap/Cylinder Filter assembly...
Use and Care Manual
Page 22
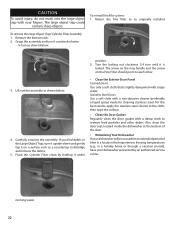
... particles and other . 3. Remove the bottom rack. 2. Turn the locking nut clockwise 1/4 turn as shown below . 4. Lift out the assembly as a countertop to dislodge and remove the debris. 5. running water. 22 Carefully examine the assembly. Stainless Steel Doors Use a soft cloth with your ingers. The arrow on the ring handle and the arrow on a surface such as shown below . Also clean the door seal, located inside the dishwasher at the bottom of...
... particles and other . 3. Remove the bottom rack. 2. Turn the locking nut clockwise 1/4 turn as shown below . 4. Lift out the assembly as a countertop to dislodge and remove the debris. 5. running water. 22 Carefully examine the assembly. Stainless Steel Doors Use a soft cloth with your ingers. The arrow on the ring handle and the arrow on a surface such as shown below . Also clean the door seal, located inside the dishwasher at the bottom of...
Use and Care Manual
Page 23
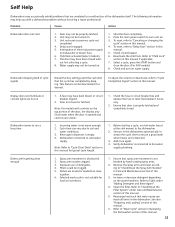
... . 3. Child lock activated (select models). 7. Shut the door completely. 2. Check circuit breaker. 6. To adjust the volume or deactivate, refer to "Canceling or changing the cycle" section in this manual. 4. Dishwasher connected to "Check/Clean the Spray Arm Nozzles" in Care and Maintenance section of this manual. 3. Filters could be properly latched. 2. Dishes are not on . 3. Remove the spray arms and clean according to cold water supply. Clean the lter. Door may not be clogged. 5. Press the main power switch to "Child Lock...
... . 3. Child lock activated (select models). 7. Shut the door completely. 2. Check circuit breaker. 6. To adjust the volume or deactivate, refer to "Canceling or changing the cycle" section in this manual. 4. Dishwasher connected to "Check/Clean the Spray Arm Nozzles" in Care and Maintenance section of this manual. 3. Filters could be properly latched. 2. Dishes are not on . 3. Remove the spray arms and clean according to cold water supply. Clean the lter. Door may not be clogged. 5. Press the main power switch to "Child Lock...
Use and Care Manual
Page 24
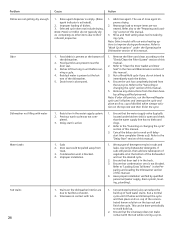
... up of this manual. 3. Ensure that the water supply line has no kinks and clogs. 2. Drain hose is activated). 2. The use of detergent results in suds and leaks. Refer also to "Clean the Door Gasket and Door Seal" in contact with the tub while running a cycle. 4. Refer to the "Preparing and Loading" section of this manual. 1. Suds 2. Cancel the delay-start is not blocked. Ensure that door seal is open and check that...
... up of this manual. 3. Ensure that the water supply line has no kinks and clogs. 2. Drain hose is activated). 2. The use of detergent results in suds and leaks. Refer also to "Clean the Door Gasket and Door Seal" in contact with the tub while running a cycle. 4. Refer to the "Preparing and Loading" section of this manual. 1. Suds 2. Cancel the delay-start is not blocked. Ensure that door seal is open and check that...
Use and Care Manual
Page 25
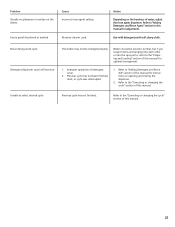
... "Canceling or changing the cycle" section of detergent cover. 2. Refer to "Adding Detergent and Rinse Aid" section of this manual for optimal arrangement. 1. Unable to "Adding Detergent and Rinse Agent" section in this manual. Refer to select desired cycle Previous cycle has not nished. Improper operation of this manual for instructions on the hardness of water, adjust the rinse agent dispenser. Problem Streaks on glassware or residue on the dishes Cause Incorrect rinse agent setting. Use mild detergents with...
... "Canceling or changing the cycle" section of detergent cover. 2. Refer to "Adding Detergent and Rinse Aid" section of this manual for optimal arrangement. 1. Unable to "Adding Detergent and Rinse Agent" section in this manual. Refer to select desired cycle Previous cycle has not nished. Improper operation of this manual for instructions on the hardness of water, adjust the rinse agent dispenser. Problem Streaks on glassware or residue on the dishes Cause Incorrect rinse agent setting. Use mild detergents with...
Use and Care Manual
Page 26
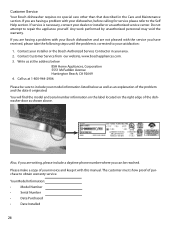
... of purchase to include your model information listed below : BSH Home Appliances, Corporation 5551 McFadden Avenue Huntington Beach, CA 92649 4. Your Model Information: • Model Number • Serial Number • Date Purchased • Date Installed 26 If you are having a problem with this manual. If service is corrected to your dishwasher, before calling for service please refer to repair the appliance yourself. Also, if...
... of purchase to include your model information listed below : BSH Home Appliances, Corporation 5551 McFadden Avenue Huntington Beach, CA 92649 4. Your Model Information: • Model Number • Serial Number • Date Purchased • Date Installed 26 If you are having a problem with this manual. If service is corrected to your dishwasher, before calling for service please refer to repair the appliance yourself. Also, if...
Use and Care Manual
Page 27
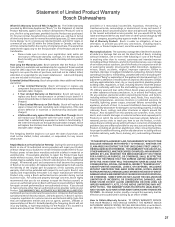
..., minor dents, and cosmetic damages on Dish Racks: Bosch will replace the upper or lower dish rack (excluding rack components), if the rack proves defective in materials or workmanship (excludes labor charges). • Lifetime Warranty against Stainless Steel Rust Through: Bosch will replace the stainless steel door if the door should rust through (excludes labor charges). Repair/Replace as is to repair manufacturer-defective Product only, using purchaser, provided that proves to be defective...
..., minor dents, and cosmetic damages on Dish Racks: Bosch will replace the upper or lower dish rack (excluding rack components), if the rack proves defective in materials or workmanship (excludes labor charges). • Lifetime Warranty against Stainless Steel Rust Through: Bosch will replace the stainless steel door if the door should rust through (excludes labor charges). Repair/Replace as is to repair manufacturer-defective Product only, using purchaser, provided that proves to be defective...


