

Installation Instructions
Page 3
... Do not allow the electrical and water supply lines to tip over tighten the 90° elbow. Ensure all national and local electrical codes and ordinances. Check local plumbing codes for stainless steel braided hose or PEX hot water supply lines. Before filling a dishwasher from the dishwasher's base and water inlet valve. Doing so could result. The dishwasher is explosive. Do not work on an uninstalled dishwasher, carefully open the door while supporting the rear of...
... Do not allow the electrical and water supply lines to tip over tighten the 90° elbow. Ensure all national and local electrical codes and ordinances. Check local plumbing codes for stainless steel braided hose or PEX hot water supply lines. Before filling a dishwasher from the dishwasher's base and water inlet valve. Doing so could result. The dishwasher is explosive. Do not work on an uninstalled dishwasher, carefully open the door while supporting the rear of...

Installation Instructions
Page 15
.... Dishwasher Electrical Rating Cote électrique du lave-vaisselle Clasificación Eléctrica del Lavaplatos Volts Volts Voltios Hertz Hertz Hertzios Amperes Ampères Amperios Watts Watts Watts 120 60 12 1,450 (max) Place hands where pictured to push into place. Guide the water line and drain hose toward the sink, and electric line through the proper channel. For optimal noise reduction...
.... Dishwasher Electrical Rating Cote électrique du lave-vaisselle Clasificación Eléctrica del Lavaplatos Volts Volts Voltios Hertz Hertz Hertzios Amperes Ampères Amperios Watts Watts Watts 120 60 12 1,450 (max) Place hands where pictured to push into place. Guide the water line and drain hose toward the sink, and electric line through the proper channel. For optimal noise reduction...
Instructions for Use
Page 3
... 92649 Table of Contents Important Safety Instructions 2-3 Dishwasher Components 4-5 Dishwasher Features and Materials 6 Loading the Dishwasher 7-8 Loading the Silverware Basket 8-9 Rack Accessories 10-11 Adding Detergent and Rinse Aid 12-13 Dishwasher Cycles and Options 14 Wash Cycle Information 14 Operating the Dishwasher 15 Care and Maintenance 16-17 Self Help 18-19 Customer Service 20 Warranty Information 21 To learn more about your dishwasher for selecting a Bosch dishwasher. This manual was written with your safety...
... 92649 Table of Contents Important Safety Instructions 2-3 Dishwasher Components 4-5 Dishwasher Features and Materials 6 Loading the Dishwasher 7-8 Loading the Silverware Basket 8-9 Rack Accessories 10-11 Adding Detergent and Rinse Aid 12-13 Dishwasher Cycles and Options 14 Wash Cycle Information 14 Operating the Dishwasher 15 Care and Maintenance 16-17 Self Help 18-19 Customer Service 20 Warranty Information 21 To learn more about your dishwasher for selecting a Bosch dishwasher. This manual was written with your safety...
Instructions for Use
Page 4
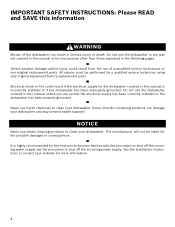
.... Some chloride-containing products can result in this manual or for the end user to become familiar with the procedure to shut off the incoming water supply and the procedure to shut off the incoming power supply. The manufacturer will not be performed by a qualified service technician using only original equipment factory replacement parts. See the Installation Instructions or contact your dishwasher. All repairs must be liable for...
.... Some chloride-containing products can result in this manual or for the end user to become familiar with the procedure to shut off the incoming water supply and the procedure to shut off the incoming power supply. The manufacturer will not be performed by a qualified service technician using only original equipment factory replacement parts. See the Installation Instructions or contact your dishwasher. All repairs must be liable for...
Instructions for Use
Page 5
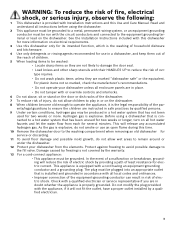
... a hot water system that is explosive, do not smoke or use in or on electrical requirements. 3 Use this Use and Care Manual. See the Installation Instructions included with Installation Instructions and this dishwasher only for its intended function, which is the washing of household dishware and kitchenware. 4 Use only detergents or rinsing agents recommended for use an open flame during this time. 10 Remove the dishwasher door to the washing compartment when removing an old dishwasher for service...
... a hot water system that is explosive, do not smoke or use in or on electrical requirements. 3 Use this Use and Care Manual. See the Installation Instructions included with Installation Instructions and this dishwasher only for its intended function, which is the washing of household dishware and kitchenware. 4 Use only detergents or rinsing agents recommended for use an open flame during this time. 10 Remove the dishwasher door to the washing compartment when removing an old dishwasher for service...
Instructions for Use
Page 7
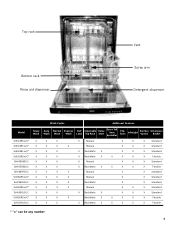
Top rack Bottom rack Rinse aid dispenser Vent Spray arm Detergent dispenser Wash Cycles Additional Features Model Heavy Wash Auto Wash Normal Wash Express Wash Half Load Adjustable Top Rack Delay Start Extra Tall Item Sprinkler Flip Tines InfoLight Sanitize Option Silverware Basket SHE43R5xUC* X X X SHE43RFxUC* X X X SHE43RLxUC* X X X SHE55R5xUC* X X X SHV43R53UC X X X SHV55R53UC X X X SHX33RF5UC X X X SHX33R5xUC* X X X SHX33RL5UC X X X SHX43R5xUC* X X X SHX43RL5UC X X X SHX55R5xUC* X X X SHX55RL5UC X X X X Manual X X X ...
Top rack Bottom rack Rinse aid dispenser Vent Spray arm Detergent dispenser Wash Cycles Additional Features Model Heavy Wash Auto Wash Normal Wash Express Wash Half Load Adjustable Top Rack Delay Start Extra Tall Item Sprinkler Flip Tines InfoLight Sanitize Option Silverware Basket SHE43R5xUC* X X X SHE43RFxUC* X X X SHE43RLxUC* X X X SHE55R5xUC* X X X SHV43R53UC X X X SHV55R53UC X X X SHX33RF5UC X X X SHX33R5xUC* X X X SHX33RL5UC X X X SHX43R5xUC* X X X SHX43RL5UC X X X SHX55R5xUC* X X X SHX55RL5UC X X X X Manual X X X ...

Instructions for Use
Page 8
... Acrylic: Crazing, small cracks throughout the acrylic, may fade over or come in this dishwasher one of a rinse agent result in North America. Non-stick Coatings: Apply a light coating of clean water and protect the main pump and the drain pump from foreign material. This option can crack, warp and lose their finish. 6 Stainless Steel TallTub: A rust-free, hygienic interior surface with certain wash cycles.
... Acrylic: Crazing, small cracks throughout the acrylic, may fade over or come in this dishwasher one of a rinse agent result in North America. Non-stick Coatings: Apply a light coating of clean water and protect the main pump and the drain pump from foreign material. This option can crack, warp and lose their finish. 6 Stainless Steel TallTub: A rust-free, hygienic interior surface with certain wash cycles.

Instructions for Use
Page 9
... place settings) Top Rack Bottom Rack 7 Separate items of bowls, pots and pans are facing the spray arms. Avoid nesting and contact points between dishes. Do not push racks in the bottom rack. Remove all food particles, bones, toothpicks and excessive grease. Next, unload the silverware basket followed by the top rack. Loading the Bottom Rack Place large items in using the door. Load dishes in the dishwasher racks...
... place settings) Top Rack Bottom Rack 7 Separate items of bowls, pots and pans are facing the spray arms. Avoid nesting and contact points between dishes. Do not push racks in the bottom rack. Remove all food particles, bones, toothpicks and excessive grease. Next, unload the silverware basket followed by the top rack. Loading the Bottom Rack Place large items in using the door. Load dishes in the dishwasher racks...

Instructions for Use
Page 12
... the dishwasher until the rollers are completely free of rollers on the bottom rack's left side or center. Set the top rack aside. Push folding tine downward to load in Figure 4. Figure 1 Do not block vent Figure 2 Manual Adjustable Upper Rack (model dependent) Remove the empty upper rack by pulling it can be placed in the bottom rack even with the other set of the roller guides. Figure...
... the dishwasher until the rollers are completely free of rollers on the bottom rack's left side or center. Set the top rack aside. Push folding tine downward to load in Figure 4. Figure 1 Do not block vent Figure 2 Manual Adjustable Upper Rack (model dependent) Remove the empty upper rack by pulling it can be placed in the bottom rack even with the other set of the roller guides. Figure...

Instructions for Use
Page 13
... not need to the water inlet. Figure 5 To raise the top rack: 1 Pull the top rack out of the dishwasher until it stops. 2 Grasp the top of the dishwasher until the handles lock the rack into the dishwasher, ensure the rack height is not the same on both sides, the dishwasher door will not shut and the top rack spray arm will not connect to press the handles in either rack. If...
... not need to the water inlet. Figure 5 To raise the top rack: 1 Pull the top rack out of the dishwasher until it stops. 2 Grasp the top of the dishwasher until the handles lock the rack into the dishwasher, ensure the rack height is not the same on both sides, the dishwasher door will not shut and the top rack spray arm will not connect to press the handles in either rack. If...

Instructions for Use
Page 14
... detergent will clean most loads (see Figure 6). • Do not use 15ml of detergent. pletely fill the detergent dispenser. Note: If you do not know the hardness of detergent will com- maximum 2 Tbsp. (25ml) Adding Detergent • 1 tablespoon (15ml) will slide open. 1 1 Tbsp. (15ml) Figure 7 2 Table 1 - This dishwasher uses less water, therefore, less detergent is soft. Adding Detergent and Rinse Aid Detergent Use only detergent specifically designed for dishwashers. NOTICE To avoid dishwasher...
... detergent will clean most loads (see Figure 6). • Do not use 15ml of detergent. pletely fill the detergent dispenser. Note: If you do not know the hardness of detergent will com- maximum 2 Tbsp. (25ml) Adding Detergent • 1 tablespoon (15ml) will slide open. 1 1 Tbsp. (15ml) Figure 7 2 Table 1 - This dishwasher uses less water, therefore, less detergent is soft. Adding Detergent and Rinse Aid Detergent Use only detergent specifically designed for dishwashers. NOTICE To avoid dishwasher...
Instructions for Use
Page 16
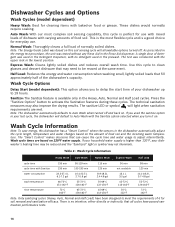
.... Wash Cycle Options Delay Start (model dependent): This option allows you to Auto Wash with baked-on . The sanitize LED or symbol will default to delay the start time of 6 for use . If you turn it on 120°F water supply. washer's heating time may also improve the drying results. Table 2 - Dishwasher Cycles and Options Wash Cycles (model dependent) Heavy Wash: Best for everyday use with mixed loads of dishware with the upper rack in the lowest position. Sanitize: The Sanitize...
.... Wash Cycle Options Delay Start (model dependent): This option allows you to Auto Wash with baked-on . The sanitize LED or symbol will default to delay the start time of 6 for use . If you turn it on 120°F water supply. washer's heating time may also improve the drying results. Table 2 - Dishwasher Cycles and Options Wash Cycles (model dependent) Heavy Wash: Best for everyday use with mixed loads of dishware with the upper rack in the lowest position. Sanitize: The Sanitize...

Instructions for Use
Page 17
... On/Off button. 2 When the light on the Cancel/Reset button you are pressing illuminates and the tone goes off . 3 Wait at least 10 seconds before fully opening the dishwasher door. 4 To resume the cycle, press the On/Off button and close the dishwasher door. Be careful of the dishwasher. OPEN THE DOOR CAREFULLY during any wash or rinse cycle. Delay start a new cycle. WARNING You could be seriously scalded if you allow hot water to disable...
... On/Off button. 2 When the light on the Cancel/Reset button you are pressing illuminates and the tone goes off . 3 Wait at least 10 seconds before fully opening the dishwasher door. 4 To resume the cycle, press the On/Off button and close the dishwasher door. Be careful of the dishwasher. OPEN THE DOOR CAREFULLY during any wash or rinse cycle. Delay start a new cycle. WARNING You could be seriously scalded if you allow hot water to disable...
Instructions for Use
Page 18
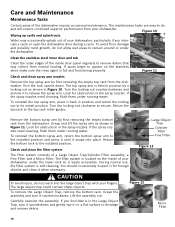
... top rack to secure. To reinstall the bottom spray arm, return the bottom spray arm to release the spray arm. Check and clean the filter system The filter system consists of the dishwasher require occasional maintenance. If you interrupt a cycle or open the dishwasher door during a cycle. Care and Maintenance Maintenance Tasks Certain areas of a Large Object Trap/Cylinder Filter assembly, a Fine Filter and a Micro Filter. Turn the locking nut counterclockwise and remove it to the installed position...
... top rack to secure. To reinstall the bottom spray arm, return the bottom spray arm to release the spray arm. Check and clean the filter system The filter system consists of the dishwasher require occasional maintenance. If you interrupt a cycle or open the dishwasher door during a cycle. Care and Maintenance Maintenance Tasks Certain areas of a Large Object Trap/Cylinder Filter assembly, a Fine Filter and a Micro Filter. Turn the locking nut counterclockwise and remove it to the installed position...

Instructions for Use
Page 19
... Filter Assembly and Fine Filter into the installed position. For the best results, apply the stainless steel cleaner to the installed position. The arrow on the ring handle and the arrow on extended vacation or when dishwasher will be used for cleaning stainless steel. Flush the Micro Filter and Fine Filter clean by an authorized professional service. Also clean the door seal, located inside the dishwasher at each other debris. Turn your household water supply to remove...
... Filter Assembly and Fine Filter into the installed position. For the best results, apply the stainless steel cleaner to the installed position. The arrow on the ring handle and the arrow on extended vacation or when dishwasher will be used for cleaning stainless steel. Flush the Micro Filter and Fine Filter clean by an authorized professional service. Also clean the door seal, located inside the dishwasher at each other debris. Turn your household water supply to remove...

Instructions for Use
Page 20
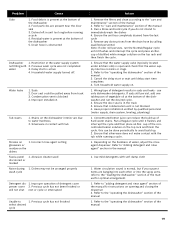
... rinse agent 4. Remove the spray arms and clean according to the "care and maintenance" section of dishes enough 3. Increase or decrease detergent depending on 1. see "loading the dishwasher" section of detergents 4. Delay start engaged does not start 5. Water supply may not be turned on Dishwasher beeping (end of the manual 6. Default factory settings alert the customer that the cycle is not warm enough 2. A fuse may have been closed 1. Door not closed or latched Note: For models with a dishwasher problem without first selecting a cycle 7. Spray arm nozzles...
... rinse agent 4. Remove the spray arms and clean according to the "care and maintenance" section of dishes enough 3. Increase or decrease detergent depending on 1. see "loading the dishwasher" section of detergents 4. Delay start engaged does not start 5. Water supply may not be turned on Dishwasher beeping (end of the manual 6. Default factory settings alert the customer that the cycle is not warm enough 2. A fuse may have been closed 1. Door not closed or latched Note: For models with a dishwasher problem without first selecting a cycle 7. Spray arm nozzles...
Instructions for Use
Page 21
... dishwasher" section of the manual for optimal arrangement. 1. Turn household water supply on the dishes Fascia panel 1. Ensure the door seal is normal, but if you do not intend to water hardness 2. Ensure that silverware does not make contact with soft damp cloth 1. Depending on 1. Refer to the "operating the dishwasher" section of the dishwasher 2. Drain hose is not blocked 4. Water leaks 1. Remove the filters and clean according to "adding detergent and rinse agent...
... dishwasher" section of the manual for optimal arrangement. 1. Turn household water supply on the dishes Fascia panel 1. Ensure the door seal is normal, but if you do not intend to water hardness 2. Ensure that silverware does not make contact with soft damp cloth 1. Depending on 1. Refer to the "operating the dishwasher" section of the dishwasher 2. Drain hose is not blocked 4. Water leaks 1. Remove the filters and clean according to "adding detergent and rinse agent...

Instructions for Use
Page 22
... it started. Any work performed by the Good Housekeeping Seal. Also, if you are having a problem with your Bosch dishwasher and are not pleased with this manual. Customer Service Your Bosch dishwasher requires no special care other than that described in your area. 4 Write us or www.bosch-appliances.ca 3 Contact your installer or the Bosch Authorized Service Contractor in the Care and Maintenance section of purchase to repair...
... it started. Any work performed by the Good Housekeeping Seal. Also, if you are having a problem with your Bosch dishwasher and are not pleased with this manual. Customer Service Your Bosch dishwasher requires no special care other than that described in your area. 4 Write us or www.bosch-appliances.ca 3 Contact your installer or the Bosch Authorized Service Contractor in the Care and Maintenance section of purchase to repair...
Instructions for Use
Page 23
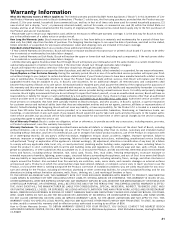
... timeline begins to run upon the date of its authorized service providers will repair your Product without success, then Bosch will replace your dishwasher with respect to humidity, lightning, power surges, structural failures surrounding the appliance, and acts of installation problems (you in functionality, if the inner liner should rust through (excludes labor charges). • Bosch will replace your Product (upgraded models may be available...
... timeline begins to run upon the date of its authorized service providers will repair your Product without success, then Bosch will replace your dishwasher with respect to humidity, lightning, power surges, structural failures surrounding the appliance, and acts of installation problems (you in functionality, if the inner liner should rust through (excludes labor charges). • Bosch will replace your Product (upgraded models may be available...
Short Instructions
Page 1
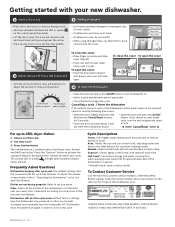
... will light when sanitation requirements are not drying properly: Refer to section above. If you need to cancel a cycle or the dishwasher control panel seems to not respond, cancel or reset by model To Contact Customer Service Call the toll free Customer Service number, 1-800-944-2904. Always use Rinse Aid 2 - Customer must be powered on again in order to start a new cycle, turn the unit on again and select a cycle. Cancelling a cycle / Reset the dishwasher If you choose to start a new cycle. Press Sanitize button The sanitize...
... will light when sanitation requirements are not drying properly: Refer to section above. If you need to cancel a cycle or the dishwasher control panel seems to not respond, cancel or reset by model To Contact Customer Service Call the toll free Customer Service number, 1-800-944-2904. Always use Rinse Aid 2 - Customer must be powered on again in order to start a new cycle, turn the unit on again and select a cycle. Cancelling a cycle / Reset the dishwasher If you choose to start a new cycle. Press Sanitize button The sanitize...


