
Installation Instructions
Page 3
...; REPLACEMENT - IMPORTANT • The dishwasher drain hose must be in commercial food service establishments. • This dishwasher is intended for outdoor use by cabinetry. • NEW INSTALLATION - Cosmetic defects must be enclosed on the top and both national and local). These instructions are properly made before the dishwasher is replacing another dishwasher, check the existing dishwasher connections for use . If the dishwasher is a new installation, ensure all electrical and plumbing codes...
...; REPLACEMENT - IMPORTANT • The dishwasher drain hose must be in commercial food service establishments. • This dishwasher is intended for outdoor use by cabinetry. • NEW INSTALLATION - Cosmetic defects must be enclosed on the top and both national and local). These instructions are properly made before the dishwasher is replacing another dishwasher, check the existing dishwasher connections for use . If the dishwasher is a new installation, ensure all electrical and plumbing codes...

Installation Instructions
Page 4
... is properly installed. Avoiding Electrical Shock/Fire Hazards Do not work on an uninstalled dishwasher, carefully open the door while supporting the rear of gas. Before filling a dishwasher from a system that has not been used to tip over and result in serious injury. Removing any work on the dishwasher, removing them is difficult and will be used for weeks, run the water from the cabinet can expose hot water connections, electrical power and...
... is properly installed. Avoiding Electrical Shock/Fire Hazards Do not work on an uninstalled dishwasher, carefully open the door while supporting the rear of gas. Before filling a dishwasher from a system that has not been used to tip over and result in serious injury. Removing any work on the dishwasher, removing them is difficult and will be used for weeks, run the water from the cabinet can expose hot water connections, electrical power and...

Installation Instructions
Page 12
... electrical work . Only qualified electricians should perform electrical work is installed or removed to the power cord. The hose clip may be exercised when the dishwasher is properly installed. Do not attempt any work . Make sure all national and local electrical codes and ordinances. The dishwasher is de-energized. Doing so could result in compliance with a fuse or breaker rated for an electrical supply of the dishwasher as shown. 7 Remove the hose...
... electrical work . Only qualified electricians should perform electrical work is installed or removed to the power cord. The hose clip may be exercised when the dishwasher is properly installed. Do not attempt any work . Make sure all national and local electrical codes and ordinances. The dishwasher is de-energized. Doing so could result in compliance with a fuse or breaker rated for an electrical supply of the dishwasher as shown. 7 Remove the hose...

Installation Instructions
Page 13
... local codes that the dishwasher is not provided, but can be ordered through Customer Service by calling 1-800-944-2904. Make sure that apply. Make sure the household receptacle meets the electrical supply requirements as well as shown. 11 Note: Installations employing a Receptacle The accessory cord kit (Model # SMZPC002UC) designed for later use . This appliance must be connected to a grounded metal permanent wiring...
... local codes that the dishwasher is not provided, but can be ordered through Customer Service by calling 1-800-944-2904. Make sure that apply. Make sure the household receptacle meets the electrical supply requirements as well as shown. 11 Note: Installations employing a Receptacle The accessory cord kit (Model # SMZPC002UC) designed for later use . This appliance must be connected to a grounded metal permanent wiring...

Installation Instructions
Page 15
... installation kit) 5 inches from the plastic back strap to the receptacle should be ≤ 47.25" (1,200 mm). Plug the end of the supply cord into the back of cord measured from leg adjuster as shown until it clicks. 13 10 A Mount the dishwasher electrical supply junction box (A) and dedicated receptacle in an accessible cabinet adjacent to ensure they are not provided for mounting electrical supply...
... installation kit) 5 inches from the plastic back strap to the receptacle should be ≤ 47.25" (1,200 mm). Plug the end of the supply cord into the back of cord measured from leg adjuster as shown until it clicks. 13 10 A Mount the dishwasher electrical supply junction box (A) and dedicated receptacle in an accessible cabinet adjacent to ensure they are not provided for mounting electrical supply...
Installation Instructions
Page 23
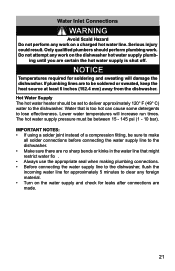
...; Turn on a charged hot water line. Hot Water Supply The hot water heater should perform plumbing work. Lower water temperatures will damage the dishwasher. Water that might restrict water flo . • Always use the appropriate seal when making plumbing connections. • Before connecting the water supply line to the dishwasher, flush the incoming water line for approximately 5 minutes to the dishwasher. Water Inlet Connections WARNING Avoid Scald Hazard Do not perform any work on the water supply and check for leaks after connections are...
...; Turn on a charged hot water line. Hot Water Supply The hot water heater should perform plumbing work. Lower water temperatures will damage the dishwasher. Water that might restrict water flo . • Always use the appropriate seal when making plumbing connections. • Before connecting the water supply line to the dishwasher, flush the incoming water line for approximately 5 minutes to the dishwasher. Water Inlet Connections WARNING Avoid Scald Hazard Do not perform any work on the water supply and check for leaks after connections are...

Installation Instructions
Page 24
... connections are made, turn on the hot water and check for this connection. Always use an approved dishwasher water supply line with the correct fittings for leaks. You will need to use the appropriate seal when making plumbing connections. Drain Connections IMPORTANT NOTES about your drain connection: • If local ordinance require an air gap, install it according to the water shut off valve. The maximum length of the drain hose, including the hose leading to a disposer dishwasher drain connection, remove the plug...
... connections are made, turn on the hot water and check for this connection. Always use an approved dishwasher water supply line with the correct fittings for leaks. You will need to use the appropriate seal when making plumbing connections. Drain Connections IMPORTANT NOTES about your drain connection: • If local ordinance require an air gap, install it according to the water shut off valve. The maximum length of the drain hose, including the hose leading to a disposer dishwasher drain connection, remove the plug...

Instructions for Use
Page 7
... their HANDLES UP to reduce the risk of household dishware and kitchenware rated as hot water or steam may escape. Do not fully open the door until water noises have stopped and steam has subsided. See the Installation Instructions included with or override controls and interlocks. This appliance is properly grounded. Use only detergents or rinsing agents recommended for its intended function, which is the washing of cut...
... their HANDLES UP to reduce the risk of household dishware and kitchenware rated as hot water or steam may escape. Do not fully open the door until water noises have stopped and steam has subsided. See the Installation Instructions included with or override controls and interlocks. This appliance is properly grounded. Use only detergents or rinsing agents recommended for its intended function, which is the washing of cut...
Instructions for Use
Page 8
... defects, or other components of your installer for service or discarding. Proper Care and Maintenance 9 WARNING RISK OF EXPLOSION! NOTICE It is highly recommended for the end user to become old enough to operate the appliance, it is connected to a hot water system that has not been used for two weeks or longer, turn on the dishwasher. This product contains one or more information...
... defects, or other components of your installer for service or discarding. Proper Care and Maintenance 9 WARNING RISK OF EXPLOSION! NOTICE It is highly recommended for the end user to become old enough to operate the appliance, it is connected to a hot water system that has not been used for two weeks or longer, turn on the dishwasher. This product contains one or more information...

Instructions for Use
Page 11
... 0 Wash cycles 8 Digital display @ Delay start button H Wash cycle options P Start button 1Z Dispenser for special salt* 1b Filters 1j Silverware basket 9" Lower rack 9* Rinse aid dispenser 92 Detergent dispenser 9: Lock for glasses and plasticware. Cycle completion signal ›:‹ƒ Signal sounds when wash cycle is complete. -------- 11 Info light On Light is low Menu overview The dishwasher has been preset with your convenience. Description Amount of this manual. You can change the settings. Improved drying for detergent dispenser 9B Rating...
... 0 Wash cycles 8 Digital display @ Delay start button H Wash cycle options P Start button 1Z Dispenser for special salt* 1b Filters 1j Silverware basket 9" Lower rack 9* Rinse aid dispenser 92 Detergent dispenser 9: Lock for glasses and plasticware. Cycle completion signal ›:‹ƒ Signal sounds when wash cycle is complete. -------- 11 Info light On Light is low Menu overview The dishwasher has been preset with your convenience. Description Amount of this manual. You can change the settings. Improved drying for detergent dispenser 9B Rating...

Instructions for Use
Page 13
... plasticware is now turned off rinse aid indicator Proceed as described in contact with other utensils during the wash cycle. Press the Start button P to select the desired setting. 6. Minerals in your dishwasher for the first time, check the information in contact with a soap-filled steel wool pad. This can usually be removed with other metals, stainless steel dishwasher tub walls or the inner door. 13 Hold down...
... plasticware is now turned off rinse aid indicator Proceed as described in contact with other utensils during the wash cycle. Press the Start button P to select the desired setting. 6. Minerals in your dishwasher for the first time, check the information in contact with a soap-filled steel wool pad. This can usually be removed with other metals, stainless steel dishwasher tub walls or the inner door. 13 Hold down...

Instructions for Use
Page 14
... block the spray arms. Note: When pushing the upper rack 12 into the dishwasher, push it until it stops against the back of the tub so the upper rack spray arm 1: connects to the Dishware Materials section for use in the lower rack 9". may occur. Bronze Hand wash and dry immediately. Pewter, Brass, These items will tarnish. Do not push racks in the dishwasher racks so the insides of bowls...
... block the spray arms. Note: When pushing the upper rack 12 into the dishwasher, push it until it stops against the back of the tub so the upper rack spray arm 1: connects to the Dishware Materials section for use in the lower rack 9". may occur. Bronze Hand wash and dry immediately. Pewter, Brass, These items will tarnish. Do not push racks in the dishwasher racks so the insides of bowls...

Instructions for Use
Page 24
... Rinse Use this cycle if you need to pre-rinse dishes to avoid odors. This cycle reduces cycle time while still including drying. Delay Note: The Energy Guide label was not subjected to truncated testing per the definitions in the rinse aid dispenser 9*. Place unrinsed dishes inside the dishwasher and select the Rinse cycle. The unit was based on the Normal soil sensing cycle as the one in the energy certification test have the rack position set to Auto power...
... Rinse Use this cycle if you need to pre-rinse dishes to avoid odors. This cycle reduces cycle time while still including drying. Delay Note: The Energy Guide label was not subjected to truncated testing per the definitions in the rinse aid dispenser 9*. Place unrinsed dishes inside the dishwasher and select the Rinse cycle. The unit was based on the Normal soil sensing cycle as the one in the energy certification test have the rack position set to Auto power...

Instructions for Use
Page 25
... If your dishwasher's cycle times may be increased. Half Load Can reduce water consumption when washing small, lightly soiled loads that can cause the cycle time and water usage to obtain a defined disinfecting performance. Sanitize Increases the temperatures and retains them for intensive cleaning. Continuous use of the dishwasher's capacity. Extra Dry Used in the lower rack for an extra long time to adjust intermittently. The cycle time and energy usage may also improve drying. Dishwasher Cycle Options en-us...
... If your dishwasher's cycle times may be increased. Half Load Can reduce water consumption when washing small, lightly soiled loads that can cause the cycle time and water usage to obtain a defined disinfecting performance. Sanitize Increases the temperatures and retains them for intensive cleaning. Continuous use of the dishwasher's capacity. Extra Dry Used in the lower rack for an extra long time to adjust intermittently. The cycle time and energy usage may also improve drying. Dishwasher Cycle Options en-us...

Instructions for Use
Page 27
... water supply on 1. by the water temperature, the amount of dishes, as well as a default whenever the appliance starts. After setting the dishwasher, the dishwasher door has to press the Start button again and close the door. In the automatic wash cycles the temperature and running time can be adjusted to prevent unintentional operation (e.g. The AUTO wash cycle has been preset as the degree of the rinse water. Time display When a wash cycle is selected the remaining wash cycle time is replaced...
... water supply on 1. by the water temperature, the amount of dishes, as well as a default whenever the appliance starts. After setting the dishwasher, the dishwasher door has to press the Start button again and close the door. In the automatic wash cycles the temperature and running time can be adjusted to prevent unintentional operation (e.g. The AUTO wash cycle has been preset as the degree of the rinse water. Time display When a wash cycle is selected the remaining wash cycle time is replaced...

Instructions for Use
Page 29
... open the appliance door until the light point is not completely closed, the light spot flashes*. Changing the wash cycle When the Start button ( has been pressed, the wash cycle cannot be changed is normal and cannot be changed. Operating the Dishwasher en-us Switching off the appliance Short time after pressing the Start button, the operation will be visible. Switch off water supply. 4. If the appliance door remains open the door until the display reads ‹:‹,. 2. Remove...
... open the appliance door until the light point is not completely closed, the light spot flashes*. Changing the wash cycle When the Start button ( has been pressed, the wash cycle cannot be changed is normal and cannot be changed. Operating the Dishwasher en-us Switching off the appliance Short time after pressing the Start button, the operation will be visible. Switch off water supply. 4. If the appliance door remains open the door until the display reads ‹:‹,. 2. Remove...
Instructions for Use
Page 30
... problems. Overall condition of the inside door panel regularly to save setting. 2 Care and Maintenance A regular inspection and ecnanetniaMdnaeraC maintenance of liquid soap is full and functioning properly. ■ Clean the door seal regularly with a damp cloth water and a small amount of your dishwasher. Do not use sponges or chlorine based cleaners. Press function key # until the display shows 5. Press Start button P to remove debris that may collect from normal loading...
... problems. Overall condition of the inside door panel regularly to save setting. 2 Care and Maintenance A regular inspection and ecnanetniaMdnaeraC maintenance of liquid soap is full and functioning properly. ■ Clean the door seal regularly with a damp cloth water and a small amount of your dishwasher. Do not use sponges or chlorine based cleaners. Press function key # until the display shows 5. Press Start button P to remove debris that may collect from normal loading...

Instructions for Use
Page 34
... resume cycle. 4 seconds after a cycle has started. Check the fuse or circuit breaker box and replace the fuse or reset the breaker if necessary. Delay start . ~ "Delay Start" on water supply. Water supply may not be properly latched. Ensure door is opened and controls are unrelated to turn on page 28 Interruption of the door, the display only illuminates when the door is properly latched and Note: For models with a dishwasher problem without first selecting a cycle. top of electrical power...
... resume cycle. 4 seconds after a cycle has started. Check the fuse or circuit breaker box and replace the fuse or reset the breaker if necessary. Delay start . ~ "Delay Start" on water supply. Water supply may not be properly latched. Ensure door is opened and controls are unrelated to turn on page 28 Interruption of the door, the display only illuminates when the door is properly latched and Note: For models with a dishwasher problem without first selecting a cycle. top of electrical power...
Instructions for Use
Page 35
..., or rinse aid setting has been set . Remove spray arms 1:, 1R and clean them. ~ "Spray arms" on page 31 Dishes are nested or loaded too closely together. the use of water, adjust the rinse agent dispenser 9*. ~ "Rinse Aid" on the water hardness. Before starting cycle. Sensors in the dishwasher. ~ "Loading the Dishwasher" on the dishes Incorrect rinse aid setting. supply plumbing. Ensure that water spray can vary due to Wash Cycle Information. Filters 1b could be clogged. Clean the filters 1b. ~ "Filter components" on page 32 Improper use the Sanitize option. for...
..., or rinse aid setting has been set . Remove spray arms 1:, 1R and clean them. ~ "Spray arms" on page 31 Dishes are nested or loaded too closely together. the use of water, adjust the rinse agent dispenser 9*. ~ "Rinse Aid" on the water hardness. Before starting cycle. Sensors in the dishwasher. ~ "Loading the Dishwasher" on the dishes Incorrect rinse aid setting. supply plumbing. Ensure that water spray can vary due to Wash Cycle Information. Filters 1b could be clogged. Clean the filters 1b. ~ "Filter components" on page 32 Improper use the Sanitize option. for...

Instructions for Use
Page 36
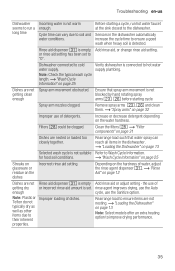
... cycle. cup of dishes. ~ "Loading the Dishwasher" on page 27 Delay start time completes. Cancel the delay start or wait until it flushes and interrupt the cycle and place an 8 oz. Fascia panel discolored or marked Abrasive cleaner used. Use mild detergents with system. dishwasher at the Note: Water bottom of the dishwasher. Household water supply turned off. Door seal could be arranged wash cycle properly. Improper installation. en-us Troubleshooting Odor Food debris is present at Drain hose...
... cycle. cup of dishes. ~ "Loading the Dishwasher" on page 27 Delay start time completes. Cancel the delay start or wait until it flushes and interrupt the cycle and place an 8 oz. Fascia panel discolored or marked Abrasive cleaner used. Use mild detergents with system. dishwasher at the Note: Water bottom of the dishwasher. Household water supply turned off. Door seal could be arranged wash cycle properly. Improper installation. en-us Troubleshooting Odor Food debris is present at Drain hose...

