

Installation Instructions
Page 2
...508mm) off the cabinet floor; Read these instructions, the dishwasher shall be installed by qualified installers only. otherwise the dishwasher may not drain properly. • This dishwasher is the responsibility of installation. It is intended for outdoor use only, and should not be in ...used in compliance with the original package until after the entire installation has been completed. The dishwasher must be reported within 30 days of the owner and the installer to these installation instructions completely and follow them carefully. They will save you ...
...508mm) off the cabinet floor; Read these instructions, the dishwasher shall be installed by qualified installers only. otherwise the dishwasher may not drain properly. • This dishwasher is the responsibility of installation. It is intended for outdoor use only, and should not be in ...used in compliance with the original package until after the entire installation has been completed. The dishwasher must be reported within 30 days of the owner and the installer to these installation instructions completely and follow them carefully. They will save you ...

Installation Instructions
Page 3
...Scalding Hazards Do not perform any work on an energized circuit. If using copper tubing or other material for proper installation. 3 When opening . Before installing the "L"-shaped supplied countertop mounting brackets (select models), decide which method will damage the mounting brackets and the ...dishwasher. If plumbing lines are certain the hot water supply is properly installed. Removing any work . Ensure all national and local electrical codes and ordinances. Doing so may damage the water inlet valve and...
...Scalding Hazards Do not perform any work on an energized circuit. If using copper tubing or other material for proper installation. 3 When opening . Before installing the "L"-shaped supplied countertop mounting brackets (select models), decide which method will damage the mounting brackets and the ...dishwasher. If plumbing lines are certain the hot water supply is properly installed. Removing any work . Ensure all national and local electrical codes and ordinances. Doing so may damage the water inlet valve and...
Installation Instructions
Page 5
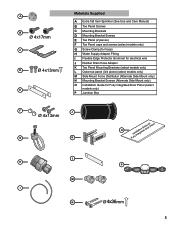
... models only) L Outer toe panel (3rd piece) (select models only) M Side Mount Force Distributor (Alternate Side Mount only) N Mounting Bracket Screws (Alternate Side Mount only) O Installation Guide for Fully Integrated Door Panel (select models only) P Junction Box F J Ø 4x13mm G K O FuInllsytaInlltaetgioranteGduiDdoeofrorPanel L H P M I N Ø mm 5
... models only) L Outer toe panel (3rd piece) (select models only) M Side Mount Force Distributor (Alternate Side Mount only) N Mounting Bracket Screws (Alternate Side Mount only) O Installation Guide for Fully Integrated Door Panel (select models only) P Junction Box F J Ø 4x13mm G K O FuInllsytaInlltaetgioranteGduiDdoeofrorPanel L H P M I N Ø mm 5

Installation Instructions
Page 6
... all three to pass through to water supply and drain lines. NOTE: This dishwasher is adequate clearance to open the door. In order to be installed in Figure 3 below. To pass the included electrical supply junction box through . 4″ x 2″ (100 x 50mm) - Figure 4 If ... x 23/8″ (120 x 60mm) - See Figure 2 below . Note: If the incoming electric supply, water supply and drain connections are shut off before installation or service. Figure 3 Select a location as close to the sink as shown in the same cabinet, the one 43/4″ x 23/8″ (120 x ...
... all three to pass through to water supply and drain lines. NOTE: This dishwasher is adequate clearance to open the door. In order to be installed in Figure 3 below. To pass the included electrical supply junction box through . 4″ x 2″ (100 x 50mm) - Figure 4 If ... x 23/8″ (120 x 60mm) - See Figure 2 below . Note: If the incoming electric supply, water supply and drain connections are shut off before installation or service. Figure 3 Select a location as close to the sink as shown in the same cabinet, the one 43/4″ x 23/8″ (120 x ...

Installation Instructions
Page 7
...43/4″ x 23/8″ (120 x 60mm) opening through the cabinet in order to securely mount the junction box so that the dishwasher electrical installation is de-energized. Use the four screws included (or appropriate fastener) in the parts bag to pass the junction box through wood, sand it ...mount the junction box or receptacle behind the dishwasher). Do not attempt any provincial/state or municipal or local codes that the dishwasher is properly installed. The electrical supply can be a minimum #14 AWG copper wire rated at 75°C (167°F) or higher. Make sure all ...
...43/4″ x 23/8″ (120 x 60mm) opening through the cabinet in order to securely mount the junction box so that the dishwasher electrical installation is de-energized. Use the four screws included (or appropriate fastener) in the parts bag to pass the junction box through wood, sand it ...mount the junction box or receptacle behind the dishwasher). Do not attempt any provincial/state or municipal or local codes that the dishwasher is properly installed. The electrical supply can be a minimum #14 AWG copper wire rated at 75°C (167°F) or higher. Make sure all ...

Installation Instructions
Page 8
...instead of a compression fitting, be soldered or sweated, keep the heat source at least 6 inches (152.4 mm) away from the house installation. Water Supply Shut Off Valve Install an easily accessible shut-off . Remove 3/8″ to clear any work . Water that might restrict water flow. · Always use ...before the water line is shut off valve (not supplied) in the hot water supply line, as shown in the water line that is installed or removed to the dishwasher. · Make sure there are made. Lower water temperatures will damage the dishwasher. WARNING Avoid Scald Hazard Do...
...instead of a compression fitting, be soldered or sweated, keep the heat source at least 6 inches (152.4 mm) away from the house installation. Water Supply Shut Off Valve Install an easily accessible shut-off . Remove 3/8″ to clear any work . Water that might restrict water flow. · Always use ...before the water line is shut off valve (not supplied) in the hot water supply line, as shown in the water line that is installed or removed to the dishwasher. · Make sure there are made. Lower water temperatures will damage the dishwasher. WARNING Avoid Scald Hazard Do...

Installation Instructions
Page 9
Figure 9 Water Shut Off Valve Dishwasher Water Inlet Hose H IMPORTANT NOTES: · If local ordinance require an air gap, install it according to the manufacturer's instructions. · If the dishwasher drain hose is heavy and will need to be connected to a disposer dishwasher drain connection, ...
Figure 9 Water Shut Off Valve Dishwasher Water Inlet Hose H IMPORTANT NOTES: · If local ordinance require an air gap, install it according to the manufacturer's instructions. · If the dishwasher drain hose is heavy and will need to be connected to a disposer dishwasher drain connection, ...

Installation Instructions
Page 10
... dishwasher into its enclosure will damage the mounting brackets and the dishwasher. Obtain the Rubber Drain Hose Adaptor (J) spring clamp from the Dishwasher Installation Kit (do not substitute). 3. Bend the mounting brackets along the small holes and in the same direction as shown in Figure 19. ...corners. Insert the dishwasher drain hose into the drain hose end. 2. C Top Mount Figure 17 Figure 16 G Side Mount is used . Installation of Rubber Drain Hose Adaptor For a large port, use the drain hose as it is difficult and will be used for countertops made of marble...
... dishwasher into its enclosure will damage the mounting brackets and the dishwasher. Obtain the Rubber Drain Hose Adaptor (J) spring clamp from the Dishwasher Installation Kit (do not substitute). 3. Bend the mounting brackets along the small holes and in the same direction as shown in Figure 19. ...corners. Insert the dishwasher drain hose into the drain hose end. 2. C Top Mount Figure 17 Figure 16 G Side Mount is used . Installation of Rubber Drain Hose Adaptor For a large port, use the drain hose as it is difficult and will be used for countertops made of marble...

Installation Instructions
Page 11
~1/2″ (12mm) WARNING Avoid Tip Over Hazard Do not use floor protection and caution when sliding the dishwasher into place before securing it is completely installed. Figure 21 D ~1/2″ (12mm) Figure 25 For Alternate Side Mount 1/16″ (2mm) Figure 22 N 11 To avoid scratching the floor, use the dishwasher until ...
~1/2″ (12mm) WARNING Avoid Tip Over Hazard Do not use floor protection and caution when sliding the dishwasher into place before securing it is completely installed. Figure 21 D ~1/2″ (12mm) Figure 25 For Alternate Side Mount 1/16″ (2mm) Figure 22 N 11 To avoid scratching the floor, use the dishwasher until ...

Installation Instructions
Page 13
Any work performed by unauthorized personnel may void the warranty. Contact your installer or the Authorized Service Contractor in your Use and Care Manual for service please refer to the Self Help section in the Use and Care ... • Serial number • Date of original purchase • Date the problem originated • Explanation of your invoice and keep it with your dealer or installer or an authorized service center. Please make a copy of the problem • Daytime phone number where you are having a problem with your dishwasher and are...
Any work performed by unauthorized personnel may void the warranty. Contact your installer or the Authorized Service Contractor in your Use and Care Manual for service please refer to the Self Help section in the Use and Care ... • Serial number • Date of original purchase • Date the problem originated • Explanation of your invoice and keep it with your dealer or installer or an authorized service center. Please make a copy of the problem • Daytime phone number where you are having a problem with your dishwasher and are...
Instructions for Use
Page 4
...procedure to shut off the incoming water supply and the procedure to clean your dishwasher and may present health hazards! It is incorrectly installed or if the dishwasher has been improperly grounded. All repairs must be liable for the dishwasher covered in this manual unless you ...are certain the electrical supply has been correctly installed or the dishwasher has been properly grounded. Some chloride-containing products can result in the following pages. Never use the dishwasher covered ...
...procedure to shut off the incoming water supply and the procedure to clean your dishwasher and may present health hazards! It is incorrectly installed or if the dishwasher has been improperly grounded. All repairs must be liable for the dishwasher covered in this manual unless you ...are certain the electrical supply has been correctly installed or the dishwasher has been properly grounded. Some chloride-containing products can result in the following pages. Never use the dishwasher covered ...
Instructions for Use
Page 5
...lead on the dishwasher. 8 When children become old enough to operate the appliance, it will not fit the outlet, have a proper outlet installed by a qualified electrician. 3 Protect against freezing to avoid possible damage to the fill valve. Damage caused by freezing is not covered by providing.... WARNING: To reduce the risk of fire, electrical shock, or serious injury, observe the following: 1 This dishwasher is provided with Installation Instructions and this time. 10 Remove the dishwasher door to the washing compartment when removing an old dishwasher for service or discarding. 11 ...
...lead on the dishwasher. 8 When children become old enough to operate the appliance, it will not fit the outlet, have a proper outlet installed by a qualified electrician. 3 Protect against freezing to avoid possible damage to the fill valve. Damage caused by freezing is not covered by providing.... WARNING: To reduce the risk of fire, electrical shock, or serious injury, observe the following: 1 This dishwasher is provided with Installation Instructions and this time. 10 Remove the dishwasher door to the washing compartment when removing an old dishwasher for service or discarding. 11 ...
Instructions for Use
Page 15
... the dishwasher 1 Open the door and press the [On/Off] button. Interrupt a cycle 1 Open the door just far enough to "r:06". If the appliance is installed at eye-level, the LED is OFF "r:01" = lowest setting "r:02" = low setting "r:03" = medium setting "r:04" = medium/high setting "r:05" = high setting "r:06" = highest...
... the dishwasher 1 Open the door and press the [On/Off] button. Interrupt a cycle 1 Open the door just far enough to "r:06". If the appliance is installed at eye-level, the LED is OFF "r:01" = lowest setting "r:02" = low setting "r:03" = medium setting "r:04" = medium/high setting "r:05" = high setting "r:06" = highest...
Instructions for Use
Page 19
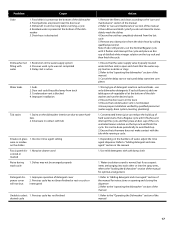
... water 3. Door seal could be pulled away from the drain hose by qualified personnel (water supply, drain system, leveling, plumbing) 1. Improper installation Tub stains 1. Silverware in the track 3. Incorrect rinse agent setting ware or residue on glass- 1. Improper operation of the manual 1. Remove ...then finish the cycle. 1. Delay start time completes 1. cup of the manual 17 this can reduce the build up . 2. Have proper installation verified by calling qualified personnel. Run a Regular cycle until delay start is not blocked 4. Refer to select 1. Dishes left in the ...
... water 3. Door seal could be pulled away from the drain hose by qualified personnel (water supply, drain system, leveling, plumbing) 1. Improper installation Tub stains 1. Silverware in the track 3. Incorrect rinse agent setting ware or residue on glass- 1. Improper operation of the manual 1. Remove ...then finish the cycle. 1. Delay start time completes 1. cup of the manual 17 this can reduce the build up . 2. Have proper installation verified by calling qualified personnel. Run a Regular cycle until delay start is not blocked 4. Refer to select 1. Dishes left in the ...
Instructions for Use
Page 20
... copy of your invoice and keep it started. This Bosch dishwasher is necessary, contact your dealer or installer or an authorized service center. The limited warranty rweiftlheicntetdhTwehabirsyfriartsnBhttoeystGrwcehoofloedydceitseHahdrowsbuaoyssefhthkepeerueGripcsoihnoabgdsaeSHc,... at 1-800-944-2904 2 Contact Customer Service from our web site: www.bosch-home.com/us or www.bosch-appliances.ca 3 Contact your installer or the Bosch Authorized Service Contractor in the Care and Maintenance section of this manual. Please be...
... copy of your invoice and keep it started. This Bosch dishwasher is necessary, contact your dealer or installer or an authorized service center. The limited warranty rweiftlheicntetdhTwehabirsyfriartsnBhttoeystGrwcehoofloedydceitseHahdrowsbuaoyssefhthkepeerueGripcsoihnoabgdsaeSHc,... at 1-800-944-2904 2 Contact Customer Service from our web site: www.bosch-home.com/us or www.bosch-appliances.ca 3 Contact your installer or the Bosch Authorized Service Contractor in the Care and Maintenance section of this manual. Please be...
Instructions for Use
Page 21
... your Product proves to have been specially trained on external surfaces and exposed parts; In no event shall Bosch have any Bosch microprocessor or printed circuit board if it proves to be extended with local fire and building codes and regulations... vessels); (2) any party's willful misconduct, negligence, misuse, abuse, accidents, neglect, improper operation, failure to maintain, improper or negligent installation, tampering, failure to follow operating instructions, mishandling, unauthorized service (including self-performed "fixing" or exploration of the appliance's internal workings);...
... your Product proves to have been specially trained on external surfaces and exposed parts; In no event shall Bosch have any Bosch microprocessor or printed circuit board if it proves to be extended with local fire and building codes and regulations... vessels); (2) any party's willful misconduct, negligence, misuse, abuse, accidents, neglect, improper operation, failure to maintain, improper or negligent installation, tampering, failure to follow operating instructions, mishandling, unauthorized service (including self-performed "fixing" or exploration of the appliance's internal workings);...


