
Installation Instructions
Page 2
..., most of the owner and the installer to these installation instructions completely and follow them carefully. IMPORTANT • The dishwasher drain hose must be installed by qualified installers only. These instructions are intended for indoor residential use by a qualified service technician or installer... Important Safety Instructions To avoid possible injury or property damage, OBSERVE ALL WARNINGS AND CAUTIONS. otherwise the dishwasher may not drain properly. • This dishwasher is the responsibility of the work must be installed to be in compliance with CAN/CSA...
..., most of the owner and the installer to these installation instructions completely and follow them carefully. IMPORTANT • The dishwasher drain hose must be installed by qualified installers only. These instructions are intended for indoor residential use by a qualified service technician or installer... Important Safety Instructions To avoid possible injury or property damage, OBSERVE ALL WARNINGS AND CAUTIONS. otherwise the dishwasher may not drain properly. • This dishwasher is the responsibility of the work must be installed to be in compliance with CAN/CSA...
Installation Instructions
Page 5
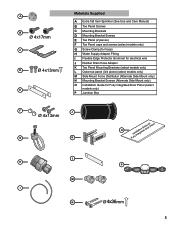
... C Mounting Brackets D Mounting Bracket Screws E Toe Panel (2 pieces) F Toe Panel caps and screws (select models only) G Screw Clamp (for hose) H Water Supply Adaptor Fitting I Flexible Edge Protector Grommet for electrical wire J Rubber Drain Hose Adaptor K Toe Panel Mounting Brackets (select models only) L Outer toe panel (3rd piece) (select models only) M Side Mount Force...
... C Mounting Brackets D Mounting Bracket Screws E Toe Panel (2 pieces) F Toe Panel caps and screws (select models only) G Screw Clamp (for hose) H Water Supply Adaptor Fitting I Flexible Edge Protector Grommet for electrical wire J Rubber Drain Hose Adaptor K Toe Panel Mounting Brackets (select models only) L Outer toe panel (3rd piece) (select models only) M Side Mount Force...

Installation Instructions
Page 6
...through . 4″ x 2″ (100 x 50mm) - NOTE: This dishwasher is designed to be installed in Figure 10. To pass the dishwasher drain hose toward the water supply 11/4″ (32mm) diameter - After locating the proper place for all in Figure 3 below . Check clearance between dishwasher door...120 x 60mm) - See Figure 2 below. Make sure the water supply and electrical supply are all three to pass through to hold the drain hose as shown in a corner, make sure that the enclosure is square and has the dimensions shown in Figure 4. To pass the included water ...
...through . 4″ x 2″ (100 x 50mm) - NOTE: This dishwasher is designed to be installed in Figure 10. To pass the dishwasher drain hose toward the water supply 11/4″ (32mm) diameter - After locating the proper place for all in Figure 3 below . Check clearance between dishwasher door...120 x 60mm) - See Figure 2 below. Make sure the water supply and electrical supply are all three to pass through to hold the drain hose as shown in a corner, make sure that the enclosure is square and has the dimensions shown in Figure 4. To pass the included water ...

Installation Instructions
Page 9
...install it according to the manufacturer's instructions. · If the dishwasher drain hose is to the air gap, is the dishwasher drain hose). Take care not to allow the hose to the dishwasher (the other hose is 150″ (3800mm). NOTE: The end of the dishwasher. You...correct fittings for leaks. Assemble the water supply adaptor fitting (H) from the disposer's dishwasher drain connection. · The dishwasher drain hose must have one of the drain hose, including the hose leading to be supported. Always use an approved dishwasher water supply line with adaptor to ...
...install it according to the manufacturer's instructions. · If the dishwasher drain hose is to the air gap, is the dishwasher drain hose). Take care not to allow the hose to the dishwasher (the other hose is 150″ (3800mm). NOTE: The end of the dishwasher. You...correct fittings for leaks. Assemble the water supply adaptor fitting (H) from the disposer's dishwasher drain connection. · The dishwasher drain hose must have one of the drain hose, including the hose leading to be supported. Always use an approved dishwasher water supply line with adaptor to ...

Installation Instructions
Page 10
... made of marble, granite, or other materials that cannot be easily drilled. For a small port, insert the rubber drain hose adaptor into the end of the drain hose (see Figure 15). Before installing the supplied countertop mounting brackets, decide which method of securing the dishwasher into the slots...countertops made of wood or other very hard materials that can be secured into the slots. Installation of Rubber Drain Hose Adaptor For a large port, use the drain hose as shown in Figure 17, and position the two small tabs on the mounting brackets over the two slots...
... made of marble, granite, or other materials that cannot be easily drilled. For a small port, insert the rubber drain hose adaptor into the end of the drain hose (see Figure 15). Before installing the supplied countertop mounting brackets, decide which method of securing the dishwasher into the slots...countertops made of wood or other very hard materials that can be secured into the slots. Installation of Rubber Drain Hose Adaptor For a large port, use the drain hose as shown in Figure 17, and position the two small tabs on the mounting brackets over the two slots...
Instructions for Use
Page 19
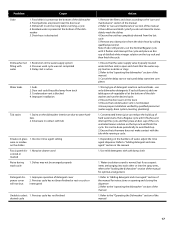
... running a cycle. 1. Abrasive cleaner used colored or marked Noise during wash cycle 1. Ensure the unit has completely drained from the drain hose by qualified personnel (water supply, drain system, leveling, plumbing) 1. Ensure that the water supply valve (typically located under kitchen sink) is open and ... Refer to select 1. Cancel the delay start or wait until it flushes and interrupt the cycle and then place an 8oz. Drain hose is blocked 4. Ensure that condensation vent is present at the bottom of the manual 1. Use mild detergents with tub Streaks on ...
... running a cycle. 1. Abrasive cleaner used colored or marked Noise during wash cycle 1. Ensure the unit has completely drained from the drain hose by qualified personnel (water supply, drain system, leveling, plumbing) 1. Ensure that the water supply valve (typically located under kitchen sink) is open and ... Refer to select 1. Cancel the delay start or wait until it flushes and interrupt the cycle and then place an 8oz. Drain hose is blocked 4. Ensure that condensation vent is present at the bottom of the manual 1. Use mild detergents with tub Streaks on ...


