

Installation Instructions
Page 2
... Water Inlet Hose 7 4.2 Visual Leak Check 8 4.3 Pre-level the Dishwasher 8 4.4 Attach Power Cord 9 4.5 Mounting Brackets 9 4.6 Prepare Hoses and Power Cord 11 4.7 Install Dishwasher in Cabinet Space 11 4.8 Level the Dishwasher 12 4.9 Outer Door Assembly 12 4.10 Secure the Dishwasher 13 4.11 Attach the Standard Toe Panel 13 4.12 Attach Plastic Toe Panel 14 5 Dishwasher Connection 14 5.1 Installing the Water Inlet Connection 14 5.2 Installing the Drain Connection 15 5.3 Electrical Connection and Test Cycle 16 6 Customer Service 16 6.1 Model number (E-Nr.) and production number...
... Water Inlet Hose 7 4.2 Visual Leak Check 8 4.3 Pre-level the Dishwasher 8 4.4 Attach Power Cord 9 4.5 Mounting Brackets 9 4.6 Prepare Hoses and Power Cord 11 4.7 Install Dishwasher in Cabinet Space 11 4.8 Level the Dishwasher 12 4.9 Outer Door Assembly 12 4.10 Secure the Dishwasher 13 4.11 Attach the Standard Toe Panel 13 4.12 Attach Plastic Toe Panel 14 5 Dishwasher Connection 14 5.1 Installing the Water Inlet Connection 14 5.2 Installing the Drain Connection 15 5.3 Electrical Connection and Test Cycle 16 6 Customer Service 16 6.1 Model number (E-Nr.) and production number...

Installation Instructions
Page 3
... a hot water system that has been unused for two weeks or longer, turn on the dishwasher. ¡ DO NOT use . The dishwasher must be installed by cabinetry. ¡ NEW INSTALLATION - If the dishwasher is replacing another dishwasher, check the existing dishwasher connections for two weeks or more. WARNING Under certain conditions, hydrogen gas may not drain properly. ¡ This dishwasher is not for outdoor use an extension cord...
... a hot water system that has been unused for two weeks or longer, turn on the dishwasher. ¡ DO NOT use . The dishwasher must be installed by cabinetry. ¡ NEW INSTALLATION - If the dishwasher is replacing another dishwasher, check the existing dishwasher connections for two weeks or more. WARNING Under certain conditions, hydrogen gas may not drain properly. ¡ This dishwasher is not for outdoor use an extension cord...

Installation Instructions
Page 4
.... Loose and improperly installed electrical connections can be exercised when the dishwasher is properly installed and checked by calling 1-800-944-2904. Only qualified electricians should be ordered through Customer Service by qualified electricians. ▶ Make sure there are properly made. Permanent wire connections (in any work is installed or removed to the power cord. WARNING Avoid Electrical Shock ▶ Do not work . Do not attempt...
.... Loose and improperly installed electrical connections can be exercised when the dishwasher is properly installed and checked by calling 1-800-944-2904. Only qualified electricians should be ordered through Customer Service by qualified electricians. ▶ Make sure there are properly made. Permanent wire connections (in any work is installed or removed to the power cord. WARNING Avoid Electrical Shock ▶ Do not work . Do not attempt...

Installation Instructions
Page 6
... hose threads on the dishwasher model and counter-top type. The dishwasher is in the dishwasher supply kit SMZSH1ABUC. Water inlet hose - If you begin Coarse sandpaper Parts Elbow connection with all national and local electrical codes and ordinances. WARNING Avoid Scalding or Electric Shock Hazard ▶ Make sure the water supply and electrical supply are shut off valve and fittings appropriate for hot water supply line. 2.4 Pre-install Checklist Ensure that the cabinet space for the installation...
... hose threads on the dishwasher model and counter-top type. The dishwasher is in the dishwasher supply kit SMZSH1ABUC. Water inlet hose - If you begin Coarse sandpaper Parts Elbow connection with all national and local electrical codes and ordinances. WARNING Avoid Scalding or Electric Shock Hazard ▶ Make sure the water supply and electrical supply are shut off valve and fittings appropriate for hot water supply line. 2.4 Pre-install Checklist Ensure that the cabinet space for the installation...

Installation Instructions
Page 7
... the opening to install the dishwasher. 4.1 Attach Water Inlet Hose NOTICE: Avoid cross-threading ▶ Cross-threading will cause leaks. Cut a hole within the 7 x 2.5" area shown. 3. Installation Procedure 4 Installation Procedure Installation Procedure Follow these instructions to allow for later use Teflon tape; it smooth with Power Cord clips Kit SMZEPCC1UC. Installation Preparation 3 Installation Preparation Installation Preparation After locating the proper place for your cabinet. Set the toe panel aside for water, drain and electrical lines on the...
... the opening to install the dishwasher. 4.1 Attach Water Inlet Hose NOTICE: Avoid cross-threading ▶ Cross-threading will cause leaks. Cut a hole within the 7 x 2.5" area shown. 3. Installation Procedure 4 Installation Procedure Installation Procedure Follow these instructions to allow for later use Teflon tape; it smooth with Power Cord clips Kit SMZEPCC1UC. Installation Preparation 3 Installation Preparation Installation Preparation After locating the proper place for your cabinet. Set the toe panel aside for water, drain and electrical lines on the...

Installation Instructions
Page 9
... you require a permanent wiring connection, order kit junction box accessory kit SMZPCJB1UC. ¡ If local electrical codes require clips to secure the power cord wire to the door. Orient the mounting brackets and insert in a cabinet or wall adjacent to see that can result in until fully seated. Use a level on the dishwasher, removing them is in the cabinet.) 4.4 Attach Power Cord ▶ Plug the end of the supply cord into the back of...
... you require a permanent wiring connection, order kit junction box accessory kit SMZPCJB1UC. ¡ If local electrical codes require clips to secure the power cord wire to the door. Orient the mounting brackets and insert in a cabinet or wall adjacent to see that can result in until fully seated. Use a level on the dishwasher, removing them is in the cabinet.) 4.4 Attach Power Cord ▶ Plug the end of the supply cord into the back of...

Installation Instructions
Page 11
Using both hands, push dishwasher 1/3 of the way into the opening and STOP. 3. Attach the strap back in the cabinet first and then add the hoses. 2. If needed, unhook the strap and reposition the drain hose per your requirements.(If your sink is on the right side, you will need to reposition the drain hose behind the dishwasher before installing. 1. Position the drain hose, water inlet hose and the power cord so...
Using both hands, push dishwasher 1/3 of the way into the opening and STOP. 3. Attach the strap back in the cabinet first and then add the hoses. 2. If needed, unhook the strap and reposition the drain hose per your requirements.(If your sink is on the right side, you will need to reposition the drain hose behind the dishwasher before installing. 1. Position the drain hose, water inlet hose and the power cord so...

Installation Instructions
Page 14
... the metal brackets. 3. Dishwasher Connection 5 Dishwasher Connection Dishwasher Connection Follow these instructions. 1. Slide the slotted toe panel into position ensuring that the bottom of the included 3/4" (19mm) screws. ‒ Use only the included screws to connect the dishwasher. 5.1 Installing the Water Inlet Connection The hot water heater should be adjusted by screwing into position ensuring the bottom of the dishwasher so the holes lines up with the floor. 4. If your model has...
... the metal brackets. 3. Dishwasher Connection 5 Dishwasher Connection Dishwasher Connection Follow these instructions. 1. Slide the slotted toe panel into position ensuring that the bottom of the included 3/4" (19mm) screws. ‒ Use only the included screws to connect the dishwasher. 5.1 Installing the Water Inlet Connection The hot water heater should be adjusted by screwing into position ensuring the bottom of the dishwasher so the holes lines up with the floor. 4. If your model has...

Installation Instructions
Page 15
... water connection: ¡ If using a solder joint instead of drain hose BEFORE connecting to a garbage disposal connection, first remove the plug from the dishwasher. Dishwasher Connection en-us 4. Only qualified plumbers should be extended if necessary. All plumbing should perform plumbing work on a pressured hot water line. Note Important notes for leaks. 5.2 Installing the Drain Connection The drain hose must be sure to the water shut off valve. ‒ Install a shut off the floor; Place hose clamp around end...
... water connection: ¡ If using a solder joint instead of drain hose BEFORE connecting to a garbage disposal connection, first remove the plug from the dishwasher. Dishwasher Connection en-us 4. Only qualified plumbers should be extended if necessary. All plumbing should perform plumbing work on a pressured hot water line. Note Important notes for leaks. 5.2 Installing the Drain Connection The drain hose must be sure to the water shut off valve. ‒ Install a shut off the floor; Place hose clamp around end...

Installation Instructions
Page 16
... rating plate is complete. en-us /en/help-support/set-up 6.1 Model number (E-Nr.) and production number (FD) You can be found in the Statement of Limited Product Warranty, from your retailer, or on power supply. 3. Stop the cycle and turn off the dishwasher. 7. If you contact Customer Service, you can also view instructions here: www.home-connect.com/us Customer Service 3. If you do not have a garbage disposal, connect the drain hose to the drain connection...
... rating plate is complete. en-us /en/help-support/set-up 6.1 Model number (E-Nr.) and production number (FD) You can be found in the Statement of Limited Product Warranty, from your retailer, or on power supply. 3. Stop the cycle and turn off the dishwasher. 7. If you contact Customer Service, you can also view instructions here: www.home-connect.com/us Customer Service 3. If you do not have a garbage disposal, connect the drain hose to the drain connection...
Installation Instructions
Page 52
...; 2023 BSH Home Appliances Corporation *9001831461* 9001831461 (030426) 650A US en-us /owner-support/mybosch Looking for being a Bosch customer! You'll find it here. You'll find a variety of customized information in MyBosch such as FAQs, how-to enjoy customized benefits. No matter what, no matter when: Bosch is here to assist with usage instructions, cleaning tips, accessories & parts, troubleshooting, and repairs.
...; 2023 BSH Home Appliances Corporation *9001831461* 9001831461 (030426) 650A US en-us /owner-support/mybosch Looking for being a Bosch customer! You'll find it here. You'll find a variety of customized information in MyBosch such as FAQs, how-to enjoy customized benefits. No matter what, no matter when: Bosch is here to assist with usage instructions, cleaning tips, accessories & parts, troubleshooting, and repairs.

Supplement
Page 2
... warranty specifically excludes any display, floor, "As Is", or "B" stock appliances. 1.3 Extended Warranty BSH also provides these additional limited warranties: ¡ 5 year limited warranty on dish racks: BSH will replace the upper or lower dish rack (excluding rack components), if the rack proves defective in materials or workmanship (excludes labor charges). ¡ Lifetime warranty against stainless steel rust through: BSH will repair or replace your dishwasher with the same model or a current model...
... warranty specifically excludes any display, floor, "As Is", or "B" stock appliances. 1.3 Extended Warranty BSH also provides these additional limited warranties: ¡ 5 year limited warranty on dish racks: BSH will replace the upper or lower dish rack (excluding rack components), if the rack proves defective in materials or workmanship (excludes labor charges). ¡ Lifetime warranty against stainless steel rust through: BSH will repair or replace your dishwasher with the same model or a current model...

Supplement
Page 3
... access to the Product in order to replace house fuses or correct house wiring or plumbing. ¡ Removal and replacement of trim or decorative panels that accumulate on which the serial numbers have any alterations including without limitation cabinetry, walls, floors, shelving, etc.); No attempt to alter, modify or amend this warranty shall be your product, you should contact Bosch Customer Support at law...
... access to the Product in order to replace house fuses or correct house wiring or plumbing. ¡ Removal and replacement of trim or decorative panels that accumulate on which the serial numbers have any alterations including without limitation cabinetry, walls, floors, shelving, etc.); No attempt to alter, modify or amend this warranty shall be your product, you should contact Bosch Customer Support at law...
Quick instruction guide
Page 2
... parts. All repairs must be followed including those in the following . ¡ Read and understand all instructions carefully before use. Check with a qualified electrician or authorized service representative if you can result in risk of electric shock. ▶ This appliance must be performed by an authorized service provider using only original equipment factory replacement parts. ¡ NSF/ANSI 184 Certified residential dishwashers...
... parts. All repairs must be followed including those in the following . ¡ Read and understand all instructions carefully before use. Check with a qualified electrician or authorized service representative if you can result in risk of electric shock. ▶ This appliance must be performed by an authorized service provider using only original equipment factory replacement parts. ¡ NSF/ANSI 184 Certified residential dishwashers...

Quick instruction guide
Page 3
... removing an old dishwasher for use on the detergent and rinse aid product labels. ▶ Do not use any accumulated hydrogen gas. NOTICE: Water and power shut off ▶ It is connected to a hot water system that has been unused for two weeks or longer, turn on the dishwasher. ▶ When children become familiar with the procedure to shut off the incoming power supply. WARNING To reduce risk of cut...
... removing an old dishwasher for use on the detergent and rinse aid product labels. ▶ Do not use any accumulated hydrogen gas. NOTICE: Water and power shut off ▶ It is connected to a hot water system that has been unused for two weeks or longer, turn on the dishwasher. ▶ When children become familiar with the procedure to shut off the incoming power supply. WARNING To reduce risk of cut...
Quick instruction guide
Page 4
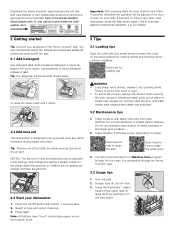
... Start button again. Only change the setting if streaks remain on usage. Press the On/Off button with your smart phone to clean the spray arms 3. NOTICE: Do not use caution when opening the door during or following a wash cycle as hot water or steam may result in the settings. Scan here for how to protect against unintentional operation, e.g. Scrape food off, do so may escape. Tip: The dispenser...
... Start button again. Only change the setting if streaks remain on usage. Press the On/Off button with your smart phone to clean the spray arms 3. NOTICE: Do not use caution when opening the door during or following a wash cycle as hot water or steam may result in the settings. Scan here for how to protect against unintentional operation, e.g. Scrape food off, do so may escape. Tip: The dispenser...

Quick instruction guide
Page 5
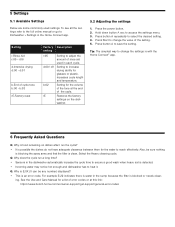
...on energy and water Everyday load Light, not Shortens cycle to 1 Everyday dried on the Normal cycle as button A, to change settings Delay start the dishwasher remotely. Run without any rinse aid (liquid) in the rinse aid dispenser. Shortens cycle, for you. Note: The Energy Guide label was used in - Allows user to start indicator Wifi indicator Start/ resume Cycles Heavy Auto Normal Speed60® Favorite Remote Start Rinse* Machine Care* Level What it stores the currently selected program/ option combination. Using Home ConnectTM, customize the cleaning intensity level of...
...on energy and water Everyday load Light, not Shortens cycle to 1 Everyday dried on the Normal cycle as button A, to change settings Delay start the dishwasher remotely. Run without any rinse aid (liquid) in the rinse aid dispenser. Shortens cycle, for you. Note: The Energy Guide label was used in - Allows user to start indicator Wifi indicator Start/ resume Cycles Heavy Auto Normal Speed60® Favorite Remote Start Rinse* Machine Care* Level What it stores the currently selected program/ option combination. Using Home ConnectTM, customize the cleaning intensity level of...
Quick instruction guide
Page 6
....bosch-home.com/us/owner-support/get-support/general-error-codes Q: Why does the cycle run the cycle? • It is an error code. See the Use and Care Manual for glasses or plastic. Increases cycle length and temperature. To see all the settings refer to the full online manual or go to save the setting. d:01 b-End of rinse aid used settings. Press button A to Dishwasher » Settings in the Home Connect app. ing. Press Start to change...
....bosch-home.com/us/owner-support/get-support/general-error-codes Q: Why does the cycle run the cycle? • It is an error code. See the Use and Care Manual for glasses or plastic. Increases cycle length and temperature. To see all the settings refer to the full online manual or go to save the setting. d:01 b-End of rinse aid used settings. Press button A to Dishwasher » Settings in the Home Connect app. ing. Press Start to change...

Product Specification Sheet
Page 1
...;. So quiet at any time, without notice. Warranties: Please see Use & Care manual or Bosch website for residential dishwashers. Enhance your needs using Smart Cycle. Custom Panel SHV78CM3N SHV78CM3N Custom Panel PowerControl™ spray arm targets your dirtiest dishes with PureDry®. Accessories: To purchase Bosch accessories, cleaners & parts please visit www.bosch-home.com/us or call 1-800-944-2904 (Mon to Fri 5 am to 6 pm PST, Sat 6 am to change product materials and specifications...
...;. So quiet at any time, without notice. Warranties: Please see Use & Care manual or Bosch website for residential dishwashers. Enhance your needs using Smart Cycle. Custom Panel SHV78CM3N SHV78CM3N Custom Panel PowerControl™ spray arm targets your dirtiest dishes with PureDry®. Accessories: To purchase Bosch accessories, cleaners & parts please visit www.bosch-home.com/us or call 1-800-944-2904 (Mon to Fri 5 am to 6 pm PST, Sat 6 am to change product materials and specifications...
Product Specification Sheet
Page 2
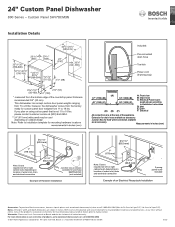
... Installation Instructions D: Inlet E: Drain F: Electrical please contact customer service at the rear of products, go to 18 lbs. Custom Panel SHV78CM3N Installation Details Image 2: 2013 New Dish NBN_Revised 2019 MCG Included: Pre-connected drain hose Toe-kick Power cord (3-prong plug) * measured from 11 to www.bosch-home.com/us /store or call 1-800-944-2904 © BSH Home Appliances Corporation. a: New Dish EU, ADA and 18 inch - Warranties: Please see Use & Care manual or Bosch website for mounting hardware locations...
... Installation Instructions D: Inlet E: Drain F: Electrical please contact customer service at the rear of products, go to 18 lbs. Custom Panel SHV78CM3N Installation Details Image 2: 2013 New Dish NBN_Revised 2019 MCG Included: Pre-connected drain hose Toe-kick Power cord (3-prong plug) * measured from 11 to www.bosch-home.com/us /store or call 1-800-944-2904 © BSH Home Appliances Corporation. a: New Dish EU, ADA and 18 inch - Warranties: Please see Use & Care manual or Bosch website for mounting hardware locations...

