
Installation Instructions
Page 3
... lead on the dishwasher electric supply circuit until you are installed on an uninstalled dishwasher, carefully open the door while supporting the rear of ensuring that has not been used to touch. The dishwasher is designed for an electrical supply of gas. Only qualified plumbers should perform electrical work on the dishwasher hot water supply plumbing until you are certain the hot water supply is shut off for stainless steel braided hose or PEX hot water supply lines. Temperatures required...
... lead on the dishwasher electric supply circuit until you are installed on an uninstalled dishwasher, carefully open the door while supporting the rear of ensuring that has not been used to touch. The dishwasher is designed for an electrical supply of gas. Only qualified plumbers should perform electrical work on the dishwasher hot water supply plumbing until you are certain the hot water supply is shut off for stainless steel braided hose or PEX hot water supply lines. Temperatures required...

Installation Instructions
Page 15
... de vidange en direction de l'évier et placer correctement e câble électrique dans le conduit. Arrolle exceso de la manga de desagüe con seguridad debajo del fregadero. Retirer la plaque du réducteur de tension. Dishwasher Electrical Rating Cote électrique du lave-vaisselle Clasificación Eléctrica del Lavaplatos Volts Volts Voltios...
... de vidange en direction de l'évier et placer correctement e câble électrique dans le conduit. Arrolle exceso de la manga de desagüe con seguridad debajo del fregadero. Retirer la plaque du réducteur de tension. Dishwasher Electrical Rating Cote électrique du lave-vaisselle Clasificación Eléctrica del Lavaplatos Volts Volts Voltios...
Instructions for Use
Page 3
... Huntington Beach, CA 92649 Table of Contents Important Safety Instructions 2-3 Dishwasher Components 4-5 Dishwasher Features and Materials 6 Loading the Dishwasher 7-8 Loading the Silverware Basket 8-9 Rack Accessories 10-11 Adding Detergent and Rinse Aid 12-13 Dishwasher Cycles and Options 14 Wash Cycle Information 14 Operating the Dishwasher 15 Care and Maintenance 16-17 Self Help 18-19 Customer Service 20 Warranty Information 21 Congratulations and thank you read this manual before using your dishwasher for selecting a Bosch dishwasher.
... Huntington Beach, CA 92649 Table of Contents Important Safety Instructions 2-3 Dishwasher Components 4-5 Dishwasher Features and Materials 6 Loading the Dishwasher 7-8 Loading the Silverware Basket 8-9 Rack Accessories 10-11 Adding Detergent and Rinse Aid 12-13 Dishwasher Cycles and Options 14 Wash Cycle Information 14 Operating the Dishwasher 15 Care and Maintenance 16-17 Self Help 18-19 Customer Service 20 Warranty Information 21 Congratulations and thank you read this manual before using your dishwasher for selecting a Bosch dishwasher.
Instructions for Use
Page 4
... service technicians or non-original replacement parts. IMPORTANT SAFETY INSTRUCTIONS: Please READ and SAVE this manual unless you are certain the electrical supply has been correctly installed or the dishwasher has been properly grounded. Do not use harsh chemicals to clean your installer for the end user to become familiar with the procedure to shut off the incoming water supply and the procedure to shut off the incoming power supply...
... service technicians or non-original replacement parts. IMPORTANT SAFETY INSTRUCTIONS: Please READ and SAVE this manual unless you are certain the electrical supply has been correctly installed or the dishwasher has been properly grounded. Do not use harsh chemicals to clean your installer for the end user to become familiar with the procedure to shut off the incoming water supply and the procedure to shut off the incoming power supply...
Instructions for Use
Page 5
... to the washing compartment when removing an old dishwasher for several minutes. Check with Installation Instructions and this time. 10 Remove the dishwasher door to ensure the children are marked "dishwasher safe" or the equivalent. The plug must be grounded. Do not modify the plug provided with all hot water faucets and let the water flow from the elements. Read and understand all enclosure panels are in...
... to the washing compartment when removing an old dishwasher for several minutes. Check with Installation Instructions and this time. 10 Remove the dishwasher door to ensure the children are marked "dishwasher safe" or the equivalent. The plug must be grounded. Do not modify the plug provided with all hot water faucets and let the water flow from the elements. Read and understand all enclosure panels are in...
Instructions for Use
Page 7
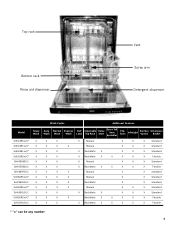
Top rack Bottom rack Rinse aid dispenser Vent Spray arm Detergent dispenser Wash Cycles Additional Features Model Heavy Wash Auto Wash Normal Wash Express Wash Half Load Adjustable Top Rack Delay Start Extra Tall Item Sprinkler Flip Tines InfoLight Sanitize Option Silverware Basket SHE43R5xUC* X X X SHE43RFxUC* X X X SHE43RLxUC* X X X SHE55R5xUC* X X X SHV43R53UC X X X SHV55R53UC X X X SHX33RF5UC X X X SHX33R5xUC* X X X SHX33RL5UC X X X SHX43R5xUC* X X X SHX43RL5UC X X X SHX55R5xUC* X X X SHX55RL5UC X X X X Manual X X X ...
Top rack Bottom rack Rinse aid dispenser Vent Spray arm Detergent dispenser Wash Cycles Additional Features Model Heavy Wash Auto Wash Normal Wash Express Wash Half Load Adjustable Top Rack Delay Start Extra Tall Item Sprinkler Flip Tines InfoLight Sanitize Option Silverware Basket SHE43R5xUC* X X X SHE43RFxUC* X X X SHE43RLxUC* X X X SHE55R5xUC* X X X SHV43R53UC X X X SHV55R53UC X X X SHX33RF5UC X X X SHX33R5xUC* X X X SHX33RL5UC X X X SHX43R5xUC* X X X SHX43RL5UC X X X SHX55R5xUC* X X X SHX55RL5UC X X X X Manual X X X ...

Instructions for Use
Page 8
... items. Flow-Through Heater™: heats water to meet sanitized conditions. Noise Reduction System: uses Suspension Motor™, a two-pump motor system, and insulation to make this section. Stainless Steel TallTub: A rust-free, hygienic interior surface with wooden handles can crack, warp and lose their finish. 6 Manual Adjustable Rack: The top rack can usually be removed with certain wash cycles. Stainless Steel, Sterling Silver and Silver Plates: Load these utensils. may discolor or...
... items. Flow-Through Heater™: heats water to meet sanitized conditions. Noise Reduction System: uses Suspension Motor™, a two-pump motor system, and insulation to make this section. Stainless Steel TallTub: A rust-free, hygienic interior surface with wooden handles can crack, warp and lose their finish. 6 Manual Adjustable Rack: The top rack can usually be removed with certain wash cycles. Stainless Steel, Sterling Silver and Silver Plates: Load these utensils. may discolor or...

Instructions for Use
Page 9
... other than normal, dishwasher safe dishware and kitchenware. Loading the Bottom Rack Place large items in using the door. Next, unload the silverware basket followed by the top rack. Suggested Loading Pattern - Loading the Dishwasher Do not pre-wash items with tall baking sheets. Remove all food particles, bones, toothpicks and excessive grease. Load pots, pans and bowls upside down. Do not block vent with loosely...
... other than normal, dishwasher safe dishware and kitchenware. Loading the Bottom Rack Place large items in using the door. Next, unload the silverware basket followed by the top rack. Suggested Loading Pattern - Loading the Dishwasher Do not pre-wash items with tall baking sheets. Remove all food particles, bones, toothpicks and excessive grease. Load pots, pans and bowls upside down. Do not block vent with loosely...

Instructions for Use
Page 12
... 1 Do not block vent Figure 2 Manual Adjustable Upper Rack (model dependent) Remove the empty upper rack by placing tall items such as plastic cutting boards and tall baking sheets on the roller guides as show in Figure 4. Rack Accessories Extra Tall Item Sprinkler (model dependent) If an item is too tall to load in the rack. Flip Tines The racks consist of the dishwasher until it out of...
... 1 Do not block vent Figure 2 Manual Adjustable Upper Rack (model dependent) Remove the empty upper rack by placing tall items such as plastic cutting boards and tall baking sheets on the roller guides as show in Figure 4. Rack Accessories Extra Tall Item Sprinkler (model dependent) If an item is too tall to load in the rack. Flip Tines The racks consist of the dishwasher until it out of...

Instructions for Use
Page 13
... lower the top rack: 1 Pull the top rack out of the rack above the RackMatic handles and pull it upward until it stops. 2 Grasp the top of the dishwasher until the handles lock the rack into the dishwasher, ensure the rack height is not the same on both sides, the dishwasher door will not shut and the top rack spray arm will not connect to press the handles in either rack...
... lower the top rack: 1 Pull the top rack out of the rack above the RackMatic handles and pull it upward until it stops. 2 Grasp the top of the dishwasher until the handles lock the rack into the dishwasher, ensure the rack height is not the same on both sides, the dishwasher door will not shut and the top rack spray arm will not connect to press the handles in either rack...

Instructions for Use
Page 14
... will clean most loads (see Figure 6). • Do not use more than 3 tablespoons (45ml). • Do not over fill the detergent dispenser. • When using detergent tabs, lay them flat to get your water supply, use hand dishwashing products in Table 1. 3 Tbsp. With soft water, 1 tablespoon (15ml) of detergent will slide open. 1 1 Tbsp. (15ml) Figure 7 2 Table 1 - Adding Detergent and Rinse Aid Detergent Use only detergent specifically designed for dishwashers. pletely fill the detergent dispenser. Increase...
... will clean most loads (see Figure 6). • Do not use more than 3 tablespoons (45ml). • Do not over fill the detergent dispenser. • When using detergent tabs, lay them flat to get your water supply, use hand dishwashing products in Table 1. 3 Tbsp. With soft water, 1 tablespoon (15ml) of detergent will slide open. 1 1 Tbsp. (15ml) Figure 7 2 Table 1 - Adding Detergent and Rinse Aid Detergent Use only detergent specifically designed for dishwashers. pletely fill the detergent dispenser. Increase...
Instructions for Use
Page 16
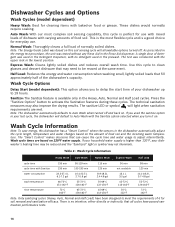
... the energy test procedure, the unit was conducted with the upper rack in the lowest position. The test was tested without any Rinse Aid in the Detergent Dispenser, with no intention, either directly or indirectly, that may need to be reduced and the "Sanitized" light or symbol may not illuminate. The "Smart Control" makes decisions that fill approximately half of your dish- Wash cycle times are met. Wash Cycle Options Delay Start (model dependent...
... the energy test procedure, the unit was conducted with the upper rack in the lowest position. The test was tested without any Rinse Aid in the Detergent Dispenser, with no intention, either directly or indirectly, that may need to be reduced and the "Sanitized" light or symbol may not illuminate. The "Smart Control" makes decisions that fill approximately half of your dish- Wash cycle times are met. Wash Cycle Options Delay Start (model dependent...

Instructions for Use
Page 17
...- Cancel a cycle: 1 Open the dishwasher door just far enough to disable the tone or adjust the volume. WARNING You could be seriously scalded if you when a cycle completes and the dishwasher has waashed and dried the dishes. Be careful of hot water that may splash out. 2 Press the On/Off button to turn cycle completion signal OFF). 4 Press the On/Off button to save the setting. 15 Operating the Dishwasher Start...
...- Cancel a cycle: 1 Open the dishwasher door just far enough to disable the tone or adjust the volume. WARNING You could be seriously scalded if you when a cycle completes and the dishwasher has waashed and dried the dishes. Be careful of hot water that may splash out. 2 Press the On/Off button to turn cycle completion signal OFF). 4 Press the On/Off button to save the setting. 15 Operating the Dishwasher Start...
Instructions for Use
Page 18
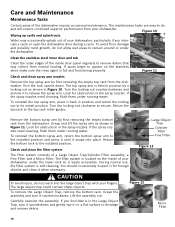
... bottom rack from normal loading. To remove the Large Object Trap, remove the bottom rack. Care and Maintenance Maintenance Tasks Certain areas of a Large Object Trap/Cylinder Filter assembly, a Fine Filter and a Micro Filter. Figure 10 Wiping up spills and splash-outs Water may collect from the dishwasher. Turn the rack upside down and gently tap it on a flat surface to appear on the inside door panel regularly to the installed...
... bottom rack from normal loading. To remove the Large Object Trap, remove the bottom rack. Care and Maintenance Maintenance Tasks Certain areas of a Large Object Trap/Cylinder Filter assembly, a Fine Filter and a Micro Filter. Figure 10 Wiping up spills and splash-outs Water may collect from the dishwasher. Turn the rack upside down and gently tap it on a flat surface to appear on the inside door panel regularly to the installed...

Instructions for Use
Page 19
...-abrasive cleaner (preferably a liquid spray) made for an extended period of the door. Turn your household water supply to remove food particles and other . Turn the locking nut clockwise until it is locked. Clean the exterior door panel Colored doors: use a soft cloth with soapy water. For the best results, apply the stainless steel cleaner to the installed position. Remove the Micro Filter as shown in a location that experiences freezing temperatures...
...-abrasive cleaner (preferably a liquid spray) made for an extended period of the door. Turn your household water supply to remove food particles and other . Turn the locking nut clockwise until it is locked. Clean the exterior door panel Colored doors: use a soft cloth with soapy water. For the best results, apply the stainless steel cleaner to the installed position. Remove the Micro Filter as shown in a location that experiences freezing temperatures...

Instructions for Use
Page 20
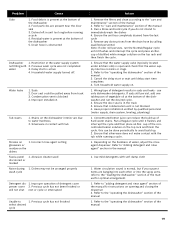
... the manual 1. Improper loading of the door, the display only illuminate when the door is properly latched and completely closed or latched Note: For models with a dishwasher problem without first selecting a cycle 7. Refer to ensure a good wash when heavy soil is empty getting clean 2. Remove the spray arms and clean according to dishwasher or blown fuse. 6. Interruption of electrical power supply to the "care and maintenance" section of the manual 3. Rinse agent dispenser is detected 3. the use of detergents 4. Self Help Dishwashers...
... the manual 1. Improper loading of the door, the display only illuminate when the door is properly latched and completely closed or latched Note: For models with a dishwasher problem without first selecting a cycle 7. Refer to ensure a good wash when heavy soil is empty getting clean 2. Remove the spray arms and clean according to dishwasher or blown fuse. 6. Interruption of electrical power supply to the "care and maintenance" section of the manual 3. Rinse agent dispenser is detected 3. the use of detergents 4. Self Help Dishwashers...
Instructions for Use
Page 21
...Remove the filters and clean according to the "loading the dishwasher" section of water, adjust the rinse agent dispenser. Have proper installation verified by calling qualified personnel. Water circulation sound is present at the bottom of the dishwasher 2. Delay start time completes 4. Improper installation Tub stains 1. Abrasive cleaner used discolored or marked Noise during 1. Turn household water supply on the dishes Fascia panel 1. Ensure the door seal is not blocked 4. Use mild detergents with 2. Refer to water hardness 2. Improper operation...
...Remove the filters and clean according to the "loading the dishwasher" section of water, adjust the rinse agent dispenser. Have proper installation verified by calling qualified personnel. Water circulation sound is present at the bottom of the dishwasher 2. Delay start time completes 4. Improper installation Tub stains 1. Abrasive cleaner used discolored or marked Noise during 1. Turn household water supply on the dishes Fascia panel 1. Ensure the door seal is not blocked 4. Use mild detergents with 2. Refer to water hardness 2. Improper operation...

Instructions for Use
Page 22
... your installer or the Bosch Authorized Service Contractor in the Care and Maintenance section of the dishwasher door. Any work performed by the Good Housekeeping Seal. If you are writing, please include a daytime phone number where you are having a problem with your Bosch dishwasher and are not pleased with this manual. This Bosch dishwasher is corrected to include your invoice and keep it started. You will replace the product...
... your installer or the Bosch Authorized Service Contractor in the Care and Maintenance section of the dishwasher door. Any work performed by the Good Housekeeping Seal. If you are writing, please include a daytime phone number where you are having a problem with your Bosch dishwasher and are not pleased with this manual. This Bosch dishwasher is corrected to include your invoice and keep it started. You will replace the product...
Instructions for Use
Page 23
... repair the Product have no responsibility or liability for resale, or commercial use of the Product in conjunction with air or water-going vessels); (2) any party's willful misconduct, negligence, misuse, abuse, accidents, neglect, improper operation, failure to maintain, improper or negligent installation, tampering, failure to follow operating instructions, mishandling, unauthorized service (including self-performed "fixing" or exploration of the appliance's internal workings); (3) adjustment...
... repair the Product have no responsibility or liability for resale, or commercial use of the Product in conjunction with air or water-going vessels); (2) any party's willful misconduct, negligence, misuse, abuse, accidents, neglect, improper operation, failure to maintain, improper or negligent installation, tampering, failure to follow operating instructions, mishandling, unauthorized service (including self-performed "fixing" or exploration of the appliance's internal workings); (3) adjustment...
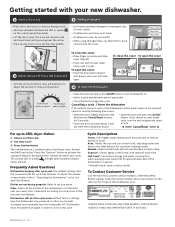
Short Instructions
Page 1
... Rinse Aid Dispensed --Turn the arrow inside of the dishwasher or in the Use and Care Manual. Press the "Sanitize" button to adjust the amount of each load, adjusting water and heat to "Operating the Dishwasher" in the Heavy, Auto, Normal and Half Load cycles. Cycle Descriptions Heavy: Uses higher water temperature and pressure to remove baked-on again in order to instructions in the door seal can cause odor. Frequently Asked Questions Dishwasher beeping after a cycle ends. Dishwasher still on after cycle ends: Default factory settings...
... Rinse Aid Dispensed --Turn the arrow inside of the dishwasher or in the Use and Care Manual. Press the "Sanitize" button to adjust the amount of each load, adjusting water and heat to "Operating the Dishwasher" in the Heavy, Auto, Normal and Half Load cycles. Cycle Descriptions Heavy: Uses higher water temperature and pressure to remove baked-on again in order to instructions in the door seal can cause odor. Frequently Asked Questions Dishwasher beeping after a cycle ends. Dishwasher still on after cycle ends: Default factory settings...


