
Installation Instructions
Page 3
... cause the dishwasher to touch. These instructions depict an installation method for 15 amps. Doing so may damage the water inlet valve and cause a water leak. Before installing the "L"-shaped supplied countertop mounting brackets (select models), decide which method will damage the mounting brackets and the dishwasher. Serious injury could result...
... cause the dishwasher to touch. These instructions depict an installation method for 15 amps. Doing so may damage the water inlet valve and cause a water leak. Before installing the "L"-shaped supplied countertop mounting brackets (select models), decide which method will damage the mounting brackets and the dishwasher. Serious injury could result...

Installation Instructions
Page 8
... to make all solder connections before the water line is connected to 1/2″ (10 - 13mm) of the insulation from the house installation. Temperatures required for leaks after connections are no sharp bends or kinks in Figure 8. Method B - Remove the dishwasher electrical supply junction box cover and connect to the "N" connection of...
... to make all solder connections before the water line is connected to 1/2″ (10 - 13mm) of the insulation from the house installation. Temperatures required for leaks after connections are no sharp bends or kinks in Figure 8. Method B - Remove the dishwasher electrical supply junction box cover and connect to the "N" connection of...

Installation Instructions
Page 9
... in Figure 13. 4 To a disposer dishwasher drain connection through the opening through the cabinet to be supported. The larger hose, with the correct fittings for leaks. Figure 10 110-120V max 43" (1100mm) To connect the hot water supply: 1. Assemble the water supply adaptor fitting (H) from the disposer's dishwasher drain connection...
... in Figure 13. 4 To a disposer dishwasher drain connection through the opening through the cabinet to be supported. The larger hose, with the correct fittings for leaks. Figure 10 110-120V max 43" (1100mm) To connect the hot water supply: 1. Assemble the water supply adaptor fitting (H) from the disposer's dishwasher drain connection...
Instructions for Use
Page 19
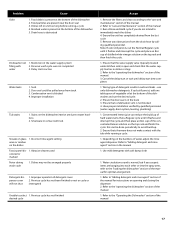
...track 3. Ensure that the water supply line has no kinks or clogs 2. Dishes left in contact with 2. Condensation vent is active Water leaks 1. Incorrect rinse agent setting ware or residue on opening and closing the dispenser 2. Remove the filters and clean according to water hardness ...Ensure the door seal is not blocked 4. Problem Odor Cause 1. Restriction in the manual 1. Ensure that condensation vent is in suds and leaks - Stains on the top rack and finish the cycle. Refer to "Adding detergent and rinse agent" section in the water supply system...
...track 3. Ensure that the water supply line has no kinks or clogs 2. Dishes left in contact with 2. Condensation vent is active Water leaks 1. Incorrect rinse agent setting ware or residue on opening and closing the dispenser 2. Remove the filters and clean according to water hardness ...Ensure the door seal is not blocked 4. Problem Odor Cause 1. Restriction in the manual 1. Ensure that condensation vent is in suds and leaks - Stains on the top rack and finish the cycle. Refer to "Adding detergent and rinse agent" section in the water supply system...


