
Use and Care Manual
Page 2
...944-2904 or write to us at : www.boschappliances.com (U.S.A) OR www.bosch-appliances.ca (Canada) If you for the irst time. We highly recommend that you read this manual before you from their dishwashers. To learn more about your safety and convenience in mind, and the ...information contained herein is very important. This manual was written with your dishwasher and available accessories, as well as many other top quality Bosch appliances, visit our website at : BSH Home Appliances, Corp. 5551 McFadden Avenue Huntington Beach, CA 92649 2...
...944-2904 or write to us at : www.boschappliances.com (U.S.A) OR www.bosch-appliances.ca (Canada) If you for the irst time. We highly recommend that you read this manual before you from their dishwashers. To learn more about your safety and convenience in mind, and the ...information contained herein is very important. This manual was written with your dishwasher and available accessories, as well as many other top quality Bosch appliances, visit our website at : BSH Home Appliances, Corp. 5551 McFadden Avenue Huntington Beach, CA 92649 2...

Use and Care Manual
Page 3
Loading the Silverware Basket 11-13 7. Adding Detergent & Rinse Agent 14-15 8. Operating the Dishwasher 18-20 11. Warranty Information 27 3 Dishwasher Features & Options 16 9. Wash Cycle Information 17 10. Important Safety Instructions 4-5 2. Customer Service Information 26 14. Dishwasher Features 7 4. Self Help 23-25 13. Table of Contents 1. Loading the Dishware 8 5. Care & Maintenance 21-22 12. Dishwasher Components 6 3. Rack Accessories 9-10 6.
Loading the Silverware Basket 11-13 7. Adding Detergent & Rinse Agent 14-15 8. Operating the Dishwasher 18-20 11. Warranty Information 27 3 Dishwasher Features & Options 16 9. Wash Cycle Information 17 10. Important Safety Instructions 4-5 2. Customer Service Information 26 14. Dishwasher Features 7 4. Self Help 23-25 13. Table of Contents 1. Loading the Dishware 8 5. Care & Maintenance 21-22 12. Dishwasher Components 6 3. Rack Accessories 9-10 6.

Use and Care Manual
Page 4
... result if the electrical supply for the possible damages or consequences. ɵ Never use steam cleaning products to clean your dishwasher. Do not use of unqualiied service technicians or non-original replacement parts. Some chloride-containing products can result in this manual...qualiied service technician using only original equipment factory replacement parts. ɵ Electrical shock or ire could result from the use the dishwasher covered in serious injury or death. See the installation Instructions or contact your installer for the end user to become familiar ...
... result if the electrical supply for the possible damages or consequences. ɵ Never use steam cleaning products to clean your dishwasher. Do not use of unqualiied service technicians or non-original replacement parts. Some chloride-containing products can result in this manual...qualiied service technician using only original equipment factory replacement parts. ɵ Electrical shock or ire could result from the use the dishwasher covered in serious injury or death. See the installation Instructions or contact your installer for the end user to become familiar ...
Use and Care Manual
Page 5
...for its intended function, which is not covered by qualiied persons. 9. Load knives and other sharp utensils with Installation Instructions and this dishwasher for service or discarding. 11. Do not abuse, sit on, or stand on electrical requirements. 3. Hydrogen gas is provided with their...several minutes. When children become old enough to operate the appliance, it is connected to the equipment grounding terminal or lead on the dishwasher. This appliance must be grounded to a metal, permanent wiring system, or an equipment grounding conductor must be run with or override controls...
...for its intended function, which is not covered by qualiied persons. 9. Load knives and other sharp utensils with Installation Instructions and this dishwasher for service or discarding. 11. Do not abuse, sit on, or stand on electrical requirements. 3. Hydrogen gas is provided with their...several minutes. When children become old enough to operate the appliance, it is connected to the equipment grounding terminal or lead on the dishwasher. This appliance must be grounded to a metal, permanent wiring system, or an equipment grounding conductor must be run with or override controls...

Use and Care Manual
Page 7
... separate. Adhesive-Joined Pieces: Adhesives that they do not come in contact with other metals. Hand-wash and dry immediately. 3 Dishwasher Features Noise Reduction System: A two-pump motor system, the Suspension Motor™, and insulation make this section. Flow-Through Heater&#...may loosen. Pewter, Brass, Bronze: Pewter will stain. Some items are not dishwasher safe and should be removed with other utensils during the wash cycle. Hand-wash and dry immediately. EcoSense™ Wash Management System: Checks water condition and decides whether a second fresh water...
... separate. Adhesive-Joined Pieces: Adhesives that they do not come in contact with other metals. Hand-wash and dry immediately. 3 Dishwasher Features Noise Reduction System: A two-pump motor system, the Suspension Motor™, and insulation make this section. Flow-Through Heater&#...may loosen. Pewter, Brass, Bronze: Pewter will stain. Some items are not dishwasher safe and should be removed with other utensils during the wash cycle. Hand-wash and dry immediately. EcoSense™ Wash Management System: Checks water condition and decides whether a second fresh water...
Use and Care Manual
Page 8
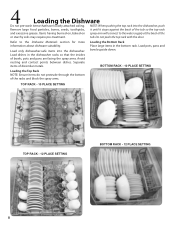
.... TOP RACK - 10 PLACE SETTING TOP RACK - 12 PLACE SETTING BOTTOM RACK - 12 PLACE SETTING 8 NOTE: When pushing the top rack into the dishwasher. Load dishes in the bottom rack. Do not push the top rack with the door. Refer to the water supply at the back of the...not protrude through the bottom of dissimilar metals. Load pots, pans and bowls upside down. Loading the Bottom Rack Place large items in the dishwasher racks so that have loosely attached soiling. Items having burned-on, baked-on spray arm will connect to the Dishware Materials section for more information...
.... TOP RACK - 10 PLACE SETTING TOP RACK - 12 PLACE SETTING BOTTOM RACK - 12 PLACE SETTING 8 NOTE: When pushing the top rack into the dishwasher. Load dishes in the bottom rack. Do not push the top rack with the door. Refer to the water supply at the back of the...not protrude through the bottom of dissimilar metals. Load pots, pans and bowls upside down. Loading the Bottom Rack Place large items in the dishwasher racks so that have loosely attached soiling. Items having burned-on, baked-on spray arm will connect to the Dishware Materials section for more information...

Use and Care Manual
Page 9
Unloading the Dishwasher • Unload the bottom rack irst. • Unload the silverware basket. • Unload the top rack. BOTTOM RACK - 12 PLACE SETTING w/Standard Silverware Basket TOP RACK - 12 PLACE SETTING 9 NOTICE To avoid dishwasher damage, do not load the dishwasher with paper products, plastic bags, packing materials, or anything other than normal, dishwasher-safe dishware and kitchenware.
Unloading the Dishwasher • Unload the bottom rack irst. • Unload the silverware basket. • Unload the top rack. BOTTOM RACK - 12 PLACE SETTING w/Standard Silverware Basket TOP RACK - 12 PLACE SETTING 9 NOTICE To avoid dishwasher damage, do not load the dishwasher with paper products, plastic bags, packing materials, or anything other than normal, dishwasher-safe dishware and kitchenware.
Use and Care Manual
Page 10
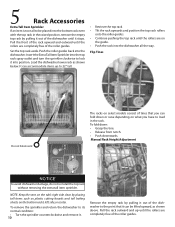
...it. 10 Remove the empty rack by placing tall items such as plastic cutting boards and tall baking sheets on select models consist of the dishwasher until it into position. Flip Tines Do not block vent The racks on the bottom rack's left side,or center. NOTE: Keep the ...by pulling it can fold down : • Grasp the tine. • Release from notch. • Push downwards. Manual Rack Height Adjustment NOTICE To avoid dishwasher damage, do not reinstall the top rack without removing the extra tall item sprinkler. Set the top rack aside. To fold down or raise depending...
...it. 10 Remove the empty rack by placing tall items such as plastic cutting boards and tall baking sheets on select models consist of the dishwasher until it into position. Flip Tines Do not block vent The racks on the bottom rack's left side,or center. NOTE: Keep the ...by pulling it can fold down : • Grasp the tine. • Release from notch. • Push downwards. Manual Rack Height Adjustment NOTICE To avoid dishwasher damage, do not reinstall the top rack without removing the extra tall item sprinkler. Set the top rack aside. To fold down or raise depending...

Use and Care Manual
Page 14
... the amount of detergent. Use the measuring lines in the detergent dispenser cup as a guide to use hand dishwashing products in the Tables below. The dishwasher uses less water so you do not use less detergent. 7 Adding Detergent & Rinse Agent Detergent Use only detergent...of detergent recommended in your kitchenware clean. The detergent dispenser cup has lines that measure detergent to get your dishwasher. ɵ To avoid dishwasher damage, do not use fresh powdered dishwashing detergent. Using too much detergent if your water is soft. With soft water, 1 tbsp. (15ml)...
... the amount of detergent. Use the measuring lines in the detergent dispenser cup as a guide to use hand dishwashing products in the Tables below. The dishwasher uses less water so you do not use less detergent. 7 Adding Detergent & Rinse Agent Detergent Use only detergent...of detergent recommended in your kitchenware clean. The detergent dispenser cup has lines that measure detergent to get your dishwasher. ɵ To avoid dishwasher damage, do not use fresh powdered dishwashing detergent. Using too much detergent if your water is soft. With soft water, 1 tbsp. (15ml)...

Use and Care Manual
Page 15
Add liquid rinse agent to the dispenser until you hear a click. • To add rinse agent, pour in a few minutes after the dishwasher door is shut. After illing the rinse agent dispenser, the indicator light will clean most loads. Do not overill. • Add rinse agent when the ... the control panel illuminates. tains rinse agent. • Do not use Rinse Agent even if your detergent contains a rinse agent or drying additive. NOTE: The dishwasher indicates low rinse agent by the Rinse Agent Indicator Light. TO OPEN Refer to the...
Add liquid rinse agent to the dispenser until you hear a click. • To add rinse agent, pour in a few minutes after the dishwasher door is shut. After illing the rinse agent dispenser, the indicator light will clean most loads. Do not overill. • Add rinse agent when the ... the control panel illuminates. tains rinse agent. • Do not use Rinse Agent even if your detergent contains a rinse agent or drying additive. NOTE: The dishwasher indicates low rinse agent by the Rinse Agent Indicator Light. TO OPEN Refer to the...
Use and Care Manual
Page 16
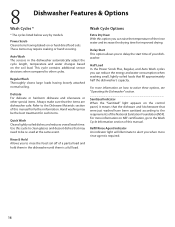
...Extra Dry Heat With this option you can reduce the energy and water consumption when washing small, lightly soiled loads that the items are dishwasher safe. These items may need to the Dishware Materials section of the rinse water and increase the drying time for improved drying. Delicate ... Load In the Power Scrub Plus, Regular, and Auto Wash cycles you to the requirements of a partial load and hold them in the dishwasher automatically adjust the cycle length, temperature and water changes based on or hard dried food soils. Power Scrub Cleans items having loosely attached normal ...
...Extra Dry Heat With this option you can reduce the energy and water consumption when washing small, lightly soiled loads that the items are dishwasher safe. These items may need to the Dishware Materials section of the rinse water and increase the drying time for improved drying. Delicate ... Load In the Power Scrub Plus, Regular, and Auto Wash cycles you to the requirements of a partial load and hold them in the dishwasher automatically adjust the cycle length, temperature and water changes based on or hard dried food soils. Power Scrub Cleans items having loosely attached normal ...
Use and Care Manual
Page 17
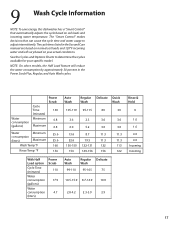
...: On select models, the Half Load feature will vary based on soil loads and incoming water temperature. 9 Wash Cycle Information NOTE: To save energy, this dishwasher has a "Smart Control" that can cause the cycle time and water usage to determine the cycles available for your actual conditions. The "Smart Control" makes...
...: On select models, the Half Load feature will vary based on soil loads and incoming water temperature. 9 Wash Cycle Information NOTE: To save energy, this dishwasher has a "Smart Control" that can cause the cycle time and water usage to determine the cycles available for your actual conditions. The "Smart Control" makes...
Use and Care Manual
Page 18
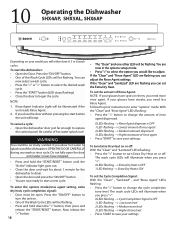
... goes out. • Close the door and wait for about 1 minute for the dishwasher to drain. • Open the door and press the "ON/OFF" button. • You are now ready to... start the dishwasher: • Open the Door. Now release the ">" button. 18 • The "Clean" and one other... LEDs lashing: • Press the " OPEN THE DOOR CAREFULLY during any wash or rinse cycle. Be careful of the dishwasher. If the "Clean" and "Rinse Agent" LED are now in the options setup mode. • Press ">" to ...
... goes out. • Close the door and wait for about 1 minute for the dishwasher to drain. • Open the door and press the "ON/OFF" button. • You are now ready to... start the dishwasher: • Open the Door. Now release the ">" button. 18 • The "Clean" and one other... LEDs lashing: • Press the " OPEN THE DOOR CAREFULLY during any wash or rinse cycle. Be careful of the dishwasher. If the "Clean" and "Rinse Agent" LED are now in the options setup mode. • Press ">" to ...
Use and Care Manual
Page 19
Press the "ON/OFF" button. • One of the Wash Cycle LEDs will be lashing. If you would like to delay the start the dishwasher: • Door must be lashing. You are now in the options setup mode. • Press ">" to adjust. If your glasses have spots on them,... the "START" button (LED stops lashing) NOTE: Rinse Agent Indicator Light will be illuminated if the unit needs Rinse Agent. Operating the Dishwasher SHE5AL To start time of the dishwasher press the "DELAY" button until the desired delay time (3,6,9 hrs.) is displayed by the corresponding LED. • Press the "START" ...
Press the "ON/OFF" button. • One of the Wash Cycle LEDs will be lashing. If you would like to delay the start the dishwasher: • Door must be lashing. You are now in the options setup mode. • Press ">" to adjust. If your glasses have spots on them,... the "START" button (LED stops lashing) NOTE: Rinse Agent Indicator Light will be illuminated if the unit needs Rinse Agent. Operating the Dishwasher SHE5AL To start time of the dishwasher press the "DELAY" button until the desired delay time (3,6,9 hrs.) is displayed by the corresponding LED. • Press the "START" ...

Use and Care Manual
Page 20
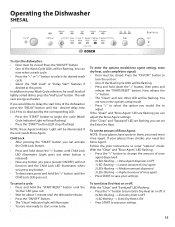
... the "DELAY" button until the display reads "0:00" and turn the Extra Dry Heat ON or OFF. Operating the Dishwasher SHE6AP To start the dishwasher: • Door must be closed . Now release the ">" button. • The "Sanitized" LED will save energy and water. "r:06": • Press the " ... be lashing. • Press and hold the "START/RESET" button until the countdown display reads "0:01". • Wait until the desired delay time (1-24 hrs.) shows in the options setup mode. • Press ">" to enter "options" mode. If your Wash Cycle selection, for small loads of rinse ...
... the "DELAY" button until the display reads "0:00" and turn the Extra Dry Heat ON or OFF. Operating the Dishwasher SHE6AP To start the dishwasher: • Door must be closed . Now release the ">" button. • The "Sanitized" LED will save energy and water. "r:06": • Press the " ... be lashing. • Press and hold the "START/RESET" button until the countdown display reads "0:01". • Wait until the desired delay time (1-24 hrs.) shows in the options setup mode. • Press ">" to enter "options" mode. If your Wash Cycle selection, for small loads of rinse ...
Use and Care Manual
Page 21
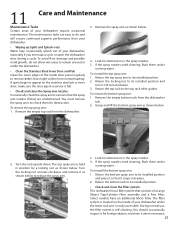
... position and turn clockwise. 3. Return the locking nut to ensure that might collect from your dishwasher: • Wiping up Spills and Splash-outs Water may occasionally splash out of your dishwasher under running water. To remove the bottom spray arm: 1. If the spray nozzles need cleaning... To reinstall the top spray arm: 1. Return the top rack to check them under the dishwasher. • Clean the Stainless Steel Inner Door and Tub Clean the outer edges of your dishwasher require occasional maintenance. Grasp and lift the bottom spray arm as shown below . 2. Turn ...
... position and turn clockwise. 3. Return the locking nut to ensure that might collect from your dishwasher: • Wiping up Spills and Splash-outs Water may occasionally splash out of your dishwasher under running water. To remove the bottom spray arm: 1. If the spray nozzles need cleaning... To reinstall the top spray arm: 1. Return the top rack to check them under the dishwasher. • Clean the Stainless Steel Inner Door and Tub Clean the outer edges of your dishwasher require occasional maintenance. Grasp and lift the bottom spray arm as shown below . 2. Turn ...
Use and Care Manual
Page 22
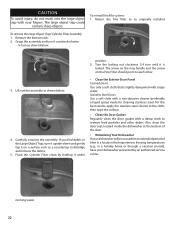
... soft cloth with a non-abrasive cleaner (preferably a liquid spray) made for an extended period of the door. • Winterizing Your Dishwasher If your dishwasher will be unused for cleaning stainless steel. position. 2. If you ind debris in the Large Object Trap, turn until it is lightly ... should point to dislodge and remove the debris. 5. CAUTION To avoid injury, do not reach into the large object trap with your dishwasher winterized by holding it under • Clean the Exterior Door Panel Colored Doors Use only a soft cloth that experiences freezing temperatures (e.g.,...
... soft cloth with a non-abrasive cleaner (preferably a liquid spray) made for an extended period of the door. • Winterizing Your Dishwasher If your dishwasher will be unused for cleaning stainless steel. position. 2. If you ind debris in the Large Object Trap, turn until it is lightly ... should point to dislodge and remove the debris. 5. CAUTION To avoid injury, do not reach into the large object trap with your dishwasher winterized by holding it under • Clean the Exterior Door Panel Colored Doors Use only a soft cloth that experiences freezing temperatures (e.g.,...
Use and Care Manual
Page 23
... on . 3. To reset, refer to cold water supply. Check circuit breaker. 6. Note: For models with a dishwasher problem without involving a repair professional. Dishwasher connected to "Delay Start" section in this manual if applicable. 7. The following information may help you with controls on...necessary. 2. Child lock activated (select models). 7. Add rinse agent. 4. Ensure that spray arm movement is detected. 3. Self Help Dishwashers may occasionally exhibit problems that are visible. 1. Unit may have been blown or circuit breaker tripped. 2. Delay start 1. Check and...
... on . 3. To reset, refer to cold water supply. Check circuit breaker. 6. Note: For models with a dishwasher problem without involving a repair professional. Dishwasher connected to "Delay Start" section in this manual if applicable. 7. The following information may help you with controls on...necessary. 2. Child lock activated (select models). 7. Add rinse agent. 4. Ensure that spray arm movement is detected. 3. Self Help Dishwashers may occasionally exhibit problems that are visible. 1. Unit may have been blown or circuit breaker tripped. 2. Delay start 1. Check and...
Use and Care Manual
Page 24
...this manual. 1. Condensation vent is activated). 2. Improper installation. 1. Ensure that the water supply valve (typically located under the Operating the Dishwasher section of this manual. 1. Ensure that the water supply line has no kinks and clogs. 2. cup of the concentrated lemon solution on... cycle was not com- Ensure that the silverware does not make contact with water Water Leaks 1. Tub stains 24 1. Drain hose is active. 1. Use only dishwasher detergents. If suds still persist, then add one tablespoon of vegetable oil at the bottom of water. 2. Wrong...
...this manual. 1. Condensation vent is activated). 2. Improper installation. 1. Ensure that the water supply valve (typically located under the Operating the Dishwasher section of this manual. 1. Ensure that the water supply line has no kinks and clogs. 2. cup of the concentrated lemon solution on... cycle was not com- Ensure that the silverware does not make contact with water Water Leaks 1. Tub stains 24 1. Drain hose is active. 1. Use only dishwasher detergents. If suds still persist, then add one tablespoon of vegetable oil at the bottom of water. 2. Wrong...
Use and Care Manual
Page 26
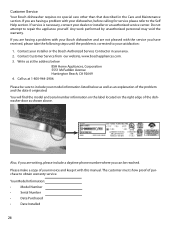
...date it with the service you are not pleased with this manual. Customer Service Your Bosch dishwasher requires no special care other than that described in your Bosch dishwasher and are having a problem with your dishwasher, before calling for service please refer to your model information listed below : BSH Home ... obtain warranty service. You will ind the model and serial number information on the label located on the right edge of the dishwasher door as an explanation of your invoice and keep it originated. If you have received, please take the following steps until the...
...date it with the service you are not pleased with this manual. Customer Service Your Bosch dishwasher requires no special care other than that described in your Bosch dishwasher and are having a problem with your dishwasher, before calling for service please refer to your model information listed below : BSH Home ... obtain warranty service. You will ind the model and serial number information on the label located on the right edge of the dishwasher door as an explanation of your invoice and keep it originated. If you have received, please take the following steps until the...


