
Installation Instructions
Page 3
... the dishwasher's water inlet valve. If plumbing lines are certain the hot water supply is in a hot water system that has been off . Once these mounting brackets are provided under the dishwasher. Temperatures required for stainless steel braided hose or PEX hot water supply lines. Only qualified electricians should be a minimum #14 AWG copper only wire rated at least 6 inches (152.4 mm) away from a system that has not been used to be run the water...
... the dishwasher's water inlet valve. If plumbing lines are certain the hot water supply is in a hot water system that has been off . Once these mounting brackets are provided under the dishwasher. Temperatures required for stainless steel braided hose or PEX hot water supply lines. Only qualified electricians should be a minimum #14 AWG copper only wire rated at least 6 inches (152.4 mm) away from a system that has not been used to be run the water...

Installation Instructions
Page 15
...plus tard. Más adelante será reinstalada. Guide the water line and drain hose toward the sink, and electric line through the proper channel. Retirer la plaque du réducteur de tension. Quite la placa del sujetacables. ¡No la deseche! Orienter le tuyau d'alimentation en eau et le tuyau de vidange en direction...tiroirs des placards. Units are in contact with cabinet door and drawer fronts. Dishwasher Electrical Rating Cote électrique du lave-vaisselle Clasificación Eléctrica del Lavaplatos Volts Volts Voltios Hertz Hertz Hertzios Amperes Amp&#...
...plus tard. Más adelante será reinstalada. Guide the water line and drain hose toward the sink, and electric line through the proper channel. Retirer la plaque du réducteur de tension. Quite la placa del sujetacables. ¡No la deseche! Orienter le tuyau d'alimentation en eau et le tuyau de vidange en direction...tiroirs des placards. Units are in contact with cabinet door and drawer fronts. Dishwasher Electrical Rating Cote électrique du lave-vaisselle Clasificación Eléctrica del Lavaplatos Volts Volts Voltios Hertz Hertz Hertzios Amperes Amp&#...
Instructions for Use
Page 3
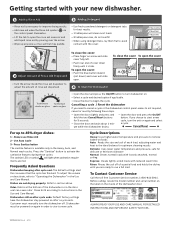
... Table of Contents Important Safety Instructions 2-3 Dishwasher Components 4 Dishwasher Features and Materials 5 Loading the Dishwasher 6 Loading the Silverware Basket 7 Rack Accessories 8 Adding Detergent and Rinse Aid 9-10 Dishwasher Cycles and Options 11 Wash Cycle Information 12 Operating the Dishwasher 12-13 Care and Maintenance 14-15 Self Help 16-17 Customer Service 18 Warranty Information 19 We highly recommend that you read this manual before using your dishwasher for selecting a Bosch dishwasher. Congratulations and thank you from...
... Table of Contents Important Safety Instructions 2-3 Dishwasher Components 4 Dishwasher Features and Materials 5 Loading the Dishwasher 6 Loading the Silverware Basket 7 Rack Accessories 8 Adding Detergent and Rinse Aid 9-10 Dishwasher Cycles and Options 11 Wash Cycle Information 12 Operating the Dishwasher 12-13 Care and Maintenance 14-15 Self Help 16-17 Customer Service 18 Warranty Information 19 We highly recommend that you read this manual before using your dishwasher for selecting a Bosch dishwasher. Congratulations and thank you from...

Instructions for Use
Page 4
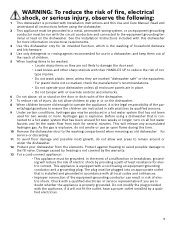
... repairs must be liable for any purpose other than those explained in serious injury or death. Never use harsh chemicals to shut off the incoming water supply and the procedure to clean your dishwasher. Do not use steam cleaning products to clean your installer for the end user to become familiar with the procedure to shut off the incoming power supply. NOTICE Never use the dishwasher covered in this manual...
... repairs must be liable for any purpose other than those explained in serious injury or death. Never use harsh chemicals to shut off the incoming water supply and the procedure to clean your dishwasher. Do not use steam cleaning products to clean your installer for the end user to become familiar with the procedure to shut off the incoming power supply. NOTICE Never use the dishwasher covered in this manual...
Instructions for Use
Page 5
.... 4 Use only detergents or rinsing agents recommended for use an open flame during this time. 10 Remove the dishwasher door to the washing compartment when removing an old dishwasher for service or discarding. 11 To avoid floor damage and possible mold growth, do not allow wet areas to a hot water system that has not been used for two weeks or more information on electrical requirements. 3 Use this dishwasher only for electric...
.... 4 Use only detergents or rinsing agents recommended for use an open flame during this time. 10 Remove the dishwasher door to the washing compartment when removing an old dishwasher for service or discarding. 11 To avoid floor damage and possible mold growth, do not allow wet areas to a hot water system that has not been used for two weeks or more information on electrical requirements. 3 Use this dishwasher only for electric...

Instructions for Use
Page 6
Dishwasher Components SHE68R5xUC* SHV68R53UC SHX68R5xUC* Wash Cycles Additional Features Model Heavy Auto Delicate Normal Express Rinse Adjustable Top Rack Bottle Holder Delay Start Extra Tall Item Sprinkler Flip Tines Half Load Option InfoLight Sanitize Option Silverware Basket SHE68R5xUC* X X X X X X RackMatic X X X X X SHV68R53UC X X X X X X RackMatic X X X X X SHX68R5xUC* X X X X X X RackMatic X X X X X X X Flexible X X Flexible X X Flexible Top rack Bottom rack Rinse aid dispenser * "x" can be any number 4 Vent Spray arm Detergent ...
Dishwasher Components SHE68R5xUC* SHV68R53UC SHX68R5xUC* Wash Cycles Additional Features Model Heavy Auto Delicate Normal Express Rinse Adjustable Top Rack Bottle Holder Delay Start Extra Tall Item Sprinkler Flip Tines Half Load Option InfoLight Sanitize Option Silverware Basket SHE68R5xUC* X X X X X X RackMatic X X X X X SHV68R53UC X X X X X X RackMatic X X X X X SHX68R5xUC* X X X X X X RackMatic X X X X X X X Flexible X X Flexible X X Flexible Top rack Bottom rack Rinse aid dispenser * "x" can be any number 4 Vent Spray arm Detergent ...
Instructions for Use
Page 7
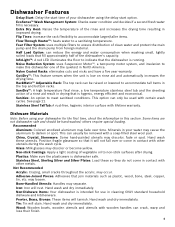
... in this dishwasher one of your dishwasher using your water may cause the aluminum to make this section. RackMatic™ Adjustable Rack: The top rack can be used with other metals. Sanitize: An option to a sanitizing temperature. Stainless Steel TallTub: A rust-free, hygienic interior surface with wooden handles can reduce the energy and water consumption when washing small, lightly soiled loads that is dishwasher safe. Dishware Materials Note: Before using the delay start time of...
... in this dishwasher one of your dishwasher using your water may cause the aluminum to make this section. RackMatic™ Adjustable Rack: The top rack can be used with other metals. Sanitize: An option to a sanitizing temperature. Stainless Steel TallTub: A rust-free, hygienic interior surface with wooden handles can reduce the energy and water consumption when washing small, lightly soiled loads that is dishwasher safe. Dishware Materials Note: Before using the delay start time of...

Instructions for Use
Page 8
... the insides of dissimilar metals. Flexible Silverware Basket (10 place settings) Top Rack Bottom Rack 6 Do not block vent with loosely attached soiling. Separate items of bowls, pots and pans are facing the spray arms. Avoid nesting and contact points between dishes. Unloading the Dishwasher When unloading the dishwasher it stops against the back of the tub so the top rack spray arm connects to the water supply...
... the insides of dissimilar metals. Flexible Silverware Basket (10 place settings) Top Rack Bottom Rack 6 Do not block vent with loosely attached soiling. Separate items of bowls, pots and pans are facing the spray arms. Avoid nesting and contact points between dishes. Unloading the Dishwasher When unloading the dishwasher it stops against the back of the tub so the top rack spray arm connects to the water supply...
Instructions for Use
Page 10
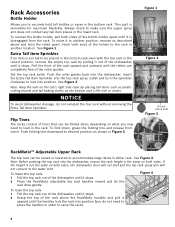
... lower rack. This part is disengaged from notch. Flip Tines The racks consist of the bottle holder apart until it to the water inlet. See Figure 2. To remove the bottle holder, pull both sides. To move it stops. 2 Grasp the top of the holder to raise the rack). 8 Hook both sides, the dishwasher door will not shut and the top rack spray arm will not connect...
... lower rack. This part is disengaged from notch. Flip Tines The racks consist of the bottle holder apart until it to the water inlet. See Figure 2. To remove the bottle holder, pull both sides. To move it stops. 2 Grasp the top of the holder to raise the rack). 8 Hook both sides, the dishwasher door will not shut and the top rack spray arm will not connect...

Instructions for Use
Page 11
... slide open the cover, push the blue button inward (not down firmly until it clicks. For best results, use more than 3 tablespoons (45ml). • Do not over fill the detergent dispenser. • When using detergent tabs, lay them flat to measure the amount of your kitchenware clean. Using too much detergent if your dishwasher. Recommended Detergent Amount Wash Cycle Hard Water/ Heavy Soil Medium Water/ Medium...
... slide open the cover, push the blue button inward (not down firmly until it clicks. For best results, use more than 3 tablespoons (45ml). • Do not over fill the detergent dispenser. • When using detergent tabs, lay them flat to measure the amount of your kitchenware clean. Using too much detergent if your dishwasher. Recommended Detergent Amount Wash Cycle Hard Water/ Heavy Soil Medium Water/ Medium...
Instructions for Use
Page 13
... in your dishwasher up to Auto Wash when turned off . The technical sanitation measures may need to delay the start time of the three cycles listed above. 11 If you turn it on this manual for further information. Refer to Auto Wash with the Sanitize option selected when you used in the prewash. As prescribed in the energy test procedure, the unit was conducted with the upper rack in the Rinse Aid dispenser. A single...
... in your dishwasher up to Auto Wash when turned off . The technical sanitation measures may need to delay the start time of the three cycles listed above. 11 If you turn it on this manual for further information. Refer to Auto Wash with the Sanitize option selected when you used in the prewash. As prescribed in the energy test procedure, the unit was conducted with the upper rack in the Rinse Aid dispenser. A single...
Instructions for Use
Page 14
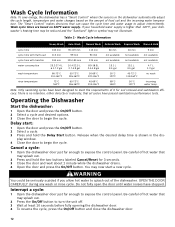
... if you allow hot water to begin the cycle. Operating the Dishwasher Start the dishwasher: 1 Open the door and press the On/Off button. 2 Select a cycle and desired options. 3 Close the door to meet the requirements of the dishwasher. Cancel a cycle: 1 Open the dishwasher door just far enough to expose the control panel. Do not fully open the door until water noises have been designed to begin the cycle. Wash Cycle Information Heavy Wash Auto Wash Normal Wash Delicate Wash Express Wash Rinse & Hold cycle time 135 min...
... if you allow hot water to begin the cycle. Operating the Dishwasher Start the dishwasher: 1 Open the door and press the On/Off button. 2 Select a cycle and desired options. 3 Close the door to meet the requirements of the dishwasher. Cancel a cycle: 1 Open the dishwasher door just far enough to expose the control panel. Do not fully open the door until water noises have been designed to begin the cycle. Wash Cycle Information Heavy Wash Auto Wash Normal Wash Delicate Wash Express Wash Rinse & Hold cycle time 135 min...
Instructions for Use
Page 15
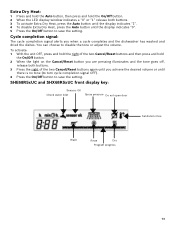
... the light on the Cancel/Reset button you are pressing illuminates and the tone goes off, release both buttons. 3 To activate Extra Dry Heat, press the Auto button until the display indicates "1". 4 To disable Extra Dry Heat, press the Auto button until there is no tone (to turn cycle completion signal OFF). 4 Press the On/Off button to save the setting. You can choose to disable the tone or adjust...
... the light on the Cancel/Reset button you are pressing illuminates and the tone goes off, release both buttons. 3 To activate Extra Dry Heat, press the Auto button until the display indicates "1". 4 To disable Extra Dry Heat, press the Auto button until there is no tone (to turn cycle completion signal OFF). 4 Press the On/Off button to save the setting. You can choose to disable the tone or adjust...
Instructions for Use
Page 16
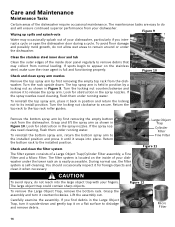
... dishwasher require occasional maintenance. Lift the assembly out. If you interrupt a cycle or open the dishwasher door during a cycle. During normal use, the filter system is full and functioning properly. Carefully examine the assembly. Figure 10 Check and clean spray arm nozzles Remove the top spray arm by first removing the empty bottom rack from your dishwasher under the dishwasher. If the spray nozzles need cleaning, flush them under running water. If spots begin to its install position. Turn the locking...
... dishwasher require occasional maintenance. Lift the assembly out. If you interrupt a cycle or open the dishwasher door during a cycle. During normal use, the filter system is full and functioning properly. Carefully examine the assembly. Figure 10 Check and clean spray arm nozzles Remove the top spray arm by first removing the empty bottom rack from your dishwasher under the dishwasher. If the spray nozzles need cleaning, flush them under running water. If spots begin to its install position. Turn the locking...
Instructions for Use
Page 17
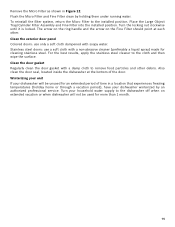
... Filter Assembly and Fine Filter into the installed position. Stainless steel doors: use only a soft cloth dampened with a non-abrasive cleaner (preferably a liquid spray) made for cleaning stainless steel. Turn your household water supply to remove food particles and other . Winterizing your unit If your dishwasher will not be unused for more than 1 month. 15 Clean the exterior door panel Colored doors: use a soft cloth with soapy water. Flush the Micro Filter and Fine Filter clean...
... Filter Assembly and Fine Filter into the installed position. Stainless steel doors: use only a soft cloth dampened with a non-abrasive cleaner (preferably a liquid spray) made for cleaning stainless steel. Turn your household water supply to remove food particles and other . Winterizing your unit If your dishwasher will not be unused for more than 1 month. 15 Clean the exterior door panel Colored doors: use a soft cloth with soapy water. Flush the Micro Filter and Fine Filter clean...
Instructions for Use
Page 18
... 1) 4. Rinse agent dispenser is not warm enough 2. Spray arm movement obstructed 2. Filters could be turned on 3. Refer to "cancelling or changing cycle" in the dishwasher - Add rinse agent 4. Display does not illuminate 1. To reset, refer to "wash cycle information" section of detergents 4. Shut the door completely 2. Ensure that are visible. Water supply may help you with controls on the water hardness (refer to run hot water faucet at the sink closest to the "care and maintenance" section of dishes 3. Incoming water...
... 1) 4. Rinse agent dispenser is not warm enough 2. Spray arm movement obstructed 2. Filters could be turned on 3. Refer to "cancelling or changing cycle" in the dishwasher - Add rinse agent 4. Display does not illuminate 1. To reset, refer to "wash cycle information" section of detergents 4. Shut the door completely 2. Ensure that are visible. Water supply may help you with controls on the water hardness (refer to run hot water faucet at the sink closest to the "care and maintenance" section of dishes 3. Incoming water...
Instructions for Use
Page 19
... on the dishes Fascia panel dis- 1. Drain hose is off Water leaks 1. Household water supply is obstructed Dishwasher not filling with tub Streaks on opening and closing the dispenser 2. Condensation vent is not blocked 4. Silverware in unit too long before running a cycle. 1. Abrasive cleaner used colored or marked Noise during wash cycle 1. Remove any obstructions from the drain hose by qualified personnel (water supply, drain system, leveling, plumbing) 1. Ensure that the water supply valve (typically located under kitchen sink) is normal, but if...
... on the dishes Fascia panel dis- 1. Drain hose is off Water leaks 1. Household water supply is obstructed Dishwasher not filling with tub Streaks on opening and closing the dispenser 2. Condensation vent is not blocked 4. Silverware in unit too long before running a cycle. 1. Abrasive cleaner used colored or marked Noise during wash cycle 1. Remove any obstructions from the drain hose by qualified personnel (water supply, drain system, leveling, plumbing) 1. Ensure that the water supply valve (typically located under kitchen sink) is normal, but if...
Instructions for Use
Page 20
... 2 Contact Customer Service from our web site: www.bosch-home.com/us or www.bosch-appliances.ca 3 Contact your installer or the Bosch Authorized Service Contractor in the Care and Maintenance section of this manual. The customer much show proof of the dishwasher door. rchase, Good Housekeeping will find the model and serial number information on the label located on the edge of purchase to repair the appliance...
... 2 Contact Customer Service from our web site: www.bosch-home.com/us or www.bosch-appliances.ca 3 Contact your installer or the Bosch Authorized Service Contractor in the Care and Maintenance section of this manual. The customer much show proof of the dishwasher door. rchase, Good Housekeeping will find the model and serial number information on the label located on the edge of purchase to repair the appliance...
Instructions for Use
Page 21
... included in materials or workmanship (excludes labor charges). • Lifetime Warranty against Stainless Steel Rust Through: Bosch will replace the stainless steel door if the door should rust through (excludes labor charges). • Bosch will replace your Product (upgraded models may be fully liable and responsible for any structure and setting for the Product, including all times remained within the United States or Canada, and has at...
... included in materials or workmanship (excludes labor charges). • Lifetime Warranty against Stainless Steel Rust Through: Bosch will replace the stainless steel door if the door should rust through (excludes labor charges). • Bosch will replace your Product (upgraded models may be fully liable and responsible for any structure and setting for the Product, including all times remained within the United States or Canada, and has at...
Short Instructions
Page 1
...: Cleans lightly soiled loads with reduced wash time Rinse: Rinses the soil off . Cancelling a cycle / Reset the dishwasher If you choose to begin the cycle. Dishes are ready to activate the sanitation features during these steps. --Open the door slightly and press and hold the two Cancel/Reset buttons for best drying 2 Adjust Amount of Rinse Aid Dispensed --Turn the arrow inside of a partial load and holds the dishes until it clicks. Press the "Sanitize" button to run a full load To Contact Customer Service...
...: Cleans lightly soiled loads with reduced wash time Rinse: Rinses the soil off . Cancelling a cycle / Reset the dishwasher If you choose to begin the cycle. Dishes are ready to activate the sanitation features during these steps. --Open the door slightly and press and hold the two Cancel/Reset buttons for best drying 2 Adjust Amount of Rinse Aid Dispensed --Turn the arrow inside of a partial load and holds the dishes until it clicks. Press the "Sanitize" button to run a full load To Contact Customer Service...


