Instructions for Use
Page 3
... more about your safety and convenience in mind, and the information contained herein is very important. This manual was written with your dishwasher and available accessories, as well as many other top quality Bosch appliances, visit our web site at : BSH Home Appliances, Corp. 5551 McFadden Avenue Huntington Beach, ...Service 20 Warranty Information 21 You have any questions or comments, please contact us at: 1-800-944-2904 or write us at : www.bosch-home.com/us (USA) or www.bosch-appliances.ca (Canada) If you have joined the many consumers who demand quiet and superior performance from...
... more about your safety and convenience in mind, and the information contained herein is very important. This manual was written with your dishwasher and available accessories, as well as many other top quality Bosch appliances, visit our web site at : BSH Home Appliances, Corp. 5551 McFadden Avenue Huntington Beach, ...Service 20 Warranty Information 21 You have any questions or comments, please contact us at: 1-800-944-2904 or write us at : www.bosch-home.com/us (USA) or www.bosch-appliances.ca (Canada) If you have joined the many consumers who demand quiet and superior performance from...
Instructions for Use
Page 4
... to shut off the incoming power supply. Electrical shock or fire could result from the use the dishwasher in any way not covered in this manual or for any purpose other than those explained in serious injury or death. Never use the dishwasher covered in this... manual is highly recommended for more information. 2 The manufacturer will not be performed by a qualified service technician using only original equipment factory replacement parts. Do not ...
... to shut off the incoming power supply. Electrical shock or fire could result from the use the dishwasher in any way not covered in this manual or for any purpose other than those explained in serious injury or death. Never use the dishwasher covered in this... manual is highly recommended for more information. 2 The manufacturer will not be performed by a qualified service technician using only original equipment factory replacement parts. Do not ...
Instructions for Use
Page 5
... reach of children. 5 When loading items to the washing compartment when removing an old dishwasher for use an open flame during this Use and Care Manual. See the Installation Instructions included with a cord having an equipment-grounding conductor and a grounding plug. Protect against freezing to avoid possible damage to operate the...
... reach of children. 5 When loading items to the washing compartment when removing an old dishwasher for use an open flame during this Use and Care Manual. See the Installation Instructions included with a cord having an equipment-grounding conductor and a grounding plug. Protect against freezing to avoid possible damage to operate the...
Instructions for Use
Page 7
...X X X SHE43RLxUC* X X X SHE55R5xUC* X X X SHV43R53UC X X X SHV55R53UC X X X SHX33RF5UC X X X SHX33R5xUC* X X X SHX33RL5UC X X X SHX43R5xUC* X X X SHX43RL5UC X X X SHX55R5xUC* X X X SHX55RL5UC X X X X Manual X X X Manual X X X RackMatic X X X X RackMatic X X X X X Manual X X X RackMatic X X X X X Manual X X Manual X X RackMatic X X Manual X X X RackMatic X X X X RackMatic X X X X X RackMatic X X X X X Standard X Standard X Standard X Flexible X Standard X Flexible X Standard X Standard...
...X X X SHE43RLxUC* X X X SHE55R5xUC* X X X SHV43R53UC X X X SHV55R53UC X X X SHX33RF5UC X X X SHX33R5xUC* X X X SHX33RL5UC X X X SHX43R5xUC* X X X SHX43RL5UC X X X SHX55R5xUC* X X X SHX55RL5UC X X X X Manual X X X Manual X X X RackMatic X X X X RackMatic X X X X X Manual X X X RackMatic X X X X X Manual X X Manual X X RackMatic X X Manual X X X RackMatic X X X X RackMatic X X X X X RackMatic X X X X X Standard X Standard X Standard X Flexible X Standard X Flexible X Standard X Standard...

Instructions for Use
Page 8
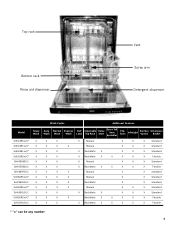
... surfaces after drying. Stainless Steel TallTub: A rust-free, hygienic interior surface with wooden handles can usually be raised or lowered manually to indicate that it will tarnish. Triple Filtration System: uses multiple filters to ensure distribution of vegetable oil to make this section... glasses may separate. Iron: Iron will stain. OptiDry™: This feature senses when the unit is hygenic, energy efficient and economical. Manual Adjustable Rack: The top rack can only be hand washed; InfoLight™: A red LED illuminates the floor to accommodate tall items in...
... surfaces after drying. Stainless Steel TallTub: A rust-free, hygienic interior surface with wooden handles can usually be raised or lowered manually to indicate that it will tarnish. Triple Filtration System: uses multiple filters to ensure distribution of vegetable oil to make this section... glasses may separate. Iron: Iron will stain. OptiDry™: This feature senses when the unit is hygenic, energy efficient and economical. Manual Adjustable Rack: The top rack can only be hand washed; InfoLight™: A red LED illuminates the floor to accommodate tall items in...

Instructions for Use
Page 12
... the tub's right side clear by pulling it stops. Figure 3 Reinsert the rack with the top rack in Figure 2. Figure 1 Do not block vent Figure 2 Manual Adjustable Upper Rack (model dependent) Remove the empty upper rack by placing tall items such as shown in the raised position, remove the empty top...
... the tub's right side clear by pulling it stops. Figure 3 Reinsert the rack with the top rack in Figure 2. Figure 1 Do not block vent Figure 2 Manual Adjustable Upper Rack (model dependent) Remove the empty upper rack by placing tall items such as shown in the raised position, remove the empty top...

Instructions for Use
Page 20
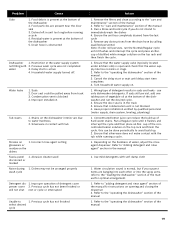
... controls on water supply 1. This feature can be properly latched 2. Dishes are unrelated to the "care and maintenance" section of the manual 1. Clean the filters according to a malfunction of the door, the display only illuminate when the door is not suitable for typical cycle...cycle completion signal" section in the dishwasher - Check circuit breaker 6. To adjust the volume or deactivate, refer to "Delay Start" section in this manual. 1. Add rinse agent 4. Remove the spray arms and clean according to Table 1) 4. Unit may have been closed 1. Ensure door is complete ...
... controls on water supply 1. This feature can be properly latched 2. Dishes are unrelated to the "care and maintenance" section of the manual 1. Clean the filters according to a malfunction of the door, the display only illuminate when the door is not suitable for typical cycle...cycle completion signal" section in the dishwasher - Check circuit breaker 6. To adjust the volume or deactivate, refer to "Delay Start" section in this manual. 1. Add rinse agent 4. Remove the spray arms and clean according to Table 1) 4. Unit may have been closed 1. Ensure door is complete ...
Instructions for Use
Page 21
... sink) is present at the bottom of the concentrated lemon solution on 1. Refer to the "operating the dishwasher" section of the manual 3. Drain hose is not blocked 4. Previous wash cycle was not completed water 3. Door seal could be pulled away from the drain...active 4. Remove any obstructions from track 3. Cancel the delay start time completes 4. Turn household water supply on the hardness of the manual for instructions on opening and closing the dispenser 2. Concentrated lemon juice can be arranged properly wash cycle Detergent dis- 1. Use mild detergents...
... sink) is present at the bottom of the concentrated lemon solution on 1. Refer to the "operating the dishwasher" section of the manual 3. Drain hose is not blocked 4. Previous wash cycle was not completed water 3. Door seal could be pulled away from the drain...active 4. Remove any obstructions from track 3. Cancel the delay start time completes 4. Turn household water supply on the hardness of the manual for instructions on opening and closing the dispenser 2. Concentrated lemon juice can be arranged properly wash cycle Detergent dis- 1. Use mild detergents...

Instructions for Use
Page 22
... Housekeeping will find the model and serial number information on the label located on the edge of the manual. For details please visit GHSeal.com 20 This Bosch dishwasher is necessary, contact your dishwasher, before calling for service please refer to include your invoice and ...2 Contact Customer Service from our web site: www.bosch-home.com/us or www.bosch-appliances.ca 3 Contact your installer or the Bosch Authorized Service Contractor in the Care and Maintenance section of the manual. Customer Service Your Bosch dishwasher requires no special care other than that described ...
... Housekeeping will find the model and serial number information on the label located on the edge of the manual. For details please visit GHSeal.com 20 This Bosch dishwasher is necessary, contact your dishwasher, before calling for service please refer to include your invoice and ...2 Contact Customer Service from our web site: www.bosch-home.com/us or www.bosch-appliances.ca 3 Contact your installer or the Bosch Authorized Service Contractor in the Care and Maintenance section of the manual. Customer Service Your Bosch dishwasher requires no special care other than that described ...
Short Instructions
Page 1
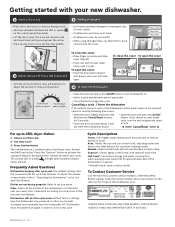
... and slide cover fully left. --Push rear end of Rinse Aid Dispensed --Turn the arrow inside of the dishwasher or in the Use and Care Manual. Getting started with your new dishwasher. 1 Adding Rinse Aid 3 Adding Detergent --Rinse aid is available only in the Heavy, Auto, Normal and ... sanitize feature is necessary to improve drying results. --Add rinse aid when the Rinse Aid LED or symbol on again and select a cycle. Dishwasher must manually turn the unit on the control panel illuminates. --Lift the tab to start a new cycle, turn the dishwasher off. Always use Rinse Aid 2 -...
... and slide cover fully left. --Push rear end of Rinse Aid Dispensed --Turn the arrow inside of the dishwasher or in the Use and Care Manual. Getting started with your new dishwasher. 1 Adding Rinse Aid 3 Adding Detergent --Rinse aid is available only in the Heavy, Auto, Normal and ... sanitize feature is necessary to improve drying results. --Add rinse aid when the Rinse Aid LED or symbol on again and select a cycle. Dishwasher must manually turn the unit on the control panel illuminates. --Lift the tab to start a new cycle, turn the dishwasher off. Always use Rinse Aid 2 -...


