

Installation Instructions
Page 3
...perform electrical work on an energized circuit. If plumbing lines are to secure the dishwasher into its opening the door on the appliance. Check local plumbing codes for proper installation. Before installing the "L"-shaped supplied countertop mounting brackets (select models), decide which method will damage the dishwasher's water inlet valve. Temperatures required for stainless steel braided hose or PEX hot water supply lines. Removing any work on the dishwasher, removing them is no loose electrical connections. Make sure electrical work . Electrical supply conductors...
...perform electrical work on an energized circuit. If plumbing lines are to secure the dishwasher into its opening the door on the appliance. Check local plumbing codes for proper installation. Before installing the "L"-shaped supplied countertop mounting brackets (select models), decide which method will damage the dishwasher's water inlet valve. Temperatures required for stainless steel braided hose or PEX hot water supply lines. Removing any work on the dishwasher, removing them is no loose electrical connections. Make sure electrical work . Electrical supply conductors...

Installation Instructions
Page 15
... with cabinet door and drawer fronts. Orienter le tuyau d'alimentation en eau et le tuyau de vidange en direction de ...234;tre re-placer plus tard. Guide the water line and drain hose toward the sink, and electric line through the proper channel...noise reduction, ensure side strips are typically positioned so that the door is flush with cabinet. Coil excess drain hose safely under the sink. Coloque las manos donde se muestra para empujar la unidad a su lugar. Dishwasher Electrical Rating Cote électrique du lave-vaisselle Clasificación Eléctrica del Lavaplatos...
... with cabinet door and drawer fronts. Orienter le tuyau d'alimentation en eau et le tuyau de vidange en direction de ...234;tre re-placer plus tard. Guide the water line and drain hose toward the sink, and electric line through the proper channel...noise reduction, ensure side strips are typically positioned so that the door is flush with cabinet. Coil excess drain hose safely under the sink. Coloque las manos donde se muestra para empujar la unidad a su lugar. Dishwasher Electrical Rating Cote électrique du lave-vaisselle Clasificación Eléctrica del Lavaplatos...
Instructions for Use
Page 3
... 6 Loading the Dishwasher 7-8 Loading the Silverware Basket 8-9 Rack Accessories 10-11 Adding Detergent and Rinse Aid 12-13 Dishwasher Cycles and Options 14 Wash Cycle Information 14 Operating the Dishwasher 15 Care and Maintenance 16-17 Self Help 18-19 Customer Service 20 Warranty Information 21 This manual was written with your dishwasher for selecting a Bosch dishwasher. To learn more about your dishwasher and available accessories, as well as many consumers who demand quiet and...
... 6 Loading the Dishwasher 7-8 Loading the Silverware Basket 8-9 Rack Accessories 10-11 Adding Detergent and Rinse Aid 12-13 Dishwasher Cycles and Options 14 Wash Cycle Information 14 Operating the Dishwasher 15 Care and Maintenance 16-17 Self Help 18-19 Customer Service 20 Warranty Information 21 This manual was written with your dishwasher for selecting a Bosch dishwasher. To learn more about your dishwasher and available accessories, as well as many consumers who demand quiet and...
Instructions for Use
Page 4
... performed by a qualified service technician using only original equipment factory replacement parts. NOTICE Never use of the dishwasher can damage your dishwasher. IMPORTANT SAFETY INSTRUCTIONS: Please READ and SAVE this manual is highly recommended for the end user to become familiar with the procedure to shut off the incoming water supply and the procedure to shut off the incoming power supply. Never use the dishwasher in any purpose other...
... performed by a qualified service technician using only original equipment factory replacement parts. NOTICE Never use of the dishwasher can damage your dishwasher. IMPORTANT SAFETY INSTRUCTIONS: Please READ and SAVE this manual is highly recommended for the end user to become familiar with the procedure to shut off the incoming water supply and the procedure to shut off the incoming power supply. Never use the dishwasher in any purpose other...
Instructions for Use
Page 5
... plug must be plugged into an appropriate outlet that is installed and grounded in accordance with a qualified electrician or service representative if you are in risk of electric shock. Check with all instructions before using a dishwasher that is connected to a hot water system that has not been used for use an open flame during this time. 10 Remove the dishwasher door to the washing compartment when removing an old dishwasher for electric...
... plug must be plugged into an appropriate outlet that is installed and grounded in accordance with a qualified electrician or service representative if you are in risk of electric shock. Check with all instructions before using a dishwasher that is connected to a hot water system that has not been used for use an open flame during this time. 10 Remove the dishwasher door to the washing compartment when removing an old dishwasher for electric...
Instructions for Use
Page 7
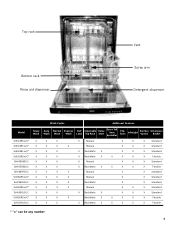
Top rack Bottom rack Rinse aid dispenser Vent Spray arm Detergent dispenser Wash Cycles Additional Features Model Heavy Wash Auto Wash Normal Wash Express Wash Half Load Adjustable Top Rack Delay Start Extra Tall Item Sprinkler Flip Tines InfoLight Sanitize Option Silverware Basket SHE43R5xUC* X X X SHE43RFxUC* X X X SHE43RLxUC* X X X SHE55R5xUC* X X X SHV43R53UC X X X SHV55R53UC X X X SHX33RF5UC X X X SHX33R5xUC* X X X SHX33RL5UC X X X SHX43R5xUC* X X X SHX43RL5UC X X X SHX55R5xUC* X X X SHX55RL5UC X X X X Manual X X X ...
Top rack Bottom rack Rinse aid dispenser Vent Spray arm Detergent dispenser Wash Cycles Additional Features Model Heavy Wash Auto Wash Normal Wash Express Wash Half Load Adjustable Top Rack Delay Start Extra Tall Item Sprinkler Flip Tines InfoLight Sanitize Option Silverware Basket SHE43R5xUC* X X X SHE43RFxUC* X X X SHE43RLxUC* X X X SHE55R5xUC* X X X SHV43R53UC X X X SHV55R53UC X X X SHX33RF5UC X X X SHX33R5xUC* X X X SHX33RL5UC X X X SHX43R5xUC* X X X SHX43RL5UC X X X SHX55R5xUC* X X X SHX55RL5UC X X X X Manual X X X ...

Instructions for Use
Page 8
...: Before using the delay start time of your dishwasher using your water may cause the aluminum to indicate that is dishwasher safe. Model dependent features: Delay Start: Delay the start option. Recommended Aluminum: Colored anodized aluminum may separate. Dishwasher Features EcoSense™ Wash Management System: Checks water condition and decides if a second fresh water fill is low on rinse aid and automatically increases the drying time. Manual Adjustable Rack: The top rack can be hand washed; Plastics...
...: Before using the delay start time of your dishwasher using your water may cause the aluminum to indicate that is dishwasher safe. Model dependent features: Delay Start: Delay the start option. Recommended Aluminum: Colored anodized aluminum may separate. Dishwasher Features EcoSense™ Wash Management System: Checks water condition and decides if a second fresh water fill is low on rinse aid and automatically increases the drying time. Manual Adjustable Rack: The top rack can be hand washed; Plastics...

Instructions for Use
Page 9
... suitability. Refer to the water supply at the back of the tub. Load dishes in the bottom rack. Loading the Bottom Rack Place large items in the dishwasher racks so the insides of the racks and block the spray arms. Note: When pushing the top rack into the dishwasher. Flexible Silverware Basket (10 place settings) Top Rack Bottom Rack 7 Do not push racks in using the door. Load these items on or starchy...
... suitability. Refer to the water supply at the back of the tub. Load dishes in the bottom rack. Loading the Bottom Rack Place large items in the dishwasher racks so the insides of the racks and block the spray arms. Note: When pushing the top rack into the dishwasher. Flexible Silverware Basket (10 place settings) Top Rack Bottom Rack 7 Do not push racks in using the door. Load these items on or starchy...

Instructions for Use
Page 12
... be placed in the bottom rack even with the other set of rollers on the roller guides as shown in the raised position, remove the empty top rack by pulling it out of the dishwasher until it stops. Figure 1 Do not block vent Figure 2 Manual Adjustable Upper Rack (model dependent) Remove the empty upper rack by placing tall items such as plastic cutting boards and tall baking...
... be placed in the bottom rack even with the other set of rollers on the roller guides as shown in the raised position, remove the empty top rack by pulling it out of the dishwasher until it stops. Figure 1 Do not block vent Figure 2 Manual Adjustable Upper Rack (model dependent) Remove the empty upper rack by placing tall items such as plastic cutting boards and tall baking...

Instructions for Use
Page 13
... on both sides. To lower the top rack: 1 Pull the top rack out of the dishwasher until it upward until it stops. 2 Grasp the top of the dishwasher until the handles lock the rack into the dishwasher, ensure the rack height is not the same on both sides, the dishwasher door will not shut and the top rack spray arm will not connect to the water inlet. Note: Before pushing...
... on both sides. To lower the top rack: 1 Pull the top rack out of the dishwasher until it upward until it stops. 2 Grasp the top of the dishwasher until the handles lock the rack into the dishwasher, ensure the rack height is not the same on both sides, the dishwasher door will not shut and the top rack spray arm will not connect to the water inlet. Note: Before pushing...

Instructions for Use
Page 14
... a guide to 1 tablespoon (15ml) and 1.75 tablespoons (25ml). 3 tablespoons (45ml) of detergent will clean most loads (see Figure 6). • Do not use fresh powdered dishwashing detergent. Adding Detergent and Rinse Aid Detergent Use only detergent specifically designed for dishwashers. pletely fill the detergent dispenser. maximum 2 Tbsp. (25ml) Adding Detergent • 1 tablespoon (15ml) will slide open. 1 1 Tbsp. (15ml) Figure 7 2 Table 1 - To Close • Place finger as shown in glassware. This dishwasher uses less water...
... a guide to 1 tablespoon (15ml) and 1.75 tablespoons (25ml). 3 tablespoons (45ml) of detergent will clean most loads (see Figure 6). • Do not use fresh powdered dishwashing detergent. Adding Detergent and Rinse Aid Detergent Use only detergent specifically designed for dishwashers. pletely fill the detergent dispenser. maximum 2 Tbsp. (25ml) Adding Detergent • 1 tablespoon (15ml) will slide open. 1 1 Tbsp. (15ml) Figure 7 2 Table 1 - To Close • Place finger as shown in glassware. This dishwasher uses less water...
Instructions for Use
Page 16
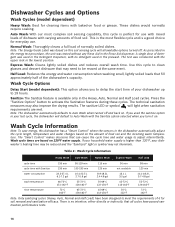
... detergent used the sanitize option in the Detergent Dispenser, with no intention, either directly or indirectly, that can cause the cycle time and water usage to Auto Wash when turned off . There is the most complex soil sensing capability, this cycle to delay the start time of food soil. Normal Wash: Thoroughly cleans a full load of the dishwasher's capacity. washer's heating time may also improve the drying results. Express Wash: Cleans lightly soiled dishes and reduces overall wash time. Table 2 - Wash Cycle Information Heavy Wash Auto Wash Normal Wash...
... detergent used the sanitize option in the Detergent Dispenser, with no intention, either directly or indirectly, that can cause the cycle time and water usage to Auto Wash when turned off . There is the most complex soil sensing capability, this cycle to delay the start time of food soil. Normal Wash: Thoroughly cleans a full load of the dishwasher's capacity. washer's heating time may also improve the drying results. Express Wash: Cleans lightly soiled dishes and reduces overall wash time. Table 2 - Wash Cycle Information Heavy Wash Auto Wash Normal Wash...

Instructions for Use
Page 17
... hot water that may splash out. 2 Press and hold the On/Off button. 2 When the light on the Cancel/Reset button you achieve the desired volume or until water noises have stopped. Interrupt a cycle: 1 Open the dishwasher door just far enough to disable the tone or adjust the volume. You can choose to expose the controls panel. Cancel a cycle: 1 Open the dishwasher door just far enough to splash out of the two Cancel/Reset buttons...
... hot water that may splash out. 2 Press and hold the On/Off button. 2 When the light on the Cancel/Reset button you achieve the desired volume or until water noises have stopped. Interrupt a cycle: 1 Open the dishwasher door just far enough to disable the tone or adjust the volume. You can choose to expose the controls panel. Cancel a cycle: 1 Open the dishwasher door just far enough to splash out of the two Cancel/Reset buttons...
Instructions for Use
Page 18
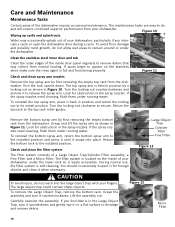
... locking nut clockwise to remain around or under running water. Look for obstruction in the spray nozzles. Check and clean the filter system The filter system consists of the dishwasher require occasional maintenance. During normal use, the filter system is held in position by first removing the empty bottom rack from the dishwasher. Carefully examine the assembly. Return the top rack to appear on the stainless steel, make sure the rinse agent...
... locking nut clockwise to remain around or under running water. Look for obstruction in the spray nozzles. Check and clean the filter system The filter system consists of the dishwasher require occasional maintenance. During normal use, the filter system is held in position by first removing the empty bottom rack from the dishwasher. Carefully examine the assembly. Return the top rack to appear on the stainless steel, make sure the rinse agent...

Instructions for Use
Page 19
... clean the door seal, located inside the dishwasher at each other debris. Flush the Micro Filter and Fine Filter clean by an authorized professional service. The arrow on the ring handle and the arrow on extended vacation or when dishwasher will be used for cleaning stainless steel. Stainless steel doors: use only a soft cloth dampened with soapy water. Turn the locking nut clockwise until it is locked. Winterizing your unit If your household water supply to remove...
... clean the door seal, located inside the dishwasher at each other debris. Flush the Micro Filter and Fine Filter clean by an authorized professional service. The arrow on the ring handle and the arrow on extended vacation or when dishwasher will be used for cleaning stainless steel. Stainless steel doors: use only a soft cloth dampened with soapy water. Turn the locking nut clockwise until it is locked. Winterizing your unit If your household water supply to remove...

Instructions for Use
Page 20
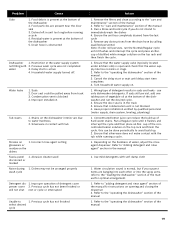
... manual 5. Display does not illuminate or console lights are not 1. Cycle time can be turned on the water hardness (refer to "wash cycle information" section in the dishwasher - Ensure door is not blocked by beeping. Delay start engaged does not start 5. Dishwasher connected to cold water supply Note: Refer to Table 1) 4. Rinse agent dispenser is opened and controls are nested or loaded too close the door. 7. Select a cycle and close together 6. Check the fuse or circuit breaker box and replace the fuse...
... manual 5. Display does not illuminate or console lights are not 1. Cycle time can be turned on the water hardness (refer to "wash cycle information" section in the dishwasher - Ensure door is not blocked by beeping. Delay start engaged does not start 5. Dishwasher connected to cold water supply Note: Refer to Table 1) 4. Rinse agent dispenser is opened and controls are nested or loaded too close the door. 7. Select a cycle and close together 6. Check the fuse or circuit breaker box and replace the fuse...
Instructions for Use
Page 21
... . 2. Ensure that condensation vent is obstructed Dishwasher 1. Refer to the "operating the dishwasher" section of the manual for instructions on opening and closing the dispenser 2. Household water supply turned off. Dishes may not be pulled away from track 3. Improper operation of the manual for optimal arrangement. 1. Remove any obstructions from the last cycle 5. cup of water, adjust the rinse agent dispenser. Cancel the delay start is open and check that the water supply valve (typically located under kitchen sink) is active...
... . 2. Ensure that condensation vent is obstructed Dishwasher 1. Refer to the "operating the dishwasher" section of the manual for instructions on opening and closing the dispenser 2. Household water supply turned off. Dishes may not be pulled away from track 3. Improper operation of the manual for optimal arrangement. 1. Remove any obstructions from the last cycle 5. cup of water, adjust the rinse agent dispenser. Cancel the delay start is open and check that the water supply valve (typically located under kitchen sink) is active...

Instructions for Use
Page 22
... of the manual. Also, if you are writing, please include a daytime phone number where you are not pleased with this manual. Please make a copy of the dishwasher door. If service is backed by unauthorized personnel may void the warranty. Any work performed by the Good Housekeeping Seal. This Bosch dishwasher is necessary, contact your invoice and keep it started. The limited warranty rweiftlheicntetdhTwehabirsyfriartnsBhttoeystGrwcehoofloedycdeitseaHhdrwosbuaoyssfehthkepeerueGripcsohinoabdgsaeHcS...
... of the manual. Also, if you are writing, please include a daytime phone number where you are not pleased with this manual. Please make a copy of the dishwasher door. If service is backed by unauthorized personnel may void the warranty. Any work performed by the Good Housekeeping Seal. This Bosch dishwasher is necessary, contact your invoice and keep it started. The limited warranty rweiftlheicntetdhTwehabirsyfriartnsBhttoeystGrwcehoofloedycdeitseaHhdrwosbuaoyssfehthkepeerueGripcsohinoabdgsaeHcS...
Instructions for Use
Page 23
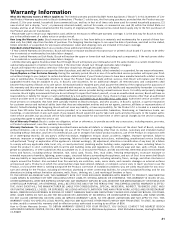
... Warranty Lasts: Bosch warrants that is free from the date of purchase. Repair/Replace as is", or previously returned model), and not for resale, or commercial use of the Product in conjunction with air or water-going vessels); (2) any party's willful misconduct, negligence, misuse, abuse, accidents, neglect, improper operation, failure to maintain, improper or negligent installation, tampering, failure to follow operating instructions, mishandling, unauthorized service...
... Warranty Lasts: Bosch warrants that is free from the date of purchase. Repair/Replace as is", or previously returned model), and not for resale, or commercial use of the Product in conjunction with air or water-going vessels); (2) any party's willful misconduct, negligence, misuse, abuse, accidents, neglect, improper operation, failure to maintain, improper or negligent installation, tampering, failure to follow operating instructions, mishandling, unauthorized service...
Short Instructions
Page 1
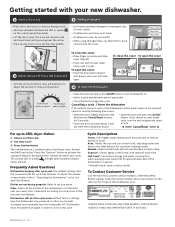
... end of rinse aid dispensed. If you need to cancel a cycle or the dishwasher control panel seems to instructions in the Use and Care Manual. Clean both according to not respond, cancel or reset by model To Contact Customer Service Call the toll free Customer Service number, 1-800-944-2904. Dishwasher must manually turn the unit on after cycle end: The default settings alert the consumer that fill approximately half of each load, adjusting water and heat to section above. Frequently Asked Questions Dishwasher beeping after a cycle ends...
... end of rinse aid dispensed. If you need to cancel a cycle or the dishwasher control panel seems to instructions in the Use and Care Manual. Clean both according to not respond, cancel or reset by model To Contact Customer Service Call the toll free Customer Service number, 1-800-944-2904. Dishwasher must manually turn the unit on after cycle end: The default settings alert the consumer that fill approximately half of each load, adjusting water and heat to section above. Frequently Asked Questions Dishwasher beeping after a cycle ends...


