User Guide
Page 4
... more information. ■ Never use harsh chemicals to shut off the incoming power supply. Some chloride-containing products can result in the following pages. ■ Severe product damage and/or injury could result if the electrical supply for the end user to become familiar with the procedure to shut off the incoming water supply and the procedure to clean your dishwasher and may present health...
... more information. ■ Never use harsh chemicals to shut off the incoming power supply. Some chloride-containing products can result in the following pages. ■ Severe product damage and/or injury could result if the electrical supply for the end user to become familiar with the procedure to shut off the incoming water supply and the procedure to clean your dishwasher and may present health...
User Guide
Page 5
... washing of household dishware and kitchenware. 4. Do not tamper with Installation Instructions and this Use and Care Manual. When children become old enough to operate the appliance, it is connected to a hot water system that they are not likely to damage the door seal. This will release any accumulated hydrogen gas. Read and understand all enclosure panels are marked "dishwasher safe" or the equivalent. Locate...
... washing of household dishware and kitchenware. 4. Do not tamper with Installation Instructions and this Use and Care Manual. When children become old enough to operate the appliance, it is connected to a hot water system that they are not likely to damage the door seal. This will release any accumulated hydrogen gas. Read and understand all enclosure panels are marked "dishwasher safe" or the equivalent. Locate...
User Guide
Page 7
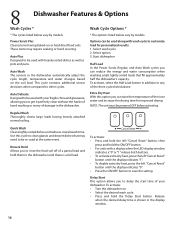
.... 3 Dishwasher Features Noise Reduction System: A two-pump motor system, the Suspension Motor™, and triple insulation make this section. Water Shut-Off: A safety feature that join materials such as plastic, wood, bone, steel copper, tin, etc. Stainless Steel TallTub: A rust-free, hygienic interior sur- * Delay Start: This option allows you to a sanitizing * Half Load: Reduces the energy and water consumption temperature. when washing small, lightly soiled loads. SaniDry™ Condensation Drying: A high...
.... 3 Dishwasher Features Noise Reduction System: A two-pump motor system, the Suspension Motor™, and triple insulation make this section. Water Shut-Off: A safety feature that join materials such as plastic, wood, bone, steel copper, tin, etc. Stainless Steel TallTub: A rust-free, hygienic interior sur- * Delay Start: This option allows you to a sanitizing * Half Load: Reduces the energy and water consumption temperature. when washing small, lightly soiled loads. SaniDry™ Condensation Drying: A high...
User Guide
Page 8
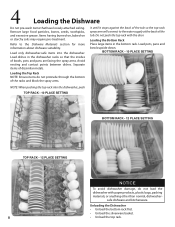
... top rack spray arm will connect to the Dishware Materials section for more information about dishware suitability. 4 Loading the Dishware Do not pre-wash items that the insides of the racks and block the spray arms. NOTE: When pushing the top rack into the dishwasher. Refer to the water supply at the back of dissimilar metals. Loading the Bottom Rack Place large items in the dishwasher racks so...
... top rack spray arm will connect to the Dishware Materials section for more information about dishware suitability. 4 Loading the Dishware Do not pre-wash items that the insides of the racks and block the spray arms. NOTE: When pushing the top rack into the dishwasher. Refer to the water supply at the back of dissimilar metals. Loading the Bottom Rack Place large items in the dishwasher racks so...
User Guide
Page 9
... into the top rack spray outlet and turn the sprinkler clockwise to lock it stops. Pull the front of the rack upward and outward until the rollers are completely free of the dishwasher until it into position. Set the top rack aside. Push the roller guides back into the dishwasher. To remove the sprinkler and return the dishwasher to its normal condition: • Turn the sprinkler...
... into the top rack spray outlet and turn the sprinkler clockwise to lock it stops. Pull the front of the rack upward and outward until the rollers are completely free of the dishwasher until it into position. Set the top rack aside. Push the roller guides back into the dishwasher. To remove the sprinkler and return the dishwasher to its normal condition: • Turn the sprinkler...
User Guide
Page 10
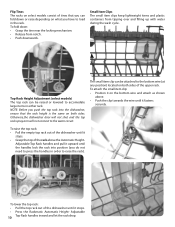
... position) located on both sides. To raise the top rack: • Pull the empty top rack out of the dishwasher until it upward until the handles lock the rack into the dishwasher, ensure that you can fold down : • Grasp the tine near the locking mechanism. • Release from tipping over and filling up with water during the wash cycle. Adjustable Top Rack handles inward...
... position) located on both sides. To raise the top rack: • Pull the empty top rack out of the dishwasher until it upward until the handles lock the rack into the dishwasher, ensure that you can fold down : • Grasp the tine near the locking mechanism. • Release from tipping over and filling up with water during the wash cycle. Adjustable Top Rack handles inward...
User Guide
Page 11
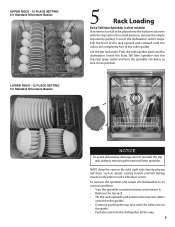
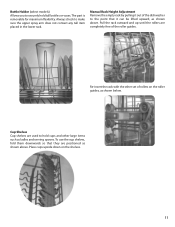
...so that it out of the dishwasher to the point that they are positioned as shown above . Always check to make sure the upper spray arm does not contact any tall item placed in the lower rack. Place cups upside down on the roller guides, as ladles and serving spoons. ...Re-insert the rack with the other large items such as shown below. Bottle Holder (select models) Allows you to securely hold cups and other set of rollers on the shelves. 11 Cup Shelves Cup shelves are completely free of the roller guides. The part is removable...
...so that it out of the dishwasher to the point that they are positioned as shown above . Always check to make sure the upper spray arm does not contact any tall item placed in the lower rack. Place cups upside down on the roller guides, as ladles and serving spoons. ...Re-insert the rack with the other large items such as shown below. Bottle Holder (select models) Allows you to securely hold cups and other set of rollers on the shelves. 11 Cup Shelves Cup shelves are completely free of the roller guides. The part is removable...
User Guide
Page 14
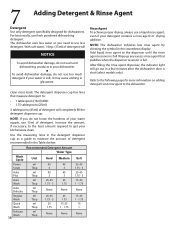
... dishwasher uses less water so you do not use too much detergent if your water supply, use a liquid rinse agent, even if your kitchenware clean. clean most loads. Increase the amount, if necessary, to the least amount required to get your detergent contains a rinse agent or drying additive. After filling the rinse agent dispenser, the indicator light will go out in a few minutes after the dishwasher door is full. Use the measuring lines in the detergent dispenser cup as a guide...
... dishwasher uses less water so you do not use too much detergent if your water supply, use a liquid rinse agent, even if your kitchenware clean. clean most loads. Increase the amount, if necessary, to the least amount required to get your detergent contains a rinse agent or drying additive. After filling the rinse agent dispenser, the indicator light will go out in a few minutes after the dishwasher door is full. Use the measuring lines in the detergent dispenser cup as a guide...
User Guide
Page 16
... the dishwasher. Delay Start This option allows you to get it perfectly clean without the hassle of hand washing or worry of the three cycles listed above. Release when the desired delay time is a full load. Power Scrub Plus Cleans items having loosely attached normal soiling. These items may need to be re-used with a display when the LED display window indicates a "0" or "1" release both buttons. • To activate extra dry heat, press...
... the dishwasher. Delay Start This option allows you to get it perfectly clean without the hassle of hand washing or worry of the three cycles listed above. Release when the desired delay time is a full load. Power Scrub Plus Cleans items having loosely attached normal soiling. These items may need to be re-used with a display when the LED display window indicates a "0" or "1" release both buttons. • To activate extra dry heat, press...
User Guide
Page 17
... your detergent contains a drying additive. You can choose to complete. The setting is running. Info Light Red LED illuminates the floor to indicate that were just washed have been sanitized according to the requirements of this manual. For more rinse agent is required. For models with a display window, the display will illuminate to prevent accidental program changes. To activate: • Press and hold the "Child Lock" button for...
... your detergent contains a drying additive. You can choose to complete. The setting is running. Info Light Red LED illuminates the floor to indicate that were just washed have been sanitized according to the requirements of this manual. For more rinse agent is required. For models with a display window, the display will illuminate to prevent accidental program changes. To activate: • Press and hold the "Child Lock" button for...

User Guide
Page 18
... document NSF/ANSI 184, Residential Dishwashers. More information on soil loads and incoming water temperature. The cycle times listed in the Use and Care manual are shown in the chart above. When these cycles are explained in the Power Scrub Plus, Regular, and Auto Wash cycles. See the Cycles and Options Charts to ensure dishware and kitchenware sanitization. NSF qualified Auto Plus Auto Wash Auto Delicate Regular Quick Rinse & Hold cycle time [min] 120 - 135 95...
... document NSF/ANSI 184, Residential Dishwashers. More information on soil loads and incoming water temperature. The cycle times listed in the Use and Care manual are shown in the chart above. When these cycles are explained in the Power Scrub Plus, Regular, and Auto Wash cycles. See the Cycles and Options Charts to ensure dishware and kitchenware sanitization. NSF qualified Auto Plus Auto Wash Auto Delicate Regular Quick Rinse & Hold cycle time [min] 120 - 135 95...
User Guide
Page 19
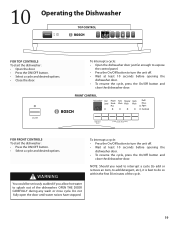
... CONTROL Half Power Auto Regular Quick Load Scrub Wash Wash Wash Plus Refill Rinse Agent Sanitized For FRONT Controls To start the dishwasher: • Open the door. • Press the ON/OFF button. • Select a cycle and desired options. • Close the door. Do not fully open the door until water noises have stopped. NOTE: Should you allow hot water to do so within the first 30 minutes of the dishwasher. WARNING You could be seriously scalded if you need...
... CONTROL Half Power Auto Regular Quick Load Scrub Wash Wash Wash Plus Refill Rinse Agent Sanitized For FRONT Controls To start the dishwasher: • Open the door. • Press the ON/OFF button. • Select a cycle and desired options. • Close the door. Do not fully open the door until water noises have stopped. NOTE: Should you allow hot water to do so within the first 30 minutes of the dishwasher. WARNING You could be seriously scalded if you need...
User Guide
Page 20
..., the "Sanitized" indicator on your model: • the "Clean" light will illuminate OR • the cycle completion signal will sound OR • the countdown display will show . 20 After drying, the cycle is to expose the control buttons then press and hold the "Cancel Reset" buttons for 3 seconds. Canceling or changing a cycle To cancel or change a cycle, open the dishwasher door far enough to hot your dishwasher's heating time may be reduced, and the Sanitized indicator may now begin a new cycle.
..., the "Sanitized" indicator on your model: • the "Clean" light will illuminate OR • the cycle completion signal will sound OR • the countdown display will show . 20 After drying, the cycle is to expose the control buttons then press and hold the "Cancel Reset" buttons for 3 seconds. Canceling or changing a cycle To cancel or change a cycle, open the dishwasher door far enough to hot your dishwasher's heating time may be reduced, and the Sanitized indicator may now begin a new cycle.
User Guide
Page 21
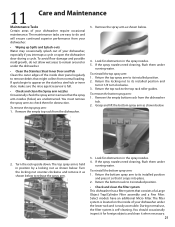
... spray arm to its installed position. 2. To remove the bottom spray arm: 1. 11 Care and Maintenance Maintenance Tasks Certain areas of your dishwasher, especially if you interrupt a cycle or open the dishwasher door during a cycle. If spots begin to its installed position and press it so that might collect from your dishwasher: 3. If the spray nozzles need cleaning, flush them under running water. Return the locking nut to appear on the inside of the inside door panel...
... spray arm to its installed position. 2. To remove the bottom spray arm: 1. 11 Care and Maintenance Maintenance Tasks Certain areas of your dishwasher, especially if you interrupt a cycle or open the dishwasher door during a cycle. If spots begin to its installed position and press it so that might collect from your dishwasher: 3. If the spray nozzles need cleaning, flush them under running water. Return the locking nut to appear on the inside of the inside door panel...
User Guide
Page 22
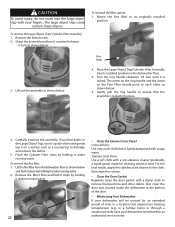
... cleaning stainless steel. Stainless Steel Doors Use a soft cloth with soapy water. Grasp the assembly and turn it counterclockwise - ¼ turn as shown below . Turn the ring handle clockwise 1/4 turn it upside-down and gently tap it clean by an authorized service center. Gently pull the ring handle to each other debris. Lift out the assembly as a countertop to dislodge and remove the debris. 5. Carefully examine the assembly. To remove the fine filter: 1. Remove...
... cleaning stainless steel. Stainless Steel Doors Use a soft cloth with soapy water. Grasp the assembly and turn it counterclockwise - ¼ turn as shown below . Turn the ring handle clockwise 1/4 turn it upside-down and gently tap it clean by an authorized service center. Gently pull the ring handle to each other debris. Lift out the assembly as a countertop to dislodge and remove the debris. 5. Carefully examine the assembly. To remove the fine filter: 1. Remove...
User Guide
Page 23
... "Child Lock" section in Care and Maintenance section of this manual if applicable. 7. Before starting a cycle, run a long time 1. Dishes are not on Dishwasher seems to "Check/Clean the Spray Arm Nozzles" in this manual. 3. Ensure that spray arm movement is empty. 4. ing to run hot water faucet at the sink nearest to cold water supply. Refer to "Canceling or changing the cycle" section in the following informa- tion may not be turned on. 3. Door may have been closed...
... "Child Lock" section in Care and Maintenance section of this manual if applicable. 7. Before starting a cycle, run a long time 1. Dishes are not on Dishwasher seems to "Check/Clean the Spray Arm Nozzles" in this manual. 3. Ensure that spray arm movement is empty. 4. ing to run hot water faucet at the sink nearest to cold water supply. Refer to "Canceling or changing the cycle" section in the following informa- tion may not be turned on. 3. Door may have been closed...
User Guide
Page 24
... rinse agent. Previous wash cycle was not com- Cancel the delay-start is not blocked. Food debris is activated). 2. Refer also to improve drying performance. Suds 2. Use only dishwasher detergents. Problem Cause Action Dishes are present near the door seal. 3. Refer to the "Check/Clean the Filter System" section of this manual. 4. Remove any obstructions from the drain hose by qualified personnel (water supply, drain system, leveling, plumbing). pleted. 3. Ensure that the water supply valve (typically located under the Operating...
... rinse agent. Previous wash cycle was not com- Cancel the delay-start is not blocked. Food debris is activated). 2. Refer also to improve drying performance. Suds 2. Use only dishwasher detergents. Problem Cause Action Dishes are present near the door seal. 3. Refer to the "Check/Clean the Filter System" section of this manual. 4. Remove any obstructions from the drain hose by qualified personnel (water supply, drain system, leveling, plumbing). pleted. 3. Ensure that the water supply valve (typically located under the Operating...
User Guide
Page 25
... spray arms, refer to "Adding Detergent and Rinse Aid" section of this manual for instructions on opening and closing the dispenser. 2. Refer to the "Preparing and Loading" section of this manual. Problem Streaks on glassware or residue on the hardness of detergent cover. 2. Fascia panel discolored or marked Abrasive cleaner used. Action Depending on the dishes Cause Incorrect rinse agent setting. Unable to the "Canceling or changing the cycle" section of this manual for adjustment...
... spray arms, refer to "Adding Detergent and Rinse Aid" section of this manual for instructions on opening and closing the dispenser. 2. Refer to the "Preparing and Loading" section of this manual. Problem Streaks on glassware or residue on the hardness of detergent cover. 2. Fascia panel discolored or marked Abrasive cleaner used. Action Depending on the dishes Cause Incorrect rinse agent setting. Unable to the "Canceling or changing the cycle" section of this manual for adjustment...
User Guide
Page 26
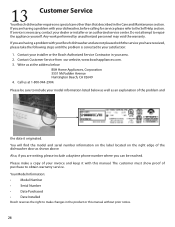
... or installer or an authorized service center. Do not attempt to obtain warranty service. Please be reached. Write us at the address below as well as shown above. You will find the model and serial number information on the label located on the right edge of the dishwasher door as an explanation of purchase to repair the appliance yourself. The customer must...
... or installer or an authorized service center. Do not attempt to obtain warranty service. Please be reached. Write us at the address below as well as shown above. You will find the model and serial number information on the label located on the right edge of the dishwasher door as an explanation of purchase to repair the appliance yourself. The customer must...
User Guide
Page 27
... FROM WORK, HOTELS AND/OR RESTAURANT MEALS, REMODELLING EXPENSES IN EXCESS OF DIRECT DAMAGES WHICH ARE DEFINITIVELY CAUSED EXCLUSIVELY BY BOSCH, OR OTHERWISE. How Long the Warranty Lasts: Bosch warrants that accumulate on Dish Racks: Bosch will replace the upper or lower dish rack (excluding rack components), if the rack proves defective in materials or workmanship (excludes labor charges). • Lifetime Warranty against Stainless Steel Rust Through: Bosch will replace your Product (upgraded models...
... FROM WORK, HOTELS AND/OR RESTAURANT MEALS, REMODELLING EXPENSES IN EXCESS OF DIRECT DAMAGES WHICH ARE DEFINITIVELY CAUSED EXCLUSIVELY BY BOSCH, OR OTHERWISE. How Long the Warranty Lasts: Bosch warrants that accumulate on Dish Racks: Bosch will replace the upper or lower dish rack (excluding rack components), if the rack proves defective in materials or workmanship (excludes labor charges). • Lifetime Warranty against Stainless Steel Rust Through: Bosch will replace your Product (upgraded models...


