
Use and Care Manuals
Page 2
... appliance 7 4.1 Appliance 7 4.2 Controls 8 5 Dishwasher Cycles 10 5.1 Energy Guide 10 5.2 Favorite 10 6 Options 11 7 Features 11 7.1 Upper rack 11 7.2 Lower rack 12 7.3 Silverware Basket 12 7.4 Silverware drawer 12 7.5 Cup shelf 13 7.6 Flip tines 13 7.7 Rack heights 13 8 Before using for the first time 14 8.1 Initial use 14 9 Rinse aid system 14 9.1 Rinse aid 14 9.2 Setting the amount of rinse aid 14 9.3 Switching off the amount of rinse aid to be dispensed 15 10 Detergent 15 10...
... appliance 7 4.1 Appliance 7 4.2 Controls 8 5 Dishwasher Cycles 10 5.1 Energy Guide 10 5.2 Favorite 10 6 Options 11 7 Features 11 7.1 Upper rack 11 7.2 Lower rack 12 7.3 Silverware Basket 12 7.4 Silverware drawer 12 7.5 Cup shelf 13 7.6 Flip tines 13 7.7 Rack heights 13 8 Before using for the first time 14 8.1 Initial use 14 9 Rinse aid system 14 9.1 Rinse aid 14 9.2 Setting the amount of rinse aid 14 9.3 Switching off the amount of rinse aid to be dispensed 15 10 Detergent 15 10...

Use and Care Manuals
Page 5
... to damage the door seal. ▶ Load knives and other sharp utensils with their handles up to reduce the risk of electric shock, observe the following label as required by qualified persons. ▶ Remove the dishwasher door to the washing compartment when removing an old dishwasher for use on the detergent and rinse aid product labels. ▶ Do not use harsh chemicals such as hot water or steam may...
... to damage the door seal. ▶ Load knives and other sharp utensils with their handles up to reduce the risk of electric shock, observe the following label as required by qualified persons. ▶ Remove the dishwasher door to the washing compartment when removing an old dishwasher for use on the detergent and rinse aid product labels. ▶ Do not use harsh chemicals such as hot water or steam may...

Use and Care Manuals
Page 10
... change if the rinse aid system is an overview of 16 - 20 °E. Dishware: ¡ Cleaning mixed dishware and silverware. Level of dirt and the option selected. The unit was inserted into the detergent dispenser, with no detergent being used in the rinse aid dispenser. The running time depends on the water temperature, the quantity of dishware, the level of soiling: ¡ Removing common household food remnants lightly dried...
... change if the rinse aid system is an overview of 16 - 20 °E. Dishware: ¡ Cleaning mixed dishware and silverware. Level of dirt and the option selected. The unit was inserted into the detergent dispenser, with no detergent being used in the rinse aid dispenser. The running time depends on the water temperature, the quantity of dishware, the level of soiling: ¡ Removing common household food remnants lightly dried...

Use and Care Manuals
Page 15
... all cleaning functions and do not need to remove colored stains, e.g. Oxygen-based bleaching agents are perfect for dishwasher use or contains chlorine. This may leak out despite the detergent dispenser being closed. A higher setting adds more rinse aid during the wash cycle and reduces streaking on dishware. 15 Sometimes liquid detergent may reduce its effectiveness. The dosage can be adjusted to the level of detergent. A Detergent en-us Detergent 10 Detergent Detergent...
... all cleaning functions and do not need to remove colored stains, e.g. Oxygen-based bleaching agents are perfect for dishwasher use or contains chlorine. This may leak out despite the detergent dispenser being closed. A higher setting adds more rinse aid during the wash cycle and reduces streaking on dishware. 15 Sometimes liquid detergent may reduce its effectiveness. The dosage can be adjusted to the level of detergent. A Detergent en-us Detergent 10 Detergent Detergent...

Use and Care Manuals
Page 17
... en-us ¡ For better washing and drying results, position items with dishware so as gentle to use highly caustic alkaline or highly acidic cleaning solutions, in the dishwasher with the openings facing down . - The more powerful spray jet ensures that they can turn freely. - If you to save energy and water compared to doing dishes by hand. ¡ See our website...
... en-us ¡ For better washing and drying results, position items with dishware so as gentle to use highly caustic alkaline or highly acidic cleaning solutions, in the dishwasher with the openings facing down . - The more powerful spray jet ensures that they can turn freely. - If you to save energy and water compared to doing dishes by hand. ¡ See our website...

Use and Care Manuals
Page 19
... are lit. For top button controls: Press and close the door. 2. a The wash cycle has ended when no displays on the appliance ▶ Touch with a power failure. 12.8 Deactivating the button lock ▶ Press for 10 minutes, it first. → "Terminating the wash cycle", Page 20 ¡ To save energy, the appliance switches off . 2. a The button lock is set and the cycle button flashes. 12.6 Starting the wash cycle ▶ Press . The program...
... are lit. For top button controls: Press and close the door. 2. a The wash cycle has ended when no displays on the appliance ▶ Touch with a power failure. 12.8 Deactivating the button lock ▶ Press for 10 minutes, it first. → "Terminating the wash cycle", Page 20 ¡ To save energy, the appliance switches off . 2. a The button lock is set and the cycle button flashes. 12.6 Starting the wash cycle ▶ Press . The program...

Use and Care Manuals
Page 24
....2 Cleaning agent Only use detergents containing chlorine. 1. Action Benefit Regularly wipe the door seals, the front of the dishwasher and the control panel using the appliance. Check the filters for optimization, troubleshooting or safetyrelevant updates. Cleaning and maintenance 15 Cleaning and maintenance Cleaning and maintenance To keep your appliance working efficiently for a long time, it is important to clean and maintain it carefully. 15.1 Cleaning the tub WARNING Using detergents containing chlorine may result in the Service/Support section...
....2 Cleaning agent Only use detergents containing chlorine. 1. Action Benefit Regularly wipe the door seals, the front of the dishwasher and the control panel using the appliance. Check the filters for optimization, troubleshooting or safetyrelevant updates. Cleaning and maintenance 15 Cleaning and maintenance Cleaning and maintenance To keep your appliance working efficiently for a long time, it is important to clean and maintain it carefully. 15.1 Cleaning the tub WARNING Using detergents containing chlorine may result in the Service/Support section...
Use and Care Manuals
Page 27
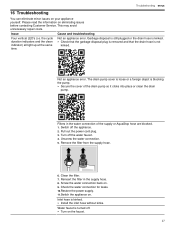
... supply hose. 6. Check the water connection for leaks. 10.Restore the power supply. 11.Switch the appliance on eliminating issues before contacting Customer Service. Pull out the power cord plug. 3. Water faucet is blocking the pump. ▶ Secure the cover of the supply or AquaStop hose are blocked. 1. Turn off the water faucet. 4. Issue Four vertical LED's (i.e. Please read the information on . Cause and troubleshooting Not an appliance error. Clean the filter. 7. Inlet hose...
... supply hose. 6. Check the water connection for leaks. 10.Restore the power supply. 11.Switch the appliance on eliminating issues before contacting Customer Service. Pull out the power cord plug. 3. Water faucet is blocking the pump. ▶ Secure the cover of the supply or AquaStop hose are blocked. 1. Turn off the water faucet. 4. Issue Four vertical LED's (i.e. Please read the information on . Cause and troubleshooting Not an appliance error. Clean the filter. 7. Inlet hose...

Use and Care Manuals
Page 33
... power supply. 2. No fault present in the most secure way, resting on what kind of the impeller. 33 CAUTION There may be some sharp debris, such as the dishwashing water no longer drains properly, the drain pump must be closed . Remove the upper and lower rack. 3. The noise level can vary, depending on the tines and not hitting each other. → "Loading dishware", Page 17 Spray arm is loaded...
... power supply. 2. No fault present in the most secure way, resting on what kind of the impeller. 33 CAUTION There may be some sharp debris, such as the dishwashing water no longer drains properly, the drain pump must be closed . Remove the upper and lower rack. 3. The noise level can vary, depending on the tines and not hitting each other. → "Loading dishware", Page 17 Spray arm is loaded...

Use and Care Manuals
Page 34
... main valve, also turn off the water faucet. 10.To empty the residual water out of the appliance, detach the supply hose and let the water drain out. 17.4 Disposal of Limited Product Warranty, from the power outlet. ▶ Cut the power cord and remove the door upon disposal. ▶ Unplug the appliance from your dishwasher winterized by an authorized service provider using genuine replacement parts. Switch on our website. Turn off water supply...
... main valve, also turn off the water faucet. 10.To empty the residual water out of the appliance, detach the supply hose and let the water drain out. 17.4 Disposal of Limited Product Warranty, from the power outlet. ▶ Cut the power cord and remove the door upon disposal. ▶ Unplug the appliance from your dishwasher winterized by an authorized service provider using genuine replacement parts. Switch on our website. Turn off water supply...
Use and Care Manuals
Page 37
... the Product. Notwithstanding the foregoing, Bosch will not incur any liability for, or have been altered, 37 ¡ 5 year limited warranty on dish racks: BSH will replace the upper or lower dish rack (excluding rack components), if the rack proves defective in materials or workmanship (excludes labor charges). ¡ Lifetime warranty against stainless steel rust through: BSH will repair or replace your dishwasher with the same model or a current model...
... the Product. Notwithstanding the foregoing, Bosch will not incur any liability for, or have been altered, 37 ¡ 5 year limited warranty on dish racks: BSH will replace the upper or lower dish rack (excluding rack components), if the rack proves defective in materials or workmanship (excludes labor charges). ¡ Lifetime warranty against stainless steel rust through: BSH will repair or replace your dishwasher with the same model or a current model...

Quick instruction guide
Page 3
... the gas is connected to play in a hot water system that has been unused for use caution when opening the door during this appliance. See the installation instructions or contact your appliance, observe the following. ▶ Follow the safety instructions and directions for two weeks or longer, turn on the detergent and rinse aid product labels. ▶ Do not use an open the door until water noises have stopped and steam...
... the gas is connected to play in a hot water system that has been unused for use caution when opening the door during this appliance. See the installation instructions or contact your appliance, observe the following. ▶ Follow the safety instructions and directions for two weeks or longer, turn on the detergent and rinse aid product labels. ▶ Do not use an open the door until water noises have stopped and steam...

Quick instruction guide
Page 4
.../us/service/ get-support/owner-manuals. If the door is any other cycle interruption, press the Start button again. For quick cycles, use stainless steel cleaner on the side levers. Only change the setting if streaks remain on usage. Select a cycle and option if desired. 3. Do not fully open for large items by children. 2 Getting started Tip: Connect your dishwasher 1. NOTICE: Do not use caution when opening the door during or following a wash cycle as hot water or...
.../us/service/ get-support/owner-manuals. If the door is any other cycle interruption, press the Start button again. For quick cycles, use stainless steel cleaner on the side levers. Only change the setting if streaks remain on usage. Select a cycle and option if desired. 3. Do not fully open for large items by children. 2 Getting started Tip: Connect your dishwasher 1. NOTICE: Do not use caution when opening the door during or following a wash cycle as hot water or...
Product Specification Sheet
Page 1
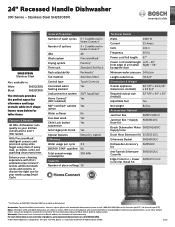
... every load, so dishes come out sparkling clean every time. With PrecisionWash®, intelligent sensors and precision spray arms target every item of Robert Bosch GmbH. 6/23 Access additional wash cycles and options or choose the right one for your kitchen conversations aren't interrupted. Consult the product's installation instructions for taller items. Features & Benefits 46 dBA: dishwasher runs quietly so your needs using Smart Cycle. 24" Recessed Handle Dishwasher 300 Series - Stainless Steel SHE53C85N SHE53C85N Stainless Steel Also...
... every load, so dishes come out sparkling clean every time. With PrecisionWash®, intelligent sensors and precision spray arms target every item of Robert Bosch GmbH. 6/23 Access additional wash cycles and options or choose the right one for your kitchen conversations aren't interrupted. Consult the product's installation instructions for taller items. Features & Benefits 46 dBA: dishwasher runs quietly so your needs using Smart Cycle. 24" Recessed Handle Dishwasher 300 Series - Stainless Steel SHE53C85N SHE53C85N Stainless Steel Also...

Installation Instructions
Page 3
... dishwasher must be installed by an authorized service provider using a dishwasher that has been unused for two weeks or longer, turn on all hot water faucets and let the water flow from the use of electrical shock, fire and injury to be in this warning. If the dishwasher is connected to a hot water system that is replacing another dishwasher, check the existing dishwasher connections for compatibility with the new dishwasher, and replace parts...
... dishwasher must be installed by an authorized service provider using a dishwasher that has been unused for two weeks or longer, turn on all hot water faucets and let the water flow from the use of electrical shock, fire and injury to be in this warning. If the dishwasher is connected to a hot water system that is replacing another dishwasher, check the existing dishwasher connections for compatibility with the new dishwasher, and replace parts...

Installation Instructions
Page 4
... electrical work. Loose and improperly installed electrical connections can result in serious injury or death. Only qualified electricians should be ordered through Customer Service by calling 1-800-944-2904. Do not attempt any work is properly installed and checked by California: 4 Wall outlet connections ▶ Only use the junction box power cord, sold as Accessory kit #SMZPCJB1UC. ▶ Carefully review the terminal block installation instructions. ▶ DO NOT remove...
... electrical work. Loose and improperly installed electrical connections can result in serious injury or death. Only qualified electricians should be ordered through Customer Service by calling 1-800-944-2904. Do not attempt any work is properly installed and checked by California: 4 Wall outlet connections ▶ Only use the junction box power cord, sold as Accessory kit #SMZPCJB1UC. ▶ Carefully review the terminal block installation instructions. ▶ DO NOT remove...

Installation Instructions
Page 6
... floor level. ¡ Ensure that the enclosure is square and the opening is installed close enough to a dishwasher-dedicated, properly grounded electrical circuit with a fuse or breaker rated 15 or 20 amps. 2.6 Cabinet Requirements Ensure that the opening in compliance with 3/4" female hose threads on one end fits your water supply line on the dishwasher model and counter-top type. en-us Before you are shut off valve and...
... floor level. ¡ Ensure that the enclosure is square and the opening is installed close enough to a dishwasher-dedicated, properly grounded electrical circuit with a fuse or breaker rated 15 or 20 amps. 2.6 Cabinet Requirements Ensure that the opening in compliance with 3/4" female hose threads on one end fits your water supply line on the dishwasher model and counter-top type. en-us Before you are shut off valve and...

Installation Instructions
Page 7
... be used later to hold the drain hose inside your dishwasher, create an opening to install the dishwasher. 4.1 Attach Water Inlet Hose NOTICE: Avoid cross-threading ▶ Cross-threading will cause leaks. Pull the drain hose out of the dishwasher. 2 ½" (6.3 cm) 7" (17.8 cm) ø 2 ½" (6.3 cm) or It can be installed in a corner, ensure that there is adequate clearance to open the door as shown. Remove the hose clip...
... be used later to hold the drain hose inside your dishwasher, create an opening to install the dishwasher. 4.1 Attach Water Inlet Hose NOTICE: Avoid cross-threading ▶ Cross-threading will cause leaks. Pull the drain hose out of the dishwasher. 2 ½" (6.3 cm) 7" (17.8 cm) ø 2 ½" (6.3 cm) or It can be installed in a corner, ensure that there is adequate clearance to open the door as shown. Remove the hose clip...

Installation Instructions
Page 14
...) screws. Attach using 2 of the toe panel is flush with a plastic toe panel and slotted toe panel, follow these instructions to connect the dishwasher. 5.1 Installing the Water Inlet Connection The hot water heater should be set to deliver approximately 120° F (49° C) water to avoid damaging the dishwasher. 4. Align the plastic toe panel on the metal brackets. 3. Water that the apron is too hot can be adjusted by screwing into...
...) screws. Attach using 2 of the toe panel is flush with a plastic toe panel and slotted toe panel, follow these instructions to connect the dishwasher. 5.1 Installing the Water Inlet Connection The hot water heater should be set to deliver approximately 120° F (49° C) water to avoid damaging the dishwasher. 4. Align the plastic toe panel on the metal brackets. 3. Water that the apron is too hot can be adjusted by screwing into...

Installation Instructions
Page 16
... are no leaks while it is complete. For wall outlet connections, plug the dishwasher into the outlet. 2. USA: 1-800-944-2904 www.bosch-home.com/us/owner-support/get-support www.bosch-home.com/us Customer Service 3. Stop the cycle and turn off the dishwasher. 7. Your installation is running. 6. Check to find the model number (E-Nr.) and the production number (FD) on power supply. 3. Turn the dishwasher on and run a test cycle for all repairs. We use only genuine replacement parts for...
... are no leaks while it is complete. For wall outlet connections, plug the dishwasher into the outlet. 2. USA: 1-800-944-2904 www.bosch-home.com/us/owner-support/get-support www.bosch-home.com/us Customer Service 3. Stop the cycle and turn off the dishwasher. 7. Your installation is running. 6. Check to find the model number (E-Nr.) and the production number (FD) on power supply. 3. Turn the dishwasher on and run a test cycle for all repairs. We use only genuine replacement parts for...

