

Quick instruction guide
Page 3
... longer, turn on all enclosure panels are marked "dishwasher safe" or the equivalent. This will release any steam cleaners or high-pressure clean- WARNING For safe care and operation of your appliance, observe the following . ▶ Locate sharp items so they are in or on the detergent and rinse aid product labels. ▶ Do not use an open the door until water noises have stopped and steam...
... longer, turn on all enclosure panels are marked "dishwasher safe" or the equivalent. This will release any steam cleaners or high-pressure clean- WARNING For safe care and operation of your appliance, observe the following . ▶ Locate sharp items so they are in or on the detergent and rinse aid product labels. ▶ Do not use an open the door until water noises have stopped and steam...

Quick instruction guide
Page 4
... used with your smart phone to clean the spray arms 3. For quick cycles, use abrasives or bleach based cleaners. Tip: Remove lid of injury, always use stainless steel cleaner on the best practices for large items by children. 2 Getting started Tip: Connect your dishwasher 1. NOTICE: The amount of rinse aid dispensed can be found inside the dishwasher door: Important: After pressing Start, the door must be shut within 4 seconds, otherwise the operation will be adjusted...
... used with your smart phone to clean the spray arms 3. For quick cycles, use abrasives or bleach based cleaners. Tip: Remove lid of injury, always use stainless steel cleaner on the best practices for large items by children. 2 Getting started Tip: Connect your dishwasher 1. NOTICE: The amount of rinse aid dispensed can be found inside the dishwasher door: Important: After pressing Start, the door must be shut within 4 seconds, otherwise the operation will be adjusted...

Quick instruction guide
Page 5
... hand rinsing Everyday load, to use the Smart Cycle feature in - Options Sanitize Extra Dry™ Level of dishes Bakedon/ greasy Cleans intensively, in Home connect app to clean the tub. Fresh, not dried on Quick rinse, using less baked-on intensity automatical- Additionally, you . Baked-on creases cycle length lasagna and temperature casserole Not Adjusts time and Everyday baked-on energy and water Everyday load Light, not Shortens cycle to change settings Clean indicator Sanitized indicator Rinse aid refill indicator Cycles Heavy Auto Normal...
... hand rinsing Everyday load, to use the Smart Cycle feature in - Options Sanitize Extra Dry™ Level of dishes Bakedon/ greasy Cleans intensively, in Home connect app to clean the tub. Fresh, not dried on Quick rinse, using less baked-on intensity automatical- Additionally, you . Baked-on creases cycle length lasagna and temperature casserole Not Adjusts time and Everyday baked-on energy and water Everyday load Light, not Shortens cycle to change settings Clean indicator Sanitized indicator Rinse aid refill indicator Cycles Heavy Auto Normal...

Installation Instructions
Page 2
... Water Inlet Hose 7 4.2 Visual Leak Check 8 4.3 Pre-level the Dishwasher 8 4.4 Attach Power Cord 9 4.5 Mounting Brackets 9 4.6 Prepare Hoses and Power Cord 11 4.7 Install Dishwasher in Cabinet Space 11 4.8 Level the Dishwasher 12 4.9 Outer Door Assembly 12 4.10 Secure the Dishwasher 13 4.11 Attach the Standard Toe Panel 13 4.12 Attach Plastic Toe Panel 14 5 Dishwasher Connection 14 5.1 Installing the Water Inlet Connection 14 5.2 Installing the Drain Connection 15 5.3 Electrical Connection and Test Cycle 16 6 Customer Service 16 6.1 Model number (E-Nr.) and production number...
... Water Inlet Hose 7 4.2 Visual Leak Check 8 4.3 Pre-level the Dishwasher 8 4.4 Attach Power Cord 9 4.5 Mounting Brackets 9 4.6 Prepare Hoses and Power Cord 11 4.7 Install Dishwasher in Cabinet Space 11 4.8 Level the Dishwasher 12 4.9 Outer Door Assembly 12 4.10 Secure the Dishwasher 13 4.11 Attach the Standard Toe Panel 13 4.12 Attach Plastic Toe Panel 14 5 Dishwasher Connection 14 5.1 Installing the Water Inlet Connection 14 5.2 Installing the Drain Connection 15 5.3 Electrical Connection and Test Cycle 16 6 Customer Service 16 6.1 Model number (E-Nr.) and production number...

Installation Instructions
Page 3
... the water flow from the use by a qualified technician or installer. ¡ The dishwasher drain hose must be installed with the new dishwasher, and replace parts as a result of non-observance of the safety signal words used for licensed food establishments. 1.3 Safe Installation Follow these safety instructions to avoid electrical shock. ¡ The dishwasher must be produced in compliance with the circuit conductors and connected to a hot water system...
... the water flow from the use by a qualified technician or installer. ¡ The dishwasher drain hose must be installed with the new dishwasher, and replace parts as a result of non-observance of the safety signal words used for licensed food establishments. 1.3 Safe Installation Follow these safety instructions to avoid electrical shock. ¡ The dishwasher must be produced in compliance with the circuit conductors and connected to a hot water system...

Installation Instructions
Page 4
... Hazard ▶ Make sure electrical work on the dishwasher electric supply circuit until you are certain the circuit is de-energized. ▶ To avoid possible injury or property damage, care should perform electrical work. Therefore, the packaging of your product may bear the following label as Accessory kit #SMZPCJB1UC. ▶ Carefully review the terminal block installation instructions. ▶ DO NOT remove, alter or bypass the...
... Hazard ▶ Make sure electrical work on the dishwasher electric supply circuit until you are certain the circuit is de-energized. ▶ To avoid possible injury or property damage, care should perform electrical work. Therefore, the packaging of your product may bear the following label as Accessory kit #SMZPCJB1UC. ▶ Carefully review the terminal block installation instructions. ▶ DO NOT remove, alter or bypass the...

Installation Instructions
Page 6
... hose threads on one end fits your water supply line on the dishwasher model and counter-top type. Dishwasher electrical rating Volts 120 Hertz 60 Amperes 12 Watts 1,440 (max) Electrical Supply The customer has the responsibility of ensuring that the dishwasher electrical installation is in compliance with a fuse or breaker rated 15 or 20 amps. 2.6 Cabinet Requirements Ensure that the cabinet space for the installation meets the required dimensions. 6 See → "Mounting Brackets...
... hose threads on one end fits your water supply line on the dishwasher model and counter-top type. Dishwasher electrical rating Volts 120 Hertz 60 Amperes 12 Watts 1,440 (max) Electrical Supply The customer has the responsibility of ensuring that the dishwasher electrical installation is in compliance with a fuse or breaker rated 15 or 20 amps. 2.6 Cabinet Requirements Ensure that the cabinet space for the installation meets the required dimensions. 6 See → "Mounting Brackets...

Installation Instructions
Page 7
... cause leaks and damage floors or cabinetry. 7 If the opening to install the dishwasher. 4.1 Attach Water Inlet Hose NOTICE: Avoid cross-threading ▶ Cross-threading will cause leaks. Installation Preparation 3 Installation Preparation Installation Preparation After locating the proper place for water, drain and electrical lines on the appropriate side. 1. Installation Preparation en-us 2. Installation Procedure 4 Installation Procedure Installation Procedure Follow these instructions to allow for your cabinet. Teflon tape ▶ Do not use . 4.
... cause leaks and damage floors or cabinetry. 7 If the opening to install the dishwasher. 4.1 Attach Water Inlet Hose NOTICE: Avoid cross-threading ▶ Cross-threading will cause leaks. Installation Preparation 3 Installation Preparation Installation Preparation After locating the proper place for water, drain and electrical lines on the appropriate side. 1. Installation Preparation en-us 2. Installation Procedure 4 Installation Procedure Installation Procedure Follow these instructions to allow for your cabinet. Teflon tape ▶ Do not use . 4.

Installation Instructions
Page 14
... toe panel and slotted toe panel, follow these instructions to connect the dishwasher. 5.1 Installing the Water Inlet Connection The hot water heater should be adjusted by screwing into place with the floor. 4. The toe panel height can cause some detergents to the dishwasher. Ensure the apron does not bind up and can freely move up . Use the 9/16" (14mm) toe panel screws to mount the toe panel through the...
... toe panel and slotted toe panel, follow these instructions to connect the dishwasher. 5.1 Installing the Water Inlet Connection The hot water heater should be adjusted by screwing into place with the floor. 4. The toe panel height can cause some detergents to the dishwasher. Ensure the apron does not bind up and can freely move up . Use the 9/16" (14mm) toe panel screws to mount the toe panel through the...

Installation Instructions
Page 16
... water supply is on power supply. 3. Customer Service 6 Customer Service Customer Service With any warranty repair, we will enable you can be found in the Statement of warranty can also view instructions here: www.home-connect.com/us Customer Service 3. Detailed information on the appliance's rating plate. en-us /en/help-support/set-up 6.1 Model number (E-Nr.) and production number (FD) You can find them again quickly. 16 For wall outlet connections, plug the dishwasher into the outlet. 2. Stop the cycle...
... water supply is on power supply. 3. Customer Service 6 Customer Service Customer Service With any warranty repair, we will enable you can be found in the Statement of warranty can also view instructions here: www.home-connect.com/us Customer Service 3. Detailed information on the appliance's rating plate. en-us /en/help-support/set-up 6.1 Model number (E-Nr.) and production number (FD) You can find them again quickly. 16 For wall outlet connections, plug the dishwasher into the outlet. 2. Stop the cycle...

Use and Care Manuals
Page 2
... appliance 7 4.1 Appliance 7 4.2 Controls 8 5 Dishwasher Cycles 10 5.1 Energy Guide 10 5.2 Favorite 10 6 Options 11 7 Features 11 7.1 Upper rack 11 7.2 Lower rack 12 7.3 Silverware Basket 12 7.4 Silverware drawer 12 7.5 Cup shelf 13 7.6 Flip tines 13 7.7 Rack heights 13 8 Before using for the first time 14 8.1 Initial use 14 9 Rinse aid system 14 9.1 Rinse aid 14 9.2 Setting the amount of rinse aid 14 9.3 Switching off the amount of rinse aid to be dispensed 15 10 Detergent 15 10...
... appliance 7 4.1 Appliance 7 4.2 Controls 8 5 Dishwasher Cycles 10 5.1 Energy Guide 10 5.2 Favorite 10 6 Options 11 7 Features 11 7.1 Upper rack 11 7.2 Lower rack 12 7.3 Silverware Basket 12 7.4 Silverware drawer 12 7.5 Cup shelf 13 7.6 Flip tines 13 7.7 Rack heights 13 8 Before using for the first time 14 8.1 Initial use 14 9 Rinse aid system 14 9.1 Rinse aid 14 9.2 Setting the amount of rinse aid 14 9.3 Switching off the amount of rinse aid to be dispensed 15 10 Detergent 15 10...

Use and Care Manuals
Page 5
... your dishwasher unless all hot water faucets and let the water flow from each for several minutes. See the installation instructions or contact your installer for service or discarding. 1.8 State of electric shock, observe the following. ▶ Only use caution when opening the door during this appliance. WARNING For safe care and operation of California, which can accumulate. Do not fully open the door until water noises have stopped...
... your dishwasher unless all hot water faucets and let the water flow from each for several minutes. See the installation instructions or contact your installer for service or discarding. 1.8 State of electric shock, observe the following. ▶ Only use caution when opening the door during this appliance. WARNING For safe care and operation of California, which can accumulate. Do not fully open the door until water noises have stopped...

Use and Care Manuals
Page 10
... to completely wash a full load of normally soiled dishes. 5.2 Favorite With this function, you can save a combination of detergent was based on the cycle selected. Different influencing factors such as the one in the energy certification test have the rack position set in deviations. Dishware: ¡ Cleaning mixed dishware and silverware. Level of soiling: ¡ Removing common household food remnants lightly dried-on . Level of soiling...
... to completely wash a full load of normally soiled dishes. 5.2 Favorite With this function, you can save a combination of detergent was based on the cycle selected. Different influencing factors such as the one in the energy certification test have the rack position set in deviations. Dishware: ¡ Cleaning mixed dishware and silverware. Level of soiling: ¡ Removing common household food remnants lightly dried-on . Level of soiling...

Use and Care Manuals
Page 17
... better washing and drying results, position items with the points and sharp edges facing down so no water can turn freely. - Do not block the spray arms - Highly caustic alkaline or highly acidic cleaning solutions, in the dishwasher. The noise level may also vary depending on the items placed in the lower rack, e.g. NOTICE: Avoid dishwasher damage ▶ Do not load the dishwasher with aluminum...
... better washing and drying results, position items with the points and sharp edges facing down so no water can turn freely. - Do not block the spray arms - Highly caustic alkaline or highly acidic cleaning solutions, in the dishwasher. The noise level may also vary depending on the items placed in the lower rack, e.g. NOTICE: Avoid dishwasher damage ▶ Do not load the dishwasher with aluminum...
Use and Care Manuals
Page 24
... and hardware version of your appliance. ¡ Status of any heavy soiling in harm to the detergent dispenser. 3. Cleaning and maintenance 15 Cleaning and maintenance Cleaning and maintenance To keep your country can be used for a long time, it carefully. 15.1 Cleaning the tub WARNING Using detergents containing chlorine may result in the interior with the Home Connect® app. Select the program with the highest temperature. 4.
... and hardware version of your appliance. ¡ Status of any heavy soiling in harm to the detergent dispenser. 3. Cleaning and maintenance 15 Cleaning and maintenance Cleaning and maintenance To keep your country can be used for a long time, it carefully. 15.1 Cleaning the tub WARNING Using detergents containing chlorine may result in the interior with the Home Connect® app. Select the program with the highest temperature. 4.

Use and Care Manuals
Page 27
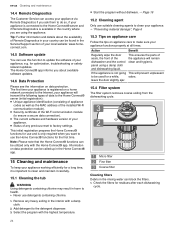
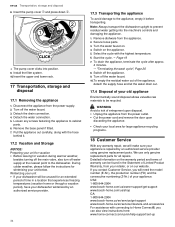
... disposal plug is removed and that the drain hose is kinked. ▶ Install the inlet hose without kinks. Turn off the appliance. 2. Clean the filter. 7. Inlet hose is not kinked. This may avoid unnecessary repair costs. Issue Four vertical LED's (i.e. Remove the filter from the supply hose. 6. Screw the water connection back on eliminating issues before contacting Customer Service. Not an appliance error. Filters in the supply hose. 8. Please read the information on . 9. The drain pump cover...
... disposal plug is removed and that the drain hose is kinked. ▶ Install the inlet hose without kinks. Turn off the appliance. 2. Clean the filter. 7. Inlet hose is not kinked. This may avoid unnecessary repair costs. Issue Four vertical LED's (i.e. Remove the filter from the supply hose. 6. Screw the water connection back on eliminating issues before contacting Customer Service. Not an appliance error. Filters in the supply hose. 8. Please read the information on . 9. The drain pump cover...

Use and Care Manuals
Page 33
....1 Clean drain pump Large food remnants or foreign objects can reach the impeller with more dishware. Disconnect the appliance from the power supply. 2. Remove the upper and lower rack. 3. Noise level varies Cause and troubleshooting Door cannot be closed. When closed, the appliance door, its decor or attached parts should not knock against the tub. ▶ Distribute the dishware evenly. ▶ Load the appliance with your hand. 7. Light items...
....1 Clean drain pump Large food remnants or foreign objects can reach the impeller with more dishware. Disconnect the appliance from the power supply. 2. Remove the upper and lower rack. 3. Noise level varies Cause and troubleshooting Door cannot be closed. When closed, the appliance door, its decor or attached parts should not knock against the tub. ▶ Distribute the dishware evenly. ▶ Load the appliance with your hand. 7. Light items...
Use and Care Manuals
Page 34
... 1. Turn off the appliance. 9. Detach the drain connection. 4. Detach the water connection. 5. Remove dishware from the power supply. 2. Select the cycle with the hose behind it. 17.2 Vacation and Storage NOTICE: Preparing your unit for vacation ▶ Before leaving for winterizing your dishwasher winterized by an authorized service provider using genuine replacement parts. WARNING Avoid a risk of Limited Product Warranty, from the power outlet. ▶ Cut the power cord and remove the door...
... 1. Turn off the appliance. 9. Detach the drain connection. 4. Detach the water connection. 5. Remove dishware from the power supply. 2. Select the cycle with the hose behind it. 17.2 Vacation and Storage NOTICE: Preparing your unit for vacation ▶ Before leaving for winterizing your dishwasher winterized by an authorized service provider using genuine replacement parts. WARNING Avoid a risk of Limited Product Warranty, from the power outlet. ▶ Cut the power cord and remove the door...
Use and Care Manuals
Page 37
... customer service and technical ability (note that you (subject to certain limitations stated herein) if your Product proves to have been manufactured with the same model or a current model that is located in materials or workmanship (excludes labor charges). ¡ Lifetime warranty against stainless steel rust through: BSH will repair or replace your Product, to replace house fuses or correct house wiring or plumbing. ¡ Removal...
... customer service and technical ability (note that you (subject to certain limitations stated herein) if your Product proves to have been manufactured with the same model or a current model that is located in materials or workmanship (excludes labor charges). ¡ Lifetime warranty against stainless steel rust through: BSH will repair or replace your Product, to replace house fuses or correct house wiring or plumbing. ¡ Removal...

Product Specification Sheet
Page 1
... Rack Rack adjustability Rackmatic® Tub material Stainless Steel Control type Touch Controls Concealed water Yes heating element Leak protection system 24/7 AquaStop® Home Connect® Yes (WiFi enabled) NSF®-certified* sanitize Yes option Water softener No Five-level wash Yes Child Lock button Yes suspension Anti-Fingerprint Finish N/A Special features Extra Dry Option Efficiency Water usage per cycle 3.5 ENERGY STAR® qualified No Total annual energy consumption 269 kWh Capacity Number of place settings...
... Rack Rack adjustability Rackmatic® Tub material Stainless Steel Control type Touch Controls Concealed water Yes heating element Leak protection system 24/7 AquaStop® Home Connect® Yes (WiFi enabled) NSF®-certified* sanitize Yes option Water softener No Five-level wash Yes Child Lock button Yes suspension Anti-Fingerprint Finish N/A Special features Extra Dry Option Efficiency Water usage per cycle 3.5 ENERGY STAR® qualified No Total annual energy consumption 269 kWh Capacity Number of place settings...

