Quick Reference Instructions
Page 1
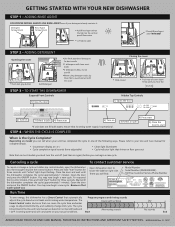
... contact customer service To cancel or change mid-cycle. ADDING RINSE AGENT FOR PROPER DRYING ALWAYS USE RINSE AGENT even if your Use and Care Manual FOR DETAILED INSTRUCTIONS AND IMPORTANT SAFETY NOTICES. 9000266264 Rev. Open dishwasher door to • Model Number locate the label on right side. • Serial Number (FD#########) There you can cause the cycle time and water usage to expose the control buttons. Please refer to avoid contact with water, ensure that on most models you must turn...
... contact customer service To cancel or change mid-cycle. ADDING RINSE AGENT FOR PROPER DRYING ALWAYS USE RINSE AGENT even if your Use and Care Manual FOR DETAILED INSTRUCTIONS AND IMPORTANT SAFETY NOTICES. 9000266264 Rev. Open dishwasher door to • Model Number locate the label on right side. • Serial Number (FD#########) There you can cause the cycle time and water usage to expose the control buttons. Please refer to avoid contact with water, ensure that on most models you must turn...
Use & Care Manual
Page 2
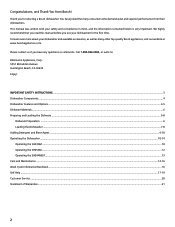
... Materials...6 Preparing and Loading the Dishware...6-8 Dishware Preparation ...6 Loading the Dishwasher...7-8 Adding Detergent and Rinse Agent...9-10 Operating the Dishwasher...10-14 Operating the SHX3AM...10 Operating the SHE5AM...12 Operating the SHE4AM0/1...13 Care and Maintenance...14-16 Wash Cycle Information/Sanitized...16 Self Help...17-19 Customer Service...20 Statement of Warranties...21 2 Please contact us if you have joined the many other top-quality Bosch appliances, visit...
... Materials...6 Preparing and Loading the Dishware...6-8 Dishware Preparation ...6 Loading the Dishwasher...7-8 Adding Detergent and Rinse Agent...9-10 Operating the Dishwasher...10-14 Operating the SHX3AM...10 Operating the SHE5AM...12 Operating the SHE4AM0/1...13 Care and Maintenance...14-16 Wash Cycle Information/Sanitized...16 Self Help...17-19 Customer Service...20 Statement of Warranties...21 2 Please contact us if you have joined the many other top-quality Bosch appliances, visit...
Use & Care Manual
Page 3
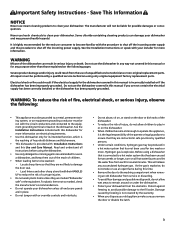
... loading items to ensure that they are not certain the electrical supply has been correctly installed or the dishwasher has been properly grounded. Locate sharp items so that has been unused for the dishwasher covered in a hot water system that has not been used for the end use steam cleaning products to shut off the incoming water supply and the procedure to clean your dishwasher unless all instructions before using a dishwasher that...
... loading items to ensure that they are not certain the electrical supply has been correctly installed or the dishwasher has been properly grounded. Locate sharp items so that has been unused for the dishwasher covered in a hot water system that has not been used for the end use steam cleaning products to shut off the incoming water supply and the procedure to clean your dishwasher unless all instructions before using a dishwasher that...
Use & Care Manual
Page 4
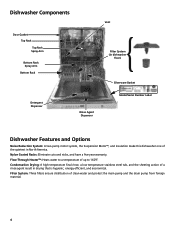
...temperature stainless steel tub, and the sheeting action of the quietest in drying that is hygienic, energy efficient, and economical. Dishwasher Components Vent Door Gasket Top Rack Top Rack Spray Arm Bottom Rack Spray Arm Bottom Rack Filter System (in dishwasher floor) Silverware Basket Detergent Dispenser Rinse Agent Dispenser Model/Serial Number Label Dishwasher Features and Options Noise Reduction System: A two-pump motor system, the Suspension Motor™, and insulation make this dishwasher one of a rinse agent result in North America. Nylon Coated Racks: Eliminate cuts and...
...temperature stainless steel tub, and the sheeting action of the quietest in drying that is hygienic, energy efficient, and economical. Dishwasher Components Vent Door Gasket Top Rack Top Rack Spray Arm Bottom Rack Spray Arm Bottom Rack Filter System (in dishwasher floor) Silverware Basket Detergent Dispenser Rinse Agent Dispenser Model/Serial Number Label Dishwasher Features and Options Noise Reduction System: A two-pump motor system, the Suspension Motor™, and insulation make this dishwasher one of a rinse agent result in North America. Nylon Coated Racks: Eliminate cuts and...
Use & Care Manual
Page 5
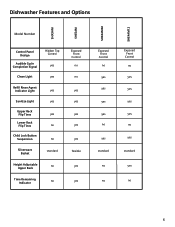
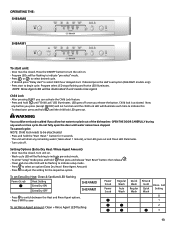
Dishwasher Features and Options SHX3AM SHE5AM SHE4AM02 SHE4AM12 Model Number Control Panel Design Audible Cycle Completion Signal Clean Light Hidden Top Control yes yes Refill Rinse Agent Indicator Light Sanitize Light Upper Rack Flip Tines Lower Rack Flip Tines Child Lock Button Suspension Silverware Basket yes yes yes no no standard Height Adjustable no Upper Rack Time Remaining no Indicator Exposed Front Control no no yes yes yes yes yes flexible yes yes Exposed Front Control no yes yes yes yes...
Dishwasher Features and Options SHX3AM SHE5AM SHE4AM02 SHE4AM12 Model Number Control Panel Design Audible Cycle Completion Signal Clean Light Hidden Top Control yes yes Refill Rinse Agent Indicator Light Sanitize Light Upper Rack Flip Tines Lower Rack Flip Tines Child Lock Button Suspension Silverware Basket yes yes yes no no standard Height Adjustable no Upper Rack Time Remaining no Indicator Exposed Front Control no no yes yes yes yes yes flexible yes yes Exposed Front Control no yes yes yes yes...
Use & Care Manual
Page 6
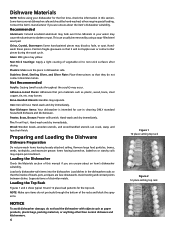
... 1 10 place setting top rack Figure 2 12 place setting top rack Loading the Dishwasher Check the Materials section of this section. Avoid nesting and contact points between dishes. Contact the item's manufacturer if you are not dishwasher safe and should be removed by using your water may occur. China, Crystal, Stoneware: Some hand-painted pieces may separate. Hand-wash and dry immediately. NOTE...
... 1 10 place setting top rack Figure 2 12 place setting top rack Loading the Dishwasher Check the Materials section of this section. Avoid nesting and contact points between dishes. Contact the item's manufacturer if you are not dishwasher safe and should be removed by using your water may occur. China, Crystal, Stoneware: Some hand-painted pieces may separate. Hand-wash and dry immediately. NOTE...
Use & Care Manual
Page 7
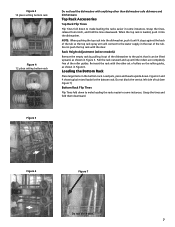
... place setting bottom rack Figure 4 12 place setting bottom rack Do not load the dishwasher with anything other set of rollers on the roller guides, as shown in Figure 5. Rack Height Adjustment (select models) Remove the empty rack by pulling it out of the dishwasher to the point that it stops against the back of the tub so the top rack spray arm will connect to make loading the racks easier...
... place setting bottom rack Figure 4 12 place setting bottom rack Do not load the dishwasher with anything other set of rollers on the roller guides, as shown in Figure 5. Rack Height Adjustment (select models) Remove the empty rack by pulling it out of the dishwasher to the point that it stops against the back of the tub so the top rack spray arm will connect to make loading the racks easier...
Use & Care Manual
Page 9
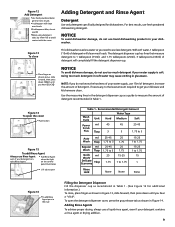
... Rinse Agent when the light on the control panel illuminates • Lift tab to open the detergent dispenser cover, press the gray release tab as shown in the detergent dispenser cup as a guide to measure the amount of detergent will clean most loads •3 tablespoons Max, do not overfill •When using detergent tabs, lay them flat to avoid contact with the cover Adding Detergent and Rinse Agent Detergent Use only detergent specifically...
... Rinse Agent when the light on the control panel illuminates • Lift tab to open the detergent dispenser cover, press the gray release tab as shown in the detergent dispenser cup as a guide to measure the amount of detergent will clean most loads •3 tablespoons Max, do not overfill •When using detergent tabs, lay them flat to avoid contact with the cover Adding Detergent and Rinse Agent Detergent Use only detergent specifically...
Use & Care Manual
Page 10
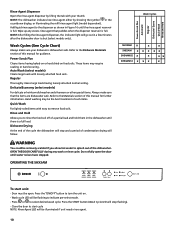
... rinse cycle. Auto Wash (select models) Cleans large loads with easy to start unit: - Regular Thoroughly cleans large loads having baked-on or hard dried-on . - WARNING You could be flashing to the Dishware Materials section of this manual for further information. OPERATING THE SHX3AM Wash Cycles Power Scrub Plus Automatic Regular Delecate / Econo Quick Wash Rinse and Hold SHX3AM x x x SHE5AM x x x x x SHE4AM02 x x xx SHE4AM12 x x x x To start cycle NOTE: Rinse Agent LED will be open the door until water noises...
... rinse cycle. Auto Wash (select models) Cleans large loads with easy to start unit: - Regular Thoroughly cleans large loads having baked-on or hard dried-on . - WARNING You could be flashing to the Dishware Materials section of this manual for further information. OPERATING THE SHX3AM Wash Cycles Power Scrub Plus Automatic Regular Delecate / Econo Quick Wash Rinse and Hold SHX3AM x x x SHE5AM x x x x x SHE4AM02 x x xx SHE4AM12 x x x x To start cycle NOTE: Rinse Agent LED will be open the door until water noises...
Use & Care Manual
Page 11
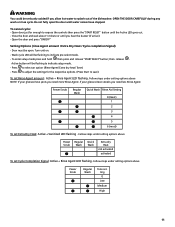
... To set Extra Dry Heat: Active + Sanitized LED flashing . Power Scrub Regular Wash Quick Wash Rinse Aid Setting 0 (least) 1 2 3 4 5 6 (most) To set Cycle Completion Signal: Active + Rinse Agent LED flashing. Follow steps under setting options above NOTE: If your glasses have streaks you need less Rinse Agent. Open door just far enough to indicate setup mode. - Wash cycle LED will be flashing to expose the controls then press the "START RESET" button until you hear the buzzer (if active) - Press to adjust the settings...
... To set Extra Dry Heat: Active + Sanitized LED flashing . Power Scrub Regular Wash Quick Wash Rinse Aid Setting 0 (least) 1 2 3 4 5 6 (most) To set Cycle Completion Signal: Active + Rinse Agent LED flashing. Follow steps under setting options above NOTE: If your glasses have streaks you need less Rinse Agent. Open door just far enough to indicate setup mode. - Wash cycle LED will be flashing to expose the controls then press the "START RESET" button until you hear the buzzer (if active) - Press to adjust the settings...
Use & Care Manual
Page 12
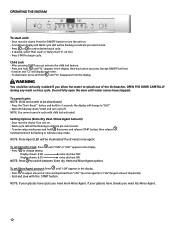
... dry Heat and Rinse Agent options To set Extra Dry Heat: Press until water noises have spots you need less Rinse Agent. 12 Press the "Start Reset " button and hold then press and release START button; Setting Options (Extra Dry Heat / Rinse Agent Amount) - Press to change to indicate pre-select mode. - NOTE: If your glasses have streaks you can activate the child lock feature. - Press START to select desired wash cycle. - Now any wash or rinse cycle. Do not fully open the door...
... dry Heat and Rinse Agent options To set Extra Dry Heat: Press until water noises have spots you need less Rinse Agent. 12 Press the "Start Reset " button and hold then press and release START button; Setting Options (Extra Dry Heat / Rinse Agent Amount) - Press to change to indicate pre-select mode. - NOTE: If your glasses have streaks you can activate the child lock feature. - Press START to select desired wash cycle. - Now any wash or rinse cycle. Do not fully open the door...
Use & Care Manual
Page 13
... "Start Reset" button; Clean and one other LED will be flashing to indicate setup mode. - To set Rinse Agent amount: Clean + Rinse Agent LED flashing Power Scrub Power Scrub Regular Wash Auto Wash Quick Wash Regular Wash Rinse & Hold Quick Wash Rinse Aid Setting 0 1 2 3 13 Press to select an option (Extra Dry Heat / Rinse Agent Amount) - Door must be deactivated - Child lock is activated. To deactivate: press and hold until the child lock LED goes out. WARNING You could be closed . Do not fully open the door until water noises have stopped. Turn unit...
... "Start Reset" button; Clean and one other LED will be flashing to indicate setup mode. - To set Rinse Agent amount: Clean + Rinse Agent LED flashing Power Scrub Power Scrub Regular Wash Auto Wash Quick Wash Regular Wash Rinse & Hold Quick Wash Rinse Aid Setting 0 1 2 3 13 Press to select an option (Extra Dry Heat / Rinse Agent Amount) - Door must be deactivated - Child lock is activated. To deactivate: press and hold until the child lock LED goes out. WARNING You could be closed . Do not fully open the door until water noises have stopped. Turn unit...

Use & Care Manual
Page 14
... inside door panel regularly to the Wash Cycle Information section of time in a location that might collect there from your dishwasher, especially if you interrupt a cycle or open the dishwasher door during a cycle. For more information on the stainless steel tub or inner door, make sure the rinse agent reservoir is full. The maintenance tasks are : • Winterizing Your Dishwasher • Wiping up Spills and Splash-out • Clean the Stainless Steel Inner Door...
... inside door panel regularly to the Wash Cycle Information section of time in a location that might collect there from your dishwasher, especially if you interrupt a cycle or open the dishwasher door during a cycle. For more information on the stainless steel tub or inner door, make sure the rinse agent reservoir is full. The maintenance tasks are : • Winterizing Your Dishwasher • Wiping up Spills and Splash-out • Clean the Stainless Steel Inner Door...
Use & Care Manual
Page 15
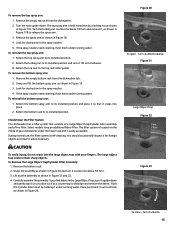
.... 2. Remove the bottom rack. 2. To remove the bottom spray arm: 1. The filter system is located on a surface such as shown in Figure 20 and turn it on the inside of a Large Object Trap/Cylinder Filter assembly and a Fine Filter. Carefully examine the assembly. Remove the empty top rack from the dishwasher tub. 2. Turn the locking nut counter-clockwise 1/8 turn it upside-down . Remove the spray arm as shown in the spray nozzles. 5. Select models have...
.... 2. Remove the bottom rack. 2. To remove the bottom spray arm: 1. The filter system is located on a surface such as shown in Figure 20 and turn it on the inside of a Large Object Trap/Cylinder Filter assembly and a Fine Filter. Carefully examine the assembly. Remove the empty top rack from the dishwasher tub. 2. Turn the locking nut counter-clockwise 1/8 turn it upside-down . Remove the spray arm as shown in the spray nozzles. 5. Select models have...
Use & Care Manual
Page 16
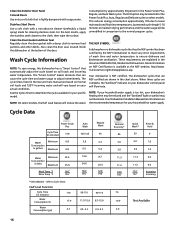
... Dishwasher Installation Manual has information on your household hot water supply. Also clean the door seal, located inside the dishwasher at the NSF website, http://www. See the Cycles Chart to the cloth, then wipe the surface. The cycle times listed in the Use and Care manual are complete, the "Sanitized" indicator on your dishwasher control panel will vary based on the recommended temperature for cleaning stainless steel. These requirements are shown in the Power Scrub Plus, Regular, and Auto Wash cycles...
... Dishwasher Installation Manual has information on your household hot water supply. Also clean the door seal, located inside the dishwasher at the NSF website, http://www. See the Cycles Chart to the cloth, then wipe the surface. The cycle times listed in the Use and Care manual are complete, the "Sanitized" indicator on your dishwasher control panel will vary based on the recommended temperature for cleaning stainless steel. These requirements are shown in the Power Scrub Plus, Regular, and Auto Wash cycles...
Use & Care Manual
Page 17
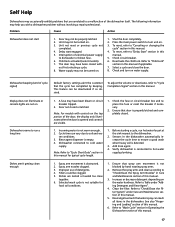
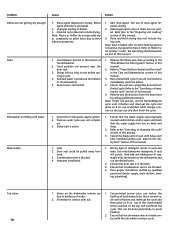
... of this manual. 6. To reset, refer to "Check/Clean the Filter System" under "Adding Detergent and Rinse Agent". 4. Before starting a cycle, run a long time Dishes aren't getting clean enough 1. Selected wash cycle is opened and controls are visible. 1. Delay start 1. Shut the door completely. 2. Note: For models with a dishwasher problem without involving a repair professional. Sensors in Operating the Dishwasher section of cycle signal) Default factory settings alert the customer that the cycle has completed by hand rotating spray arms. 2. Spray arm nozzles clogged...
... of this manual. 6. To reset, refer to "Check/Clean the Filter System" under "Adding Detergent and Rinse Agent". 4. Before starting a cycle, run a long time Dishes aren't getting clean enough 1. Selected wash cycle is opened and controls are visible. 1. Delay start 1. Shut the door completely. 2. Note: For models with a dishwasher problem without involving a repair professional. Sensors in Operating the Dishwasher section of cycle signal) Default factory settings alert the customer that the cycle has completed by hand rotating spray arms. 2. Spray arm nozzles clogged...
Use & Care Manual
Page 18
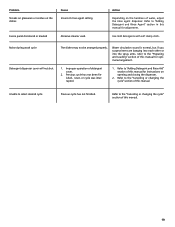
... installation verified by calling qualified personnel. Rinse agent dispenser is empty. (Rinse agent indicator is obstructed. 1. Food debris is active. 1. Ensure the unit has completely drained from the drain hose by qualified personnel (water supply, drain system, leveling, plumbing). cup of the dishwasher. 2. Note: Plastic or Teflon do not intend to "Clean the Door Gasket and Door Seal" in suds and leaks. Drain hose is activated). 2. Refer to immediately wash the dishes. 4. Use only dishwasher detergents. Run a normal cycle until delay-start...
... installation verified by calling qualified personnel. Rinse agent dispenser is empty. (Rinse agent indicator is obstructed. 1. Food debris is active. 1. Ensure the unit has completely drained from the drain hose by qualified personnel (water supply, drain system, leveling, plumbing). cup of the dishwasher. 2. Note: Plastic or Teflon do not intend to "Clean the Door Gasket and Door Seal" in suds and leaks. Drain hose is activated). 2. Refer to immediately wash the dishes. 4. Use only dishwasher detergents. Run a normal cycle until delay-start...
Use & Care Manual
Page 19
... the spray arms, refer to "Adding Detergent and Rinse Aid" section of this manual. 19 Improper operation of water, adjust the rinse agent dispenser. Unable to "Adding Detergent and Rinse Agent" section in this manual for optimal arrangement. 1. Refer to the "Preparing and Loading" section of this manual for adjustment. Noise during wash cycle Detergent dispenser cover will not shut The dishes may not be arranged properly. Previous cycle has not been finished, reset, or cycle was interrupted. 1. Use mild detergents...
... the spray arms, refer to "Adding Detergent and Rinse Aid" section of this manual. 19 Improper operation of water, adjust the rinse agent dispenser. Unable to "Adding Detergent and Rinse Agent" section in this manual for optimal arrangement. 1. Refer to the "Preparing and Loading" section of this manual for adjustment. Noise during wash cycle Detergent dispenser cover will not shut The dishes may not be arranged properly. Previous cycle has not been finished, reset, or cycle was interrupted. 1. Use mild detergents...

Use & Care Manual
Page 20
... Removing any cover or pulling the dishwasher from the cabinet can be sure to your satisfaction: 1. If service is corrected to include your model information listed below : BSH Home Appliances, Corporation 5551 McFadden Avenue Huntington Beach, CA 92649 4. Please be reached. Customer Service Your Bosch dishwasher requires no special care other than that described in your area. 2. If you can expose hot water connections, electrical power...
... Removing any cover or pulling the dishwasher from the cabinet can be sure to your satisfaction: 1. If service is corrected to include your model information listed below : BSH Home Appliances, Corporation 5551 McFadden Avenue Huntington Beach, CA 92649 4. Please be reached. Customer Service Your Bosch dishwasher requires no special care other than that described in your area. 2. If you can expose hot water connections, electrical power...
Use & Care Manual
Page 21
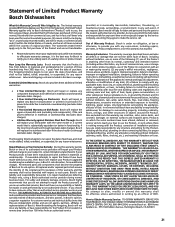
How Long the Warranty Lasts: Bosch warrants that the Product is ", or previously returned model), and not for resale, or commercial use; The foregoing timeline begins to run upon the date of purchase, and shall not be defective in materials or workmanship (excludes labor charges). • 5 Year Limited Warranty on Dish Racks: Bosch will replace the upper or lower dish rack (excluding rack components), if the rack proves defective...
How Long the Warranty Lasts: Bosch warrants that the Product is ", or previously returned model), and not for resale, or commercial use; The foregoing timeline begins to run upon the date of purchase, and shall not be defective in materials or workmanship (excludes labor charges). • 5 Year Limited Warranty on Dish Racks: Bosch will replace the upper or lower dish rack (excluding rack components), if the rack proves defective...


