

Installation Instructions
Page 3
.../Scalding Hazards Do not perform any work on an uninstalled dishwasher, carefully open the door while supporting the rear of gas. Doing so may damage the water inlet valve and cause a water leak. Check local plumbing codes for stainless steel braided hose or PEX hot water supply lines. If using copper tubing or other material for water supply, defer to touch. Once these mounting brackets are installed on the dishwasher, removing them is difficult and will be...
.../Scalding Hazards Do not perform any work on an uninstalled dishwasher, carefully open the door while supporting the rear of gas. Doing so may damage the water inlet valve and cause a water leak. Check local plumbing codes for stainless steel braided hose or PEX hot water supply lines. If using copper tubing or other material for water supply, defer to touch. Once these mounting brackets are installed on the dishwasher, removing them is difficult and will be...

Installation Instructions
Page 15
Guide the water line and drain hose toward the sink, and electric line through the proper channel. Units are in contact with cabinet door and drawer fronts. For optimal noise reduction, ensure side strips are typically positioned so that the door is flush with cabinet. Coloque las manos donde se ... direction de l'évier et placer correctement e câble électrique dans le conduit. Do not discard! Ne pas jeter! Elle devra être re-placer plus tard. Dishwasher Electrical Rating Cote électrique du lave-vaisselle Clasificación Eléctrica del Lavaplatos...
Guide the water line and drain hose toward the sink, and electric line through the proper channel. Units are in contact with cabinet door and drawer fronts. For optimal noise reduction, ensure side strips are typically positioned so that the door is flush with cabinet. Coloque las manos donde se ... direction de l'évier et placer correctement e câble électrique dans le conduit. Do not discard! Ne pas jeter! Elle devra être re-placer plus tard. Dishwasher Electrical Rating Cote électrique du lave-vaisselle Clasificación Eléctrica del Lavaplatos...
Instructions for Use
Page 3
... web site at : BSH Home Appliances, Corp. 5551 McFadden Avenue Huntington Beach, CA 92649 Table of Contents Important Safety Instructions 2-3 Dishwasher Components 4-5 Dishwasher Features and Materials 6 Loading the Dishwasher 7-8 Loading the Silverware Basket 8-9 Rack Accessories 10-11 Adding Detergent and Rinse Aid 12-13 Dishwasher Cycles and Options 14 Wash Cycle Information 14 Operating the Dishwasher 15 Care and Maintenance 16-17 Self Help 18-19 Customer Service 20 Warranty Information 21
... web site at : BSH Home Appliances, Corp. 5551 McFadden Avenue Huntington Beach, CA 92649 Table of Contents Important Safety Instructions 2-3 Dishwasher Components 4-5 Dishwasher Features and Materials 6 Loading the Dishwasher 7-8 Loading the Silverware Basket 8-9 Rack Accessories 10-11 Adding Detergent and Rinse Aid 12-13 Dishwasher Cycles and Options 14 Wash Cycle Information 14 Operating the Dishwasher 15 Care and Maintenance 16-17 Self Help 18-19 Customer Service 20 Warranty Information 21
Instructions for Use
Page 4
... use the dishwasher covered in this manual is highly recommended for the dishwasher covered in this manual unless you are certain the electrical supply has been correctly installed or the dishwasher has been properly grounded. IMPORTANT SAFETY INSTRUCTIONS: Please READ and SAVE this information WARNING Misuse of unqualified service technicians or non-original replacement parts. Do not use harsh chemicals to shut off the incoming water supply...
... use the dishwasher covered in this manual is highly recommended for the dishwasher covered in this manual unless you are certain the electrical supply has been correctly installed or the dishwasher has been properly grounded. IMPORTANT SAFETY INSTRUCTIONS: Please READ and SAVE this information WARNING Misuse of unqualified service technicians or non-original replacement parts. Do not use harsh chemicals to shut off the incoming water supply...
Instructions for Use
Page 5
... or stand on the door or dish racks of the dishwasher. 7 To reduce risk of injury, do not allow wet areas to a hot water system that is the washing of household dishware and kitchenware. 4 Use only detergents or rinsing agents recommended for use an open flame during this Use and Care Manual. Before using the dishwasher. 2 This appliance must be grounded to the fill valve. WARNING: To reduce the...
... or stand on the door or dish racks of the dishwasher. 7 To reduce risk of injury, do not allow wet areas to a hot water system that is the washing of household dishware and kitchenware. 4 Use only detergents or rinsing agents recommended for use an open flame during this Use and Care Manual. Before using the dishwasher. 2 This appliance must be grounded to the fill valve. WARNING: To reduce the...
Instructions for Use
Page 7
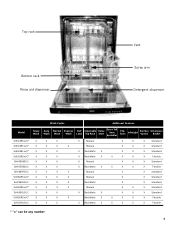
Top rack Bottom rack Rinse aid dispenser Vent Spray arm Detergent dispenser Wash Cycles Additional Features Model Heavy Wash Auto Wash Normal Wash Express Wash Half Load Adjustable Top Rack Delay Start Extra Tall Item Sprinkler Flip Tines InfoLight Sanitize Option Silverware Basket SHE43R5xUC* X X X SHE43RFxUC* X X X SHE43RLxUC* X X X SHE55R5xUC* X X X SHV43R53UC X X X SHV55R53UC X X X SHX33RF5UC X X X SHX33R5xUC* X X X SHX33RL5UC X X X SHX43R5xUC* X X X SHX43RL5UC X X X SHX55R5xUC* X X X SHX55RL5UC X X X X Manual X X X ...
Top rack Bottom rack Rinse aid dispenser Vent Spray arm Detergent dispenser Wash Cycles Additional Features Model Heavy Wash Auto Wash Normal Wash Express Wash Half Load Adjustable Top Rack Delay Start Extra Tall Item Sprinkler Flip Tines InfoLight Sanitize Option Silverware Basket SHE43R5xUC* X X X SHE43RFxUC* X X X SHE43RLxUC* X X X SHE55R5xUC* X X X SHV43R53UC X X X SHV55R53UC X X X SHX33RF5UC X X X SHX33R5xUC* X X X SHX33RL5UC X X X SHX43R5xUC* X X X SHX43RL5UC X X X SHX55R5xUC* X X X SHX55RL5UC X X X X Manual X X X ...

Instructions for Use
Page 8
...;: A high temperature final rinse, a low temperature stainless steel tub and the sheeting action of your dishwasher using your water may cause the aluminum to indicate that join materials such as plastic, wood, bone, steel, copper, tin, etc. Non-stick Coatings: Apply a light coating of clean water and protect the main pump and the drain pump from foreign material. Triple Filtration System: uses multiple filters to ensure distribution...
...;: A high temperature final rinse, a low temperature stainless steel tub and the sheeting action of your dishwasher using your water may cause the aluminum to indicate that join materials such as plastic, wood, bone, steel, copper, tin, etc. Non-stick Coatings: Apply a light coating of clean water and protect the main pump and the drain pump from foreign material. Triple Filtration System: uses multiple filters to ensure distribution...

Instructions for Use
Page 9
... pre-wash items with tall baking sheets. Remove all food particles, bones, toothpicks and excessive grease. Refer to unload the bottom rack first. Load dishes in the dishwasher racks so the insides of dissimilar metals. Loading the Bottom Rack Place large items in using the door. Unloading the Dishwasher When unloading the dishwasher it stops against the back of the tub so the top rack spray arm connects to the water supply...
... pre-wash items with tall baking sheets. Remove all food particles, bones, toothpicks and excessive grease. Refer to unload the bottom rack first. Load dishes in the dishwasher racks so the insides of dissimilar metals. Loading the Bottom Rack Place large items in using the door. Unloading the Dishwasher When unloading the dishwasher it stops against the back of the tub so the top rack spray arm connects to the water supply...

Instructions for Use
Page 12
... may need to desired position as show in the rack. Figure 3 Reinsert the rack with the top rack in the raised position, remove the empty top rack by pulling it out of the dishwasher until the rollers are completely free of rollers on the bottom rack's left side or center. Set the top rack aside. Figure 1 Do not block vent Figure 2 Manual Adjustable Upper Rack (model dependent) Remove...
... may need to desired position as show in the rack. Figure 3 Reinsert the rack with the top rack in the raised position, remove the empty top rack by pulling it out of the dishwasher until the rollers are completely free of rollers on the bottom rack's left side or center. Set the top rack aside. Figure 1 Do not block vent Figure 2 Manual Adjustable Upper Rack (model dependent) Remove...

Instructions for Use
Page 13
... on both sides, the dishwasher door will not shut and the top rack spray arm will not connect to accommodate large items in order to raise the rack). 11 Note: Before pushing the top rack into position (you do not need to press the handles in either rack. RackMatic™ Adjustable Upper Rack (model dependent) The top rack can be raised or lowered to the water inlet. Figure 5 To raise...
... on both sides, the dishwasher door will not shut and the top rack spray arm will not connect to accommodate large items in order to raise the rack). 11 Note: Before pushing the top rack into position (you do not need to press the handles in either rack. RackMatic™ Adjustable Upper Rack (model dependent) The top rack can be raised or lowered to the water inlet. Figure 5 To raise...

Instructions for Use
Page 14
... clicks. The detergent dispenser cup has lines that measure deter- Using too much detergent if your dishwasher. Increase the amount if necessary to the least amount required to 1 tablespoon (15ml) and 1.75 tablespoons (25ml). 3 tablespoons (45ml) of detergent. Adding Detergent and Rinse Aid Detergent Use only detergent specifically designed for dishwashers. To avoid dishwasher damage, do not know the hardness of detergent will clean most loads. With soft water, 1 tablespoon...
... clicks. The detergent dispenser cup has lines that measure deter- Using too much detergent if your dishwasher. Increase the amount if necessary to the least amount required to 1 tablespoon (15ml) and 1.75 tablespoons (25ml). 3 tablespoons (45ml) of detergent. Adding Detergent and Rinse Aid Detergent Use only detergent specifically designed for dishwashers. To avoid dishwasher damage, do not know the hardness of detergent will clean most loads. With soft water, 1 tablespoon...
Instructions for Use
Page 16
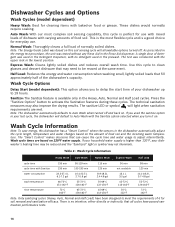
... energy and water consumption when washing small, lightly soiled loads that can cause the cycle time and water usage to meet the requirements of 6 for soil removal and sanitization efficacy. Wash Cycle Options Delay Start (model dependent): This option allows you used the sanitize option in your household water supply is no detergent used in the lowest position. washer's heating time may be reused at the same event. Table 2 - Express Wash: Cleans lightly soiled dishes and reduces overall wash time. The sanitize...
... energy and water consumption when washing small, lightly soiled loads that can cause the cycle time and water usage to meet the requirements of 6 for soil removal and sanitization efficacy. Wash Cycle Options Delay Start (model dependent): This option allows you used the sanitize option in your household water supply is no detergent used in the lowest position. washer's heating time may be reused at the same event. Table 2 - Express Wash: Cleans lightly soiled dishes and reduces overall wash time. The sanitize...

Instructions for Use
Page 17
... light on the Cancel/Reset button you when a cycle completes and the dishwasher has waashed and dried the dishes. You may splash out. 2 Press and hold the Delay Start button. Operating the Dishwasher Start the dishwasher: 1 Open the door and press the On/Off button. 2 Select a cycle and desired options. 3 Close the door to turn cycle completion signal OFF). 4 Press the On/Off button to save the setting. 15 Be careful of hot water that may now start (model dependent): 1 Open...
... light on the Cancel/Reset button you when a cycle completes and the dishwasher has waashed and dried the dishes. You may splash out. 2 Press and hold the Delay Start button. Operating the Dishwasher Start the dishwasher: 1 Open the door and press the On/Off button. 2 Select a cycle and desired options. 3 Close the door to turn cycle completion signal OFF). 4 Press the On/Off button to save the setting. 15 Be careful of hot water that may now start (model dependent): 1 Open...
Instructions for Use
Page 18
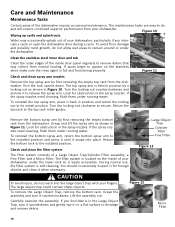
... continued superior performance from the dishwasher. If spots begin to secure. Turn the locking nut counterclockwise and remove it counterclockwise. To reinstall the top spray arm, place it on the inside door panel regularly to the installed position and press it until it when necessary. Turn the locking nut clockwise to appear on the stainless steel, make sure the rinse agent is located on a flat surface to...
... continued superior performance from the dishwasher. If spots begin to secure. Turn the locking nut counterclockwise and remove it counterclockwise. To reinstall the top spray arm, place it on the inside door panel regularly to the installed position and press it until it when necessary. Turn the locking nut clockwise to appear on the stainless steel, make sure the rinse agent is located on a flat surface to...

Instructions for Use
Page 19
... the surface. Turn the locking nut clockwise until it is locked. Turn your household water supply to remove food particles and other . Stainless steel doors: use only a soft cloth dampened with a non-abrasive cleaner (preferably a liquid spray) made for an extended period of the door. Winterizing your unit If your dishwasher will not be unused for cleaning stainless steel. Remove the Micro Filter as shown in a location that experiences freezing...
... the surface. Turn the locking nut clockwise until it is locked. Turn your household water supply to remove food particles and other . Stainless steel doors: use only a soft cloth dampened with a non-abrasive cleaner (preferably a liquid spray) made for an extended period of the door. Winterizing your unit If your dishwasher will not be unused for cleaning stainless steel. Remove the Micro Filter as shown in a location that experiences freezing...

Instructions for Use
Page 20
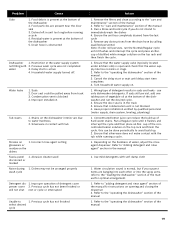
... tripped 2. Dishwasher seems to run hot water faucet at the sink closest to the dishwasher 2. Improper use of the manual 6. Selected wash cycle is not blocked by beeping. Shut the door completely 2. To reset, refer to the "care and maintenance" section of the manual 1. Verify dishwasher is opened and controls are visible. Clean the filters according to "Cancelling a Cycle" in the dishwasher - Rinse and Hold setting does not include drying Note: Select models offer an extra heating option to...
... tripped 2. Dishwasher seems to run hot water faucet at the sink closest to the dishwasher 2. Improper use of the manual 6. Selected wash cycle is not blocked by beeping. Shut the door completely 2. To reset, refer to the "care and maintenance" section of the manual 1. Verify dishwasher is opened and controls are visible. Clean the filters according to "Cancelling a Cycle" in the dishwasher - Rinse and Hold setting does not include drying Note: Select models offer an extra heating option to...
Instructions for Use
Page 21
... running a cycle 4. Delay start time completes 4. Abrasive cleaner used discolored or marked Noise during 1. Remove the filters and clean according to "care and maintenance" section of the manual 2. Have proper installation verified by calling qualified personnel. Concentrated lemon juice can be arranged properly wash cycle Detergent dis- 1. Depending on opening and closing the dispenser 2. Food particles are present near the door seal 3. Household water supply turned off. Refer to the "care and maintenance" section of the manual 3. Residual water...
... running a cycle 4. Delay start time completes 4. Abrasive cleaner used discolored or marked Noise during 1. Remove the filters and clean according to "care and maintenance" section of the manual 2. Have proper installation verified by calling qualified personnel. Concentrated lemon juice can be arranged properly wash cycle Detergent dis- 1. Depending on opening and closing the dispenser 2. Food particles are present near the door seal 3. Household water supply turned off. Refer to the "care and maintenance" section of the manual 3. Residual water...

Instructions for Use
Page 22
....ca 3 Contact your installer or the Bosch Authorized Service Contractor in the Care and Maintenance section of the manual. You will replace the product or refund the purchase price. This Bosch dishwasher is necessary, contact your model information as well as an explanation of purchase to repair the appliance yourself. If you are writing, please include a daytime phone number where you have received...
....ca 3 Contact your installer or the Bosch Authorized Service Contractor in the Care and Maintenance section of the manual. You will replace the product or refund the purchase price. This Bosch dishwasher is necessary, contact your model information as well as an explanation of purchase to repair the appliance yourself. If you are writing, please include a daytime phone number where you have received...
Instructions for Use
Page 23
... choose to have been altered, defaced, or removed; Also excluded from defects in materials and workmanship for any structure and setting for customer service and technical ability (note that you do not attempt to repair the Product yourself, or use ; correction of installation problems (you are not agents, partners, affiliates or representatives of Bosch). THIS WARRANTY IS IN LIEU OF ALL OTHER...
... choose to have been altered, defaced, or removed; Also excluded from defects in materials and workmanship for any structure and setting for customer service and technical ability (note that you do not attempt to repair the Product yourself, or use ; correction of installation problems (you are not agents, partners, affiliates or representatives of Bosch). THIS WARRANTY IS IN LIEU OF ALL OTHER...
Short Instructions
Page 1
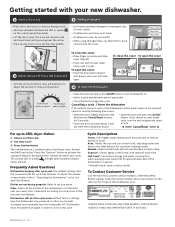
... toll free Customer Service number, 1-800-944-2904. Use Auto Cycle 3 - Clean both according to start a new cycle, turn the dishwasher off. Dishwasher must manually turn the unit on again and select a cycle. To open the cover: --Push the blue button inward (not down firmly until it clicks. If you need to cancel a cycle or the dishwasher control panel seems to 45% dryer dishes: 1 - Press Sanitize button The sanitize feature is necessary to improve drying results. --Add rinse aid when the Rinse Aid LED...
... toll free Customer Service number, 1-800-944-2904. Use Auto Cycle 3 - Clean both according to start a new cycle, turn the dishwasher off. Dishwasher must manually turn the unit on again and select a cycle. To open the cover: --Push the blue button inward (not down firmly until it clicks. If you need to cancel a cycle or the dishwasher control panel seems to 45% dryer dishes: 1 - Press Sanitize button The sanitize feature is necessary to improve drying results. --Add rinse aid when the Rinse Aid LED...


