

Installation Instructions
Page 3
... sure electrical work . There should perform plumbing work on an uninstalled dishwasher, carefully open the door while supporting the rear of 120V, 60 Hz, AC, connected to secure the dishwasher into its opening the door on the dishwasher electric supply circuit until you are certain the circuit is completely installed. Doing so may damage the water inlet valve and cause a water leak. Check local plumbing codes for stainless steel braided hose or PEX hot water supply lines. Avoiding Electrical Shock...
... sure electrical work . There should perform plumbing work on an uninstalled dishwasher, carefully open the door while supporting the rear of 120V, 60 Hz, AC, connected to secure the dishwasher into its opening the door on the dishwasher electric supply circuit until you are certain the circuit is completely installed. Doing so may damage the water inlet valve and cause a water leak. Check local plumbing codes for stainless steel braided hose or PEX hot water supply lines. Avoiding Electrical Shock...

Installation Instructions
Page 15
...door is flush with cabinet. Orienter le tuyau d'alimentation en eau et le tuyau de vidange en direction de l'évier et placer correctement e câble électrique dans le conduit. Coloque las manos donde se muestra para empujar la unidad a su lugar. Guide the water line and drain hose toward the sink, and electric line...! 11 Do Not Over-tighten or Remove Terminal Screws 12 Remove strain relief plate. Dishwasher Electrical Rating Cote électrique du lave-vaisselle Clasificación Eléctrica del Lavaplatos Volts Volts Voltios Hertz Hertz Hertzios Amperes...
...door is flush with cabinet. Orienter le tuyau d'alimentation en eau et le tuyau de vidange en direction de l'évier et placer correctement e câble électrique dans le conduit. Coloque las manos donde se muestra para empujar la unidad a su lugar. Guide the water line and drain hose toward the sink, and electric line...! 11 Do Not Over-tighten or Remove Terminal Screws 12 Remove strain relief plate. Dishwasher Electrical Rating Cote électrique du lave-vaisselle Clasificación Eléctrica del Lavaplatos Volts Volts Voltios Hertz Hertz Hertzios Amperes...
Instructions for Use
Page 3
... Instructions 2-3 Dishwasher Components 4-5 Dishwasher Features and Materials 6 Loading the Dishwasher 7-8 Loading the Silverware Basket 8-9 Rack Accessories 10-11 Adding Detergent and Rinse Aid 12-13 Dishwasher Cycles and Options 14 Wash Cycle Information 14 Operating the Dishwasher 15 Care and Maintenance 16-17 Self Help 18-19 Customer Service 20 Warranty Information 21 To learn more about your dishwasher and available accessories, as well as many consumers who demand quiet and superior performance from Bosch...
... Instructions 2-3 Dishwasher Components 4-5 Dishwasher Features and Materials 6 Loading the Dishwasher 7-8 Loading the Silverware Basket 8-9 Rack Accessories 10-11 Adding Detergent and Rinse Aid 12-13 Dishwasher Cycles and Options 14 Wash Cycle Information 14 Operating the Dishwasher 15 Care and Maintenance 16-17 Self Help 18-19 Customer Service 20 Warranty Information 21 To learn more about your dishwasher and available accessories, as well as many consumers who demand quiet and superior performance from Bosch...
Instructions for Use
Page 4
... service technicians or non-original replacement parts. All repairs must be liable for the possible damages or consequences. Do not use the dishwasher covered in this manual or for the end user to become familiar with the procedure to shut off the incoming power supply. Some chloride-containing products can result in this manual unless you are certain the electrical supply has been correctly installed or the dishwasher...
... service technicians or non-original replacement parts. All repairs must be liable for the possible damages or consequences. Do not use the dishwasher covered in this manual or for the end user to become familiar with the procedure to shut off the incoming power supply. Some chloride-containing products can result in this manual unless you are certain the electrical supply has been correctly installed or the dishwasher...
Instructions for Use
Page 5
... a hot water system that has been unused for two weeks or longer, turn on electrical requirements. 3 Use this time. 10 Remove the dishwasher door to the washing compartment when removing an old dishwasher for use in a dishwasher, and keep them out of the reach of children. 5 When loading items to operate the appliance, it will not fit the outlet, have a proper outlet installed by the warranty. 13 For a cord-connect...
... a hot water system that has been unused for two weeks or longer, turn on electrical requirements. 3 Use this time. 10 Remove the dishwasher door to the washing compartment when removing an old dishwasher for use in a dishwasher, and keep them out of the reach of children. 5 When loading items to operate the appliance, it will not fit the outlet, have a proper outlet installed by the warranty. 13 For a cord-connect...
Instructions for Use
Page 7
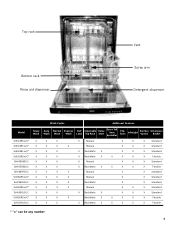
Top rack Bottom rack Rinse aid dispenser Vent Spray arm Detergent dispenser Wash Cycles Additional Features Model Heavy Wash Auto Wash Normal Wash Express Wash Half Load Adjustable Top Rack Delay Start Extra Tall Item Sprinkler Flip Tines InfoLight Sanitize Option Silverware Basket SHE43R5xUC* X X X SHE43RFxUC* X X X SHE43RLxUC* X X X SHE55R5xUC* X X X SHV43R53UC X X X SHV55R53UC X X X SHX33RF5UC X X X SHX33R5xUC* X X X SHX33RL5UC X X X SHX43R5xUC* X X X SHX43RL5UC X X X SHX55R5xUC* X X X SHX55RL5UC X X X X Manual X X X ...
Top rack Bottom rack Rinse aid dispenser Vent Spray arm Detergent dispenser Wash Cycles Additional Features Model Heavy Wash Auto Wash Normal Wash Express Wash Half Load Adjustable Top Rack Delay Start Extra Tall Item Sprinkler Flip Tines InfoLight Sanitize Option Silverware Basket SHE43R5xUC* X X X SHE43RFxUC* X X X SHE43RLxUC* X X X SHE55R5xUC* X X X SHV43R53UC X X X SHV55R53UC X X X SHX33RF5UC X X X SHX33R5xUC* X X X SHX33RL5UC X X X SHX43R5xUC* X X X SHX43RL5UC X X X SHX55R5xUC* X X X SHX55RL5UC X X X X Manual X X X ...

Instructions for Use
Page 8
... handles can be removed with certain wash cycles. Non-stick Coatings: Apply a light coating of the quietest in North America. InfoLight™: A red LED illuminates the floor to make this section. RackMatic™ Adjustable Rack: The top rack can crack, warp and lose their finish. 6 Dishware Materials Note: Before using your dishwasher using the delay start time of clean water and protect the main pump and the drain pump...
... handles can be removed with certain wash cycles. Non-stick Coatings: Apply a light coating of the quietest in North America. InfoLight™: A red LED illuminates the floor to make this section. RackMatic™ Adjustable Rack: The top rack can crack, warp and lose their finish. 6 Dishware Materials Note: Before using your dishwasher using the delay start time of clean water and protect the main pump and the drain pump...

Instructions for Use
Page 9
... spray arms. Avoid nesting and contact points between dishes. Load dishes in the dishwasher racks so the insides of the dishwasher. Loading the Bottom Rack Place large items in using the door. Load pots, pans and bowls upside down. NOTICE To avoid dishwasher damage, do not protrude through the bottom of the racks and block the spray arms. Note: When pushing the top rack into the dishwasher. Refer to the water supply...
... spray arms. Avoid nesting and contact points between dishes. Load dishes in the dishwasher racks so the insides of the dishwasher. Loading the Bottom Rack Place large items in using the door. Load pots, pans and bowls upside down. NOTICE To avoid dishwasher damage, do not protrude through the bottom of the racks and block the spray arms. Note: When pushing the top rack into the dishwasher. Refer to the water supply...

Instructions for Use
Page 12
... guides. Figure 4 10 Set the top rack aside. Push the roller guides back into position. Note: Keep the vent on the tub's right side clear by pulling it can be lifted upward as shown in the rack. Figure 1 Do not block vent Figure 2 Manual Adjustable Upper Rack (model dependent) Remove the empty upper rack by placing tall items such as plastic cutting boards and tall baking sheets...
... guides. Figure 4 10 Set the top rack aside. Push the roller guides back into position. Note: Keep the vent on the tub's right side clear by pulling it can be lifted upward as shown in the rack. Figure 1 Do not block vent Figure 2 Manual Adjustable Upper Rack (model dependent) Remove the empty upper rack by placing tall items such as plastic cutting boards and tall baking sheets...

Instructions for Use
Page 13
... stops. 2 Grasp the top of the dishwasher until the handles lock the rack into the dishwasher, ensure the rack height is not the same on both sides, the dishwasher door will not shut and the top rack spray arm will not connect to press the handles in either rack. Note: Before pushing the top rack into position (you do not need to the water inlet. Figure 5 To raise the top rack...
... stops. 2 Grasp the top of the dishwasher until the handles lock the rack into the dishwasher, ensure the rack height is not the same on both sides, the dishwasher door will not shut and the top rack spray arm will not connect to press the handles in either rack. Note: Before pushing the top rack into position (you do not need to the water inlet. Figure 5 To raise the top rack...

Instructions for Use
Page 14
... measuring lines in the detergent dispenser cup as shown in Table 1. 3 Tbsp. Adding Detergent and Rinse Aid Detergent Use only detergent specifically designed for dishwashers. To Open • Push the blue button inward (not down firmly until it clicks. NOTICE To avoid dishwasher damage, do not use fresh powdered dishwashing detergent. Note: If you do not use 15ml of the cover down ) as a guide to get your water supply, use too much detergent...
... measuring lines in the detergent dispenser cup as shown in Table 1. 3 Tbsp. Adding Detergent and Rinse Aid Detergent Use only detergent specifically designed for dishwashers. To Open • Push the blue button inward (not down firmly until it clicks. NOTICE To avoid dishwasher damage, do not use fresh powdered dishwashing detergent. Note: If you do not use 15ml of the cover down ) as a guide to get your water supply, use too much detergent...
Instructions for Use
Page 16
... sanitize option in your last cycle, the dishwasher will default to Auto Wash with the upper rack in the Detergent Dispenser, with varying amounts of food soil and the incoming water temperature. Express Wash: Cleans lightly soiled dishes and reduces overall wash time. There is a good choice for everyday use with mixed loads of your dish- Wash Cycle Information Note: To save energy, this soil sensing cycle will light when sanitation requirements are based on . washer's heating time...
... sanitize option in your last cycle, the dishwasher will default to Auto Wash with the upper rack in the Detergent Dispenser, with varying amounts of food soil and the incoming water temperature. Express Wash: Cleans lightly soiled dishes and reduces overall wash time. There is a good choice for everyday use with mixed loads of your dish- Wash Cycle Information Note: To save energy, this soil sensing cycle will light when sanitation requirements are based on . washer's heating time...

Instructions for Use
Page 17
... waashed and dried the dishes. Be careful of hot water that may now start (model dependent): 1 Open the door and press the On/Off button. 2 Select a cycle. 3 Press and hold the Delay Start button. Operating the Dishwasher Start the dishwasher: 1 Open the door and press the On/Off button. 2 Select a cycle and desired options. 3 Close the door to begin the cycle. OPEN THE DOOR CAREFULLY during any wash or rinse cycle. Interrupt a cycle: 1 Open the dishwasher door just far enough to expose the control panel. Cycle completion signal...
... waashed and dried the dishes. Be careful of hot water that may now start (model dependent): 1 Open the door and press the On/Off button. 2 Select a cycle. 3 Press and hold the Delay Start button. Operating the Dishwasher Start the dishwasher: 1 Open the door and press the On/Off button. 2 Select a cycle and desired options. 3 Close the door to begin the cycle. OPEN THE DOOR CAREFULLY during any wash or rinse cycle. Interrupt a cycle: 1 Open the dishwasher door just far enough to expose the control panel. Cycle completion signal...
Instructions for Use
Page 18
... or under running water. Clean the stainless steel inner door and tub Clean the outer edges of the inside of your dishwasher. Figure 11 Check and clean spray arm nozzles Remove the top spray arm by first removing the empty bottom rack from normal loading. Look for obstruction in Figure 11. Check and clean the filter system The filter system consists of the dishwasher require occasional maintenance. If you interrupt a cycle or open the dishwasher door during a cycle. Grasp...
... or under running water. Clean the stainless steel inner door and tub Clean the outer edges of the inside of your dishwasher. Figure 11 Check and clean spray arm nozzles Remove the top spray arm by first removing the empty bottom rack from normal loading. Look for obstruction in Figure 11. Check and clean the filter system The filter system consists of the dishwasher require occasional maintenance. If you interrupt a cycle or open the dishwasher door during a cycle. Grasp...

Instructions for Use
Page 19
... exterior door panel Colored doors: use a soft cloth with soapy water. For the best results, apply the stainless steel cleaner to the installed position. To reinstall the filter system, return the Micro Filter to the cloth and then wipe the surface. Place the Large Object Trap/Cylinder Filter Assembly and Fine Filter into the installed position. Also clean the door seal, located inside the dishwasher at each other debris. Turn the locking...
... exterior door panel Colored doors: use a soft cloth with soapy water. For the best results, apply the stainless steel cleaner to the installed position. To reinstall the filter system, return the Micro Filter to the cloth and then wipe the surface. Place the Large Object Trap/Cylinder Filter Assembly and Fine Filter into the installed position. Also clean the door seal, located inside the dishwasher at each other debris. Turn the locking...

Instructions for Use
Page 20
... 5. Dishwasher connected to cold water supply Note: Refer to soil and water conditions 3. Spray arm movement obstructed getting dry 2. Spray arm nozzles clogged enough 3. Improper use of electrical power supply to run hot water faucet at the sink closest to a malfunction of the manual 3. Dishes are not 1. Selected wash cycle is detected 3. Shut the door completely 2. Press the main power switch to "Cancelling a Cycle" in this manual 5. To reset, refer to turn on the water hardness (refer to the "care and maintenance...
... 5. Dishwasher connected to cold water supply Note: Refer to soil and water conditions 3. Spray arm movement obstructed getting dry 2. Spray arm nozzles clogged enough 3. Improper use of electrical power supply to run hot water faucet at the sink closest to a malfunction of the manual 3. Dishes are not 1. Selected wash cycle is detected 3. Shut the door completely 2. Press the main power switch to "Cancelling a Cycle" in this manual 5. To reset, refer to turn on the water hardness (refer to the "care and maintenance...
Instructions for Use
Page 21
... or into the spray arms, refer to the "care and maintenance" section of detergent cover penser cover 2. Turn household water supply on 1. Water circulation sound is obstructed Dishwasher 1. Refer to immediately wash the dishes 4. Dishes left in contact with soft damp cloth 1. Silverware in unit too long before running a cycle. 1. Previous wash cycle was not completed water 3. Delay start time completes 4. Note: If odor still persists, run the desired cycle. 2. Drain hose is normal, but if you...
... or into the spray arms, refer to the "care and maintenance" section of detergent cover penser cover 2. Turn household water supply on 1. Water circulation sound is obstructed Dishwasher 1. Refer to immediately wash the dishes 4. Dishes left in contact with soft damp cloth 1. Silverware in unit too long before running a cycle. 1. Previous wash cycle was not completed water 3. Delay start time completes 4. Note: If odor still persists, run the desired cycle. 2. Drain hose is normal, but if you...

Instructions for Use
Page 22
... a problem with your Bosch dishwasher and are having a problem with your invoice and keep it started. Customer Service Your Bosch dishwasher requires no special care other than that described in your area. 4 Write us or www.bosch-appliances.ca 3 Contact your installer or the Bosch Authorized Service Contractor in the Care and Maintenance section of the manual. If you are not pleased with this manual. The limited warranty rweiftlheicntetdhTwehabirsyfriartnsBhttoeystGrwcehoofloedycdeitseaHhdrwosbuaoyssfehthkepeerueGripcsohinoabdgsaeHcS...
... a problem with your Bosch dishwasher and are having a problem with your invoice and keep it started. Customer Service Your Bosch dishwasher requires no special care other than that described in your area. 4 Write us or www.bosch-appliances.ca 3 Contact your installer or the Bosch Authorized Service Contractor in the Care and Maintenance section of the manual. If you are not pleased with this manual. The limited warranty rweiftlheicntetdhTwehabirsyfriartnsBhttoeystGrwcehoofloedycdeitseaHhdrwosbuaoyssfehthkepeerueGripcsohinoabdgsaeHcS...
Instructions for Use
Page 23
... is located in Bosch's sole discretion, for your normal, household (non-commercial) use of the Product in conjunction with air or water-going vessels); (2) any party's willful misconduct, negligence, misuse, abuse, accidents, neglect, improper operation, failure to maintain, improper or negligent installation, tampering, failure to follow operating instructions, mishandling, unauthorized service (including self-performed "fixing" or exploration of the appliance's internal workings); (3) adjustment, alteration...
... is located in Bosch's sole discretion, for your normal, household (non-commercial) use of the Product in conjunction with air or water-going vessels); (2) any party's willful misconduct, negligence, misuse, abuse, accidents, neglect, improper operation, failure to maintain, improper or negligent installation, tampering, failure to follow operating instructions, mishandling, unauthorized service (including self-performed "fixing" or exploration of the appliance's internal workings); (3) adjustment, alteration...
Short Instructions
Page 1
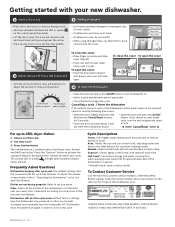
... applicable. --Close the door to begin the cycle. Before calling, locate the model number and serial number on the label on the inside the rinse aid dispenser to adjust the amount of rinse aid dispensed. If you need to cancel a cycle or the dishwasher control panel seems to not respond, cancel or reset by following these steps. --Open the door slightly and press and hold the two Cancel/Reset buttons for best drying 2 Adjust Amount of Rinse Aid Dispensed --Turn the arrow inside of the dishwasher door. maximum...
... applicable. --Close the door to begin the cycle. Before calling, locate the model number and serial number on the label on the inside the rinse aid dispenser to adjust the amount of rinse aid dispensed. If you need to cancel a cycle or the dishwasher control panel seems to not respond, cancel or reset by following these steps. --Open the door slightly and press and hold the two Cancel/Reset buttons for best drying 2 Adjust Amount of Rinse Aid Dispensed --Turn the arrow inside of the dishwasher door. maximum...


