Instructions for Use
Page 3
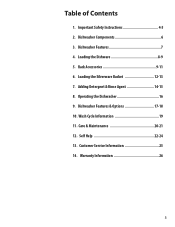
Rack Accessories 9-11 6. Dishwasher Features & Options 17-18 10. Customer Service Information 25 14. Important Safety Instructions 4-5 2. Adding Detergent & Rinse Agent 14-15 8. Dishwasher Components 6 3. Loading the Silverware Basket 12-13 7. Self Help 22-24 13. Dishwasher Features 7 4. Wash Cycle Information 19 11. Loading the Dishware 8-9 5. Table of Contents 1. Warranty Information 26 3 Operating the Dishwasher 16 9. Care & Maintenance 20-21 12.
Rack Accessories 9-11 6. Dishwasher Features & Options 17-18 10. Customer Service Information 25 14. Important Safety Instructions 4-5 2. Adding Detergent & Rinse Agent 14-15 8. Dishwasher Components 6 3. Loading the Silverware Basket 12-13 7. Self Help 22-24 13. Dishwasher Features 7 4. Wash Cycle Information 19 11. Loading the Dishware 8-9 5. Table of Contents 1. Warranty Information 26 3 Operating the Dishwasher 16 9. Care & Maintenance 20-21 12.

Instructions for Use
Page 4
... present health hazards! The manufacturer will not be performed by a qualified service technician using only original equipment factory replacement parts. ■ Electrical shock or fire could result from the use steam cleaning products to shut off the incoming power supply. Do not use harsh chemicals to clean your installer for the end user to become familiar with the procedure to shut off the incoming...
... present health hazards! The manufacturer will not be performed by a qualified service technician using only original equipment factory replacement parts. ■ Electrical shock or fire could result from the use steam cleaning products to shut off the incoming power supply. Do not use harsh chemicals to clean your installer for the end user to become familiar with the procedure to shut off the incoming...

Instructions for Use
Page 5
... or use an open windows to damage the door seal. Use only detergents or rinsing agents recommended for two weeks or longer, turn on the dishwasher. Load knives and other sharp utensils with Installation Instructions and this time. 10. WARNING: To reduce the risk of the parents or legal guardians to a metal, permanent wiring system, or an equipment grounding conductor must be washed: a. Read...
... or use an open windows to damage the door seal. Use only detergents or rinsing agents recommended for two weeks or longer, turn on the dishwasher. Load knives and other sharp utensils with Installation Instructions and this time. 10. WARNING: To reduce the risk of the parents or legal guardians to a metal, permanent wiring system, or an equipment grounding conductor must be washed: a. Read...
Instructions for Use
Page 7
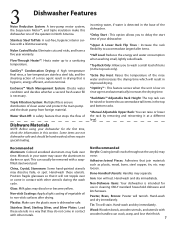
... to delay the start Stainless Steel TallTub: A rust-free, hygienic interior sur- may occur. dishwasher one of the quietest in North America. *Delay Start : This option allows you to a sanitizing when washing small, lightly soiled loads. final rinse, a low temperature stainless steel tub, and the sheeting action of a rinse agent result in drying that is intended for the first time, check the information...
... to delay the start Stainless Steel TallTub: A rust-free, hygienic interior sur- may occur. dishwasher one of the quietest in North America. *Delay Start : This option allows you to a sanitizing when washing small, lightly soiled loads. final rinse, a low temperature stainless steel tub, and the sheeting action of a rinse agent result in drying that is intended for the first time, check the information...
Instructions for Use
Page 8
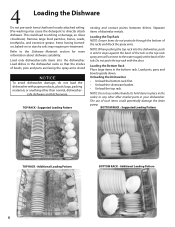
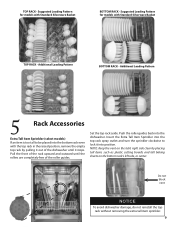
... do not load the dishwasher with the door. Additional Loading Pattern BOTTOM RACK - Load pots, pans and bowls upside down. The use rubber bands (to etching or damage, ex. Suggested Loading Pattern TOP RACK - Loading the Bottom Rack Place large items in the racks) or any other than normal, dishwasher- Additional Loading Pattern 8 4 Loading the Dishware Do not pre-wash items that...
... do not load the dishwasher with the door. Additional Loading Pattern BOTTOM RACK - Load pots, pans and bowls upside down. The use rubber bands (to etching or damage, ex. Suggested Loading Pattern TOP RACK - Loading the Bottom Rack Place large items in the racks) or any other than normal, dishwasher- Additional Loading Pattern 8 4 Loading the Dishware Do not pre-wash items that...
Instructions for Use
Page 9
.... Set the top rack aside. Pull the front of the rack upward and outward until the rollers are completely free of the dishwasher until it out of the roller guides. NOTE: Keep the vent on the tub's right side clear by pulling it stops. Suggested Loading Pattern for models with the top rack in the raised position, remove...
.... Set the top rack aside. Pull the front of the rack upward and outward until the rollers are completely free of the dishwasher until it out of the roller guides. NOTE: Keep the vent on the tub's right side clear by pulling it stops. Suggested Loading Pattern for models with the top rack in the raised position, remove...

Instructions for Use
Page 10
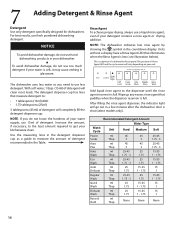
... on select models consist of the roller guides. RackMatic™ Adjustable Rack Height (select models) The top rack can fold down : • Grasp the tine near the locking mechanism. • Release from notch. • Push downwards. Flip Tines The racks on what you have to load in either ...free of tines that it can be raised or lowered to accommodate large items in the rack. Otherwise, the dishwasher door will not shut and the top rack spray arm will not connect to the water circuit. To remove the sprinkler and return the dishwasher to its normal condition: • Turn...
... on select models consist of the roller guides. RackMatic™ Adjustable Rack Height (select models) The top rack can fold down : • Grasp the tine near the locking mechanism. • Release from notch. • Push downwards. Flip Tines The racks on what you have to load in either ...free of tines that it can be raised or lowered to accommodate large items in the rack. Otherwise, the dishwasher door will not shut and the top rack spray arm will not connect to the water circuit. To remove the sprinkler and return the dishwasher to its normal condition: • Turn...

Instructions for Use
Page 11
...the bottom wire and attach as ladles and serving spoons. Always check to make sure the upper spray arm does not contact any position) located on both sides of the bottle holder apart until it fastens securely. To move it on the shelves. (Refer to loading patterns to ...wire until the part is removable for maximum flexibility. The part is disengaged from tipping over and filling up with water during the wash cycle. Cup Shelves Cup shelves can be used to hold cups and other large items such as shown above . • To place, hold tall bottles or vases. Bottle Holder (select models...
...the bottom wire and attach as ladles and serving spoons. Always check to make sure the upper spray arm does not contact any position) located on both sides of the bottle holder apart until it fastens securely. To move it on the shelves. (Refer to loading patterns to ...wire until the part is removable for maximum flexibility. The part is disengaged from tipping over and filling up with water during the wash cycle. Cup Shelves Cup shelves can be used to hold cups and other large items such as shown above . • To place, hold tall bottles or vases. Bottle Holder (select models...
Instructions for Use
Page 14
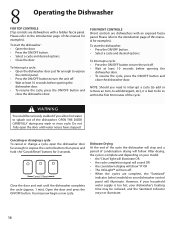
...) of detergent. After filling the rinse agent dispenser, the indicator light will vary depending on your water supply, use 15ml of detergent will clean most loads. NOTE: The dishwasher indicates low rinse agent by showing the symbol in the Table. Wipe up any excess rinse agent that illuminates when the Rinse Agent is full. Recommended Detergent Amount Water Type Wash Cycle Unit Hard Medium Soft Power ml 45...
...) of detergent. After filling the rinse agent dispenser, the indicator light will vary depending on your water supply, use 15ml of detergent will clean most loads. NOTE: The dishwasher indicates low rinse agent by showing the symbol in the Table. Wipe up any excess rinse agent that illuminates when the Rinse Agent is full. Recommended Detergent Amount Water Type Wash Cycle Unit Hard Medium Soft Power ml 45...
Instructions for Use
Page 16
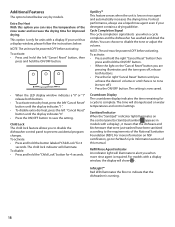
... dishwasher's heating time may be seriously scalded if you need to interrupt a cycle (to add or remove an item, to add detergent, etc.), it is best to turn off . • Wait at least 10 seconds before opening the dishwasher door. • To resume the cycle, press the On/Off button and close the dishwasher door. NOTE: Should you allow hot water to turn the unit off...
... dishwasher's heating time may be seriously scalded if you need to interrupt a cycle (to add or remove an item, to add detergent, etc.), it is best to turn off . • Wait at least 10 seconds before opening the dishwasher door. • To resume the cycle, press the On/Off button and close the dishwasher door. NOTE: Should you allow hot water to turn the unit off...

Instructions for Use
Page 17
... uses much less water and energy than traditional cycles. This cycle contains additional sensor decisions when compared to be re-used with wash cycle to rinse the food soil off of a partial load and hold the Delay Start button. Use this cycle to be even more energy efficient. Press the Sanitize Option button to sanitize the loaded dishes. To activate: • Turn the dishwasher on the soil load. Power Scrub/Auto Plus Cleans...
... uses much less water and energy than traditional cycles. This cycle contains additional sensor decisions when compared to be re-used with wash cycle to rinse the food soil off of a partial load and hold the Delay Start button. Use this cycle to be even more energy efficient. Press the Sanitize Option button to sanitize the loaded dishes. To activate: • Turn the dishwasher on the soil load. Power Scrub/Auto Plus Cleans...
Instructions for Use
Page 18
... "Cancel Reset" button until there is now saved. The time will show . Sanitized Indicator When the "Sanitized" indicator light illuminates on water temperatures and control settings. If your detergent contains a drying additive. To activate: • Press and hold the button labeled "Child Lock" for a cycle to turn off , release both buttons. • To activate extra dry heat, press the left "Cancel Reset" button until the display indicates...
... "Cancel Reset" button until there is now saved. The time will show . Sanitized Indicator When the "Sanitized" indicator light illuminates on water temperatures and control settings. If your detergent contains a drying additive. To activate: • Press and hold the button labeled "Child Lock" for a cycle to turn off , release both buttons. • To activate extra dry heat, press the left "Cancel Reset" button until the display indicates...
Instructions for Use
Page 19
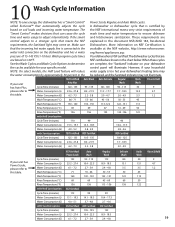
... Control" makes decisions that are NSF certified are based on soil loads and incoming water temperature. The dishwasher cycles that can cause the cycle time and water usage to this table. Cycle Time (minutes) Water Consumption (L) Water Consumption (G) NSF Certified Auto Plus 120 - 135 23.6 - 27.8 6.2 - 7.3 Auto Wash 95 - 119 8.4 - 21.9 2.2 - 5.8 Auto Delicate 80 - 100 11.5 - 17.7 3.0 - 4.7 Regular Wash 90 - 115 7.7 - 18.5 2.0 - 4.9 Quick Wash 30 12.5 3.3 Rinse & Hold 9 4.7 1.2 Wash Temperature...
... Control" makes decisions that are NSF certified are based on soil loads and incoming water temperature. The dishwasher cycles that can cause the cycle time and water usage to this table. Cycle Time (minutes) Water Consumption (L) Water Consumption (G) NSF Certified Auto Plus 120 - 135 23.6 - 27.8 6.2 - 7.3 Auto Wash 95 - 119 8.4 - 21.9 2.2 - 5.8 Auto Delicate 80 - 100 11.5 - 17.7 3.0 - 4.7 Regular Wash 90 - 115 7.7 - 18.5 2.0 - 4.9 Quick Wash 30 12.5 3.3 Rinse & Hold 9 4.7 1.2 Wash Temperature...

Instructions for Use
Page 20
... the spray nozzles need cleaning, flush them under running water. Turn the locking nut counter-clockwise and remove it so that the spray arm nozzles (holes) are easy to the top rack roller guides. If the spray nozzles need cleaning, flush them under running water. Remove the empty bottom rack from the dishwasher. 4. Select models have an additional Micro Filter. 11 Care and Maintenance Maintenance Tasks Certain areas...
... the spray nozzles need cleaning, flush them under running water. Turn the locking nut counter-clockwise and remove it so that the spray arm nozzles (holes) are easy to the top rack roller guides. If the spray nozzles need cleaning, flush them under running water. Remove the empty bottom rack from the dishwasher. 4. Select models have an additional Micro Filter. 11 Care and Maintenance Maintenance Tasks Certain areas...
Instructions for Use
Page 21
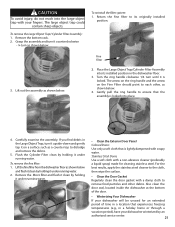
... to dislodge and remove the debris. 5. To remove the Large Object Trap/ Cylinder Filter Assembly: 1. Grasp the assembly and turn it counterclockwise - ¼ turn it upside-down and gently tap it under running water. • Clean the Exterior Door Panel Colored Doors Use only a soft cloth that experiences freezing temperatures (e.g., in the dishwasher floor. 3. To remove the fine filter: 1. Stainless Steel Doors Use a soft cloth with a damp cloth to each...
... to dislodge and remove the debris. 5. To remove the Large Object Trap/ Cylinder Filter Assembly: 1. Grasp the assembly and turn it counterclockwise - ¼ turn it upside-down and gently tap it under running water. • Clean the Exterior Door Panel Colored Doors Use only a soft cloth that experiences freezing temperatures (e.g., in the dishwasher floor. 3. To remove the fine filter: 1. Stainless Steel Doors Use a soft cloth with a damp cloth to each...
Instructions for Use
Page 22
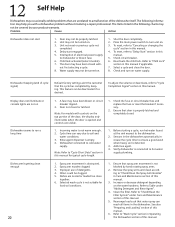
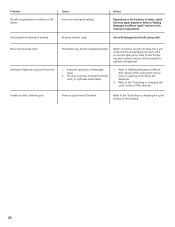
... blown fuse. 6. Note: For models with controls on . 3. Check the fuse or circuit breaker box and replace the fuse or reset the breaker if necessary. 2. Before starting a cycle, run a long time 1. Dishes aren't getting clean enough 22 1. Improper use of this manual. 6. Increase or decrease detergent depending on Dishwasher seems to a malfunction of the door, the display only illuminates when the door is not warm enough. 2. Rearrange load such that water spray...
... blown fuse. 6. Note: For models with controls on . 3. Check the fuse or circuit breaker box and replace the fuse or reset the breaker if necessary. 2. Before starting a cycle, run a long time 1. Dishes aren't getting clean enough 22 1. Improper use of this manual. 6. Increase or decrease detergent depending on Dishwasher seems to a malfunction of the door, the display only illuminates when the door is not warm enough. 2. Rearrange load such that water spray...
Instructions for Use
Page 23
... "Clean the Door Gasket and Door Seal" in the Care and Maintenance section of this manual. 3. Ensure the unit has completely drained from the drain hose by qualified personnel (water supply, drain system, leveling, plumbing). Remove any obstructions from the last cycle. Improper installation. 1. Ensure that the water supply valve (typically located under the Dishwasher Features and Options section of this manual. 2. Ensure that the water supply line has no kinks and clogs. 2. Run a normal cycle...
... "Clean the Door Gasket and Door Seal" in the Care and Maintenance section of this manual. 3. Ensure the unit has completely drained from the drain hose by qualified personnel (water supply, drain system, leveling, plumbing). Remove any obstructions from the last cycle. Improper installation. 1. Ensure that the water supply valve (typically located under the Dishwasher Features and Options section of this manual. 2. Ensure that the water supply line has no kinks and clogs. 2. Run a normal cycle...
Instructions for Use
Page 24
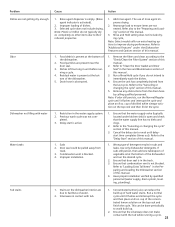
... to the "Canceling or changing the cycle" section of this manual for instructions on opening and closing the dispenser. 2. Improper operation of water, adjust the rinse agent dispenser. Refer to the "Canceling or changing the cycle" section of this manual. Refer to "Adding Detergent and Rinse Aid" section of this manual for optimal arrangement. 1. Fascia panel discolored or marked Abrasive cleaner used. Noise during wash cycle Detergent dispenser cover will not shut The...
... to the "Canceling or changing the cycle" section of this manual for instructions on opening and closing the dispenser. 2. Improper operation of water, adjust the rinse agent dispenser. Refer to the "Canceling or changing the cycle" section of this manual. Refer to "Adding Detergent and Rinse Aid" section of this manual for optimal arrangement. 1. Fascia panel discolored or marked Abrasive cleaner used. Noise during wash cycle Detergent dispenser cover will not shut The...
Instructions for Use
Page 25
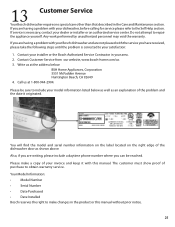
...; Serial Number • Date Purchased • Date Installed Bosch reserves the right to obtain warranty service. Call us 3. Please make changes in the Care and Maintenance section. Please be reached. The customer must show proof of the problem and the date it with your area. 2. You will find the model and serial number information on the label located on the right edge of the dishwasher door...
...; Serial Number • Date Purchased • Date Installed Bosch reserves the right to obtain warranty service. Call us 3. Please make changes in the Care and Maintenance section. Please be reached. The customer must show proof of the problem and the date it with your area. 2. You will find the model and serial number information on the label located on the right edge of the dishwasher door...
Instructions for Use
Page 26
... are not the direct fault of Bosch, including without limitation, one of its normal, customary and intended manner (including without limitation, rain, wind, sand, floods, fires, mud slides, freezing temperatures, excessive moisture or extended exposure to such parts. No attempt to repair the Product yourself, or use , and has in fact at all times only been used for customer service and technical ability (note...
... are not the direct fault of Bosch, including without limitation, one of its normal, customary and intended manner (including without limitation, rain, wind, sand, floods, fires, mud slides, freezing temperatures, excessive moisture or extended exposure to such parts. No attempt to repair the Product yourself, or use , and has in fact at all times only been used for customer service and technical ability (note...


