
Installation Instructions
Page 3
... a water leak. Temperatures required for weeks, run with all electrical connections are certain the circuit is shut off for soldering and sweating will damage the dishwasher's base and water inlet valve. Removing any work on a charged hot water line. Do not use the dishwasher until it is properly installed. All plumbing should perform electrical work . WARNING Avoiding General Hazards Do not use extension cords. Doing so could result. Make sure electrical work on the dishwasher electric supply...
... a water leak. Temperatures required for weeks, run with all electrical connections are certain the circuit is shut off for soldering and sweating will damage the dishwasher's base and water inlet valve. Removing any work on a charged hot water line. Do not use the dishwasher until it is properly installed. All plumbing should perform electrical work . WARNING Avoiding General Hazards Do not use extension cords. Doing so could result. Make sure electrical work on the dishwasher electric supply...
Instructions for Use
Page 3
... of Contents Important Safety Instructions 2-3 Dishwasher Components 4-5 Dishwasher Features and Materials 6 Loading the Dishwasher 7-8 Loading the Silverware Basket 8-9 Rack Accessories 10 Adding Detergent and Rinse Agent 10-11 Dishwasher Cycles and Options 12 Wash Cycle Information 12 Operating the Dishwasher 13-14 Care and Maintenance 14-15 Self Help 16-17 Customer Service 18 Warranty Information 19 Congratulations and thank you from their dishwashers. Thank you read this manual before using your safety and convenience...
... of Contents Important Safety Instructions 2-3 Dishwasher Components 4-5 Dishwasher Features and Materials 6 Loading the Dishwasher 7-8 Loading the Silverware Basket 8-9 Rack Accessories 10 Adding Detergent and Rinse Agent 10-11 Dishwasher Cycles and Options 12 Wash Cycle Information 12 Operating the Dishwasher 13-14 Care and Maintenance 14-15 Self Help 16-17 Customer Service 18 Warranty Information 19 Congratulations and thank you from their dishwashers. Thank you read this manual before using your safety and convenience...
Instructions for Use
Page 4
... removal and sanitation efficacy. There is highly recommended for the possible damages or consequences. See the Installation Instructions or contact your dishwasher and may present health hazards! Some chloride-containing products can result in the following pages. All repairs must be liable for the end user to become familiar with the procedure to shut off the incoming power supply. Never use steam cleaning products to clean...
... removal and sanitation efficacy. There is highly recommended for the possible damages or consequences. See the Installation Instructions or contact your dishwasher and may present health hazards! Some chloride-containing products can result in the following pages. All repairs must be liable for the end user to become familiar with the procedure to shut off the incoming power supply. Never use steam cleaning products to clean...
Instructions for Use
Page 5
... is the washing of household dishware and kitchenware. 4 Use only detergents or rinsing agents recommended for service or discarding. 11 To avoid floor damage and possible mold growth, do not allow children to play in or on all instructions before using a dishwasher that is connected to a hot water system that is installed and grounded in place. • Do not tamper with a cord having an...
... is the washing of household dishware and kitchenware. 4 Use only detergents or rinsing agents recommended for service or discarding. 11 To avoid floor damage and possible mold growth, do not allow children to play in or on all instructions before using a dishwasher that is connected to a hot water system that is installed and grounded in place. • Do not tamper with a cord having an...
Instructions for Use
Page 6
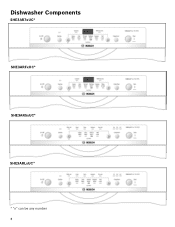
Dishwasher Components SHE3AR7xUC* SHE3ARFxUC* SHE3AR5xUC* SHE3ARLxUC* * "x" can be any number 4
Dishwasher Components SHE3AR7xUC* SHE3ARFxUC* SHE3AR5xUC* SHE3ARLxUC* * "x" can be any number 4
Instructions for Use
Page 7
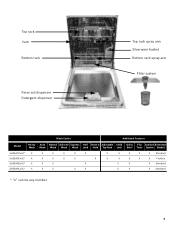
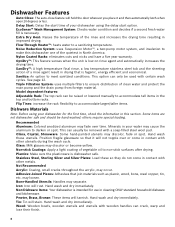
Top rack Vent Bottom rack Rinse aid dispenser Detergent dispenser Top rack spray arm Silverware basket Bottom rack spray arm Filter system Wash Cycles Additional Features Model Heavy Auto Normal Delicate Express Half Rinse & Adjustable Child Delay Flip Sanitize Silverware Wash Wash Wash Wash Wash Load Hold Top Rack Lock Start Tines Option Basket SHE3AR7xUC* X X X X X X SHE3ARFxUC* X X X X X X SHE3AR5xUC* X X X X SHE3ARLxUC* X X X X X X X X X X Standard X X X X X Flexible X X X Standard X X X Standard * "x" can be any number 5
Top rack Vent Bottom rack Rinse aid dispenser Detergent dispenser Top rack spray arm Silverware basket Bottom rack spray arm Filter system Wash Cycles Additional Features Model Heavy Auto Normal Delicate Express Half Rinse & Adjustable Child Delay Flip Sanitize Silverware Wash Wash Wash Wash Wash Load Hold Top Rack Lock Start Tines Option Basket SHE3AR7xUC* X X X X X X SHE3ARFxUC* X X X X X X SHE3AR5xUC* X X X X SHE3ARLxUC* X X X X X X X X X X Standard X X X X X Flexible X X X Standard X X X Standard * "x" can be any number 5
Instructions for Use
Page 8
... final rinse, a low temperature stainless steel tub and the sheeting action of clean water and protect the main pump and the drain pump from foreign material. This can only be hand washed; Non-Dishware Items: Your dishwasher is hygenic, energy efficient and economical. Nylon Coated Racks: eliminates cuts and nicks and have a five year warranty. Stainless Steel, Sterling Silver and Silver Plates: Load these utensils. Bone-Handled Utensils: Handles may...
... final rinse, a low temperature stainless steel tub and the sheeting action of clean water and protect the main pump and the drain pump from foreign material. This can only be hand washed; Non-Dishware Items: Your dishwasher is hygenic, energy efficient and economical. Nylon Coated Racks: eliminates cuts and nicks and have a five year warranty. Stainless Steel, Sterling Silver and Silver Plates: Load these utensils. Bone-Handled Utensils: Handles may...
Instructions for Use
Page 9
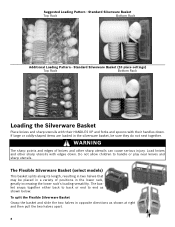
... left side of the dishwasher. Load only dishwasher safe items into the dishwasher, push it until it is best to unload the bottom rack first. Next, unload the silverware basket followed by the top rack. Flexible Silverware Basket (10 place settings) Top Rack Bottom Rack 7 Refer to the water supply at the back of the tub so the top rack spray arm connects to the Dishware Materials...
... left side of the dishwasher. Load only dishwasher safe items into the dishwasher, push it until it is best to unload the bottom rack first. Next, unload the silverware basket followed by the top rack. Flexible Silverware Basket (10 place settings) Top Rack Bottom Rack 7 Refer to the water supply at the back of the tub so the top rack spray arm connects to the Dishware Materials...
Instructions for Use
Page 10
... either back to back or end to handle or play near knives and sharp utensils. Standard Silverware Basket (10 place settings) Top Rack Bottom Rack Loading the Silverware Basket Place knives and sharp utensils with their handles down . To split the Flexible Silverware Basket Grasp the basket and slide the two halves in the lower rack, greatly increasing the lower rack's loading versatility. WARNING The sharp...
... either back to back or end to handle or play near knives and sharp utensils. Standard Silverware Basket (10 place settings) Top Rack Bottom Rack Loading the Silverware Basket Place knives and sharp utensils with their handles down . To split the Flexible Silverware Basket Grasp the basket and slide the two halves in the lower rack, greatly increasing the lower rack's loading versatility. WARNING The sharp...
Instructions for Use
Page 11
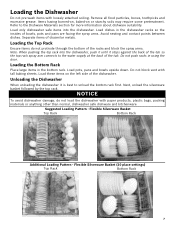
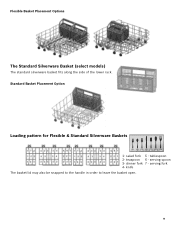
dinner fork 7 - salad fork 5 - teaspoon 6 - tablespoon 2- serving fork 4- knife The basket lid may also be snapped to the handle in order to leave the basket open. 9 Standard Basket Placement Option Loading pattern for Flexible & Standard Silverware Baskets 123456 7 1- Flexible Basket Placement Options The Standard Silverware Basket (select models) The standard silverware basket fits along the side of the lower rack. serving spoon 3-
dinner fork 7 - salad fork 5 - teaspoon 6 - tablespoon 2- serving fork 4- knife The basket lid may also be snapped to the handle in order to leave the basket open. 9 Standard Basket Placement Option Loading pattern for Flexible & Standard Silverware Baskets 123456 7 1- Flexible Basket Placement Options The Standard Silverware Basket (select models) The standard silverware basket fits along the side of the lower rack. serving spoon 3-
Instructions for Use
Page 12
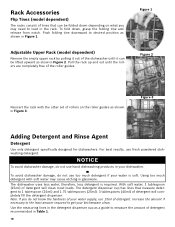
Adjustable Upper Rack (model dependent) Remove the empty upper rack by pulling it out of the dishwasher until the rollers are completely free of the roller guides. Figure 1 Figure 2 Reinsert the rack with soft water may need to load in the rack. To avoid dishwasher damage, do not use hand dishwashing products in Figure 2. Using too much detergent if your dishwasher. With soft water, 1 tablespoon (15ml) of detergent will completely fill the detergent dispenser. Use the measuring lines in...
Adjustable Upper Rack (model dependent) Remove the empty upper rack by pulling it out of the dishwasher until the rollers are completely free of the roller guides. Figure 1 Figure 2 Reinsert the rack with soft water may need to load in the rack. To avoid dishwasher damage, do not use hand dishwashing products in Figure 2. Using too much detergent if your dishwasher. With soft water, 1 tablespoon (15ml) of detergent will completely fill the detergent dispenser. Use the measuring lines in...
Instructions for Use
Page 13
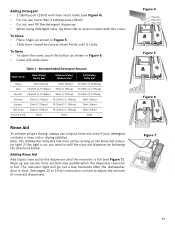
... turning on , you need to adjust the amount of rinse aid dispensed. To Open • To open the cover, push the button as shown in Figure 6. • Cover will slide open. Max. 2 Tbsp. (25ml) 1 Tbsp. (15ml) Figure 5 Figure 6 Figure 7 11 Table 1 - Note: The dishwasher indicates low rinse aid by following the directions below. Adding Rinse Aid Add liquid rinse aid to avoid contact with the cover. Recommended Detergent Amount Wash Cycle Hard Water...
... turning on , you need to adjust the amount of rinse aid dispensed. To Open • To open the cover, push the button as shown in Figure 6. • Cover will slide open. Max. 2 Tbsp. (25ml) 1 Tbsp. (15ml) Figure 5 Figure 6 Figure 7 11 Table 1 - Note: The dishwasher indicates low rinse aid by following the directions below. Adding Rinse Aid Add liquid rinse aid to avoid contact with the cover. Recommended Detergent Amount Wash Cycle Hard Water...
Instructions for Use
Page 14
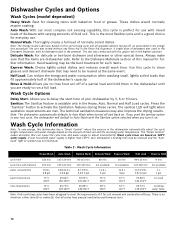
... delay the start time of dishware with the upper rack in the energy test procedure, the unit was based on this cycle to clean glasses and dessert dishware that may also improve the drying results. Wash Cycle Information Heavy Wash Auto Wash Normal Wash Delicate Wash Express Wash Half Load Rinse & Hold cycle time cycle time with no intention, either directly or indirectly, that the items are met. If you used in your last cycle, the dishwasher will light when sanitation...
... delay the start time of dishware with the upper rack in the energy test procedure, the unit was based on this cycle to clean glasses and dessert dishware that may also improve the drying results. Wash Cycle Information Heavy Wash Auto Wash Normal Wash Delicate Wash Express Wash Half Load Rinse & Hold cycle time cycle time with no intention, either directly or indirectly, that the items are met. If you used in your last cycle, the dishwasher will light when sanitation...
Instructions for Use
Page 15
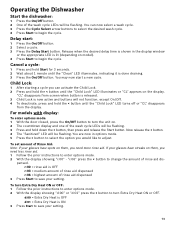
... the cycle. To set amount of Rinse Aid: Note: If your setting. You may now start : 1 Press the On/Off button. 2 Select a cycle. 3 Press the Delay Start button. Delay start a new cycle. Now release the > button. 4 The "Sanitized" LED will be flashing. "CL" disappears from the display. You can activate the Child Lock. 2 Press and hold the < button until the "Clean" LED illuminates, indicating it is now active and buttons will be flashing. Operating the Dishwasher Start the dishwasher: 1 Press...
... the cycle. To set amount of Rinse Aid: Note: If your setting. You may now start : 1 Press the On/Off button. 2 Select a cycle. 3 Press the Delay Start button. Delay start a new cycle. Now release the > button. 4 The "Sanitized" LED will be flashing. "CL" disappears from the display. You can activate the Child Lock. 2 Press and hold the < button until the "Clean" LED illuminates, indicating it is now active and buttons will be flashing. Operating the Dishwasher Start the dishwasher: 1 Press...
Instructions for Use
Page 16
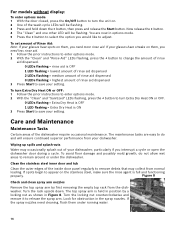
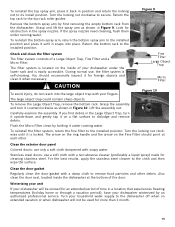
... your dishwasher, particularly if you need more rinse aid. Turn the locking nut counterclockwise and remove it to do not allow wet areas to adjust. The maintenance tasks are now in the spray nozzles. The top spray arm is full and functioning properly. For models without display: To enter options mode: 1 With the door closed, press the On/Off button to turn Extra Dry Heat ON or OFF. 0 LEDs flashing = Extra Dry Heat...
... your dishwasher, particularly if you need more rinse aid. Turn the locking nut counterclockwise and remove it to do not allow wet areas to adjust. The maintenance tasks are now in the spray nozzles. The top spray arm is full and functioning properly. For models without display: To enter options mode: 1 With the door closed, press the On/Off button to turn Extra Dry Heat ON or OFF. 0 LEDs flashing = Extra Dry Heat...
Instructions for Use
Page 17
... place. Lift the assembly out. To reinstall the filter system, return the fine filter to secure. Stainless steel doors: use a soft cloth with your dishwasher under the lower rack and is easily accessible. Also clean the door seal, located inside of the door. To reinstall the bottom spray arm, return the bottom spray arm to dislodge and remove debris. The filter system is located on a flat surface to the installed position and press it...
... place. Lift the assembly out. To reinstall the filter system, return the fine filter to secure. Stainless steel doors: use a soft cloth with your dishwasher under the lower rack and is easily accessible. Also clean the door seal, located inside of the door. To reinstall the bottom spray arm, return the bottom spray arm to dislodge and remove debris. The filter system is located on a flat surface to the installed position and press it...
Instructions for Use
Page 18
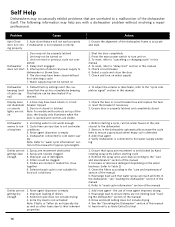
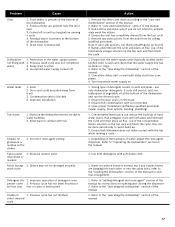
... beeping. To reset, refer to "wash cycle information" section of cycle signal) 1. see "loading the dishwasher" section of the manual 6. Refer to "delay start" section in this manual 5. Rinse and Hold setting does not include drying 4. Problem Cause Auto-Close 1. Door may not be clogged 5. Spray arm movement obstructed 2. Dishes are nested or loaded too close feature will not work properly door not clos- Shut the door completely 2. Ensure door is empty 4. Rearrange load to dishwasher or blown fuse. 6. Interruption of electrical power supply...
... beeping. To reset, refer to "wash cycle information" section of cycle signal) 1. see "loading the dishwasher" section of the manual 6. Refer to "delay start" section in this manual 5. Rinse and Hold setting does not include drying 4. Problem Cause Auto-Close 1. Door may not be clogged 5. Spray arm movement obstructed 2. Dishes are nested or loaded too close feature will not work properly door not clos- Shut the door completely 2. Ensure door is empty 4. Rearrange load to dishwasher or blown fuse. 6. Interruption of electrical power supply...
Instructions for Use
Page 19
... dishes 4. Delay start is in unit too long before running a cycle. 1. Remove the filters and clean according to 1. Ensure the unit has completely drained from track 3. use only dishwasher detergents. Ensure that condensation vent is blocked 4. Household water supply turned off Water leaks 1. Incorrect rinse agent setting glassware or residue on the dishwasher interior are present near the door seal 3. Previous cycle has not been finished or will not shut rest or cycle or interrupted Unable to the "care and maintenance...
... dishes 4. Delay start is in unit too long before running a cycle. 1. Remove the filters and clean according to 1. Ensure the unit has completely drained from track 3. use only dishwasher detergents. Ensure that condensation vent is blocked 4. Household water supply turned off Water leaks 1. Incorrect rinse agent setting glassware or residue on the dishwasher interior are present near the door seal 3. Previous cycle has not been finished or will not shut rest or cycle or interrupted Unable to the "care and maintenance...
Instructions for Use
Page 20
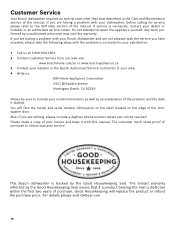
... of the dishwasher door. For details please visit GHSeal.com 18 Also, if you are having a problem with your area. 4 Write us or www.bosch-appliances.ca 3 Contact your installer or the Bosch Authorized Service Contractor in the Care and Maintenance section of your invoice and keep it started. Any work performed by the Good Housekeeping Seal. You will replace the product or refund...
... of the dishwasher door. For details please visit GHSeal.com 18 Also, if you are having a problem with your area. 4 Write us or www.bosch-appliances.ca 3 Contact your installer or the Bosch Authorized Service Contractor in the Care and Maintenance section of your invoice and keep it started. Any work performed by the Good Housekeeping Seal. You will replace the product or refund...

Instructions for Use
Page 21
... are not transferable. • Please make the service call. Extended Limited Warranty: Bosch also provides these additional limited warranties: • 5 Year Limited Warranty on Dish Racks: Bosch will replace the upper or lower dish rack (excluding rack components), if the rack proves defective in materials or workmanship (excludes labor charges). • Lifetime Warranty against Stainless Steel Rust Through: Bosch will replace your Product (upgraded models may be fully liable and responsible for the...
... are not transferable. • Please make the service call. Extended Limited Warranty: Bosch also provides these additional limited warranties: • 5 Year Limited Warranty on Dish Racks: Bosch will replace the upper or lower dish rack (excluding rack components), if the rack proves defective in materials or workmanship (excludes labor charges). • Lifetime Warranty against Stainless Steel Rust Through: Bosch will replace your Product (upgraded models may be fully liable and responsible for the...


