Installation Instructions
Page 3
... of 120V, 60 Hz, AC, connected to the equipment-grounding terminal or lead on a charged hot water line. Handle with a fuse or breaker rated for weeks, run with the circuit conductors and connected to a dishwasher-dedicated, properly grounded electrical circuit with care. These instructions depict an installation method for soldering and sweating will damage the dishwasher's base and water inlet valve. When opening . Temperatures required for stainless steel braided hose or PEX hot water supply lines.
... of 120V, 60 Hz, AC, connected to the equipment-grounding terminal or lead on a charged hot water line. Handle with a fuse or breaker rated for weeks, run with the circuit conductors and connected to a dishwasher-dedicated, properly grounded electrical circuit with care. These instructions depict an installation method for soldering and sweating will damage the dishwasher's base and water inlet valve. When opening . Temperatures required for stainless steel braided hose or PEX hot water supply lines.
Instructions for Use
Page 3
... web site at : BSH Home Appliances, Corp. 5551 McFadden Avenue Huntington Beach, CA 92649 Table of Contents Important Safety Instructions 2-3 Dishwasher Components 4-5 Dishwasher Features and Materials 6 Loading the Dishwasher 7-8 Loading the Silverware Basket 8-9 Rack Accessories 10 Adding Detergent and Rinse Agent 10-11 Dishwasher Cycles and Options 12 Wash Cycle Information 12 Operating the Dishwasher 13-14 Care and Maintenance 14-15 Self Help 16-17 Customer Service 18 Warranty Information 19
... web site at : BSH Home Appliances, Corp. 5551 McFadden Avenue Huntington Beach, CA 92649 Table of Contents Important Safety Instructions 2-3 Dishwasher Components 4-5 Dishwasher Features and Materials 6 Loading the Dishwasher 7-8 Loading the Silverware Basket 8-9 Rack Accessories 10 Adding Detergent and Rinse Agent 10-11 Dishwasher Cycles and Options 12 Wash Cycle Information 12 Operating the Dishwasher 13-14 Care and Maintenance 14-15 Self Help 16-17 Customer Service 18 Warranty Information 19
Instructions for Use
Page 4
... dishwashers are certain the electrical supply has been correctly installed or the dishwasher has been properly grounded. See the Installation Instructions or contact your installer for the end user to become familiar with the procedure to shut off the incoming water supply and the procedure to clean your dishwasher. Never use steam cleaning products to shut off the incoming power supply. All repairs must be liable for soil removal and sanitation efficacy. IMPORTANT SAFETY INSTRUCTIONS...
... dishwashers are certain the electrical supply has been correctly installed or the dishwasher has been properly grounded. See the Installation Instructions or contact your installer for the end user to become familiar with the procedure to shut off the incoming water supply and the procedure to clean your dishwasher. Never use steam cleaning products to shut off the incoming power supply. All repairs must be liable for soil removal and sanitation efficacy. IMPORTANT SAFETY INSTRUCTIONS...
Instructions for Use
Page 5
... outlet installed by qualified persons. 9 Under certain conditions, hydrogen gas may be produced in a hot water system that has not been used for two weeks or more information on electrical requirements. 3 Use this dishwasher only for its intended function, which is the washing of household dishware and kitchenware. 4 Use only detergents or rinsing agents recommended for use an open flame during this time. 10 Remove the dishwasher door...
... outlet installed by qualified persons. 9 Under certain conditions, hydrogen gas may be produced in a hot water system that has not been used for two weeks or more information on electrical requirements. 3 Use this dishwasher only for its intended function, which is the washing of household dishware and kitchenware. 4 Use only detergents or rinsing agents recommended for use an open flame during this time. 10 Remove the dishwasher door...
Instructions for Use
Page 6
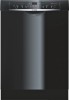
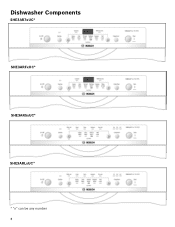
Dishwasher Components SHE3AR7xUC* SHE3ARFxUC* SHE3AR5xUC* SHE3ARLxUC* * "x" can be any number 4
Dishwasher Components SHE3AR7xUC* SHE3ARFxUC* SHE3AR5xUC* SHE3ARLxUC* * "x" can be any number 4
Instructions for Use
Page 7
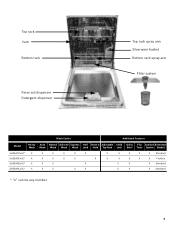
Top rack Vent Bottom rack Rinse aid dispenser Detergent dispenser Top rack spray arm Silverware basket Bottom rack spray arm Filter system Wash Cycles Additional Features Model Heavy Auto Normal Delicate Express Half Rinse & Adjustable Child Delay Flip Sanitize Silverware Wash Wash Wash Wash Wash Load Hold Top Rack Lock Start Tines Option Basket SHE3AR7xUC* X X X X X X SHE3ARFxUC* X X X X X X SHE3AR5xUC* X X X X SHE3ARLxUC* X X X X X X X X X X Standard X X X X X Flexible X X X Standard X X X Standard * "x" can be any number 5
Top rack Vent Bottom rack Rinse aid dispenser Detergent dispenser Top rack spray arm Silverware basket Bottom rack spray arm Filter system Wash Cycles Additional Features Model Heavy Auto Normal Delicate Express Half Rinse & Adjustable Child Delay Flip Sanitize Silverware Wash Wash Wash Wash Wash Load Hold Top Rack Lock Start Tines Option Basket SHE3AR7xUC* X X X X X X SHE3ARFxUC* X X X X X X SHE3AR5xUC* X X X X SHE3ARLxUC* X X X X X X X X X X Standard X X X X X Flexible X X X Standard X X X Standard * "x" can be any number 5
Instructions for Use
Page 8
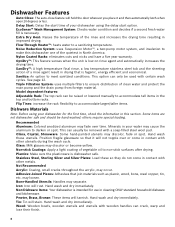
... then automatically latch when open 20 degrees or less. Noise Reduction System: uses Suspension Motor™, a two-pump motor system, and insulation to accommodate larger/taller items. Dishware Materials Note: Before using the delay start time of clean water and protect the main pump and the drain pump from foreign material. may discolor, fade or spot. Triple Filtration System: uses multiple filters to non-stick surfaces after drying. Non...
... then automatically latch when open 20 degrees or less. Noise Reduction System: uses Suspension Motor™, a two-pump motor system, and insulation to accommodate larger/taller items. Dishware Materials Note: Before using the delay start time of clean water and protect the main pump and the drain pump from foreign material. may discolor, fade or spot. Triple Filtration System: uses multiple filters to non-stick surfaces after drying. Non...
Instructions for Use
Page 9
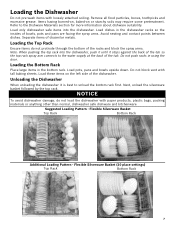
... Rack Ensure items do not load the dishwasher with paper products, plastic bags, packing materials or anything other than normal, dishwasher safe dishware and kitchenware. Load pots, pans and bowls upside down. Suggested Loading Pattern - Flexible Silverware Basket (10 place settings) Top Rack Bottom Rack 7 Unloading the Dishwasher When unloading the dishwasher it stops against the back of the tub so the top rack spray arm connects to the water supply...
... Rack Ensure items do not load the dishwasher with paper products, plastic bags, packing materials or anything other than normal, dishwasher safe dishware and kitchenware. Load pots, pans and bowls upside down. Suggested Loading Pattern - Flexible Silverware Basket (10 place settings) Top Rack Bottom Rack 7 Unloading the Dishwasher When unloading the dishwasher it stops against the back of the tub so the top rack spray arm connects to the water supply...
Instructions for Use
Page 10
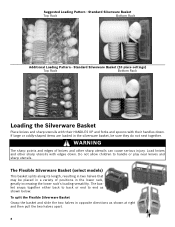
... Basket (10 place settings) Top Rack Bottom Rack Loading the Silverware Basket Place knives and sharp utensils with their handles down . WARNING The sharp points and edges of positions in opposite directions as shown below. Standard Silverware Basket Top Rack Bottom Rack Additional Loading Pattern - To split the Flexible Silverware Basket Grasp the basket and slide the two halves in the lower rack, greatly increasing the lower rack's loading...
... Basket (10 place settings) Top Rack Bottom Rack Loading the Silverware Basket Place knives and sharp utensils with their handles down . WARNING The sharp points and edges of positions in opposite directions as shown below. Standard Silverware Basket Top Rack Bottom Rack Additional Loading Pattern - To split the Flexible Silverware Basket Grasp the basket and slide the two halves in the lower rack, greatly increasing the lower rack's loading...
Instructions for Use
Page 11
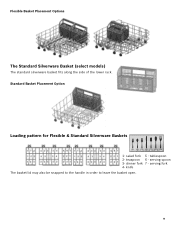
teaspoon 6 - tablespoon 2- serving spoon 3- serving fork 4- knife The basket lid may also be snapped to the handle in order to leave the basket open. 9 Standard Basket Placement Option Loading pattern for Flexible & Standard Silverware Baskets 123456 7 1- salad fork 5 - dinner fork 7 - Flexible Basket Placement Options The Standard Silverware Basket (select models) The standard silverware basket fits along the side of the lower rack.
teaspoon 6 - tablespoon 2- serving spoon 3- serving fork 4- knife The basket lid may also be snapped to the handle in order to leave the basket open. 9 Standard Basket Placement Option Loading pattern for Flexible & Standard Silverware Baskets 123456 7 1- salad fork 5 - dinner fork 7 - Flexible Basket Placement Options The Standard Silverware Basket (select models) The standard silverware basket fits along the side of the lower rack.
Instructions for Use
Page 12
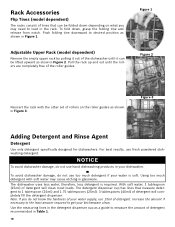
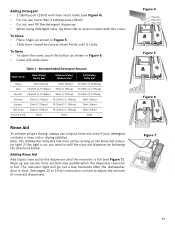
...) of detergent. Using too much detergent if your water supply, use too much detergent with the other set of the dishwasher until the rollers are completely free of tines that measure detergent to load in Figure 3. To fold down depending on the roller guides as show in Figure 2. Push folding tine downward to desired position as a guide to get your dishwasher. Adjustable Upper Rack (model dependent) Remove the empty upper rack by...
...) of detergent. Using too much detergent if your water supply, use too much detergent with the other set of the dishwasher until the rollers are completely free of tines that measure detergent to load in Figure 3. To fold down depending on the roller guides as show in Figure 2. Push folding tine downward to desired position as a guide to get your dishwasher. Adjustable Upper Rack (model dependent) Remove the empty upper rack by...
Instructions for Use
Page 13
... light is shut. The indicator light will go out a few moments after the dishwasher door is on, you need to refill the rinse aid dispenser by turning on how to avoid contact with the cover. To Open • To open the cover, push the button as shown in Figure 6. • Cover will slide open. Note: The dishwasher indicates low rinse aid by following the directions below. Table 1 - Recommended Detergent Amount Wash Cycle Hard Water...
... light is shut. The indicator light will go out a few moments after the dishwasher door is on, you need to refill the rinse aid dispenser by turning on how to avoid contact with the cover. To Open • To open the cover, push the button as shown in Figure 6. • Cover will slide open. Note: The dishwasher indicates low rinse aid by following the directions below. Table 1 - Recommended Detergent Amount Wash Cycle Hard Water...
Instructions for Use
Page 14
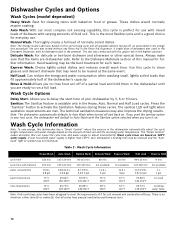
... you turn it on . Wash cycle times are ready to adjust intermittently. Wash Cycle Information Heavy Wash Auto Wash Normal Wash Delicate Wash Express Wash Half Load Rinse & Hold cycle time cycle time with the upper rack in the Heavy, Auto, Normal and Half Load cycles. Half Load: Can reduce the energy and water consumption when washing small, lightly soiled loads that can cause the cycle time and water usage to run a full load. Note: The Energy Guide Label was used in the Detergent Dispenser, with the Sanitize option selected when you used in the dishwasher...
... you turn it on . Wash cycle times are ready to adjust intermittently. Wash Cycle Information Heavy Wash Auto Wash Normal Wash Delicate Wash Express Wash Half Load Rinse & Hold cycle time cycle time with the upper rack in the Heavy, Auto, Normal and Half Load cycles. Half Load: Can reduce the energy and water consumption when washing small, lightly soiled loads that can cause the cycle time and water usage to run a full load. Note: The Energy Guide Label was used in the Detergent Dispenser, with the Sanitize option selected when you used in the dishwasher...
Instructions for Use
Page 15
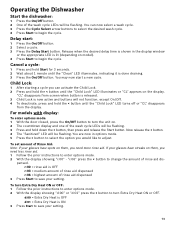
... the door closed, press the On/Off button to turn Extra Dry Heat ON or OFF: 1 Follow the prior instructions to enter options mode. 2 With the display showing "d:00" or "d:01" press the < button to change the amount of rinse aid dis- Release when the desired delay time is done draining. 3 Press the On/Off button. Now release the > button. 4 The "Sanitized" LED will be flashing. Operating the Dishwasher Start the dishwasher: 1 Press...
... the door closed, press the On/Off button to turn Extra Dry Heat ON or OFF: 1 Follow the prior instructions to enter options mode. 2 With the display showing "d:00" or "d:01" press the < button to change the amount of rinse aid dis- Release when the desired delay time is done draining. 3 Press the On/Off button. Now release the > button. 4 The "Sanitized" LED will be flashing. Operating the Dishwasher Start the dishwasher: 1 Press...
Instructions for Use
Page 16
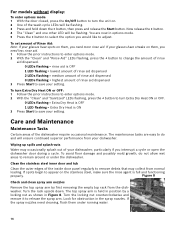
... a cycle or open the dishwasher door during a cycle. Wiping up spills and splash-outs Water may collect from normal loading. Look for obstruction in Figure 8. Clean the stainless steel inner door and tub Clean the outer edges of the inside door panel regularly to remove debris that may occasionally splash out of rinse aid dispensed 3 Press Start to save your setting. Turn the rack upside down the > button, then press and release the Start button. Turn the locking nut...
... a cycle or open the dishwasher door during a cycle. Wiping up spills and splash-outs Water may collect from normal loading. Look for obstruction in Figure 8. Clean the stainless steel inner door and tub Clean the outer edges of the inside door panel regularly to remove debris that may occasionally splash out of rinse aid dispensed 3 Press Start to save your setting. Turn the rack upside down the > button, then press and release the Start button. Turn the locking nut...
Instructions for Use
Page 17
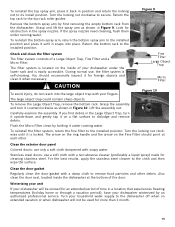
... installed position. Clean the door gasket Regularly clean the door gasket with your fingers. Remove the bottom spray arm by holding it under running water. Grasp and lift the spray arm as shown in Figure 10. Return the bottom rack to secure. Stainless steel doors: use a soft cloth with soapy water. If the spray nozzles need cleaning, flush them under the lower rack and is located on the Fine Filter should occasionally inspect it for cleaning stainless steel...
... installed position. Clean the door gasket Regularly clean the door gasket with your fingers. Remove the bottom spray arm by holding it under running water. Grasp and lift the spray arm as shown in Figure 10. Return the bottom rack to secure. Stainless steel doors: use a soft cloth with soapy water. If the spray nozzles need cleaning, flush them under the lower rack and is located on the Fine Filter should occasionally inspect it for cleaning stainless steel...
Instructions for Use
Page 18
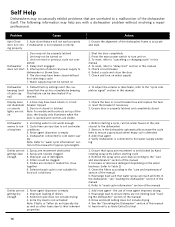
... "wash cycle information" section in this manual to learn how to the dishwasher 2. Rearrange load to "delay start 1. Unit may not be properly latched 2. To reset, refer to ensure items are visible. Remove the spray arms and clean according to dishwasher or blown fuse. 6. Clean the filters according to the "care and maintenance" section of electrical power supply to the "care and maintenance" section of the manual) 3. Rinse and Hold setting does not include drying 4. Rinse agent dispenser is accurate and level...
... "wash cycle information" section in this manual to learn how to the dishwasher 2. Rearrange load to "delay start 1. Unit may not be properly latched 2. To reset, refer to ensure items are visible. Remove the spray arms and clean according to dishwasher or blown fuse. 6. Clean the filters according to the "care and maintenance" section of electrical power supply to the "care and maintenance" section of the manual) 3. Rinse and Hold setting does not include drying 4. Rinse agent dispenser is accurate and level...
Instructions for Use
Page 19
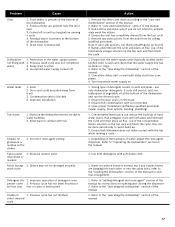
... intend to the "operating the dishwasher" section of the dishwasher 2. Food debris is blocked 4. Dishes left in suds and leaks - Restriction in the manual 1. Household water supply turned off Water leaks 1. Condensation vent is present at the bottom of the manual 1. Abrasive cleaner used discolored or marked Noise during 1. Previous cycle has not finished select desired cycle Action 1. cup of water, adjust the rinse agent dispenser. Turn household water supply on the dishes Fascia panel 1. If suds...
... intend to the "operating the dishwasher" section of the dishwasher 2. Food debris is blocked 4. Dishes left in suds and leaks - Restriction in the manual 1. Household water supply turned off Water leaks 1. Condensation vent is present at the bottom of the manual 1. Abrasive cleaner used discolored or marked Noise during 1. Previous cycle has not finished select desired cycle Action 1. cup of water, adjust the rinse agent dispenser. Turn household water supply on the dishes Fascia panel 1. If suds...
Instructions for Use
Page 20
...-944-2904 2 Contact Customer Service from our web site: www.bosch-home.com/us or www.bosch-appliances.ca 3 Contact your installer or the Bosch Authorized Service Contractor in the Care and Maintenance section of your invoice and keep it started. If you are having a problem with this manual. You will replace the product or refund the purchase price. This Bosch dishwasher is necessary, contact your...
...-944-2904 2 Contact Customer Service from our web site: www.bosch-home.com/us or www.bosch-appliances.ca 3 Contact your installer or the Bosch Authorized Service Contractor in the Care and Maintenance section of your invoice and keep it started. If you are having a problem with this manual. You will replace the product or refund the purchase price. This Bosch dishwasher is necessary, contact your...

Instructions for Use
Page 21
... same model or a current model that accumulate on Electronics: Bosch will replace your Product (upgraded models may be defective in materials or workmanship (excludes labor charges). • 5 Year Limited Warranty on Dish Racks: Bosch will replace the upper or lower dish rack (excluding rack components), if the rack proves defective in materials or workmanship (excludes labor charges). • Lifetime Warranty against Stainless Steel Rust Through: Bosch will replace your dishwasher with respect to such parts...
... same model or a current model that accumulate on Electronics: Bosch will replace your Product (upgraded models may be defective in materials or workmanship (excludes labor charges). • 5 Year Limited Warranty on Dish Racks: Bosch will replace the upper or lower dish rack (excluding rack components), if the rack proves defective in materials or workmanship (excludes labor charges). • Lifetime Warranty against Stainless Steel Rust Through: Bosch will replace your dishwasher with respect to such parts...


