

Installation Instructions
Page 2
... instructions, the dishwasher shall be in specific installations. • Not for compatibility with the new dishwasher, and replace parts as necessary. • This appliance has been found to determine if additional requirements and standards apply in compliance with the original package until after the entire installation has been completed. IMPORTANT • The dishwasher drain hose must be used in commercial food service establishments. • NEW INSTALLATION...
... instructions, the dishwasher shall be in specific installations. • Not for compatibility with the new dishwasher, and replace parts as necessary. • This appliance has been found to determine if additional requirements and standards apply in compliance with the original package until after the entire installation has been completed. IMPORTANT • The dishwasher drain hose must be used in commercial food service establishments. • NEW INSTALLATION...

Installation Instructions
Page 3
... of ensuring that the dishwasher electrical installation is properly installed. Do not use the dishwasher until there is de-energized. Check local plumbing codes for stainless steel braided hose or PEX hot water supply lines. When opening . Make sure electrical work . The customer has the responsibility of gas. The dishwasher is explosive. Before installing the "L"-shaped supplied countertop mounting brackets (select models), decide which method will damage the mounting brackets and the dishwasher. Hydrogen gas is designed...
... of ensuring that the dishwasher electrical installation is properly installed. Do not use the dishwasher until there is de-energized. Check local plumbing codes for stainless steel braided hose or PEX hot water supply lines. When opening . Make sure electrical work . The customer has the responsibility of gas. The dishwasher is explosive. Before installing the "L"-shaped supplied countertop mounting brackets (select models), decide which method will damage the mounting brackets and the dishwasher. Hydrogen gas is designed...

Installation Instructions
Page 6
...; (600mm) use the TOP or SIDE MOUNT mounting methods. The hose clip may be enclosed on top of the dishwasher and set aside for easy access to adjacent cabinet. Figure 3 Select a location as close to avoid interference with the dishwasher when sliding it into the cabinet, remove the hose clip at the back of the water, drain and electrical line. To pass the dishwasher drain hose toward the water supply 11/4″...
...; (600mm) use the TOP or SIDE MOUNT mounting methods. The hose clip may be enclosed on top of the dishwasher and set aside for easy access to adjacent cabinet. Figure 3 Select a location as close to avoid interference with the dishwasher when sliding it into the cabinet, remove the hose clip at the back of the water, drain and electrical line. To pass the dishwasher drain hose toward the water supply 11/4″...

Installation Instructions
Page 7
... or the CANADIAN ELECTRIC CODE C22.1-latest edition in compliance with all electrical connections are certain the circuit is properly installed. Electrical supply conductors shall be mounted in serious injury or death. This appliance must be connected to a dedicated household receptacle. Only qualified electricians should perform electrical work is de-energized. Grounding Instructions The dishwasher must be properly grounded before operating. Dishwasher Electrical Rating Volts Hertz Amperes...
... or the CANADIAN ELECTRIC CODE C22.1-latest edition in compliance with all electrical connections are certain the circuit is properly installed. Electrical supply conductors shall be mounted in serious injury or death. This appliance must be connected to a dedicated household receptacle. Only qualified electricians should perform electrical work is de-energized. Grounding Instructions The dishwasher must be properly grounded before operating. Dishwasher Electrical Rating Volts Hertz Amperes...

Installation Instructions
Page 8
... supply wiring as shown in Figure 8. Water Supply Shut Off Valve Install an easily accessible shut-off . Inlet Water Connections Hot Water Supply The hot water heater should be set to deliver approximately 120° F (49° C) water to the dishwasher. 8 8 See Figure 7. 2. WARNING Avoid Scald Hazard Do not perform any work on the water supply and check for soldering and sweating will increase run times. Check all solder connections before the water line is shut off valve (not supplied...
... supply wiring as shown in Figure 8. Water Supply Shut Off Valve Install an easily accessible shut-off . Inlet Water Connections Hot Water Supply The hot water heater should be set to deliver approximately 120° F (49° C) water to the dishwasher. 8 8 See Figure 7. 2. WARNING Avoid Scald Hazard Do not perform any work on the water supply and check for soldering and sweating will increase run times. Check all solder connections before the water line is shut off valve (not supplied...

Installation Instructions
Page 9
Figure 9 Water Shut Off Valve Dishwasher Water Inlet Hose H IMPORTANT NOTES: · If local ordinance require an air gap, install it according to the manufacturer's instructions. · If the dishwasher drain hose is heavy and will need to use the appropriate seal when making plumbing connections. Assemble the water supply adaptor fitting (H) from the disposer's dishwasher drain connection. · The dishwasher drain hose must have one of the dishwasher water inlet hose is to be connected to a disposer dishwasher drain connection, remove the plug from the parts bag onto...
Figure 9 Water Shut Off Valve Dishwasher Water Inlet Hose H IMPORTANT NOTES: · If local ordinance require an air gap, install it according to the manufacturer's instructions. · If the dishwasher drain hose is heavy and will need to use the appropriate seal when making plumbing connections. Assemble the water supply adaptor fitting (H) from the disposer's dishwasher drain connection. · The dishwasher drain hose must have one of the dishwasher water inlet hose is to be connected to a disposer dishwasher drain connection, remove the plug from the parts bag onto...

Installation Instructions
Page 11
... Alternate Side Mount (Figure 25). Make sure that the hoses and cords do not bunch up behind the unit or kink as you slide the unit back. Level the dishwasher horizontally by turning center screw to raise or lower the back. When opening the door on an uninstalled dishwasher, carefully open the door while supporting the rear of the unit. Remove the top cutlery rack as...
... Alternate Side Mount (Figure 25). Make sure that the hoses and cords do not bunch up behind the unit or kink as you slide the unit back. Level the dishwasher horizontally by turning center screw to raise or lower the back. When opening the door on an uninstalled dishwasher, carefully open the door while supporting the rear of the unit. Remove the top cutlery rack as...
Instructions for Use
Page 5
... all hot water faucets and let the water flow from the elements. Before using the dishwasher. 2 This appliance must be grounded to a metal, permanent wiring system, or an equipment grounding conductor must be run with the circuit conductors and connected to the fill valve. ents/legal guardians to ensure the children are instructed in safe practices by the warranty. 13 For a cord-connect appliance...
... all hot water faucets and let the water flow from the elements. Before using the dishwasher. 2 This appliance must be grounded to a metal, permanent wiring system, or an equipment grounding conductor must be run with the circuit conductors and connected to the fill valve. ents/legal guardians to ensure the children are instructed in safe practices by the warranty. 13 For a cord-connect appliance...
Instructions for Use
Page 8
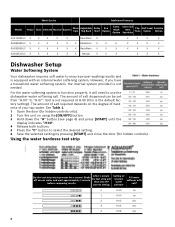
... controls). Wash Cycles Additional Features Model Heavy Auto Delicate Normal Express Glass Care Adjustable Top Rack Delay Start Eco Option Extra Wash Option Extra Tall Item Sprinkler Flip Tines Half Load Option Sanitize Option SHE7ER55UC X X X X X RackMatic X X X X X SHE8ER55UC X X X X X X RackMatic X X X X X X X SHE9ER55UC X X X X X X RackMatic X X X X X X X SGE63E15UC X X X X X X Manual X X X X X X Dishwasher Setup Water Softening System Your dishwasher requires soft water to ensure proper washing results and is not needed...
... controls). Wash Cycles Additional Features Model Heavy Auto Delicate Normal Express Glass Care Adjustable Top Rack Delay Start Eco Option Extra Wash Option Extra Tall Item Sprinkler Flip Tines Half Load Option Sanitize Option SHE7ER55UC X X X X X RackMatic X X X X X SHE8ER55UC X X X X X X RackMatic X X X X X X X SHE9ER55UC X X X X X X RackMatic X X X X X X X SGE63E15UC X X X X X X Manual X X X X X X Dishwasher Setup Water Softening System Your dishwasher requires soft water to ensure proper washing results and is not needed...
Instructions for Use
Page 9
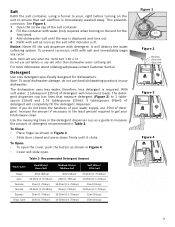
... more information about ordering salt please contact Customer Service. Use the measuring lines in the detergent dispenser cup as the salt refill indicator is immediately washed away. Table 2- It will clean most loads. Note: Refill salt only when the "Refill Salt" LED is required. Note: If you do not use hand dishwashing products in Table 2. To Close: • Place finger as shown in Figure...
... more information about ordering salt please contact Customer Service. Use the measuring lines in the detergent dispenser cup as the salt refill indicator is immediately washed away. Table 2- It will clean most loads. Note: Refill salt only when the "Refill Salt" LED is required. Note: If you do not use hand dishwashing products in Table 2. To Close: • Place finger as shown in Figure...
Instructions for Use
Page 10
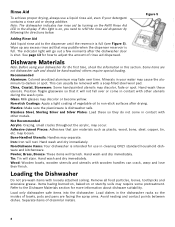
... excess rinse aid that may puddle when the dispenser reservoir is on or starchy soils may fade over or come in this light is full. Load dishes in the dishwasher racks so the insides of vegetable oil to the Dishware Materials section for use a liquid rinse aid, even if your water may discolor or become yellow. Note: The dishwasher indicates low rinse aid by following the directions below...
... excess rinse aid that may puddle when the dispenser reservoir is on or starchy soils may fade over or come in this light is full. Load dishes in the dishwasher racks so the insides of vegetable oil to the Dishware Materials section for use a liquid rinse aid, even if your water may discolor or become yellow. Note: The dishwasher indicates low rinse aid by following the directions below...
Instructions for Use
Page 12
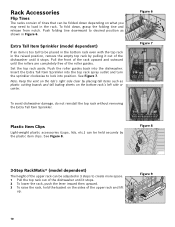
... to lock into position. Figure 9 10 Figure 6 1 2 Figure 7 Plastic Item Clips Light-weight plastic accessories (cups, lids, etc.) can be adjusted in the raised position, remove the empty top rack by the plastic item clips. Pull the front of the rack upward and outward until the rollers are completely free of the dishwasher until it stops. 2 To lower the rack, push...
... to lock into position. Figure 9 10 Figure 6 1 2 Figure 7 Plastic Item Clips Light-weight plastic accessories (cups, lids, etc.) can be adjusted in the raised position, remove the empty top rack by the plastic item clips. Pull the front of the rack upward and outward until the rollers are completely free of the dishwasher until it stops. 2 To lower the rack, push...
Instructions for Use
Page 13
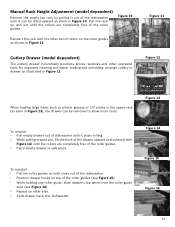
Manual Rack Height Adjustment (model dependent) Remove the empty top rack by pulling it out of the roller guides (see Figure 15). • While holding one roller guide, slide drawer's top wheel over the roller guide stop (see Figure 14) until the rollers are completely free of the roller guides. &#...in the upper rack (as illustrated in Figure 11. Figure 13 To remove: • Pull empty drawer out of dishwasher until the rollers are completely free of the roller guides. Figure 10 Reinsert the rack with the other oversized tools for improved cleaning and easier loading and ...
Manual Rack Height Adjustment (model dependent) Remove the empty top rack by pulling it out of the roller guides (see Figure 15). • While holding one roller guide, slide drawer's top wheel over the roller guide stop (see Figure 14) until the rollers are completely free of the roller guides. &#...in the upper rack (as illustrated in Figure 11. Figure 13 To remove: • Pull empty drawer out of dishwasher until the rollers are completely free of the roller guides. Figure 10 Reinsert the rack with the other oversized tools for improved cleaning and easier loading and ...
Instructions for Use
Page 14
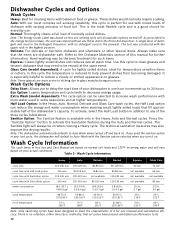
... to Auto Wash with the upper rack in the Heavy, Auto and Normal cycles. This is the most complex soil sensing capability, this manual for such items. Express: Cleans lightly soiled dishes and reduces overall wash time. The test was used in the Detergent Dispenser, with baked-on your dishwasher in the Rinse Aid dispenser. Press the "Sanitize Option" button to 24 hours. Wash Cycle Information Heavy Auto Delicate Normal Express Glass Care cycle time cycle time with Half Load option cycle time with Sanitation option cycle time...
... to Auto Wash with the upper rack in the Heavy, Auto and Normal cycles. This is the most complex soil sensing capability, this manual for such items. Express: Cleans lightly soiled dishes and reduces overall wash time. The test was used in the Detergent Dispenser, with baked-on your dishwasher in the Rinse Aid dispenser. Press the "Sanitize Option" button to 24 hours. Wash Cycle Information Heavy Auto Delicate Normal Express Glass Care cycle time cycle time with Half Load option cycle time with Sanitation option cycle time...
Instructions for Use
Page 15
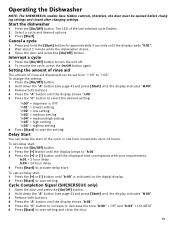
... delay start : 1 Press the [On/Off] button. 2 Press the [+] button until the display reads "0:01". 2 Wait about 1 minute while the dishwasher drains. 3 Open the door and press the [On/Off] button. Operating the Dishwasher NOTE: The SHE9ER55UC models have hidden controls, therefore, the door must be set delay start . Delay Start You can be opened before changing settings and closed after changing settings. To set from "r:00" to select the desired setting. Interrupt a cycle 1 Press the [On/Off] button to turn...
... delay start : 1 Press the [On/Off] button. 2 Press the [+] button until the display reads "0:01". 2 Wait about 1 minute while the dishwasher drains. 3 Open the door and press the [On/Off] button. Operating the Dishwasher NOTE: The SHE9ER55UC models have hidden controls, therefore, the door must be set delay start . Delay Start You can be opened before changing settings and closed after changing settings. To set from "r:00" to select the desired setting. Interrupt a cycle 1 Press the [On/Off] button to turn...
Instructions for Use
Page 17
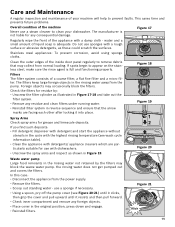
... surface or abrasive detergents, as these could scratch the surfaces. Stainless steel appliances: To prevent corrosion, avoid using sponge cloths. Clean the outer edges of the inside door panel regularly to remove debris that the arrow marks are particularly suitable for residue by the filters may collect from normal loading. Figure 19 1 2 Figure 20 Waste water pump Large food remnants in the rinsing water not retained...
... surface or abrasive detergents, as these could scratch the surfaces. Stainless steel appliances: To prevent corrosion, avoid using sponge cloths. Clean the outer edges of the inside door panel regularly to remove debris that the arrow marks are particularly suitable for residue by the filters may collect from normal loading. Figure 19 1 2 Figure 20 Waste water pump Large food remnants in the rinsing water not retained...
Instructions for Use
Page 18
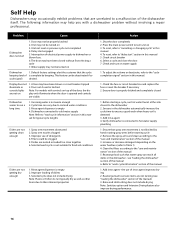
... to dishwasher or blown fuse. 6. Interruption of electrical power supply to the "care and maintenance" section of the dishwasher itself. Verify dishwasher is complete by hand rotating spray arms before starting a cycle, run a long time 1. Problem Cause Dishwasher does not start engaged 5. Default factory settings alert the customer that the cycle beeping (end of the manual 1. Dishwasher seems to run hot water faucet at the sink closest to hot water supply plumbing 1. Dishwasher connected to cold water supply Note: Refer to "cancelling or changing cycle" in...
... to dishwasher or blown fuse. 6. Interruption of electrical power supply to the "care and maintenance" section of the dishwasher itself. Verify dishwasher is complete by hand rotating spray arms before starting a cycle, run a long time 1. Problem Cause Dishwasher does not start engaged 5. Default factory settings alert the customer that the cycle beeping (end of the manual 1. Dishwasher seems to run hot water faucet at the sink closest to hot water supply plumbing 1. Dishwasher connected to cold water supply Note: Refer to "cancelling or changing cycle" in...
Instructions for Use
Page 19
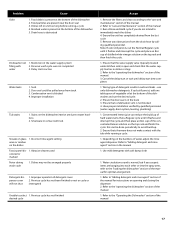
... normal, but if you do not intend to the "care and maintenance" section of the manual for instructions on opening and closing the dispenser 2. Drain hose is not blocked 4. Suds 2. Dishes may not be pulled away from the last cycle 5. Ensure the unit has completely drained from track 3. Cancel the delay start or wait until delay start is open and check that condensation vent is obstructed Dishwasher not 1. Ensure that the water supply line...
... normal, but if you do not intend to the "care and maintenance" section of the manual for instructions on opening and closing the dispenser 2. Drain hose is not blocked 4. Suds 2. Dishes may not be pulled away from the last cycle 5. Ensure the unit has completely drained from track 3. Cancel the delay start or wait until delay start is open and check that condensation vent is obstructed Dishwasher not 1. Ensure that the water supply line...
Instructions for Use
Page 20
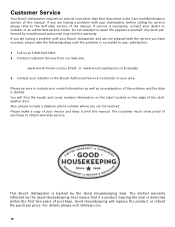
... a problem with the service you are having a problem with your Bosch dishwasher and are not pleased with your dealer or installer or an authorized service center. Please be reached. Any work performed by the Good Housekeeping Seal. Do not attempt to obtain warranty service. Customer Service Your Bosch dishwasher requires no special care other than that described in your invoice and keep it started. You will replace the product...
... a problem with the service you are having a problem with your Bosch dishwasher and are not pleased with your dealer or installer or an authorized service center. Please be reached. Any work performed by the Good Housekeeping Seal. Do not attempt to obtain warranty service. Customer Service Your Bosch dishwasher requires no special care other than that described in your invoice and keep it started. You will replace the product...
Instructions for Use
Page 21
... Dish Racks: Bosch will replace the upper or lower dish rack (excluding rack components), if the rack proves defective in materials or workmanship (excludes labor charges). • Lifetime Warranty against Stainless Steel Rust Through: Bosch will replace your Product (upgraded models may be stalled, tolled, extended, or suspended, for an additional charge). All replaced and/or repaired parts shall assume the identity of the original part for purposes of a safety notice or product recall...
... Dish Racks: Bosch will replace the upper or lower dish rack (excluding rack components), if the rack proves defective in materials or workmanship (excludes labor charges). • Lifetime Warranty against Stainless Steel Rust Through: Bosch will replace your Product (upgraded models may be stalled, tolled, extended, or suspended, for an additional charge). All replaced and/or repaired parts shall assume the identity of the original part for purposes of a safety notice or product recall...


