Use & Care Manual (all languages)
Page 5
...personal clothing catches fire, drop and roll immediately to boil dry. • Have the cooktop installed and grounded by a qualified technician. • Do not repair or replace any other metal tray, then turn off the gas burner. If the flames do not extend over or near the kitchen. • Never ...use the cooktop to warm or heat a room. • Children should be left alone or unattended in contact with...
...personal clothing catches fire, drop and roll immediately to boil dry. • Have the cooktop installed and grounded by a qualified technician. • Do not repair or replace any other metal tray, then turn off the gas burner. If the flames do not extend over or near the kitchen. • Never ...use the cooktop to warm or heat a room. • Children should be left alone or unattended in contact with...

Use & Care Manual (all languages)
Page 6
... • During cooking, set the burner control so that the flame heats only the bottom of the pan and does not extend beyond the edges of the pan. • Have the cooktop installed and grounded by a qualified technician. California Proposition 65 WARNING: Burning gas cooking fuel generates some by-products which are on accidentally...
... • During cooking, set the burner control so that the flame heats only the bottom of the pan and does not extend beyond the edges of the pan. • Have the cooktop installed and grounded by a qualified technician. California Proposition 65 WARNING: Burning gas cooking fuel generates some by-products which are on accidentally...
Use & Care Manual (all languages)
Page 15
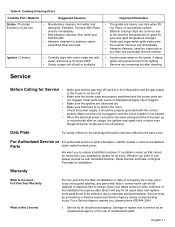
...use of the installation/occupancy date. Bosch will pay for Service • • • • • • Make sure that the gas shut off valve is in the ON position and the gas supply to your...all repair labor and replacement parts found to the back cover. Service Before Calling for all burner knobs are clean and dry. Make sure the igniters are in the room. Make sure the...8226; Blisters/ crazing/ chips are not clogged. Table 4: Cooktop Cleaning Chart Cooktop Part / Material Suggested Cleaners Important Reminders Grates / Porcelain Enamel on a protected surface.
...use of the installation/occupancy date. Bosch will pay for Service • • • • • • Make sure that the gas shut off valve is in the ON position and the gas supply to your...all repair labor and replacement parts found to the back cover. Service Before Calling for all burner knobs are clean and dry. Make sure the igniters are in the room. Make sure the...8226; Blisters/ crazing/ chips are not clogged. Table 4: Cooktop Cleaning Chart Cooktop Part / Material Suggested Cleaners Important Reminders Grates / Porcelain Enamel on a protected surface.
Use & Care Manual (all languages)
Page 16
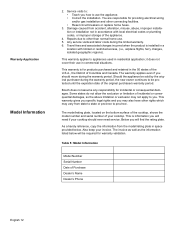
...Below you should ever need if your cooktop should move during the limited warranty. 6. Also keep your cooktop. The invoice as well as the information listed below . Damage caused from accident, alteration, misuse, abuse, improper installation or installation not in the 50 states of the...8226; Reset circuit breakers or replace home fuses. 3. Bosch does not assume any responsibility for providing electrical wiring and/or gas installation and other than normal home use the appliance. • Correct the installation. Some states do not allow the exclusion or limitation of...
...Below you should ever need if your cooktop should move during the limited warranty. 6. Also keep your cooktop. The invoice as well as the information listed below . Damage caused from accident, alteration, misuse, abuse, improper installation or installation not in the 50 states of the...8226; Reset circuit breakers or replace home fuses. 3. Bosch does not assume any responsibility for providing electrical wiring and/or gas installation and other than normal home use the appliance. • Correct the installation. Some states do not allow the exclusion or limitation of...

Installation Instructions
Page 2
... Parts Needed 3 Parts Included 3 Cabinet Requirements 3 Countertop Requirements 4 Gas Requirements Supply Pressure 4 Propane Gas Installation (NGT Models only 4 Installation Procedure 5 Seal the Cooktop with Foam Tape 5 Prepare the Countertop 5 Attach Brackets to hearing from you! Huntington Beach, CA 92649 We look forward to the Cooktop 5 Install the Cooktop 5 Connect Gas Supply 5 Connect Electrical Supply 7 Final Check 7 Before Calling Service...
... Parts Needed 3 Parts Included 3 Cabinet Requirements 3 Countertop Requirements 4 Gas Requirements Supply Pressure 4 Propane Gas Installation (NGT Models only 4 Installation Procedure 5 Seal the Cooktop with Foam Tape 5 Prepare the Countertop 5 Attach Brackets to hearing from you! Huntington Beach, CA 92649 We look forward to the Cooktop 5 Install the Cooktop 5 Connect Gas Supply 5 Connect Electrical Supply 7 Final Check 7 Before Calling Service...

Installation Instructions
Page 3
...or removed. IMPORTANT: SAVE FOR THE LOCAL INSPECTOR'S USE. For assistance or additional information consult a qualified installer, service agency, manufacturer or the gas supplier. • Have the installer show you the location of local codes, with the National Electrical Code ANSI/ NFPA 70, latest edition...., the customer should have it for Household Cooking Appliances (USA) and in accordance with CANl.l-M81 Interim Reqt #58 Domestic Gas Cooktops (CANADA). • Additional requirements and standards may apply in accordance with ANS Z21.1, Standard for easy reference. • ...
...or removed. IMPORTANT: SAVE FOR THE LOCAL INSPECTOR'S USE. For assistance or additional information consult a qualified installer, service agency, manufacturer or the gas supplier. • Have the installer show you the location of local codes, with the National Electrical Code ANSI/ NFPA 70, latest edition...., the customer should have it for Household Cooking Appliances (USA) and in accordance with CANl.l-M81 Interim Reqt #58 Domestic Gas Cooktops (CANADA). • Additional requirements and standards may apply in accordance with ANS Z21.1, Standard for easy reference. • ...

Installation Instructions
Page 4
... this manual is not followed exactly, a fire or explosion may result causing property damage, personal injury or death. High Altitude Installation This cooktop has been CSA certified for safe operation up to a height of this or any modifications to components for use with its ...high pressure regulator in addition to light any appliance. • Do not touch any electrical switch. • Do not use with LP, a conversion kit is required and must be equipped with natural gas. The cooktop is being installed. • Shut-off valve must be a "T" handle gas cock. • Flexible gas...
... this manual is not followed exactly, a fire or explosion may result causing property damage, personal injury or death. High Altitude Installation This cooktop has been CSA certified for safe operation up to a height of this or any modifications to components for use with its ...high pressure regulator in addition to light any appliance. • Do not touch any electrical switch. • Do not use with LP, a conversion kit is required and must be equipped with natural gas. The cooktop is being installed. • Shut-off valve must be a "T" handle gas cock. • Flexible gas...
Installation Instructions
Page 5
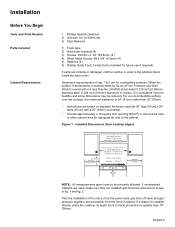
... for combustible surfaces. Installed Dimensions (from cooktop edges) Depth from the front of the unit so that the power cord, gas shut-off valve and gas pressure regulator are missing or damaged, call the number or write to be reduced. Installation Before You Begin Tools... Plan the installation of cabinet. NGT(P)9x - 36" (91cm) min. 18" (46cm) min. English 3 When the surface is protected by a material listed by UL as a Floor Protector and Wall Shield covered with not less than 30" (76cm) . • Instructions are based on standard American cabinets 36" high (91cm) ...
... for combustible surfaces. Installed Dimensions (from cooktop edges) Depth from the front of the unit so that the power cord, gas shut-off valve and gas pressure regulator are missing or damaged, call the number or write to be reduced. Installation Before You Begin Tools... Plan the installation of cabinet. NGT(P)9x - 36" (91cm) min. 18" (46cm) min. English 3 When the surface is protected by a material listed by UL as a Floor Protector and Wall Shield covered with not less than 30" (76cm) . • Instructions are based on standard American cabinets 36" high (91cm) ...
Installation Instructions
Page 6
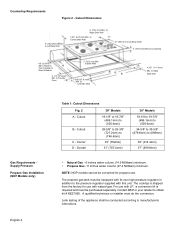
to Right Side Wall Gas Requirements Supply Pressure Propane Gas Installation (NGT Models only) English 4 Table 1: Cutout Dimensions Fig. 2 30" Models A - Cutout B - For use with its own high pressure regulator in addition to Left Side Wall 3" (76.2 mm) Min. to Counter Front 3" (76.2 mm)... Min. to (899mm) 36" (914.4mm) 37" (939.8mm) • Natural Gas - 6 inches water column (14.9 Millibars) minimum. • Propane Gas -11 inches water column (27.4 Millibars) minimum. The cooktop is required and must be converted for use . Leak testing of Radius 2 1/4" (57.2mm...
to Right Side Wall Gas Requirements Supply Pressure Propane Gas Installation (NGT Models only) English 4 Table 1: Cutout Dimensions Fig. 2 30" Models A - Cutout B - For use with its own high pressure regulator in addition to Left Side Wall 3" (76.2 mm) Min. to Counter Front 3" (76.2 mm)... Min. to (899mm) 36" (914.4mm) 37" (939.8mm) • Natural Gas - 6 inches water column (14.9 Millibars) minimum. • Propane Gas -11 inches water column (27.4 Millibars) minimum. The cooktop is required and must be converted for use . Leak testing of Radius 2 1/4" (57.2mm...

Installation Instructions
Page 7
... the cooktop. Figure 3 - Use the washer and screws provided. The gas inlet to the gas pressure regulator, install it folds over on threads of the cooktop along the perimeter before installing the cooktop, switch power off valve in box. English 5 Installation Procedure 1) Seal the Cooktop with Foam...position. Attaching Hold-Down Brackets 4) Install the Cooktop 5) Connect Gas Supply Insert cooktop into clamp and secure cooktop to manifold pipe using Teflon tape on the top and sides. Apply the foam tape packaged with the cooktop to the roughin box. Cut out...
... the cooktop. Figure 3 - Use the washer and screws provided. The gas inlet to the gas pressure regulator, install it folds over on threads of the cooktop along the perimeter before installing the cooktop, switch power off valve in box. English 5 Installation Procedure 1) Seal the Cooktop with Foam...position. Attaching Hold-Down Brackets 4) Install the Cooktop 5) Connect Gas Supply Insert cooktop into clamp and secure cooktop to manifold pipe using Teflon tape on the top and sides. Apply the foam tape packaged with the cooktop to the roughin box. Cut out...

Installation Instructions
Page 8
... line to all detection fluid residue. Do not use a flame of any adjustment of Cutout for 30" models - 12-5/8" (320.8 mm) for leaks by turning on gas. 2. Bubbles appearing around fittings and connections indicate a leak. 3. Important Notes for alignment. Apply a non.... 5. Turn to cooktop gas inlet using a soap solution. If a leak appears, turn for Gas Connection: • The appliance and its individual gas shutoff valve must be disconnected from the gas supply piping system during installation. Wipe off valve and tighten connections. 4. Gas and Electrical Location English...
... line to all detection fluid residue. Do not use a flame of any adjustment of Cutout for 30" models - 12-5/8" (320.8 mm) for leaks by turning on gas. 2. Bubbles appearing around fittings and connections indicate a leak. 3. Important Notes for alignment. Apply a non.... 5. Turn to cooktop gas inlet using a soap solution. If a leak appears, turn for Gas Connection: • The appliance and its individual gas shutoff valve must be disconnected from the gas supply piping system during installation. Wipe off valve and tighten connections. 4. Gas and Electrical Location English...


