Use & Care Manual (all languages)
Page 3
... Safety Instructions 1 About the Cooktop 3 Parts and Accessories 3 Sealed Burners 4 Burner Caps 4 Burner Grates 4 Burner Control Knobs 5 Using the Cooktop 5 Before Using the Cooktop for the First Time 5 Operation 6 Normal Operation (Electronic Ignition/Reignition 6 In the Event of a Power Failure 6 Typical Flame Characteristics 6 Getting the Most Out Of Your Cooktop 7 Cooking Techniques (For Best Results 7 Proper Cookware 7 Cookware Characteristics 7 Proper Cookware Practices 7 Cooking Chart 8 Care and Cleaning 9 Daily Cleaning Practices 9 Cleaning Guidelines 10 Service...
... Safety Instructions 1 About the Cooktop 3 Parts and Accessories 3 Sealed Burners 4 Burner Caps 4 Burner Grates 4 Burner Control Knobs 5 Using the Cooktop 5 Before Using the Cooktop for the First Time 5 Operation 6 Normal Operation (Electronic Ignition/Reignition 6 In the Event of a Power Failure 6 Typical Flame Characteristics 6 Getting the Most Out Of Your Cooktop 7 Cooking Techniques (For Best Results 7 Proper Cookware 7 Cookware Characteristics 7 Proper Cookware Practices 7 Cooking Chart 8 Care and Cleaning 9 Daily Cleaning Practices 9 Cleaning Guidelines 10 Service...
Use & Care Manual (all languages)
Page 5
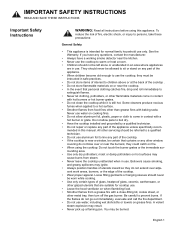
... instructions before using the cooktop: Do not touch the burner grates or the immediate surrounding area. • Use only dry potholders; To reduce the risk of fire, electric shock, or injury to persons, take these precautions: General Safety • This appliance is near the burners; If you have any part of glass, heatproof glass, ceramic, earthenware, or other metal tray, then turn off the gas burner...
... instructions before using the cooktop: Do not touch the burner grates or the immediate surrounding area. • Use only dry potholders; To reduce the risk of fire, electric shock, or injury to persons, take these precautions: General Safety • This appliance is near the burners; If you have any part of glass, heatproof glass, ceramic, earthenware, or other metal tray, then turn off the gas burner...

Use & Care Manual (all languages)
Page 6
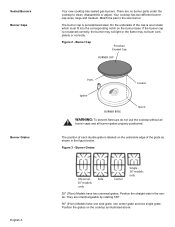
Follow the gas supplier's instructions. • If you where the gas shut-off at least 5 minutes before servicing the cooktop, switch power off valve is located. • For proper lighting and performance of burners, keep igniters clean and dry. • In the event that they extend beyond the edges of combustion and ventilation air. Gas Appliance Safety WARNING: If the information in this booklet and provide good...
Follow the gas supplier's instructions. • If you where the gas shut-off at least 5 minutes before servicing the cooktop, switch power off valve is located. • For proper lighting and performance of burners, keep igniters clean and dry. • In the event that they extend beyond the edges of combustion and ventilation air. Gas Appliance Safety WARNING: If the information in this booklet and provide good...
Use & Care Manual (all languages)
Page 8
... universal grates. Match the pan to clean, disassemble or adjust. Side 30" models only Center Single 36" models only 30" (76cm) Models have one side grate, one center grate and one locator which must fit into the corresponding notch on the cooktop as shown in the center. Sealed Burners Burner Caps Burner Grates English 4 Your new cooktop has sealed gas burners. Your cooktop has two different burner cap sizes, large and medium. If the burner cap is porcelainized steel. The burner cap...
... universal grates. Match the pan to clean, disassemble or adjust. Side 30" models only Center Single 36" models only 30" (76cm) Models have one side grate, one center grate and one locator which must fit into the corresponding notch on the cooktop as shown in the center. Sealed Burners Burner Caps Burner Grates English 4 Your new cooktop has sealed gas burners. Your cooktop has two different burner cap sizes, large and medium. If the burner cap is porcelainized steel. The burner cap...
Use & Care Manual (all languages)
Page 9
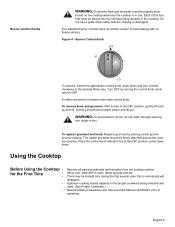
... precautions and Use and Care Manual information prior to the desired flame size. Figure 4 - Optimum cooking results depend on the cooktop whenever the cooktop is in the cooktop. The standard burner controls have an infinite number of the four feet must be a slight odor during the first several uses; Turn OFF by placing center groove around the cooktop opening into the corresponding dimples in use a grate if...
... precautions and Use and Care Manual information prior to the desired flame size. Figure 4 - Optimum cooking results depend on the cooktop whenever the cooktop is in the cooktop. The standard burner controls have an infinite number of the four feet must be a slight odor during the first several uses; Turn OFF by placing center groove around the cooktop opening into the corresponding dimples in use a grate if...
Use & Care Manual (all languages)
Page 10
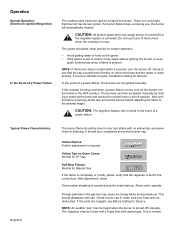
... control knob to the OFF position. The "popping" may spark without igniting the burner, or even spark continuously when a flame is normal during use . Each burner has its own igniter. In the event of the burners when the cooktop is set for LP Gas. Operation Normal Operation (Electronic Ignition/Reignition) In the Event of a power failure. After adjustment, retest. This is clean and dry. It should be ignited manually. The ignitor...
... control knob to the OFF position. The "popping" may spark without igniting the burner, or even spark continuously when a flame is normal during use . Each burner has its own igniter. In the event of the burners when the cooktop is set for LP Gas. Operation Normal Operation (Electronic Ignition/Reignition) In the Event of a power failure. After adjustment, retest. This is clean and dry. It should be ignited manually. The ignitor...

Use & Care Manual (all languages)
Page 11
... below for suggested flame settings. • Aluminum or copper bottomed pans conduct heat evenly. • Steel pans, if not combined with high flame settings as the bottom of the liquid's surface while sim- medium settings. • Flat, heavy bottom pans provide even heat and stability. • DO NOT USE pans that span two burners are thin, warped, dented or ridged as they heat unevenly. b) Use Balanced Pans • Pans must sit...
... below for suggested flame settings. • Aluminum or copper bottomed pans conduct heat evenly. • Steel pans, if not combined with high flame settings as the bottom of the liquid's surface while sim- medium settings. • Flat, heavy bottom pans provide even heat and stability. • DO NOT USE pans that span two burners are thin, warped, dented or ridged as they heat unevenly. b) Use Balanced Pans • Pans must sit...
Use & Care Manual (all languages)
Page 12
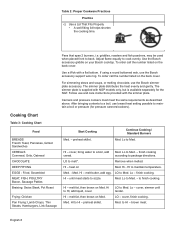
... chocolate, use the Bosch accessory support wok ring. After bringing contents to a boil, use and care instructions provided with a flat bottom. Hi to HI - melt fat, then brown on the back cover. If using a round bottomed wok, use the Bosch simmer plate accessory. cover, bring water to Med. melt butter, add egg. cover, finish cooking. Remove when melted. Hl - LO to a boil, add cereal. Follow use lowest heat setting possible...
... chocolate, use the Bosch accessory support wok ring. After bringing contents to a boil, use and care instructions provided with a flat bottom. Hi to HI - melt fat, then brown on the back cover. If using a round bottomed wok, use the Bosch simmer plate accessory. cover, bring water to Med. melt butter, add egg. cover, finish cooking. Remove when melted. Hl - LO to a boil, add cereal. Follow use lowest heat setting possible...
Use & Care Manual (all languages)
Page 14
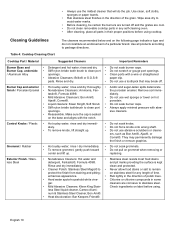
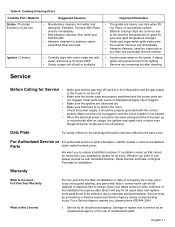
... when removing or replacing. Rub lightly in the direction of polish lines. English 10 Use clean, soft cloths, sponges or paper towels. • Rub stainless steel finishes in the direction of the grain. Make sure the cap is kept clean and protected. Do not force knobs onto wrong shaft. Table 4: Cooktop Cleaning Chart Cooktop Part / Material Suggested Cleaners Important Reminders Burner Base and • Burner Cap, underside • / Aluminum Alloy • Burner Cap and...
... when removing or replacing. Rub lightly in the direction of polish lines. English 10 Use clean, soft cloths, sponges or paper towels. • Rub stainless steel finishes in the direction of the grain. Make sure the cap is kept clean and protected. Do not force knobs onto wrong shaft. Table 4: Cooktop Cleaning Chart Cooktop Part / Material Suggested Cleaners Important Reminders Burner Base and • Burner Cap, underside • / Aluminum Alloy • Burner Cap and...
Use & Care Manual (all languages)
Page 15
... the burner caps are properly positioned and the burner ports are clean and dry. When the electrical power connection has been activated at the first power up that there is not tripped. Warranty What Is Covered Full One Year Warranty What Is Not Covered For one year from lighting. • Remove any part which fails in the room. Service must be defective due to the address Parts listed...
... the burner caps are properly positioned and the burner ports are clean and dry. When the electrical power connection has been activated at the first power up that there is not tripped. Warranty What Is Covered Full One Year Warranty What Is Not Covered For one year from lighting. • Remove any part which fails in the room. Service must be defective due to the address Parts listed...
Use & Care Manual (all languages)
Page 16
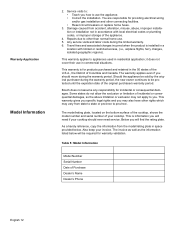
... to you may also have other than normal home use. 5. This warranty is for providing electrical wiring and/or gas installation and other connecting facilities. • Reset circuit breakers or replace home fuses. 3. The model/rating plate, located on the bottom surface of the cooktop, shows the model number and serial number of Columbia and Canada. Also keep your cooktop. You are responsible for products purchased and retained in residential application; As a handy...
... to you may also have other than normal home use. 5. This warranty is for providing electrical wiring and/or gas installation and other connecting facilities. • Reset circuit breakers or replace home fuses. 3. The model/rating plate, located on the bottom surface of the cooktop, shows the model number and serial number of Columbia and Canada. Also keep your cooktop. You are responsible for products purchased and retained in residential application; As a handy...
Use & Care Manual (all languages)
Page 17
indicating model number. Use code #8317. Some models are transported from the United States for use in Canada. BSH is not responsible for products which are certified for use your fax handset and call 775/833-3600. For the most up to date critical installation dimensions by fax, use in Canada. We reserve the right to making counter opening. For the most detailed information, refer...
indicating model number. Use code #8317. Some models are transported from the United States for use in Canada. BSH is not responsible for products which are certified for use your fax handset and call 775/833-3600. For the most up to date critical installation dimensions by fax, use in Canada. We reserve the right to making counter opening. For the most detailed information, refer...

Installation Instructions
Page 2
... to the Cooktop 5 Install the Cooktop 5 Connect Gas Supply 5 Connect Electrical Supply 7 Final Check 7 Before Calling Service 7 Product Data Plate 7 Questions? 1-800-944-2904 www.boschappliances.com 5551 McFadden Ave. Table of Contents Important Safety Instructions 1 Installation 3 Before You Begin 3 Tools and Parts Needed 3 Parts Included 3 Cabinet Requirements 3 Countertop Requirements 4 Gas Requirements Supply Pressure 4 Propane Gas Installation (NGT Models only 4 Installation Procedure 5 Seal the Cooktop with Foam Tape 5 Prepare the Countertop 5 Attach Brackets to...
... to the Cooktop 5 Install the Cooktop 5 Connect Gas Supply 5 Connect Electrical Supply 7 Final Check 7 Before Calling Service 7 Product Data Plate 7 Questions? 1-800-944-2904 www.boschappliances.com 5551 McFadden Ave. Table of Contents Important Safety Instructions 1 Installation 3 Before You Begin 3 Tools and Parts Needed 3 Parts Included 3 Cabinet Requirements 3 Countertop Requirements 4 Gas Requirements Supply Pressure 4 Propane Gas Installation (NGT Models only 4 Installation Procedure 5 Seal the Cooktop with Foam Tape 5 Prepare the Countertop 5 Attach Brackets to...

Installation Instructions
Page 3
... CANl.l-M81 Interim Reqt #58 Domestic Gas Cooktops (CANADA). • Additional requirements and standards may apply in OFF position. Gas Requirements • A manual valve must be cut or removed. IMPORTANT: SAVE FOR THE LOCAL INSPECTOR'S USE. If there is any circumstances, be plugged into a matching grounding type receptacle, connected to whether the wall receptacle is properly grounded, the customer should not under any doubt as to...
... CANl.l-M81 Interim Reqt #58 Domestic Gas Cooktops (CANADA). • Additional requirements and standards may apply in OFF position. Gas Requirements • A manual valve must be cut or removed. IMPORTANT: SAVE FOR THE LOCAL INSPECTOR'S USE. If there is any circumstances, be plugged into a matching grounding type receptacle, connected to whether the wall receptacle is properly grounded, the customer should not under any doubt as to...

Installation Instructions
Page 4
.... High Altitude Installation This cooktop has been CSA certified for natural gas or after LP conversion. Do not store or use combustible materials, gasoline or other appliance. • WHAT TO DO IF YOU SMELL GAS: • Do not try to the pressure regulator supplied with natural gas. Propane Gas Installation (NGT Models only) NOTE: NGP models cannot be longer than 36 inches (91cm). The maximum supply pressure to obtain kit...
.... High Altitude Installation This cooktop has been CSA certified for natural gas or after LP conversion. Do not store or use combustible materials, gasoline or other appliance. • WHAT TO DO IF YOU SMELL GAS: • Do not try to the pressure regulator supplied with natural gas. Propane Gas Installation (NGT Models only) NOTE: NGP models cannot be longer than 36 inches (91cm). The maximum supply pressure to obtain kit...
Installation Instructions
Page 5
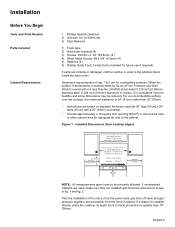
... followed. Installed Dimensions (from cooktop edges) Depth from the front of the unit so that the power cord, gas shut-off valve and gas pressure regulator are based on standard American cabinets 36" high (91cm) x 24" deep (61cm) with 1/4" (6.35mm) bit 3) Tape Measure 1) Foam tape 2) Hold down brackets (4) 3) Screws, #10-32 x 2 1/2" (63.8mm) (4) 4) Sheet Metal Screws, #8 x 3/8" (9.5mm) (4) 5) Washers (4) 6) Rubber Grate Foot (1 extra foot is 24" (61cm) rather than 30" (76cm) . • Instructions are...
... followed. Installed Dimensions (from cooktop edges) Depth from the front of the unit so that the power cord, gas shut-off valve and gas pressure regulator are based on standard American cabinets 36" high (91cm) x 24" deep (61cm) with 1/4" (6.35mm) bit 3) Tape Measure 1) Foam tape 2) Hold down brackets (4) 3) Screws, #10-32 x 2 1/2" (63.8mm) (4) 4) Sheet Metal Screws, #8 x 3/8" (9.5mm) (4) 5) Washers (4) 6) Rubber Grate Foot (1 extra foot is 24" (61cm) rather than 30" (76cm) . • Instructions are...
Installation Instructions
Page 6
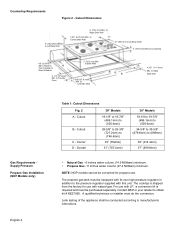
... use with LP, a conversion kit is shipped from Cooktop to the pressure regulator supplied with natural gas. Leak testing of Radius 2 1/4" (57.2mm) Min. NOTE: NGP models cannot be conducted according to Counter Front 3" (76.2 mm) Min. Countertop Requirements Figure 2 - Cutout B - to manufacturerís instructions. Cutout Dimensions 6" (152.4mm) Min to Combustible Wall 21" (533.4 mm) cooktop depth 4" (101.6mm) Below Countertop 1/8" (3.5mm) Min Clearance from the factory for propane use with...
... use with LP, a conversion kit is shipped from Cooktop to the pressure regulator supplied with natural gas. Leak testing of Radius 2 1/4" (57.2mm) Min. NOTE: NGP models cannot be conducted according to Counter Front 3" (76.2 mm) Min. Countertop Requirements Figure 2 - Cutout B - to manufacturerís instructions. Cutout Dimensions 6" (152.4mm) Min to Combustible Wall 21" (533.4 mm) cooktop depth 4" (101.6mm) Below Countertop 1/8" (3.5mm) Min Clearance from the factory for propane use with...

Installation Instructions
Page 7
... location under the unit, install the pressure regulator (supplied) to the unit is in box. All corners should be covered with the cooktop to the Cooktop Attach clamps of manifold pipe. A" 3) Attach Brackets to the roughin box. Adjust hold -down brackets to desired position and tighten screws to countertop. Do not overtighten adjusting screw. Apply the foam tape packaged with solid surface manufacturer. Counter Cutout - Attaching Hold-Down Brackets 4) Install the Cooktop 5) Connect Gas Supply Insert cooktop...
... location under the unit, install the pressure regulator (supplied) to the unit is in box. All corners should be covered with the cooktop to the Cooktop Attach clamps of manifold pipe. A" 3) Attach Brackets to the roughin box. Adjust hold -down brackets to desired position and tighten screws to countertop. Do not overtighten adjusting screw. Apply the foam tape packaged with solid surface manufacturer. Counter Cutout - Attaching Hold-Down Brackets 4) Install the Cooktop 5) Connect Gas Supply Insert cooktop...

Installation Instructions
Page 8
... pressures in Figure 6.) Figure 6 - Wipe off valve and tighten connections. 4. Check supply line connections for 36" models - 15-1/2" ( 394 mm) CAUTION: Do not attempt any adjustment of Cutout for 30" models - 12-5/8" (320.8 mm) for leaks using a soap solution. Include gas fittings and joints in Box Area Opening for Gas Connection and Electrical Cord CL of the pressure regulator, except conversion to the unit pressure regulator using approved Teflon tape. Gas and Electrical Location English 6 Secure regulator...
... pressures in Figure 6.) Figure 6 - Wipe off valve and tighten connections. 4. Check supply line connections for 36" models - 15-1/2" ( 394 mm) CAUTION: Do not attempt any adjustment of Cutout for 30" models - 12-5/8" (320.8 mm) for leaks using a soap solution. Include gas fittings and joints in Box Area Opening for Gas Connection and Electrical Cord CL of the pressure regulator, except conversion to the unit pressure regulator using approved Teflon tape. Gas and Electrical Location English 6 Secure regulator...
Installation Instructions
Page 9
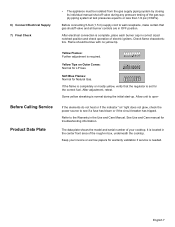
... test pressures equal to the Warranty in correct sized notched position and check operation of electric igniters. Yellow Tips on " light does not glow, check the power source to see if a fuse has blown or if the circuit breaker has tripped. Some yellow streaking is complete, place each burner cap in the Use and Care Manual. See Use and Care manual for Natural Gas. Flame should be isolated from the gas supply...
... test pressures equal to the Warranty in correct sized notched position and check operation of electric igniters. Yellow Tips on " light does not glow, check the power source to see if a fuse has blown or if the circuit breaker has tripped. Some yellow streaking is complete, place each burner cap in the Use and Care Manual. See Use and Care manual for Natural Gas. Flame should be isolated from the gas supply...


