Use & Care Manual (all languages)
Page 7
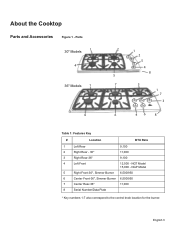
NGT Model 15,000 - English 3 NGP Model 5 Right Front-30", Simmer Burner 6,500/950 6 Center Front-36", Simmer Burner 6,500/950 7 Center Rear-36" 11,000 8 Serial Number/Data Plate * Key numbers 1-7 also correspond to the control knob location for the burner. Parts 30" Models 1 4 36" Models 1 4 2 1 2 5 4 8 5 7 3 1 7 3 6 46 8 Table 1: Features Key # Location BTU Rate 1 Left Rear 9,100 2 Right Rear - 30" 11,000 3 Right Rear-36" 9,100 4 Left Front 12,500 - About the Cooktop Parts and Accessories Figure 1 -
NGT Model 15,000 - English 3 NGP Model 5 Right Front-30", Simmer Burner 6,500/950 6 Center Front-36", Simmer Burner 6,500/950 7 Center Rear-36" 11,000 8 Serial Number/Data Plate * Key numbers 1-7 also correspond to the control knob location for the burner. Parts 30" Models 1 4 36" Models 1 4 2 1 2 5 4 8 5 7 3 1 7 3 6 46 8 Table 1: Features Key # Location BTU Rate 1 Left Rear 9,100 2 Right Rear - 30" 11,000 3 Right Rear-36" 9,100 4 Left Front 12,500 - About the Cooktop Parts and Accessories Figure 1 -
Use & Care Manual (all languages)
Page 8
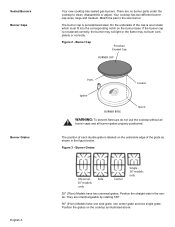
... the cooktop to the size burner. Burner Cap Porcelain Enamel Cap BURNER CAP Ports Locator Igniter BURNER BASE Notch WARNING: To prevent flare-ups do not use the cooktop without all burner caps and all burner grates properly positioned. Figure 3 - Sealed Burners Burner Caps Burner Grates English 4 Your new cooktop has sealed gas burners. If the burner cap is porcelainized steel. Burner Grates Universal - The burner cap...
... the cooktop to the size burner. Burner Cap Porcelain Enamel Cap BURNER CAP Ports Locator Igniter BURNER BASE Notch WARNING: To prevent flare-ups do not use the cooktop without all burner caps and all burner grates properly positioned. Figure 3 - Sealed Burners Burner Caps Burner Grates English 4 Your new cooktop has sealed gas burners. If the burner cap is porcelainized steel. Burner Grates Universal - The burner cap...
Use & Care Manual (all languages)
Page 13
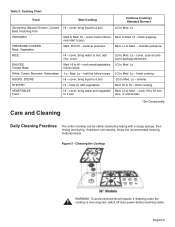
.... Lo follow recipe. finish cooking. cover, bring water to a boil. cook 10 to a boil. to 30 min- Cleaning the Cooktop WARNING: To avoid electrical shock hazard: If cleaning under the cooktop is ever required, switch off main power before reaching inside. RICE Hl - simmer. HI to Med. -...White, Cream, Bernaise, Hollandaise Lo - finish popping. HI to Hl - English 9 Table 3: Cooking Chart Food Start Cooking Continue Cooking / Standard Burners Simmering: Stewed Chicken, Corned Hl - Med. If stubborn soil remains, follow the recommended cleaning methods below.
.... Lo follow recipe. finish cooking. cover, bring water to a boil. cook 10 to a boil. to 30 min- Cleaning the Cooktop WARNING: To avoid electrical shock hazard: If cleaning under the cooktop is ever required, switch off main power before reaching inside. RICE Hl - simmer. HI to Med. -...White, Cream, Bernaise, Hollandaise Lo - finish popping. HI to Hl - English 9 Table 3: Cooking Chart Food Start Cooking Continue Cooking / Standard Burners Simmering: Stewed Chicken, Corned Hl - Med. If stubborn soil remains, follow the recommended cleaning methods below.
Installation Instructions
Page 5
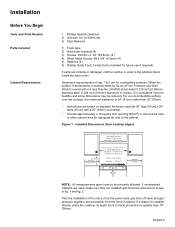
... max. Installed Dimensions (from cooktop edges) Depth from the front of the unit so that the power cord, gas shut-off valve and gas pressure regulator are for adequate ...5mm) (4) 5) Washers (4) 6) Rubber Grate Foot (1 extra foot is 24" (61cm) rather than 30" (76cm) . • Instructions are based on standard American cabinets 36" high (91cm) x 24" deep (61cm) with not less than 15" (38cm). If a drawer ... (0.6mm) aluminum or copper, it is installed directly under the cooktop, its depth (front to Combustible Surface NGT(P)7x - 30" (76cm) min. Left Side 6" (15cm) min. Installation...
... max. Installed Dimensions (from cooktop edges) Depth from the front of the unit so that the power cord, gas shut-off valve and gas pressure regulator are for adequate ...5mm) (4) 5) Washers (4) 6) Rubber Grate Foot (1 extra foot is 24" (61cm) rather than 30" (76cm) . • Instructions are based on standard American cabinets 36" high (91cm) x 24" deep (61cm) with not less than 15" (38cm). If a drawer ... (0.6mm) aluminum or copper, it is installed directly under the cooktop, its depth (front to Combustible Surface NGT(P)7x - 30" (76cm) min. Left Side 6" (15cm) min. Installation...
Installation Instructions
Page 6
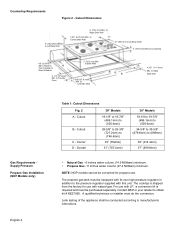
...Min. For use with its own high pressure regulator in addition to manufacturerís instructions. Corner D - to (899mm) 36" (914.4mm) 37" (939.8mm) • Natural Gas - 6 inches water column (14.9 Millibars) minimum. • Propane Gas -11 inches water column (27.4 ...Right Side Wall Gas Requirements Supply Pressure Propane Gas Installation (NGT Models only) English 4 Table 1: Cutout Dimensions Fig. 2 30" Models A - A qualified technician or installer must be equipped with LP, a conversion kit is shipped from Cooktop to Combustible Wall 21" (533.4 mm) cooktop depth 4" (...
...Min. For use with its own high pressure regulator in addition to manufacturerís instructions. Corner D - to (899mm) 36" (914.4mm) 37" (939.8mm) • Natural Gas - 6 inches water column (14.9 Millibars) minimum. • Propane Gas -11 inches water column (27.4 ...Right Side Wall Gas Requirements Supply Pressure Propane Gas Installation (NGT Models only) English 4 Table 1: Cutout Dimensions Fig. 2 30" Models A - A qualified technician or installer must be equipped with LP, a conversion kit is shipped from Cooktop to Combustible Wall 21" (533.4 mm) cooktop depth 4" (...

Installation Instructions
Page 8
...Cord CL of the pressure regulator, except conversion to all detection fluid residue. Turn to cooktop gas inlet using approved Teflon tape. Check supply line connections for leaks using a 1/2" flex gas line connector between the shut-off valve. Apply a non-corrosive leak detection fluid to..." models - 15-1/2" ( 394 mm) CAUTION: Do not attempt any adjustment of Cutout for 30" models - 12-5/8" (320.8 mm) for leaks by turning on gas. 2. Important Notes for alignment. Include gas fittings and joints in excess of that system at test pressures in the range if connections may...
...Cord CL of the pressure regulator, except conversion to all detection fluid residue. Turn to cooktop gas inlet using approved Teflon tape. Check supply line connections for leaks using a 1/2" flex gas line connector between the shut-off valve. Apply a non-corrosive leak detection fluid to..." models - 15-1/2" ( 394 mm) CAUTION: Do not attempt any adjustment of Cutout for 30" models - 12-5/8" (320.8 mm) for leaks by turning on gas. 2. Important Notes for alignment. Include gas fittings and joints in excess of that system at test pressures in the range if connections may...