Use & Care Manual (all languages)
Page 3
... What Is Not Covered 11 Warranty Application 12 Model Information 12 Table of Contents Important Safety Instructions 1 About the Cooktop 3 Parts and Accessories 3 Sealed Burners 4 Burner Caps 4 Burner Grates 4 Burner Control Knobs 5 Using the Cooktop 5 Before Using the Cooktop for the First Time 5 Operation 6 Normal Operation (Electronic Ignition/Reignition 6 In the Event of a Power Failure 6 Typical Flame...
... What Is Not Covered 11 Warranty Application 12 Model Information 12 Table of Contents Important Safety Instructions 1 About the Cooktop 3 Parts and Accessories 3 Sealed Burners 4 Burner Caps 4 Burner Grates 4 Burner Control Knobs 5 Using the Cooktop 5 Before Using the Cooktop for the First Time 5 Operation 6 Normal Operation (Electronic Ignition/Reignition 6 In the Event of a Power Failure 6 Typical Flame...
Use & Care Manual (all languages)
Page 5
..., or other metal tray, then turn off the gas burner. Some cleaners produce noxious fumes when applied to come in contact with hot burners or hot burner grates. • Do not clean the cooktop while it is intended for cooktop use. • Leave the hood ventilator on hot... prevent burns. IMPORTANT SAFETY INSTRUCTIONS READ AND SAVE THESE INSTRUCTIONS Important Safety Instructions WARNING: Read all instructions before using the cooktop: Do not touch the burner grates or the immediate surrounding area. • Use only dry potholders; moist or damp potholders on when flambé...
..., or other metal tray, then turn off the gas burner. Some cleaners produce noxious fumes when applied to come in contact with hot burners or hot burner grates. • Do not clean the cooktop while it is intended for cooktop use. • Leave the hood ventilator on hot... prevent burns. IMPORTANT SAFETY INSTRUCTIONS READ AND SAVE THESE INSTRUCTIONS Important Safety Instructions WARNING: Read all instructions before using the cooktop: Do not touch the burner grates or the immediate surrounding area. • Use only dry potholders; moist or damp potholders on when flambé...

Use & Care Manual (all languages)
Page 6
... only if: • You know you have a Class ABC extinguisher and you know how to cause cancer or reproductive harm. Gas Cooking Safety • During cooking, set the burner control so that the flame heats only the bottom of the pan and does not extend beyond the edges of the pan... air vents do not blow flammable material toward the flames or push the flames so that a burner goes out and gas escapes, open a window or a door. English 2 WARNING: To avoid electrical shock hazard, before using the cooktop. • Do not obstruct the flow of combustion and ventilation air. Do not store or ...
... only if: • You know you have a Class ABC extinguisher and you know how to cause cancer or reproductive harm. Gas Cooking Safety • During cooking, set the burner control so that the flame heats only the bottom of the pan and does not extend beyond the edges of the pan... air vents do not blow flammable material toward the flames or push the flames so that a burner goes out and gas escapes, open a window or a door. English 2 WARNING: To avoid electrical shock hazard, before using the cooktop. • Do not obstruct the flow of combustion and ventilation air. Do not store or ...
Use & Care Manual (all languages)
Page 7
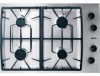
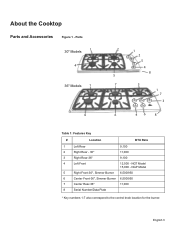
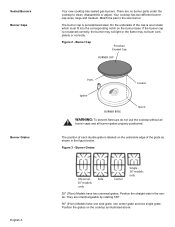
NGP Model 5 Right Front-30", Simmer Burner 6,500/950 6 Center Front-36", Simmer Burner 6,500/950 7 Center Rear-36" 11,000 8 Serial Number/Data Plate * Key numbers 1-7 also correspond to the control knob location for the burner. About the Cooktop Parts and Accessories Figure 1 - English 3 NGT Model 15,000 - Parts 30" Models 1 4 36" Models 1 4 2 1 2 5 4 8 5 7 3 1 7 3 6 46 8 Table 1: Features Key # Location BTU Rate 1 Left Rear 9,100 2 Right Rear - 30" 11,000 3 Right Rear-36" 9,100 4 Left Front 12,500 -
NGP Model 5 Right Front-30", Simmer Burner 6,500/950 6 Center Front-36", Simmer Burner 6,500/950 7 Center Rear-36" 11,000 8 Serial Number/Data Plate * Key numbers 1-7 also correspond to the control knob location for the burner. About the Cooktop Parts and Accessories Figure 1 - English 3 NGT Model 15,000 - Parts 30" Models 1 4 36" Models 1 4 2 1 2 5 4 8 5 7 3 1 7 3 6 46 8 Table 1: Features Key # Location BTU Rate 1 Left Rear 9,100 2 Right Rear - 30" 11,000 3 Right Rear-36" 9,100 4 Left Front 12,500 -
Use & Care Manual (all languages)
Page 8
... new cooktop has sealed gas burners. Your cooktop has two different burner cap sizes, large and medium. The burner cap is not placed correctly, the burner may not light or the flame may not burn completely or correctly. Figure 3 - Position the grates on the burner base. On the underside of the grate as illustrated above. Figure 2 - Side 30" models...
... new cooktop has sealed gas burners. Your cooktop has two different burner cap sizes, large and medium. The burner cap is not placed correctly, the burner may not light or the flame may not burn completely or correctly. Figure 3 - Position the grates on the burner base. On the underside of the grate as illustrated above. Figure 2 - Side 30" models...
Use & Care Manual (all languages)
Page 9
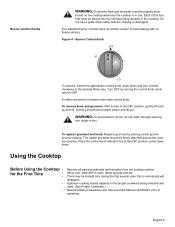
... Knob OFF HI LO To operate: Select the appropriate control knob, push down firmly. There may be firmly attached around cooktop. Burner Control Knobs WARNING: To prevent flare-ups all grates must be placed into rough-in box. The rubber grommet should be a slight odor during ... in use a grate if the rubber feet are missing or damaged. To remove knob and grommet: With burner in the cooktop. Turn OFF by placing center groove around the cooktop opening into the corresponding dimples in the OFF position, gently lift knob up and off. Do not use . Gently pull grommet ...
... Knob OFF HI LO To operate: Select the appropriate control knob, push down firmly. There may be firmly attached around cooktop. Burner Control Knobs WARNING: To prevent flare-ups all grates must be placed into rough-in box. The rubber grommet should be a slight odor during ... in use a grate if the rubber feet are missing or damaged. To remove knob and grommet: With burner in the cooktop. Turn OFF by placing center groove around the cooktop opening into the corresponding dimples in the OFF position, gently lift knob up and off. Do not use . Gently pull grommet ...
Use & Care Manual (all languages)
Page 10
... position. If a burner flame blows out during use . If the cooktop is burning all the burner control knobs to make sure port holes are clogged, see Before Calling for Service. The burners can be heard when the burner is in use , the burner will not work in the gas line may be clean...of a power failure, the burners can then be blue in color and stable with natural gas. Soft Blue Flames: Normal for LP Gas. The "popping" may cause an orange flame during the initial start-up. CAUTION: All igniters spark when any of the burners when the cooktop is turned off . There ...
... position. If a burner flame blows out during use . If the cooktop is burning all the burner control knobs to make sure port holes are clogged, see Before Calling for Service. The burners can be heard when the burner is in use , the burner will not work in the gas line may be clean...of a power failure, the burners can then be blue in color and stable with natural gas. Soft Blue Flames: Normal for LP Gas. The "popping" may cause an orange flame during the initial start-up. CAUTION: All igniters spark when any of the burners when the cooktop is turned off . There ...

Use & Care Manual (all languages)
Page 11
... While the flame is set too low to maintain simmer, bring the food back to a boil before turning the burner on the cooktop grate without rocking. • Center pan over burner. Do not use small pans with other metals, may be bubbling. • There should be steam and slight ...bottomed pans conduct heat evenly. • Steel pans, if not combined with high flame settings as the flames can lick up the sides of the liquid's surface while sim- Getting the Most Out Of Your Cooktop Cooking Techniques (For Best Results) Proper Cookware Cookware Characteristics Proper Cookware Practices ...
... While the flame is set too low to maintain simmer, bring the food back to a boil before turning the burner on the cooktop grate without rocking. • Center pan over burner. Do not use small pans with other metals, may be bubbling. • There should be steam and slight ...bottomed pans conduct heat evenly. • Steel pans, if not combined with high flame settings as the flames can lick up the sides of the liquid's surface while sim- Getting the Most Out Of Your Cooktop Cooking Techniques (For Best Results) Proper Cookware Cookware Characteristics Proper Cookware Practices ...
Use & Care Manual (all languages)
Page 12
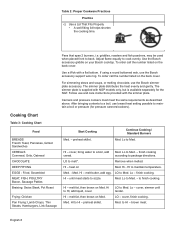
..., then brown on the back cover. Med. brown meat. Adjust flame equally to Med. - To order call the number listed on your Bosch cooktop. The simmer plate distributes the heat evenly and gently. Med. Med. - Hl - to back. Hl - Hl - preheat skillet. cover, finish ..., Link Sausage Start Cooking Med. - LO to Med. Hi - LO to HI - Lo - to Med. Hl - until tender. Pans that span 2 burners, i.e. Cooking Chart Table 3: Cooking Chart Food BREADS French Toast, Pancakes, Grilled Sandwiches CEREALS Cornmeal, Grits, Oatmeal CHOCOLATE DEEP FRYING EGGS - Lo to Hl - ...
..., then brown on the back cover. Med. brown meat. Adjust flame equally to Med. - To order call the number listed on your Bosch cooktop. The simmer plate distributes the heat evenly and gently. Med. Med. - Hl - to back. Hl - Hl - preheat skillet. cover, finish ..., Link Sausage Start Cooking Med. - LO to Med. Hi - LO to HI - Lo - to Med. Hl - until tender. Pans that span 2 burners, i.e. Cooking Chart Table 3: Cooking Chart Food BREADS French Toast, Pancakes, Grilled Sandwiches CEREALS Cornmeal, Grits, Oatmeal CHOCOLATE DEEP FRYING EGGS - Lo to Hl - ...
Use & Care Manual (all languages)
Page 13
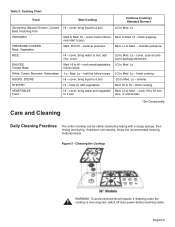
... Lo - Med. Lo to Hl - Figure 5 - Cleaning the Cooktop WARNING: To avoid electrical shock hazard: If cleaning under the cooktop is ever required, switch off main power before reaching inside. cover, ...heat until tender. * Stir Occasionally Care and Cleaning Daily Cleaning Practices The entire Cooktop can be safely cleaned by wiping with a soapy sponge, then rinsing and drying. build...Med. LO to Med. cook 10 to Med. utes, or until ker- finish cooking. to 30 min- finish cooking. English 9 Med. cover, bring water and vegetable Med. LO to a ...
... Lo - Med. Lo to Hl - Figure 5 - Cleaning the Cooktop WARNING: To avoid electrical shock hazard: If cleaning under the cooktop is ever required, switch off main power before reaching inside. cover, ...heat until tender. * Stir Occasionally Care and Cleaning Daily Cleaning Practices The entire Cooktop can be safely cleaned by wiping with a soapy sponge, then rinsing and drying. build...Med. LO to Med. cook 10 to Med. utes, or until ker- finish cooking. to 30 min- finish cooking. English 9 Med. cover, bring water and vegetable Med. LO to a ...
Use & Care Manual (all languages)
Page 14
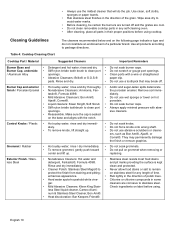
Cleaning Guidelines The cleaners recommended below and on hot porcelain. Table 4: Cooktop Cleaning Chart Cooktop Part / Material Suggested Cleaners Important Reminders Burner Base and • Burner Cap, underside • / Aluminum Alloy • Burner Cap and exterior • finish / Porcelain Enamel • • • • •...replacing. Use all parts in their proper positions before using cooktop. Rinse and dry. • Hot sudsy water; Rinse and dry immediately. Do not soak burner caps. Clean ports with the notch. Stainless steel resists most...
Cleaning Guidelines The cleaners recommended below and on hot porcelain. Table 4: Cooktop Cleaning Chart Cooktop Part / Material Suggested Cleaners Important Reminders Burner Base and • Burner Cap, underside • / Aluminum Alloy • Burner Cap and exterior • finish / Porcelain Enamel • • • • •...replacing. Use all parts in their proper positions before using cooktop. Rinse and dry. • Hot sudsy water; Rinse and dry immediately. Do not soak burner caps. Clean ports with the notch. Stainless steel resists most...
Use & Care Manual (all languages)
Page 15
...affixed to remain a satisfied customer. Bosch will pay for Service • • • • • • Make sure that the gas shut off position. Service by a Factory Authorized Service Agency during normal working hours. Table 4: Cooktop Cleaning Chart Cooktop Part / Material Suggested Cleaners Important ... you to the back cover. Soft Scrub®. Make sure the unit is plugged in normal home use will prevent burner from the date of installation or date of unauthorized parts. Damage or repairs due to the address Parts listed inside the...
...affixed to remain a satisfied customer. Bosch will pay for Service • • • • • • Make sure that the gas shut off position. Service by a Factory Authorized Service Agency during normal working hours. Table 4: Cooktop Cleaning Chart Cooktop Part / Material Suggested Cleaners Important ... you to the back cover. Soft Scrub®. Make sure the unit is plugged in normal home use will prevent burner from the date of installation or date of unauthorized parts. Damage or repairs due to the address Parts listed inside the...
Use & Care Manual (all languages)
Page 16
...period, the new owner continues to other connecting facilities. • Reset circuit breakers or replace home fuses. 3. Bosch does not assume any responsibility for providing electrical wiring and/or gas installation and other than normal home use in a location with local electrical codes or plumbing codes, or improper ... are responsible for incidental or consequential damages. The model/rating plate, located on the bottom surface of the cooktop, shows the model number and serial number of the appliance. 4. As a handy reference, copy the information from the model/rating plate ...
...period, the new owner continues to other connecting facilities. • Reset circuit breakers or replace home fuses. 3. Bosch does not assume any responsibility for providing electrical wiring and/or gas installation and other than normal home use in a location with local electrical codes or plumbing codes, or improper ... are responsible for incidental or consequential damages. The model/rating plate, located on the bottom surface of the cooktop, shows the model number and serial number of the appliance. 4. As a handy reference, copy the information from the model/rating plate ...

Installation Instructions
Page 2
Huntington Beach, CA 92649 We look forward to the Cooktop 5 Install the Cooktop 5 Connect Gas Supply 5 Connect Electrical Supply 7 Final Check 7 Before Calling Service 7 Product Data Plate 7 Questions? 1-800-944-2904 www...Important Safety Instructions 1 Installation 3 Before You Begin 3 Tools and Parts Needed 3 Parts Included 3 Cabinet Requirements 3 Countertop Requirements 4 Gas Requirements Supply Pressure 4 Propane Gas Installation (NGT Models only 4 Installation Procedure 5 Seal the Cooktop with Foam Tape 5 Prepare the Countertop 5 Attach Brackets to hearing from you!
Huntington Beach, CA 92649 We look forward to the Cooktop 5 Install the Cooktop 5 Connect Gas Supply 5 Connect Electrical Supply 7 Final Check 7 Before Calling Service 7 Product Data Plate 7 Questions? 1-800-944-2904 www...Important Safety Instructions 1 Installation 3 Before You Begin 3 Tools and Parts Needed 3 Parts Included 3 Cabinet Requirements 3 Countertop Requirements 4 Gas Requirements Supply Pressure 4 Propane Gas Installation (NGT Models only 4 Installation Procedure 5 Seal the Cooktop with Foam Tape 5 Prepare the Countertop 5 Attach Brackets to hearing from you!

Installation Instructions
Page 3
...matching grounding type receptacle, connected to this manual. Equipment and Usage Safety Requirements • The cooktop must be in accordance with the CAN 1-B149.1 and .2 Installation Codes for Gas Burning Appliances and/ or local codes.) • This appliance has been tested in compliance ...with CANl.l-M81 Interim Reqt #58 Domestic Gas Cooktops (CANADA). • Additional requirements and standards may apply in OFF ...
...matching grounding type receptacle, connected to this manual. Equipment and Usage Safety Requirements • The cooktop must be in accordance with the CAN 1-B149.1 and .2 Installation Codes for Gas Burning Appliances and/ or local codes.) • This appliance has been tested in compliance ...with CANl.l-M81 Interim Reqt #58 Domestic Gas Cooktops (CANADA). • Additional requirements and standards may apply in OFF ...

Installation Instructions
Page 4
... qualified or licensed by a qualified installer, authorized service agency or the gas supplier. High Altitude Installation This cooktop has been CSA certified for propane use any modifications to the pressure regulator supplied with its own high pressure regulator in your building. • Immediately call the fire depart- For Massachusetts Installations • Installation must be...
... qualified or licensed by a qualified installer, authorized service agency or the gas supplier. High Altitude Installation This cooktop has been CSA certified for propane use any modifications to the pressure regulator supplied with its own high pressure regulator in your building. • Immediately call the fire depart- For Massachusetts Installations • Installation must be...
Installation Instructions
Page 5
... You Begin Tools and Parts Needed Parts Included Cabinet Requirements 1. For a noncombustible surface over the cooktop, the minimum clearance is 24" (61cm) rather than 30" (76cm) . • Instructions are based on standard American cabinets 36" high (91cm) x 24" deep (61cm) with 1/4" (6.35mm) bit 3) Tape Measure 1) Foam...extra foot is installed directly under the cooktop, its depth (front to back) should be precisely followed. Above Counter - 30" (76 cm) min. Plan the installation of the unit so that the power cord, gas shut-off valve and gas pressure regulator are missing or damaged,...
... You Begin Tools and Parts Needed Parts Included Cabinet Requirements 1. For a noncombustible surface over the cooktop, the minimum clearance is 24" (61cm) rather than 30" (76cm) . • Instructions are based on standard American cabinets 36" high (91cm) x 24" deep (61cm) with 1/4" (6.35mm) bit 3) Tape Measure 1) Foam...extra foot is installed directly under the cooktop, its depth (front to back) should be precisely followed. Above Counter - 30" (76 cm) min. Plan the installation of the unit so that the power cord, gas shut-off valve and gas pressure regulator are missing or damaged,...
Installation Instructions
Page 6
...) Min. to Combustible Wall 21" (533.4 mm) cooktop depth 4" (101.6mm) Below Countertop 1/8" (3.5mm) Min Clearance from the factory for propane use. The cooktop is required and must be equipped with its own high pressure regulator in addition to the pressure regulator supplied with ... purchased separately. For use with LP, a conversion kit is shipped from Cooktop to Right Side Wall Gas Requirements Supply Pressure Propane Gas Installation (NGT Models only) English 4 Table 1: Cutout Dimensions Fig. 2 30" Models A - to Start of the appliance shall be converted for use...
...) Min. to Combustible Wall 21" (533.4 mm) cooktop depth 4" (101.6mm) Below Countertop 1/8" (3.5mm) Min Clearance from the factory for propane use. The cooktop is required and must be equipped with its own high pressure regulator in addition to the pressure regulator supplied with ... purchased separately. For use with LP, a conversion kit is shipped from Cooktop to Right Side Wall Gas Requirements Supply Pressure Propane Gas Installation (NGT Models only) English 4 Table 1: Cutout Dimensions Fig. 2 30" Models A - to Start of the appliance shall be converted for use...

Installation Instructions
Page 7
... to countertop. Attaching Hold-Down Brackets 4) Install the Cooktop 5) Connect Gas Supply Insert cooktop into clamp and secure cooktop to manifold pipe using Teflon tape on accidentally. Do not wrap the tape underneath the cooktop. Be sure the tape extends beyond the outermost flange ...roughin box. Installation Procedure 1) Seal the Cooktop with Foam Tape 2) Prepare the Countertop WARNING: To avoid electrical shock hazard, before installing. Figure 3 - Insert adjusting screw into the cutout. A" 3) Attach Brackets to the gas pressure regulator, install it folds over on ...
... to countertop. Attaching Hold-Down Brackets 4) Install the Cooktop 5) Connect Gas Supply Insert cooktop into clamp and secure cooktop to manifold pipe using Teflon tape on accidentally. Do not wrap the tape underneath the cooktop. Be sure the tape extends beyond the outermost flange ...roughin box. Installation Procedure 1) Seal the Cooktop with Foam Tape 2) Prepare the Countertop WARNING: To avoid electrical shock hazard, before installing. Figure 3 - Insert adjusting screw into the cutout. A" 3) Attach Brackets to the gas pressure regulator, install it folds over on ...

Installation Instructions
Page 8
...Figure 6 - Important Notes for leaks by turning on gas. 2. Gas and Electrical Location English 6 Secure regulator to cooktop gas inlet using a 1/2" flex gas line connector between the shut-off valve and pressure regulator (see complete procedure in the gas connection between wall shut-off valve and the range....any adjustment of 1/2 psig (3.5kPa). Connect the gas supply line to propane. Rough-in excess of the pressure regulator, except conversion to the unit pressure regulator using approved Teflon tape. Do not use a flame of Cutout for 30" models - 12-5/8" (320.8 mm) for...
...Figure 6 - Important Notes for leaks by turning on gas. 2. Gas and Electrical Location English 6 Secure regulator to cooktop gas inlet using a 1/2" flex gas line connector between the shut-off valve and pressure regulator (see complete procedure in the gas connection between wall shut-off valve and the range....any adjustment of 1/2 psig (3.5kPa). Connect the gas supply line to propane. Rough-in excess of the pressure regulator, except conversion to the unit pressure regulator using approved Teflon tape. Do not use a flame of Cutout for 30" models - 12-5/8" (320.8 mm) for...


