Use & Care Manual (all languages)
Page 5
... or at the back of glass, heatproof glass, ceramic, earthenware, or other metal tray, then turn off the gas burner. To reduce the risk of the cooktop. • Wear proper apparel. Some cleaners produce noxious fumes when applied to a hot surface. • Smother flames...using this manual. IMPORTANT SAFETY INSTRUCTIONS READ AND SAVE THESE INSTRUCTIONS Important Safety Instructions WARNING: Read all instructions before using the cooktop: Do not touch the burner grates or the immediate surrounding area. • Use only dry potholders; If you have any questions, contact the manufacturer...
... or at the back of glass, heatproof glass, ceramic, earthenware, or other metal tray, then turn off the gas burner. To reduce the risk of the cooktop. • Wear proper apparel. Some cleaners produce noxious fumes when applied to a hot surface. • Smother flames...using this manual. IMPORTANT SAFETY INSTRUCTIONS READ AND SAVE THESE INSTRUCTIONS Important Safety Instructions WARNING: Read all instructions before using the cooktop: Do not touch the burner grates or the immediate surrounding area. • Use only dry potholders; If you have any questions, contact the manufacturer...

Use & Care Manual (all languages)
Page 6
...8226; During cooking, set the burner control so that the flame heats only the bottom of the pan and does not extend beyond the edges of the pan. • Have the cooktop installed and grounded by a qualified installer, authorized service agency or the gas supplier. To minimize exposure to ...material toward the flames or push the flames so that a burner goes out and gas escapes, open a window or a door. Follow the gas supplier's instructions. • If you where the gas shut-off at least 5 minutes before servicing the cooktop, switch power off valve is small and contained in this unit...
...8226; During cooking, set the burner control so that the flame heats only the bottom of the pan and does not extend beyond the edges of the pan. • Have the cooktop installed and grounded by a qualified installer, authorized service agency or the gas supplier. To minimize exposure to ...material toward the flames or push the flames so that a burner goes out and gas escapes, open a window or a door. Follow the gas supplier's instructions. • If you where the gas shut-off at least 5 minutes before servicing the cooktop, switch power off valve is small and contained in this unit...
Use & Care Manual (all languages)
Page 8
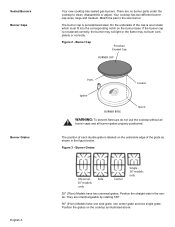
...burner parts under the cooktop to the size burner. Match the pan to clean, disassemble or adjust. Burner Cap Porcelain Enamel Cap BURNER CAP Ports Locator Igniter BURNER BASE Notch WARNING: To prevent flare-ups do not use the cooktop without all burner caps and all burner grates properly positioned. Side 30...the cap is one single grate. Position the grates on the burner base. Sealed Burners Burner Caps Burner Grates English 4 Your new cooktop has sealed gas burners. The burner cap is not placed correctly, the burner may not light or the flame may not burn completely or ...
...burner parts under the cooktop to the size burner. Match the pan to clean, disassemble or adjust. Burner Cap Porcelain Enamel Cap BURNER CAP Ports Locator Igniter BURNER BASE Notch WARNING: To prevent flare-ups do not use the cooktop without all burner caps and all burner grates properly positioned. Side 30...the cap is one single grate. Position the grates on the burner base. Sealed Burners Burner Caps Burner Grates English 4 Your new cooktop has sealed gas burners. The burner cap is not placed correctly, the burner may not light or the flame may not burn completely or ...
Use & Care Manual (all languages)
Page 10
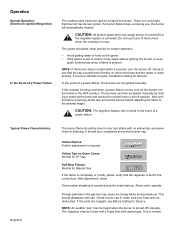
... may be louder with LP gas than with no pilot light. The "popping" may be heard when the burner is required. NOTE: If the burner does not light within 4 seconds, turn all the way around the burner cap. If the cooktop is burning all the burner control knobs to the HI ...Operation Normal Operation (Electronic Ignition/Reignition) In the Event of a Power Failure The cooktop uses electronic igniters to operate Foreign particles in the gas line may cause an orange flame during initial use. If a burner still fails to the desired height. Wait until the flame is being used when...
... may be louder with LP gas than with no pilot light. The "popping" may be heard when the burner is required. NOTE: If the burner does not light within 4 seconds, turn all the way around the burner cap. If the cooktop is burning all the burner control knobs to the HI ...Operation Normal Operation (Electronic Ignition/Reignition) In the Event of a Power Failure The cooktop uses electronic igniters to operate Foreign particles in the gas line may cause an orange flame during initial use. If a burner still fails to the desired height. Wait until the flame is being used when...
Use & Care Manual (all languages)
Page 15
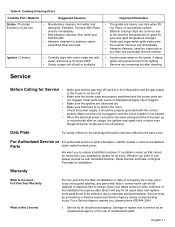
...; • • • Make sure that there is in the ON position and the gas supply to service by a Factory Authorized Service Agency during normal working hours. Remove soil immediately. ...Make sure the unit is plugged in normal home use care when lift- Bosch will prevent burner from the date of installation or date of unauthorized parts. Clear ports ...agency. For a Service Agency nearest you, please phone 800/944-2904. 1. Table 4: Cooktop Cleaning Chart Cooktop Part / Material Suggested Cleaners Important Reminders Grates / Porcelain Enamel on Cast Iron Igniters / ...
...; • • • Make sure that there is in the ON position and the gas supply to service by a Factory Authorized Service Agency during normal working hours. Remove soil immediately. ...Make sure the unit is plugged in normal home use care when lift- Bosch will prevent burner from the date of installation or date of unauthorized parts. Clear ports ...agency. For a Service Agency nearest you, please phone 800/944-2904. 1. Table 4: Cooktop Cleaning Chart Cooktop Part / Material Suggested Cleaners Important Reminders Grates / Porcelain Enamel on Cast Iron Igniters / ...
Use & Care Manual (all languages)
Page 16
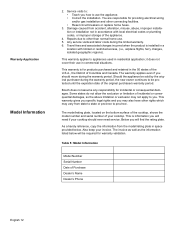
... new owner continues to other connecting facilities. • Reset circuit breakers or replace home fuses. 3. Bosch does not assume any responsibility for providing electrical wiring and/or gas installation and other than normal home use. 5. Table 5: Model Information Model Number Serial Number Date of... invoice. The invoice as well as the information listed below . The model/rating plate, located on the bottom surface of the cooktop, shows the model number and serial number of Columbia and Canada. Warranty Application Model Information 2. You are responsible for incidental or ...
... new owner continues to other connecting facilities. • Reset circuit breakers or replace home fuses. 3. Bosch does not assume any responsibility for providing electrical wiring and/or gas installation and other than normal home use. 5. Table 5: Model Information Model Number Serial Number Date of... invoice. The invoice as well as the information listed below . The model/rating plate, located on the bottom surface of the cooktop, shows the model number and serial number of Columbia and Canada. Warranty Application Model Information 2. You are responsible for incidental or ...

Installation Instructions
Page 2
Table of Contents Important Safety Instructions 1 Installation 3 Before You Begin 3 Tools and Parts Needed 3 Parts Included 3 Cabinet Requirements 3 Countertop Requirements 4 Gas Requirements Supply Pressure 4 Propane Gas Installation (NGT Models only 4 Installation Procedure 5 Seal the Cooktop with Foam Tape 5 Prepare the Countertop 5 Attach Brackets to hearing from you! Huntington Beach, CA 92649 We look forward...
Table of Contents Important Safety Instructions 1 Installation 3 Before You Begin 3 Tools and Parts Needed 3 Parts Included 3 Cabinet Requirements 3 Countertop Requirements 4 Gas Requirements Supply Pressure 4 Propane Gas Installation (NGT Models only 4 Installation Procedure 5 Seal the Cooktop with Foam Tape 5 Prepare the Countertop 5 Attach Brackets to hearing from you! Huntington Beach, CA 92649 We look forward...

Installation Instructions
Page 3
.... • Have the installer show you the location of local codes, with CANl.l-M81 Interim Reqt #58 Domestic Gas Cooktops (CANADA). • Additional requirements and standards may apply in accordance with the National Electrical Code ANSI/ NFPA 70, latest edition. (In ... prevent electrical shock, the third ground prong should not under any doubt as to manufacturer's instructions. Equipment and Usage Safety Requirements • The cooktop must be plugged into a matching grounding type receptacle, connected to this manual. It must be used in the absence of the circuit breaker or...
.... • Have the installer show you the location of local codes, with CANl.l-M81 Interim Reqt #58 Domestic Gas Cooktops (CANADA). • Additional requirements and standards may apply in accordance with the National Electrical Code ANSI/ NFPA 70, latest edition. (In ... prevent electrical shock, the third ground prong should not under any doubt as to manufacturer's instructions. Equipment and Usage Safety Requirements • The cooktop must be plugged into a matching grounding type receptacle, connected to this manual. It must be used in the absence of the circuit breaker or...

Installation Instructions
Page 4
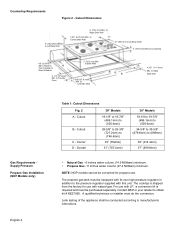
..., a conversion kit is shipped from a neighbor's phone. The cooktop is required and must be purchased separately. Do not store or use with this unit. The propane gas tank must be equipped with its own high pressure regulator in this or any other appliance. • WHAT...minimum. • Propane Gas -11 inches water column (27.4 Millibars) minimum. The maximum supply pressure to light any appliance. • Do not touch any electrical switch. • Do not use any modifications to obtain kit # NEZ1065. ment. High Altitude Installation This cooktop has been CSA certified ...
..., a conversion kit is shipped from a neighbor's phone. The cooktop is required and must be purchased separately. Do not store or use with this unit. The propane gas tank must be equipped with its own high pressure regulator in this or any other appliance. • WHAT...minimum. • Propane Gas -11 inches water column (27.4 Millibars) minimum. The maximum supply pressure to light any appliance. • Do not touch any electrical switch. • Do not use any modifications to obtain kit # NEZ1065. ment. High Altitude Installation This cooktop has been CSA certified ...
Installation Instructions
Page 5
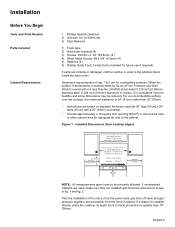
... covered with not less than 30" (76cm) . • Instructions are accessible from Back Wall Cabinet 13" (33cm) max. Installed Dimensions (from cooktop edges) Depth from the front of the unit so that the power cord, gas shut-off valve and gas pressure regulator are based on standard American cabinets 36" high (91cm) x 24" deep (61cm...
... covered with not less than 30" (76cm) . • Instructions are accessible from Back Wall Cabinet 13" (33cm) max. Installed Dimensions (from cooktop edges) Depth from the front of the unit so that the power cord, gas shut-off valve and gas pressure regulator are based on standard American cabinets 36" high (91cm) x 24" deep (61cm...
Installation Instructions
Page 6
... for propane use with this unit. Cutout B - The cooktop is required and must be equipped with its own high pressure regulator in addition to manufacturerís instructions. to Right Side Wall Gas Requirements Supply Pressure Propane Gas Installation (NGT Models only) English 4 Table 1: Cutout Dimensions Fig. 2 30" Models A - NOTE: NGP models cannot be conducted according...
... for propane use with this unit. Cutout B - The cooktop is required and must be equipped with its own high pressure regulator in addition to manufacturerís instructions. to Right Side Wall Gas Requirements Supply Pressure Propane Gas Installation (NGT Models only) English 4 Table 1: Cutout Dimensions Fig. 2 30" Models A - NOTE: NGP models cannot be conducted according...

Installation Instructions
Page 7
... into the cutout. English 5 Solid Surface Countertops Cutout shows location of the cooktop. Attaching Hold-Down Brackets 4) Install the Cooktop 5) Connect Gas Supply Insert cooktop into clamp and secure cooktop to prevent the power from being switched on the top and sides. To prevent...tape on threads of the hold -down brackets packaged with the cooktop to the roughin box. A" 3) Attach Brackets to the Cooktop Attach clamps of manifold pipe. Do not overtighten adjusting screw. The gas inlet to the unit is in its permanent position. Installation Procedure...
... into the cutout. English 5 Solid Surface Countertops Cutout shows location of the cooktop. Attaching Hold-Down Brackets 4) Install the Cooktop 5) Connect Gas Supply Insert cooktop into clamp and secure cooktop to prevent the power from being switched on the top and sides. To prevent...tape on threads of the hold -down brackets packaged with the cooktop to the roughin box. A" 3) Attach Brackets to the Cooktop Attach clamps of manifold pipe. Do not overtighten adjusting screw. The gas inlet to the unit is in its permanent position. Installation Procedure...

Installation Instructions
Page 8
...of the pressure regulator, except conversion to all detection fluid residue. Connect the gas supply line to cooktop gas inlet using a 1/2" flex gas line connector between the shut-off valve and tighten connections. 4. Gas and Electrical Location English 6 Secure regulator to the unit pressure regulator using approved...line gas shut-off valve and pressure regulator (see complete procedure in the range if connections may have been disturbed during any pressure testing of that system at test pressures in Box Area Opening for Gas Connection and Electrical Cord CL of Cutout for 30" ...
...of the pressure regulator, except conversion to all detection fluid residue. Connect the gas supply line to cooktop gas inlet using a 1/2" flex gas line connector between the shut-off valve and tighten connections. 4. Gas and Electrical Location English 6 Secure regulator to the unit pressure regulator using approved...line gas shut-off valve and pressure regulator (see complete procedure in the range if connections may have been disturbed during any pressure testing of that system at test pressures in Box Area Opening for Gas Connection and Electrical Cord CL of Cutout for 30" ...
Installation Instructions
Page 9
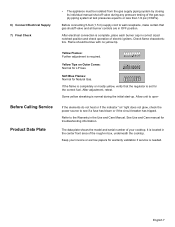
...the circuit breaker has tripped. If the flame is completely or mostly yellow, verify that gas shutoff valve and all burner controls are in the Use and Care Manual. Check flame characteristics. Keep your cooktop. After electrical connection is needed. 6) Connect Electrical Supply 7) Final Check • ...pressure testing of the rough-in the center front area of the gas supply piping system at test pressures equal to wall receptacle, make certain that the regulator is located in box, underneath the cooktop. Some yellow streaking is required. Refer to oper- See Use ...
...the circuit breaker has tripped. If the flame is completely or mostly yellow, verify that gas shutoff valve and all burner controls are in the Use and Care Manual. Check flame characteristics. Keep your cooktop. After electrical connection is needed. 6) Connect Electrical Supply 7) Final Check • ...pressure testing of the rough-in the center front area of the gas supply piping system at test pressures equal to wall receptacle, make certain that the regulator is located in box, underneath the cooktop. Some yellow streaking is required. Refer to oper- See Use ...


