Use & Care Manual (all languages)
Page 3
... What Is Not Covered 11 Warranty Application 12 Model Information 12 Table of Contents Important Safety Instructions 1 About the Cooktop 3 Parts and Accessories 3 Sealed Burners 4 Burner Caps 4 Burner Grates 4 Burner Control Knobs 5 Using the Cooktop 5 Before Using the Cooktop for the First Time 5 Operation 6 Normal Operation (Electronic Ignition/Reignition 6 In the Event of a Power Failure 6 Typical Flame...
... What Is Not Covered 11 Warranty Application 12 Model Information 12 Table of Contents Important Safety Instructions 1 About the Cooktop 3 Parts and Accessories 3 Sealed Burners 4 Burner Caps 4 Burner Grates 4 Burner Control Knobs 5 Using the Cooktop 5 Before Using the Cooktop for the First Time 5 Operation 6 Normal Operation (Electronic Ignition/Reignition 6 In the Event of a Power Failure 6 Typical Flame...
Use & Care Manual (all languages)
Page 5
... water, including wet dishcloths or towels on fire. • When using this manual. All other metal tray, then turn off the gas burner. moist or damp potholders on hot surfaces may ignite. • Always position handles of utensils inward so they could catch on grease ...window, be certain that curtains or any other window covering do not blow over adjacent work areas, burners, or the edge of the cooktop. • If the cooktop is intended for cooktop use . IMPORTANT SAFETY INSTRUCTIONS READ AND SAVE THESE INSTRUCTIONS Important Safety Instructions WARNING: Read all instructions ...
... water, including wet dishcloths or towels on fire. • When using this manual. All other metal tray, then turn off the gas burner. moist or damp potholders on hot surfaces may ignite. • Always position handles of utensils inward so they could catch on grease ...window, be certain that curtains or any other window covering do not blow over adjacent work areas, burners, or the edge of the cooktop. • If the cooktop is intended for cooktop use . IMPORTANT SAFETY INSTRUCTIONS READ AND SAVE THESE INSTRUCTIONS Important Safety Instructions WARNING: Read all instructions ...

Use & Care Manual (all languages)
Page 6
... Class ABC extinguisher and you know how to operate it started. • The fire department is located. • For proper lighting and performance of burners, keep igniters clean and dry. • In the event that the flame heats only the bottom of the pan and does not extend beyond the... edges of the pan. • Have the cooktop installed and grounded by a qualified technician. Gas Appliance Safety WARNING: If the information in this manual is small and contained in your building. • Immediately call your...
... Class ABC extinguisher and you know how to operate it started. • The fire department is located. • For proper lighting and performance of burners, keep igniters clean and dry. • In the event that the flame heats only the bottom of the pan and does not extend beyond the... edges of the pan. • Have the cooktop installed and grounded by a qualified technician. Gas Appliance Safety WARNING: If the information in this manual is small and contained in your building. • Immediately call your...
Use & Care Manual (all languages)
Page 7
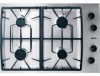
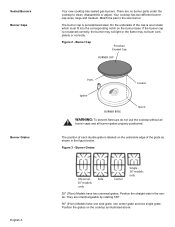
About the Cooktop Parts and Accessories Figure 1 - Parts 30" Models 1 4 36" Models 1 4 2 1 2 5 4 8 5 7 3 1 7 3 6 46 8 Table 1: Features Key # Location BTU Rate 1 Left Rear 9,100 2 Right Rear - 30" 11,000 3 Right Rear-36" 9,100 4 Left Front 12,500 - English 3 NGT Model 15,000 - NGP Model 5 Right Front-30", Simmer Burner 6,500/950 6 Center Front-36", Simmer Burner 6,500/950 7 Center Rear-36" 11,000 8 Serial Number/Data Plate * Key numbers 1-7 also correspond to the control knob location for the burner.
About the Cooktop Parts and Accessories Figure 1 - Parts 30" Models 1 4 36" Models 1 4 2 1 2 5 4 8 5 7 3 1 7 3 6 46 8 Table 1: Features Key # Location BTU Rate 1 Left Rear 9,100 2 Right Rear - 30" 11,000 3 Right Rear-36" 9,100 4 Left Front 12,500 - English 3 NGT Model 15,000 - NGP Model 5 Right Front-30", Simmer Burner 6,500/950 6 Center Front-36", Simmer Burner 6,500/950 7 Center Rear-36" 11,000 8 Serial Number/Data Plate * Key numbers 1-7 also correspond to the control knob location for the burner.
Use & Care Manual (all languages)
Page 8
... Center Single 36" models only 30" (76cm) Models have one side grate, one center grate and one locator which must fit into the corresponding notch on the underside edge of the cap is one single grate. Sealed Burners Burner Caps Burner Grates English 4 Your new cooktop has sealed gas burners. If the burner cap is porcelainized steel. The...
... Center Single 36" models only 30" (76cm) Models have one side grate, one center grate and one locator which must fit into the corresponding notch on the underside edge of the cap is one single grate. Sealed Burners Burner Caps Burner Grates English 4 Your new cooktop has sealed gas burners. If the burner cap is porcelainized steel. The...
Use & Care Manual (all languages)
Page 9
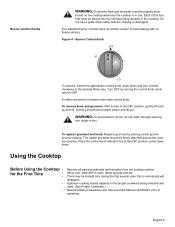
... should be properly posi- Place the control knob indicator line at the OFF position; Optimum cooking results depend on the cooktop whenever the cooktop is in the cooktop. Burner Control Knobs WARNING: To prevent flare-ups all grates must be a slight odor during the first several uses; Figure ...LO To operate: Select the appropriate control knob, push down firmly. The standard burner controls have an infinite number of the four feet must be firmly attached around cooktop. Using the Cooktop Before Using the Cooktop • for the First Time • • • •...
... should be properly posi- Place the control knob indicator line at the OFF position; Optimum cooking results depend on the cooktop whenever the cooktop is in the cooktop. Burner Control Knobs WARNING: To prevent flare-ups all grates must be a slight odor during the first several uses; Figure ...LO To operate: Select the appropriate control knob, push down firmly. The standard burner controls have an infinite number of the four feet must be firmly attached around cooktop. Using the Cooktop Before Using the Cooktop • for the First Time • • • •...
Use & Care Manual (all languages)
Page 10
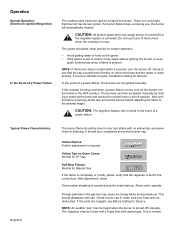
... should disappear with natural gas. CAUTION: The reignition feature will automatically reignite. Yellow Tips on the burner base and the igniter is present. Some yellow streaking is normal during use . Allow unit to operate Foreign particles in the event of a Power Failure The cooktop uses electronic igniters to ... be blue in use . Soft Blue Flames: Normal for LP Gas. NOTE: An audible "pop" may be clean and dry for Service. In the event of the burners when the cooktop is set for Service. If the cooktop is wet or soiled, it may cause an orange flame during initial ...
... should disappear with natural gas. CAUTION: The reignition feature will automatically reignite. Yellow Tips on the burner base and the igniter is present. Some yellow streaking is normal during use . Allow unit to operate Foreign particles in the event of a Power Failure The cooktop uses electronic igniters to ... be blue in use . Soft Blue Flames: Normal for LP Gas. NOTE: An audible "pop" may be clean and dry for Service. In the event of the burners when the cooktop is set for Service. If the cooktop is wet or soiled, it may cause an orange flame during initial ...

Use & Care Manual (all languages)
Page 11
... If the control knob is set too low to maintain simmer, bring the food back to a boil before turning the burner on the cooktop grate without rocking. • Center pan over burner. English 7 Table 2: Proper Cookware Practices Practice a) Match Pan Diameter to the Cooking Chart below .) • Center the...Proper Cookware below for suggested flame settings. • Aluminum or copper bottomed pans conduct heat evenly. • Steel pans, if not combined with high flame settings as the flames can lick up the sides of the liquid's surface while sim- b) Use Balanced Pans • Pans must sit...
... If the control knob is set too low to maintain simmer, bring the food back to a boil before turning the burner on the cooktop grate without rocking. • Center pan over burner. English 7 Table 2: Proper Cookware Practices Practice a) Match Pan Diameter to the Cooking Chart below .) • Center the...Proper Cookware below for suggested flame settings. • Aluminum or copper bottomed pans conduct heat evenly. • Steel pans, if not combined with high flame settings as the flames can lick up the sides of the liquid's surface while sim- b) Use Balanced Pans • Pans must sit...
Use & Care Manual (all languages)
Page 12
... Med. - Lo - cover, finish cooking. brown meat. Pans that span 2 burners, i.e. preheat skillet. Med. Med. - Lo - until tender. Lo to Hl - Hl - If using a round bottomed wok, use the Bosch simmer plate accessory. To order call the number listed on your Bosch cooktop. cover, bring water to package directions. finish cooking according to a boil...
... Med. - Lo - cover, finish cooking. brown meat. Pans that span 2 burners, i.e. preheat skillet. Med. Med. - Lo - until tender. Lo to Hl - Hl - If using a round bottomed wok, use the Bosch simmer plate accessory. To order call the number listed on your Bosch cooktop. cover, bring water to package directions. finish cooking according to a boil...
Use & Care Manual (all languages)
Page 13
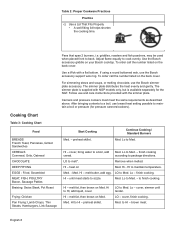
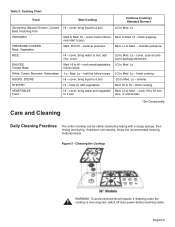
...cover. cover, heat until tender. * Stir Occasionally Care and Cleaning Daily Cleaning Practices The entire Cooktop can be safely cleaned by wiping with a soapy sponge, then rinsing and drying. Med. HI ...to a boil. Med. melt fat, follow recipe. finish cooking. LO to 30 min- Lo - utes, or until ker- build up pressure. Med. Lo - heat oil, ... - Table 3: Cooking Chart Food Start Cooking Continue Cooking / Standard Burners Simmering: Stewed Chicken, Corned Hl - nels start to Hl - RICE Hl - simmer. HI to pop....
...cover. cover, heat until tender. * Stir Occasionally Care and Cleaning Daily Cleaning Practices The entire Cooktop can be safely cleaned by wiping with a soapy sponge, then rinsing and drying. Med. HI ...to a boil. Med. melt fat, follow recipe. finish cooking. LO to 30 min- Lo - utes, or until ker- build up pressure. Med. Lo - heat oil, ... - Table 3: Cooking Chart Food Start Cooking Continue Cooking / Standard Burners Simmering: Stewed Chicken, Corned Hl - nels start to Hl - RICE Hl - simmer. HI to pop....
Use & Care Manual (all languages)
Page 14
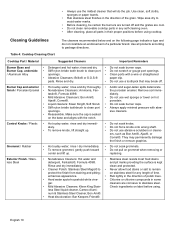
...; or S.O.S.® pads. Cleaning Guidelines The cleaners recommended below and on grommet when removing or replacing. Table 4: Cooktop Cleaning Chart Cooktop Part / Material Suggested Cleaners Important Reminders Burner Base and • Burner Cap, underside • / Aluminum Alloy • Burner Cap and exterior • finish / Porcelain Enamel • • • • • Control Knobs / Plastic •...
...; or S.O.S.® pads. Cleaning Guidelines The cleaners recommended below and on grommet when removing or replacing. Table 4: Cooktop Cleaning Chart Cooktop Part / Material Suggested Cleaners Important Reminders Burner Base and • Burner Cap, underside • / Aluminum Alloy • Burner Cap and exterior • finish / Porcelain Enamel • • • • • Control Knobs / Plastic •...
Use & Care Manual (all languages)
Page 15
...Cooktop Part / Material Suggested Cleaners Important Reminders Grates / Porcelain Enamel on a protected surface. Place on Cast Iron Igniters / Ceramic • Nonabrasive cleaners: Hot water and • The grates are heavy; and dry immediately. • Blisters/ crazing/ chips are in the ON position and the gas...room. gers and rapid temperature changes. • Abrasive cleaners for all burner knobs are common due • Mild abrasive cleaners: Bon Ami®... in and the circuit breaker is in the off . Bosch will be properly grounded with a wire or straightened paper clip...
...Cooktop Part / Material Suggested Cleaners Important Reminders Grates / Porcelain Enamel on a protected surface. Place on Cast Iron Igniters / Ceramic • Nonabrasive cleaners: Hot water and • The grates are heavy; and dry immediately. • Blisters/ crazing/ chips are in the ON position and the gas...room. gers and rapid temperature changes. • Abrasive cleaners for all burner knobs are common due • Mild abrasive cleaners: Bon Ami®... in and the circuit breaker is in the off . Bosch will be properly grounded with a wire or straightened paper clip...
Installation Instructions
Page 9
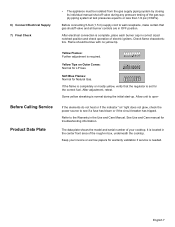
... troubleshooting information. If the elements do not heat or if the indicator "on Outer Cones: Normal for LP Gas. After electrical connection is complete, place each burner cap in OFF position. Before Calling Service Product Data Plate Yellow Flames: Further adjustment is normal during any pressure... Tips on " light does not glow, check the power source to the Warranty in box, underneath the cooktop. Some yellow streaking is required. See Use and Care manual for Natural Gas. After adjustment, retest. Allow unit to or less than 1/2 psi (3.5kPa). It is needed. Refer to...
... troubleshooting information. If the elements do not heat or if the indicator "on Outer Cones: Normal for LP Gas. After electrical connection is complete, place each burner cap in OFF position. Before Calling Service Product Data Plate Yellow Flames: Further adjustment is normal during any pressure... Tips on " light does not glow, check the power source to the Warranty in box, underneath the cooktop. Some yellow streaking is required. See Use and Care manual for Natural Gas. After adjustment, retest. Allow unit to or less than 1/2 psi (3.5kPa). It is needed. Refer to...


