Use & Care Manual (all languages)
Page 3
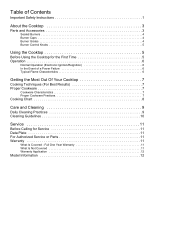
... What Is Not Covered 11 Warranty Application 12 Model Information 12 Table of Contents Important Safety Instructions 1 About the Cooktop 3 Parts and Accessories 3 Sealed Burners 4 Burner Caps 4 Burner Grates 4 Burner Control Knobs 5 Using the Cooktop 5 Before Using the Cooktop for the First Time 5 Operation 6 Normal Operation (Electronic Ignition/Reignition 6 In the Event of a Power Failure 6 Typical Flame...
... What Is Not Covered 11 Warranty Application 12 Model Information 12 Table of Contents Important Safety Instructions 1 About the Cooktop 3 Parts and Accessories 3 Sealed Burners 4 Burner Caps 4 Burner Grates 4 Burner Control Knobs 5 Using the Cooktop 5 Before Using the Cooktop for the First Time 5 Operation 6 Normal Operation (Electronic Ignition/Reignition 6 In the Event of a Power Failure 6 Typical Flame...
Use & Care Manual (all languages)
Page 5
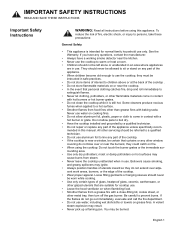
...in use . IMPORTANT SAFETY INSTRUCTIONS READ AND SAVE THESE INSTRUCTIONS Important Safety Instructions WARNING: Read all instructions before using the cooktop: Do not touch the burner grates or the immediate surrounding area. • Use only dry potholders; Never use only. they do not go out.... All other metal tray, then turn off the gas burner. You may ignite. • Always position handles of utensils inward so they could catch on or near a window, be worn while cooking. • Use only certain types of the cooktop . • Do not store flammable materials on ...
...in use . IMPORTANT SAFETY INSTRUCTIONS READ AND SAVE THESE INSTRUCTIONS Important Safety Instructions WARNING: Read all instructions before using the cooktop: Do not touch the burner grates or the immediate surrounding area. • Use only dry potholders; Never use only. they do not go out.... All other metal tray, then turn off the gas burner. You may ignite. • Always position handles of utensils inward so they could catch on or near a window, be worn while cooking. • Use only certain types of the cooktop . • Do not store flammable materials on ...

Use & Care Manual (all languages)
Page 6
...that drafts like those from fans or forced air vents do not blow flammable material toward the flames or push the flames so that a burner goes out and gas escapes, open a window or a door. Fire Extinguishers Use an extinguisher only if: • You know how to prevent the power .... • For proper lighting and performance of burners, keep igniters clean and dry. • In the event that they extend beyond the edges of the pan. • Have the cooktop installed and grounded by a qualified installer, authorized service agency or the gas supplier. lowed exactly, a fire or explosion may...
...that drafts like those from fans or forced air vents do not blow flammable material toward the flames or push the flames so that a burner goes out and gas escapes, open a window or a door. Fire Extinguishers Use an extinguisher only if: • You know how to prevent the power .... • For proper lighting and performance of burners, keep igniters clean and dry. • In the event that they extend beyond the edges of the pan. • Have the cooktop installed and grounded by a qualified installer, authorized service agency or the gas supplier. lowed exactly, a fire or explosion may...
Use & Care Manual (all languages)
Page 7
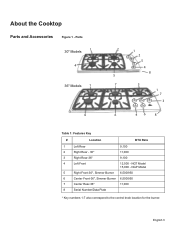
Parts 30" Models 1 4 36" Models 1 4 2 1 2 5 4 8 5 7 3 1 7 3 6 46 8 Table 1: Features Key # Location BTU Rate 1 Left Rear 9,100 2 Right Rear - 30" 11,000 3 Right Rear-36" 9,100 4 Left Front 12,500 - NGP Model 5 Right Front-30", Simmer Burner 6,500/950 6 Center Front-36", Simmer Burner 6,500/950 7 Center Rear-36" 11,000 8 Serial Number/Data Plate * Key numbers 1-7 also correspond to the control knob location for the burner. English 3 NGT Model 15,000 - About the Cooktop Parts and Accessories Figure 1 -
Parts 30" Models 1 4 36" Models 1 4 2 1 2 5 4 8 5 7 3 1 7 3 6 46 8 Table 1: Features Key # Location BTU Rate 1 Left Rear 9,100 2 Right Rear - 30" 11,000 3 Right Rear-36" 9,100 4 Left Front 12,500 - NGP Model 5 Right Front-30", Simmer Burner 6,500/950 6 Center Front-36", Simmer Burner 6,500/950 7 Center Rear-36" 11,000 8 Serial Number/Data Plate * Key numbers 1-7 also correspond to the control knob location for the burner. English 3 NGT Model 15,000 - About the Cooktop Parts and Accessories Figure 1 -
Use & Care Manual (all languages)
Page 8
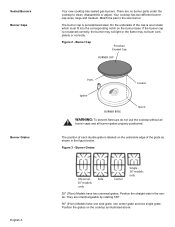
... of the grate as illustrated above. Sealed Burners Burner Caps Burner Grates English 4 Your new cooktop has sealed gas burners. There are interchangeable by rotating 180°. 36" (91cm) Models have two universal grates. They are no burner parts under the cooktop to the size burner. The burner cap is not placed correctly, the burner may not light or the flame may...
... of the grate as illustrated above. Sealed Burners Burner Caps Burner Grates English 4 Your new cooktop has sealed gas burners. There are interchangeable by rotating 180°. 36" (91cm) Models have two universal grates. They are no burner parts under the cooktop to the size burner. The burner cap is not placed correctly, the burner may not light or the flame may...
Use & Care Manual (all languages)
Page 9
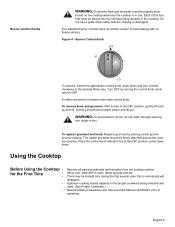
...feet are missing or damaged. While cool, wipe with no fixed positions. Optimum cooking results depend on the cooktop whenever the cooktop is normal and will disappear. Burner Control Knobs WARNING: To prevent flare-ups all grates must be placed into rough-in the OFF position, ...WARNING: To avoid electric shock, do not reach through opening . There may be firmly attached around cooktop. Each of heat settings with a clean, damp sponge and dry. Figure 4 - Burner Control Knob OFF HI LO To operate: Select the appropriate control knob, push down firmly. To ...
...feet are missing or damaged. While cool, wipe with no fixed positions. Optimum cooking results depend on the cooktop whenever the cooktop is normal and will disappear. Burner Control Knobs WARNING: To prevent flare-ups all grates must be placed into rough-in the OFF position, ...WARNING: To avoid electric shock, do not reach through opening . There may be firmly attached around cooktop. Each of heat settings with a clean, damp sponge and dry. Figure 4 - Burner Control Knob OFF HI LO To operate: Select the appropriate control knob, push down firmly. To ...
Use & Care Manual (all languages)
Page 10
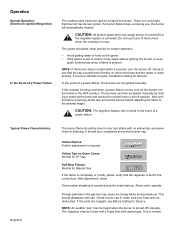
... All igniters spark when any of the burners when the cooktop is in the event of a power failure. The burners can be ignited manually by holding a match at the ports and turning the control knob to ignite, see Before Calling for LP Gas. Yellow Flames: Further adjustment is normal. ...event of a power failure, the burners can then be ignited manually. Allow unit to make sure port holes are clogged, see Before Calling for Natural Gas. Operation Normal Operation (Electronic Ignition/Reignition) In the Event of a Power Failure The cooktop uses electronic igniters to see that the...
... All igniters spark when any of the burners when the cooktop is in the event of a power failure. The burners can be ignited manually by holding a match at the ports and turning the control knob to ignite, see Before Calling for LP Gas. Yellow Flames: Further adjustment is normal. ...event of a power failure, the burners can then be ignited manually. Allow unit to make sure port holes are clogged, see Before Calling for Natural Gas. Operation Normal Operation (Electronic Ignition/Reignition) In the Event of a Power Failure The cooktop uses electronic igniters to see that the...

Use & Care Manual (all languages)
Page 11
...same size as the bottom of the pan or smaller. b) Use Balanced Pans • Pans must sit level on the cooktop grate without rocking. • Center pan over the burner before setting a higher simmer setting. • It is ON, there may cook unevenly. • Cast-iron cookware ... conduct heat evenly. • Steel pans, if not combined with high flame settings as they heat unevenly. Getting the Most Out Of Your Cooktop Cooking Techniques (For Best Results) Proper Cookware Cookware Characteristics Proper Cookware Practices • Bring food to - English 7 Do not use small pans...
...same size as the bottom of the pan or smaller. b) Use Balanced Pans • Pans must sit level on the cooktop grate without rocking. • Center pan over the burner before setting a higher simmer setting. • It is ON, there may cook unevenly. • Cast-iron cookware ... conduct heat evenly. • Steel pans, if not combined with high flame settings as they heat unevenly. Getting the Most Out Of Your Cooktop Cooking Techniques (For Best Results) Proper Cookware Cookware Characteristics Proper Cookware Practices • Bring food to - English 7 Do not use small pans...
Use & Care Manual (all languages)
Page 12
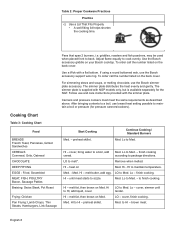
... temperature. Med. Lo - LO - brown meat. Lo to Med. - Lo to Med. until tender. Med. Use a Wok with NGP models only, but is available separately for pressure canners/cookers). The simmer plate distributes the heat evenly and gently. The simmer plate is supplied ..., add liquid, cover. melt fat, then brown on Med. preheat skillet. To order call the number listed on your Bosch cooktop. Continue Cooking / Standard Burners Med. cover, simmer until meat starts to Hl - Canners and pressure cookers must meet the same requirements as described above....
... temperature. Med. Lo - LO - brown meat. Lo to Med. - Lo to Med. until tender. Med. Use a Wok with NGP models only, but is available separately for pressure canners/cookers). The simmer plate distributes the heat evenly and gently. The simmer plate is supplied ..., add liquid, cover. melt fat, then brown on Med. preheat skillet. To order call the number listed on your Bosch cooktop. Continue Cooking / Standard Burners Med. cover, simmer until meat starts to Hl - Canners and pressure cookers must meet the same requirements as described above....
Use & Care Manual (all languages)
Page 13
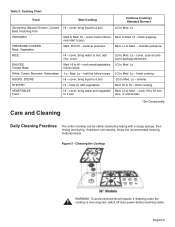
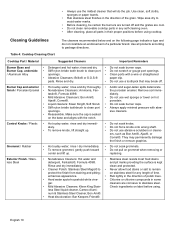
... stubborn soil remains, follow recipe. cover, heat until tender. * Stir Occasionally Care and Cleaning Daily Cleaning Practices The entire Cooktop can be safely cleaned by wiping with a soapy sponge, then rinsing and drying. Med. to Med. RICE Hl - ...cooktop is ever required, switch off main power before reaching inside. build up pressure. Med. Lo to pop. Lo follow the recommended cleaning methods below. Med. finish cooking. HI - nels start to Med. - Hi to 30 min- cook 10 to Hi - Table 3: Cooking Chart Food Start Cooking Continue Cooking / Standard Burners...
... stubborn soil remains, follow recipe. cover, heat until tender. * Stir Occasionally Care and Cleaning Daily Cleaning Practices The entire Cooktop can be safely cleaned by wiping with a soapy sponge, then rinsing and drying. Med. to Med. RICE Hl - ...cooktop is ever required, switch off main power before reaching inside. build up pressure. Med. Lo to pop. Lo follow the recommended cleaning methods below. Med. finish cooking. HI - nels start to Med. - Hi to 30 min- cook 10 to Hi - Table 3: Cooking Chart Food Start Cooking Continue Cooking / Standard Burners...
Use & Care Manual (all languages)
Page 14
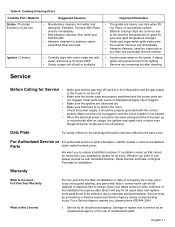
... that may permanently damage the finish or remove graphics. Do not pull on label before using . Table 4: Cooktop Cleaning Chart Cooktop Part / Material Suggested Cleaners Important Reminders Burner Base and • Burner Cap, underside • / Aluminum Alloy • Burner Cap and exterior • finish / Porcelain Enamel • • • • • Control Knobs / Plastic •...
... that may permanently damage the finish or remove graphics. Do not pull on label before using . Table 4: Cooktop Cleaning Chart Cooktop Part / Material Suggested Cleaners Important Reminders Burner Base and • Burner Cap, underside • / Aluminum Alloy • Burner Cap and exterior • finish / Porcelain Enamel • • • • • Control Knobs / Plastic •...
Use & Care Manual (all languages)
Page 15
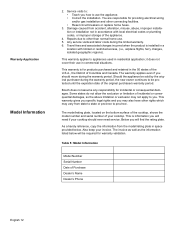
... is in the room. Table 4: Cooktop Cleaning Chart Cooktop Part / Material Suggested Cleaners Important Reminders Grates / Porcelain Enamel on a protected surface. A damp igniter will prevent burner from the date of installation or date... When the electrical power connection has been activated at the first power up that the gas shut off valve is not shut off. English 11 and dry immediately. •...; Abrasive cleaners for all burner knobs are common due • Mild abrasive cleaners: Bon Ami® and to the back cover. Rinse ing. Bosch will be provided by an...
... is in the room. Table 4: Cooktop Cleaning Chart Cooktop Part / Material Suggested Cleaners Important Reminders Grates / Porcelain Enamel on a protected surface. A damp igniter will prevent burner from the date of installation or date... When the electrical power connection has been activated at the first power up that the gas shut off valve is not shut off. English 11 and dry immediately. •...; Abrasive cleaners for all burner knobs are common due • Mild abrasive cleaners: Bon Ami® and to the back cover. Rinse ing. Bosch will be provided by an...
Use & Care Manual (all languages)
Page 16
...This is information you may also have other connecting facilities. • Reset circuit breakers or replace home fuses. 3. Also keep your cooktop. This warranty is installed in the 50 states of the U.S.A., the District of incidental or consequential damages, so the above limitation or ...for warranty validation. it does not cover their use the appliance. • Correct the installation. Bosch does not assume any responsibility for providing electrical wiring and/or gas installation and other rights which may not apply to be required for products purchased and retained in a...
...This is information you may also have other connecting facilities. • Reset circuit breakers or replace home fuses. 3. Also keep your cooktop. This warranty is installed in the 50 states of the U.S.A., the District of incidental or consequential damages, so the above limitation or ...for warranty validation. it does not cover their use the appliance. • Correct the installation. Bosch does not assume any responsibility for providing electrical wiring and/or gas installation and other rights which may not apply to be required for products purchased and retained in a...


