
Use & Care Manual (all languages)
Page 1
Bosch Use and Care Manual: NGT/NGP
Bosch Use and Care Manual: NGT/NGP
Use & Care Manual (all languages)
Page 3
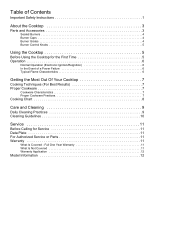
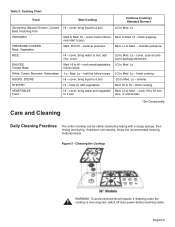
... Safety Instructions 1 About the Cooktop 3 Parts and Accessories 3 Sealed Burners 4 Burner Caps 4 Burner Grates 4 Burner Control Knobs 5 Using the Cooktop 5 Before Using the Cooktop for the First Time 5 Operation 6 Normal Operation (Electronic Ignition/Reignition 6 In the Event of a Power Failure 6 Typical Flame Characteristics 6 Getting the Most Out Of Your Cooktop 7 Cooking Techniques (For Best Results 7 Proper Cookware 7 Cookware Characteristics 7 Proper Cookware Practices 7 Cooking Chart 8 Care and Cleaning 9 Daily Cleaning Practices 9 Cleaning Guidelines 10 Service...
... Safety Instructions 1 About the Cooktop 3 Parts and Accessories 3 Sealed Burners 4 Burner Caps 4 Burner Grates 4 Burner Control Knobs 5 Using the Cooktop 5 Before Using the Cooktop for the First Time 5 Operation 6 Normal Operation (Electronic Ignition/Reignition 6 In the Event of a Power Failure 6 Typical Flame Characteristics 6 Getting the Most Out Of Your Cooktop 7 Cooking Techniques (For Best Results 7 Proper Cookware 7 Cookware Characteristics 7 Proper Cookware Practices 7 Cooking Chart 8 Care and Cleaning 9 Daily Cleaning Practices 9 Cleaning Guidelines 10 Service...
Use & Care Manual (all languages)
Page 5
...; Do not use . • Leave the hood ventilator on fire. • When using this manual. they do not blow over adjacent work areas, burners, or the edge of glass, heatproof glass, ceramic, earthenware, or other window covering do not extend over or near the kitchen. • Never use only. Boilovers cause smoking, and greasy spillovers may result. • Never pick up a flaming pan. English...
...; Do not use . • Leave the hood ventilator on fire. • When using this manual. they do not blow over adjacent work areas, burners, or the edge of glass, heatproof glass, ceramic, earthenware, or other window covering do not extend over or near the kitchen. • Never use only. Boilovers cause smoking, and greasy spillovers may result. • Never pick up a flaming pan. English...

Use & Care Manual (all languages)
Page 6
... not touch any electrical switch. • Do not use any phone in this manual is not fol- Have the installer show you where the gas shut-off at least 5 minutes before servicing the cooktop, switch power off valve is located. • For proper lighting and performance of burners, keep igniters clean and dry. • In the event that the flame heats only the bottom of the pan and does not...
... not touch any electrical switch. • Do not use any phone in this manual is not fol- Have the installer show you where the gas shut-off at least 5 minutes before servicing the cooktop, switch power off valve is located. • For proper lighting and performance of burners, keep igniters clean and dry. • In the event that the flame heats only the bottom of the pan and does not...
Use & Care Manual (all languages)
Page 7
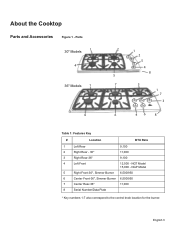
NGP Model 5 Right Front-30", Simmer Burner 6,500/950 6 Center Front-36", Simmer Burner 6,500/950 7 Center Rear-36" 11,000 8 Serial Number/Data Plate * Key numbers 1-7 also correspond to the control knob location for the burner. NGT Model 15,000 - English 3 Parts 30" Models 1 4 36" Models 1 4 2 1 2 5 4 8 5 7 3 1 7 3 6 46 8 Table 1: Features Key # Location BTU Rate 1 Left Rear 9,100 2 Right Rear - 30" 11,000 3 Right Rear-36" 9,100 4 Left Front 12,500 - About the Cooktop Parts and Accessories Figure 1 -
NGP Model 5 Right Front-30", Simmer Burner 6,500/950 6 Center Front-36", Simmer Burner 6,500/950 7 Center Rear-36" 11,000 8 Serial Number/Data Plate * Key numbers 1-7 also correspond to the control knob location for the burner. NGT Model 15,000 - English 3 Parts 30" Models 1 4 36" Models 1 4 2 1 2 5 4 8 5 7 3 1 7 3 6 46 8 Table 1: Features Key # Location BTU Rate 1 Left Rear 9,100 2 Right Rear - 30" 11,000 3 Right Rear-36" 9,100 4 Left Front 12,500 - About the Cooktop Parts and Accessories Figure 1 -
Use & Care Manual (all languages)
Page 8
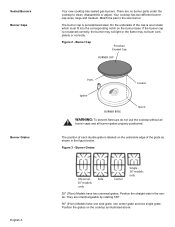
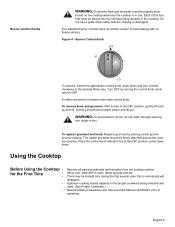
... sealed gas burners. There are interchangeable by rotating 180°. 36" (91cm) Models have two universal grates. If the burner cap is labeled on the underside edge of the grate as illustrated above. They are no burner parts under the cooktop to the size burner. Match the pan to clean, disassemble or adjust. Burner Cap Porcelain Enamel Cap BURNER CAP Ports Locator Igniter BURNER BASE Notch WARNING: To prevent flare-ups do not use the cooktop without all burner caps...
... sealed gas burners. There are interchangeable by rotating 180°. 36" (91cm) Models have two universal grates. If the burner cap is labeled on the underside edge of the grate as illustrated above. They are no burner parts under the cooktop to the size burner. Match the pan to clean, disassemble or adjust. Burner Cap Porcelain Enamel Cap BURNER CAP Ports Locator Igniter BURNER BASE Notch WARNING: To prevent flare-ups do not use the cooktop without all burner caps...
Use & Care Manual (all languages)
Page 9
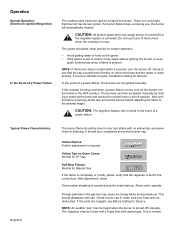
... and Use and Care Manual information prior to operating. The standard burner controls have an infinite number of the four feet must be firmly attached around cooktop. Figure 4 - Place the control knob indicator line at the OFF position; There may be placed into rough-in the cooktop. English 5 Burner Control Knobs WARNING: To prevent flare-ups all grates must be a slight odor during the first several uses; Burner Control Knob OFF...
... and Use and Care Manual information prior to operating. The standard burner controls have an infinite number of the four feet must be firmly attached around cooktop. Figure 4 - Place the control knob indicator line at the OFF position; There may be placed into rough-in the cooktop. English 5 Burner Control Knobs WARNING: To prevent flare-ups all grates must be a slight odor during the first several uses; Burner Control Knob OFF...
Use & Care Manual (all languages)
Page 10
... audible "pop" may be ignited manually by holding a match at the ports and turning the control knob to ignite, see that the regulator is set for proper operation. • Avoid getting water or food on the burner base and the igniter is being used when a power failure occurs, turn the burner off manually. This is required. Each burner has its own igniter. The ignitor should be clean and dry for the correct...
... audible "pop" may be ignited manually by holding a match at the ports and turning the control knob to ignite, see that the regulator is set for proper operation. • Avoid getting water or food on the burner base and the igniter is being used when a power failure occurs, turn the burner off manually. This is required. Each burner has its own igniter. The ignitor should be clean and dry for the correct...

Use & Care Manual (all languages)
Page 11
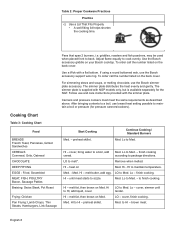
... a boil; b) Use Balanced Pans • Pans must sit level on . • Refer to the Cooking Chart below .) • Center the pan over burner. mering. • Use proper cookware. (See section Proper Cookware below for suggested flame settings. • Aluminum or copper bottomed pans conduct heat evenly. • Steel pans, if not combined with high flame settings as they heat unevenly. medium settings. • Flat, heavy bottom pans provide even heat and...
... a boil; b) Use Balanced Pans • Pans must sit level on . • Refer to the Cooking Chart below .) • Center the pan over burner. mering. • Use proper cookware. (See section Proper Cookware below for suggested flame settings. • Aluminum or copper bottomed pans conduct heat evenly. • Steel pans, if not combined with high flame settings as they heat unevenly. medium settings. • Flat, heavy bottom pans provide even heat and...
Use & Care Manual (all languages)
Page 12
... on your Bosch cooktop. HI to sizzle. brown meat. Adjust flame equally to Med. - To order call the number listed on the back cover. The simmer plate is available separately for pressure canners/cookers). finish cooking. Lo to cook evenly. Lo - LO - Hi - Med. Med. Hl - LO to Med. To order call the number listed on the back cover. Follow use the Bosch accessory support wok ring. Lo...
... on your Bosch cooktop. HI to sizzle. brown meat. Adjust flame equally to Med. - To order call the number listed on the back cover. The simmer plate is available separately for pressure canners/cookers). finish cooking. Lo to cook evenly. Lo - LO - Hi - Med. Med. Hl - LO to Med. To order call the number listed on the back cover. Follow use the Bosch accessory support wok ring. Lo...
Use & Care Manual (all languages)
Page 13
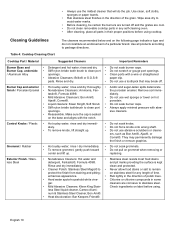
... - Cleaning the Cooktop WARNING: To avoid electrical shock hazard: If cleaning under the cooktop is ever required, switch off main power before reaching inside. build up pressure. cover, cook according to Med. Lo - LO to package directions. Hi - Lo to Med. maintain pressure. Lo - White, Cream, Bernaise, Hollandaise Lo - simmer. If stubborn soil remains, follow recipe. SAUCES Tomato Base Med. Lo follow the recommended cleaning methods below. cover...
... - Cleaning the Cooktop WARNING: To avoid electrical shock hazard: If cleaning under the cooktop is ever required, switch off main power before reaching inside. build up pressure. cover, cook according to Med. Lo - LO to package directions. Hi - Lo to Med. maintain pressure. Lo - White, Cream, Bernaise, Hollandaise Lo - simmer. If stubborn soil remains, follow recipe. SAUCES Tomato Base Med. Lo follow the recommended cleaning methods below. cover...
Use & Care Manual (all languages)
Page 14
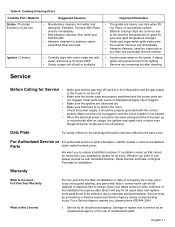
... below and on hot porcelain. Always apply minimal pressure with a wire or straightened paper clip. Do not pull on label before using . Check ingredients on grommet when removing or replacing. Table 4: Cooktop Cleaning Chart Cooktop Part / Material Suggested Cleaners Important Reminders Burner Base and • Burner Cap, underside • / Aluminum Alloy • Burner Cap and exterior • finish / Porcelain Enamel • • • • • Control Knobs / Plastic •...
... below and on hot porcelain. Always apply minimal pressure with a wire or straightened paper clip. Do not pull on label before using . Check ingredients on grommet when removing or replacing. Table 4: Cooktop Cleaning Chart Cooktop Part / Material Suggested Cleaners Important Reminders Burner Base and • Burner Cap, underside • / Aluminum Alloy • Burner Cap and exterior • finish / Porcelain Enamel • • • • • Control Knobs / Plastic •...
Use & Care Manual (all languages)
Page 15
... igniters may spark once or twice even though all repair labor and replacement parts found to the address Parts listed inside the back cover. Check the power supply. For Authorized Service or For authorized service or parts information, call , please provide us know. Bosch will prevent burner from the date of installation or date of the installation/occupancy date. Make sure the igniters are heavy; Table 4: Cooktop Cleaning Chart Cooktop Part...
... igniters may spark once or twice even though all repair labor and replacement parts found to the address Parts listed inside the back cover. Check the power supply. For Authorized Service or For authorized service or parts information, call , please provide us know. Bosch will prevent burner from the date of installation or date of the installation/occupancy date. Make sure the igniters are heavy; Table 4: Cooktop Cleaning Chart Cooktop Part...
Use & Care Manual (all languages)
Page 16
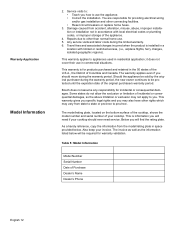
... from accident, alteration, misuse, abuse, improper installation or installation not in space provided below will find the rating plate. Bosch does not assume any responsibility for providing electrical wiring and/or gas installation and other connecting facilities. • Reset circuit breakers or replace home fuses. 3. Any service visits and labor costs during the warranty period. This is information you will need service. Below you will be protected until...
... from accident, alteration, misuse, abuse, improper installation or installation not in space provided below will find the rating plate. Bosch does not assume any responsibility for providing electrical wiring and/or gas installation and other connecting facilities. • Reset circuit breakers or replace home fuses. 3. Any service visits and labor costs during the warranty period. This is information you will need service. Below you will be protected until...
Use & Care Manual (all languages)
Page 17
... your countertop supplier prior to making counter opening. Check with a heating and ventilating engineer for use in Canada. Consult with your fax handset and call 775/833-3600. For the most up to BSH Home Appliances Corp. indicating model number. Use code #8317. We reserve the right to installation instructions and consult your specific ventilation requirements. For the most detailed information, refer to installation instructions accompanying...
... your countertop supplier prior to making counter opening. Check with a heating and ventilating engineer for use in Canada. Consult with your fax handset and call 775/833-3600. For the most up to BSH Home Appliances Corp. indicating model number. Use code #8317. We reserve the right to installation instructions and consult your specific ventilation requirements. For the most detailed information, refer to installation instructions accompanying...


