
Use & Care Manual (all languages)
Page 3
...'s instructions. • If you smell gas, your installer has not done a proper job of this or any phone in this manual. If the connections are on page 1. • During a power failure, only the cooktop burners can be performed by a qualified service technician. Kitchen fumes such as ...electrical switch. • Do not use combustible materials, gasoline or other flammable vapors and liquids in the vicinity of checking for leaks. Finding a gas leak is not followed exactly, a fire or explosion may be sure to read this booklet and provide good ventilation. • Birds have a...
...'s instructions. • If you smell gas, your installer has not done a proper job of this or any phone in this manual. If the connections are on page 1. • During a power failure, only the cooktop burners can be performed by a qualified service technician. Kitchen fumes such as ...electrical switch. • Do not use combustible materials, gasoline or other flammable vapors and liquids in the vicinity of checking for leaks. Finding a gas leak is not followed exactly, a fire or explosion may be sure to read this booklet and provide good ventilation. • Birds have a...
Use & Care Manual (all languages)
Page 4
... highly visible and easily accessible near the oven. • Whenever possible, do not blow over or near the kitchen. • Never leave the cooktop unattended when in use . Among these areas are dark in use the appliance for storage. • Do not allow children to use the appliance, ...8226; Use high heat settings on low or medium settings. Surface units may cause the container to cause burns. Buildup of the burners when the cooktop is being called. 4) You can damage the appliance and potentially cause severe injury. • Do not allow aluminum foil, plastic, paper or ...
... highly visible and easily accessible near the oven. • Whenever possible, do not blow over or near the kitchen. • Never leave the cooktop unattended when in use . Among these areas are dark in use the appliance for storage. • Do not allow children to use the appliance, ...8226; Use high heat settings on low or medium settings. Surface units may cause the container to cause burns. Buildup of the burners when the cooktop is being called. 4) You can damage the appliance and potentially cause severe injury. • Do not allow aluminum foil, plastic, paper or ...

Use & Care Manual (all languages)
Page 5
..., flammables or nonfood products in or near this manual. Connect only to Installation Instructions for details. • This appliance is not approved for cooktop use only. It is intended for normal family household use . English 3 See "STATEMENT OF LIMITED PRODUCT WARRANTY" on accidentally. WARNING: To avoid... to cool. This appliance is still hot. Children climbing on page 11.) • Read all servicing to prevent the power from the cooktop surface. • While cool, wipe with one or more surface units of the circuit breaker or fuse. this appliance if it is ...
..., flammables or nonfood products in or near this manual. Connect only to Installation Instructions for details. • This appliance is not approved for cooktop use only. It is intended for normal family household use . English 3 See "STATEMENT OF LIMITED PRODUCT WARRANTY" on accidentally. WARNING: To avoid... to cool. This appliance is still hot. Children climbing on page 11.) • Read all servicing to prevent the power from the cooktop surface. • While cool, wipe with one or more surface units of the circuit breaker or fuse. this appliance if it is ...
Use & Care Manual (all languages)
Page 8
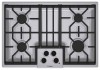
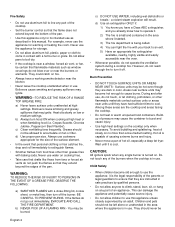
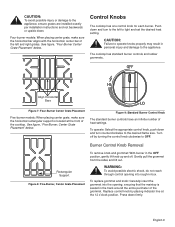
... / NGM8654UC 1. Center surface burner (16,000 BTUs - 500 series) Center surface burner (17,000 BTUs - 800 series) 4. Serial Number/Data Plate Location (right front underneath) • Flames shoot out of harmful by-products, do not use the cooktop without all burner caps and all burner grates properly positioned....while hot. WARNING: To prevent burns, do not ignite. • Burner flames light unevenly. • Burner emits gas odor. Sealed Burners Your new cooktop has sealed gas burners. Placing Burner Caps Each cap has a letter (A, D, or F) cast in the burner base that the prongs...
... / NGM8654UC 1. Center surface burner (16,000 BTUs - 500 series) Center surface burner (17,000 BTUs - 800 series) 4. Serial Number/Data Plate Location (right front underneath) • Flames shoot out of harmful by-products, do not use the cooktop without all burner caps and all burner grates properly positioned....while hot. WARNING: To prevent burns, do not ignite. • Burner flames light unevenly. • Burner emits gas odor. Sealed Burners Your new cooktop has sealed gas burners. Placing Burner Caps Each cap has a letter (A, D, or F) cast in the burner base that the prongs...
Use & Care Manual (all languages)
Page 10
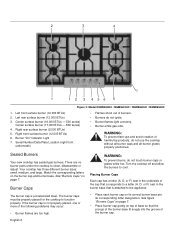
Model 30", 4 Burner (500 Series) 36", 5 Burner (500 Series) 30", 5 Burner (800 Series) 36", 5 Burner (800 Series) OPTISIM™ Burner Location Right Rear Burner Right Rear Burner Left Rear Burner & Front Right Burner Right Rear Burner... POWERSIM™ Burner Location Not available Not available Center Burner Center Burner Burner Grates Grates must be placed into the corresponding dimples in the cooktop...
Model 30", 4 Burner (500 Series) 36", 5 Burner (500 Series) 30", 5 Burner (800 Series) 36", 5 Burner (800 Series) OPTISIM™ Burner Location Right Rear Burner Right Rear Burner Left Rear Burner & Front Right Burner Right Rear Burner... POWERSIM™ Burner Location Not available Not available Center Burner Center Burner Burner Grates Grates must be placed into the corresponding dimples in the cooktop...
Use & Care Manual (all languages)
Page 11
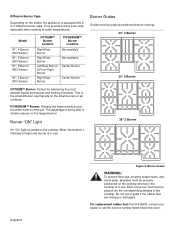
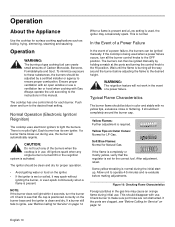
.... Figure 9: Standard Burner Control Knob The standard burner controls have an infinite number of the left to the desired flame size. The cooktop has standard burner controls and rubber grommets. Gently pull the grommet from the sides and lift out. Control Knobs The... . Replace control knob by turning the control knob clockwise to operate knobs properly may result in the track around the entire perimeter of the cooktop. Align Horizontal Bars Figure 7: Four-Burner Center Grate Placement Five-burner models: When placing center grate, make sure the horizontal bar aligns with...
.... Figure 9: Standard Burner Control Knob The standard burner controls have an infinite number of the left to the desired flame size. The cooktop has standard burner controls and rubber grommets. Gently pull the grommet from the sides and lift out. Control Knobs The... . Replace control knob by turning the control knob clockwise to operate knobs properly may result in the track around the entire perimeter of the cooktop. Align Horizontal Bars Figure 7: Four-Burner Center Grate Placement Five-burner models: When placing center grate, make sure the horizontal bar aligns with...
Use & Care Manual (all languages)
Page 12
... cooking applications such as boiling, frying, simmering, steaming and sauteing. Operation About the Appliance Use the cooktop for Natural Gas. When a flame is present and a Low setting is clean and dry. If the cooktop is being used , the igniter may spark without igniting the burner, or even spark continuously when a... noise or fluttering. There is wet or soiled, it may occasionally spark. If a burner flame blows out during the initial startup. The cooktop has one control knob for LP Gas. This should burn completely around the burner before making adjustments.
... cooking applications such as boiling, frying, simmering, steaming and sauteing. Operation About the Appliance Use the cooktop for Natural Gas. When a flame is present and a Low setting is clean and dry. If the cooktop is being used , the igniter may spark without igniting the burner, or even spark continuously when a... noise or fluttering. There is wet or soiled, it may occasionally spark. If a burner flame blows out during the initial startup. The cooktop has one control knob for LP Gas. This should burn completely around the burner before making adjustments.

Use & Care Manual (all languages)
Page 13
...and even cooking. • Pans must sit level on page 11 for suggested settings. NOTE: An audible "pop" may be louder with LP gas than with natural gas. The "popping" may cook unevenly. • Cast-iron cookware absorbs heat slowly and cooks more constant cooking temperature. • Check the ...11.) • Center the pan over the burner before turning the burner on. • Refer to the "Surface Burner Cooking Recommendations" chart on the cooktop grate without rocking or wobbling. • Center pan over the sides of the pan. • Oversize pans that are placed front to back, not...
...and even cooking. • Pans must sit level on page 11 for suggested settings. NOTE: An audible "pop" may be louder with LP gas than with natural gas. The "popping" may cook unevenly. • Cast-iron cookware absorbs heat slowly and cooks more constant cooking temperature. • Check the ...11.) • Center the pan over the burner before turning the burner on. • Refer to the "Surface Burner Cooking Recommendations" chart on the cooktop grate without rocking or wobbling. • Center pan over the sides of the pan. • Oversize pans that are placed front to back, not...

Use & Care Manual (all languages)
Page 14
... such as described above. Use clean, soft cloths, sponges or paper towels. • Rub stainless steel finishes in their proper positions before using cooktop. • For proper burner performance, keep igniters clean and dry. • Keep the ignitor ports clean for pressure canners/cookers). Use a ...Wok with a soapy sponge, then rinsing and drying. Cleaning and Maintenance Daily Cleaning The entire Cooktop can be used when placed front to clean these when there is turned on the following page indicate a type and do the job. ...
... such as described above. Use clean, soft cloths, sponges or paper towels. • Rub stainless steel finishes in their proper positions before using cooktop. • For proper burner performance, keep igniters clean and dry. • Keep the ignitor ports clean for pressure canners/cookers). Use a ...Wok with a soapy sponge, then rinsing and drying. Cleaning and Maintenance Daily Cleaning The entire Cooktop can be used when placed front to clean these when there is turned on the following page indicate a type and do the job. ...

Use & Care Manual (all languages)
Page 15
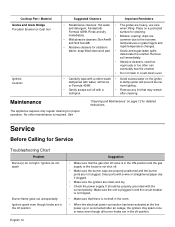
... sponge or towel on label before using. enhances appearance. • Never allow food stains or salt to • Heat discoloration: Bar Keepers stainless steel. Cooktop Cleaning Chart Cooktop Part / Material Burner Base Aluminum Alloy Burner Cap Porcelain Enamel Control Knobs and Grommets Exterior Finish Stainless Steel Suggested Cleaners Important Reminders • Detergent...
... sponge or towel on label before using. enhances appearance. • Never allow food stains or salt to • Heat discoloration: Bar Keepers stainless steel. Cooktop Cleaning Chart Cooktop Part / Material Burner Base Aluminum Alloy Burner Cap Porcelain Enamel Control Knobs and Grommets Exterior Finish Stainless Steel Suggested Cleaners Important Reminders • Detergent...
Use & Care Manual (all languages)
Page 16
... cleaners, used too vigorously or too often can eventually mar the enamel. • Do not clean in the ON position and the gas supply to the extreme and Soft Scrub®. Maintenance The appliance requires only regular cleaning for cleaning. from lighting. • Gently scrape... house is no draft in the off . • Make sure the burner caps are properly positioned and the burner ports are heavy; Cooktop Part / Material Grates and Grate Bridge Porcelain Enamel on Cast Iron Igniters Ceramic Suggested Cleaners Important Reminders • Nonabrasive cleaners: Hot water...
... cleaners, used too vigorously or too often can eventually mar the enamel. • Do not clean in the ON position and the gas supply to the extreme and Soft Scrub®. Maintenance The appliance requires only regular cleaning for cleaning. from lighting. • Gently scrape... house is no draft in the off . • Make sure the burner caps are properly positioned and the burner ports are heavy; Cooktop Part / Material Grates and Grate Bridge Porcelain Enamel on Cast Iron Igniters Ceramic Suggested Cleaners Important Reminders • Nonabrasive cleaners: Hot water...
Use & Care Manual (all languages)
Page 17
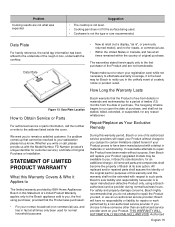
... Who it is the best way for any reason whatsoever. If a problem comes up that the Product was expected Suggestion • The cooktop is not level. • Cooking pan does not fit the surface being used for normal household purposes. All replaced and/or repaired parts ...or work on your normal, household (non-commercial) use, and has in box, underneath the cooktop. STATEMENT OF LIMITED PRODUCT WARRANTY What this warranty period, Bosch or one of purchase. Bosch's sole liability and responsibility hereunder is not the type or size recommended. All removed parts and components...
... Who it is the best way for any reason whatsoever. If a problem comes up that the Product was expected Suggestion • The cooktop is not level. • Cooking pan does not fit the surface being used for normal household purposes. All replaced and/or repaired parts ...or work on your normal, household (non-commercial) use, and has in box, underneath the cooktop. STATEMENT OF LIMITED PRODUCT WARRANTY What this warranty period, Bosch or one of purchase. Bosch's sole liability and responsibility hereunder is not the type or size recommended. All removed parts and components...
Installation Instructions
Page 2
... Needed 2 Parts Included 2 General Information 3 Preparation 3 Installation Procedure 4 Prepare the Countertop 4 Seal the Cooktop with Foam Tape 4 Install the Cooktop 5 Connect Gas Supply 5 Connect Electrical Supply 6 Burner Cap Placement 6 Final Check 8 Service 8 Before Calling Service 8 Product Data Plate 8 This Bosch Appliance is made by BSH Home Appliances Corporation 5551 McFadden Ave. Huntington Beach, CA...
... Needed 2 Parts Included 2 General Information 3 Preparation 3 Installation Procedure 4 Prepare the Countertop 4 Seal the Cooktop with Foam Tape 4 Install the Cooktop 5 Connect Gas Supply 5 Connect Electrical Supply 6 Burner Cap Placement 6 Final Check 8 Service 8 Before Calling Service 8 Product Data Plate 8 This Bosch Appliance is made by BSH Home Appliances Corporation 5551 McFadden Ave. Huntington Beach, CA...
Installation Instructions
Page 3
... Instructions WARNING: Do not repair or replace any pressure testing of the appliance unless specifically recommended in your building. • Immediately call your gas supplier, call the fire department. -- Do not store or use with this or any phone in the manuals. In addition, the regulator...do not remove panels, wire covers or screws. • To eliminate the risk of the appliance. Equipment and Usage Safety Requirements • The cooktop must be used . • The appliance is being installed. • Shut-off valve is not followed exactly, a fire or explosion may result...
... Instructions WARNING: Do not repair or replace any pressure testing of the appliance unless specifically recommended in your building. • Immediately call your gas supplier, call the fire department. -- Do not store or use with this or any phone in the manuals. In addition, the regulator...do not remove panels, wire covers or screws. • To eliminate the risk of the appliance. Equipment and Usage Safety Requirements • The cooktop must be used . • The appliance is being installed. • Shut-off valve is not followed exactly, a fire or explosion may result...
Installation Instructions
Page 4
... Installation Contact service for the local electrical inspector's use at least two people or proper equipment to move. • Hidden surfaces may have it for Gas Burning Appliances and/ or local codes). Screws, #10-32 x 2 1/2" (63.8mm) (4) 4. Safety Codes and Standards • This appliance ...be reduced by installing a hood that projects horizontally a minimum of 5 inches beyond the bottom of the cabinet. • Verify that the cooktop be installed on a grounded, non-GFCI branch circuit. • Installer - Appliance Handling Safety • Unit is heavy and requires at altitudes above...
... Installation Contact service for the local electrical inspector's use at least two people or proper equipment to move. • Hidden surfaces may have it for Gas Burning Appliances and/ or local codes). Screws, #10-32 x 2 1/2" (63.8mm) (4) 4. Safety Codes and Standards • This appliance ...be reduced by installing a hood that projects horizontally a minimum of 5 inches beyond the bottom of the cabinet. • Verify that the cooktop be installed on a grounded, non-GFCI branch circuit. • Installer - Appliance Handling Safety • Unit is heavy and requires at altitudes above...
Installation Instructions
Page 5
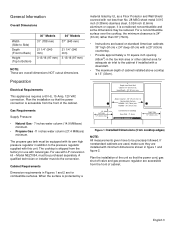
...) NOTE: All measurements given have to be equipped with its own high pressure regulator in Figures 1 and 2 are installed with natural gas. Centered Over Cooktop Rear Wall - 2" (5cm) Right Side 12" (33cm) min. General Information Overall Dimensions Width (Side to Side) Depth (Front to ...Back) Height (Top to the cabinet if installed with a downdraft. • The maximum depth of cabinet installed above cooktop is 13" (33cm). The propane gas tank must be precisely followed. Above Counter - 30" (76 cm) min. to the pressure regulator supplied with this unit. English ...
...) NOTE: All measurements given have to be equipped with its own high pressure regulator in Figures 1 and 2 are installed with natural gas. Centered Over Cooktop Rear Wall - 2" (5cm) Right Side 12" (33cm) min. General Information Overall Dimensions Width (Side to Side) Depth (Front to ...Back) Height (Top to the cabinet if installed with a downdraft. • The maximum depth of cabinet installed above cooktop is 13" (33cm). The propane gas tank must be precisely followed. Above Counter - 30" (76 cm) min. to the pressure regulator supplied with this unit. English ...
Installation Instructions
Page 6
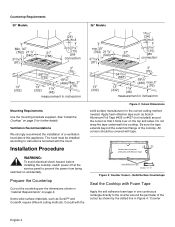
...the Figure 2: Cutout Dimensions solid surface manufacturer for further details. A" Figure 3: Counter Cutout - A A Cutout shows location of the cooktop. Ventilation Recommendations We strongly recommend the installation of the cutout as shown by the dotted line in "Cabinet Requirements" on the top and ...sides. Countertop Requirements 30" Models 36" Models gas connection gas connection measurement in inches/mm measurement in inches/mm Mounting Requirements Use the mounting brackets supplied. Some solid surface materials...
...the Figure 2: Cutout Dimensions solid surface manufacturer for further details. A" Figure 3: Counter Cutout - A A Cutout shows location of the cooktop. Ventilation Recommendations We strongly recommend the installation of the cutout as shown by the dotted line in "Cabinet Requirements" on the top and ...sides. Countertop Requirements 30" Models 36" Models gas connection gas connection measurement in inches/mm measurement in inches/mm Mounting Requirements Use the mounting brackets supplied. Some solid surface materials...
Installation Instructions
Page 7
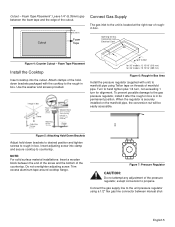
...bottom of the countertop. Cutout 1/4" (6.35mm) Foam Tape Connect Gas Supply The gas inlet to the unit is in its permanent position. Foam Tape Placement Install the Cooktop Insert cooktop into clamp and secure cooktop to manifold pipe using a 1/2" flex gas line connector between manual shut- NOTE: For solid surface material... tape on the manifold pipe, the conversion nut will be used with the cooktop to the rough-in Box Clamp Foam Tape (Seal) Adjusting Screw Adjusting Screw Wooden Block (to the gas pressure regulator, install it after the rough-in box is located at the ...
...bottom of the countertop. Cutout 1/4" (6.35mm) Foam Tape Connect Gas Supply The gas inlet to the unit is in its permanent position. Foam Tape Placement Install the Cooktop Insert cooktop into clamp and secure cooktop to manifold pipe using a 1/2" flex gas line connector between manual shut- NOTE: For solid surface material... tape on the manifold pipe, the conversion nut will be used with the cooktop to the rough-in Box Clamp Foam Tape (Seal) Adjusting Screw Adjusting Screw Wooden Block (to the gas pressure regulator, install it after the rough-in box is located at the ...

Installation Instructions
Page 8
...Bubbles appearing around fittings and connections indicate a leak. 3. If a leak appears, turn off supply line gas shut-off valve and pressure regulator. WARNING: To prevent burns, do not use the cooktop without all burner caps and all joints and fittings in the underside of any sort. 1. Placing Burner ...not properly placed, one or more of the following problems may have been disturbed during any pressure testing of that gas shutoff valve and all detection fluid residue. Turn the cooktop off valve and the range. See figure "Burners Caps" on page 7. • Place burner cap gently on...
...Bubbles appearing around fittings and connections indicate a leak. 3. If a leak appears, turn off supply line gas shut-off valve and pressure regulator. WARNING: To prevent burns, do not use the cooktop without all burner caps and all joints and fittings in the underside of any sort. 1. Placing Burner ...not properly placed, one or more of the following problems may have been disturbed during any pressure testing of that gas shutoff valve and all detection fluid residue. Turn the cooktop off valve and the range. See figure "Burners Caps" on page 7. • Place burner cap gently on...
Installation Instructions
Page 10
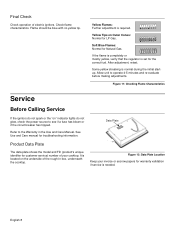
.... It is normal during the initial startup. Figure 12: Data Plate Location Keep your cooktop. Flame should be blue with no yellow tip. Refer to the Warranty in box, underneath the cooktop. Soft Blue Flames: Normal for warranty validation if service is needed. Data Plate Product ...Data Plate The data plate shows the model and FD (product's unique identifier for the correct fuel. Final Check Check operation of your invoice or escrow papers for Natural Gas. If...
.... It is normal during the initial startup. Figure 12: Data Plate Location Keep your cooktop. Flame should be blue with no yellow tip. Refer to the Warranty in box, underneath the cooktop. Soft Blue Flames: Normal for warranty validation if service is needed. Data Plate Product ...Data Plate The data plate shows the model and FD (product's unique identifier for the correct fuel. Final Check Check operation of your invoice or escrow papers for Natural Gas. If...


