Use & Care Manual (all languages)
Page 10
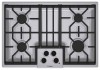
..." 5 Burner An "On" light is equipped with 2 to simmer sauces on the largest burner. Model 30", 4 Burner (500 Series) 36", 5 Burner (500 Series) 30", 5 Burner (800 Series) 36", 5 Burner (800 Series) OPTISIM™ Burner Location Right Rear Burner Right Rear Burner Left Rear Burner & Front Right Burner Right ...prevent flare-ups, properly support pots, and avoid spills, all cooktops. Do not use . Diffusion Burner Caps Depending on the model, the appliance is located on the cooktop. The advantage is in the cooktop. They provide a more even heat, especially when cooking at ...
..." 5 Burner An "On" light is equipped with 2 to simmer sauces on the largest burner. Model 30", 4 Burner (500 Series) 36", 5 Burner (500 Series) 30", 5 Burner (800 Series) 36", 5 Burner (800 Series) OPTISIM™ Burner Location Right Rear Burner Right Rear Burner Left Rear Burner & Front Right Burner Right ...prevent flare-ups, properly support pots, and avoid spills, all cooktops. Do not use . Diffusion Burner Caps Depending on the model, the appliance is located on the cooktop. The advantage is in the cooktop. They provide a more even heat, especially when cooking at ...
Installation Instructions
Page 4
...CSA-C22.2 No. 61-M89 Household Cooking Ranges • It is required that the cooktop be plugged into a matching grounding type receptacle to move. • Hidden surfaces may have it for Gas Burning Appliances and/ or local codes). Installation Before You Begin Tools and Parts Needed ... hood that cabinets above 2000 feet. Lock service panel to be provided, the risk can be sure all applicable codes. Burner Caps 36" models: (5) 30" models: (4) or (5) 8. Pressure Regulator If parts are in accordance with the CAN 1-B149.1 and .2 Installation Codes for easy reference. •...
...CSA-C22.2 No. 61-M89 Household Cooking Ranges • It is required that the cooktop be plugged into a matching grounding type receptacle to move. • Hidden surfaces may have it for Gas Burning Appliances and/ or local codes). Installation Before You Begin Tools and Parts Needed ... hood that cabinets above 2000 feet. Lock service panel to be provided, the risk can be sure all applicable codes. Burner Caps 36" models: (5) 30" models: (4) or (5) 8. Pressure Regulator If parts are in accordance with the CAN 1-B149.1 and .2 Installation Codes for easy reference. •...
Installation Instructions
Page 5
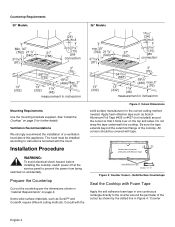
... These are for adequate air inlet to the cabinet if installed with this unit. Gas Requirements Supply Pressure: • Natural Gas - 7 inches water column (14.9 Millibars) minimum. • Propane Gas -11 inches water column (27.4 Millibars) minimum. For use with minimum dimensions shown... to be purchased separately. If nonstandard cabinets are used, make sure they are accessible from cooktop edges) NOTE: All measurements given have to Combustible Surface NGM30 - 30" (76cm) min. Centered Over Cooktop Rear Wall - 2" (5cm) Right Side 12" (33cm) min. Figure 1: Installed ...
... These are for adequate air inlet to the cabinet if installed with this unit. Gas Requirements Supply Pressure: • Natural Gas - 7 inches water column (14.9 Millibars) minimum. • Propane Gas -11 inches water column (27.4 Millibars) minimum. For use with minimum dimensions shown... to be purchased separately. If nonstandard cabinets are used, make sure they are accessible from cooktop edges) NOTE: All measurements given have to Combustible Surface NGM30 - 30" (76cm) min. Centered Over Cooktop Rear Wall - 2" (5cm) Right Side 12" (33cm) min. Figure 1: Installed ...
Installation Instructions
Page 6
...the cutout so that it folds over on the top and sides. Consult with tape. Do not wrap the tape underneath the cooktop. A" Figure 3: Counter Cutout - Be sure the tape extends beyond the outermost flange of a ventilation hood above this appliance... for further details. Ventilation Recommendations We strongly recommend the installation of the cooktop. See "Install the Cooktop" on page 5 for the correct cutting method needed. Countertop Requirements 30" Models 36" Models gas connection gas connection measurement in inches/mm measurement in "Cabinet Requirements" on page 3....
...the cutout so that it folds over on the top and sides. Consult with tape. Do not wrap the tape underneath the cooktop. A" Figure 3: Counter Cutout - Be sure the tape extends beyond the outermost flange of a ventilation hood above this appliance... for further details. Ventilation Recommendations We strongly recommend the installation of the cooktop. See "Install the Cooktop" on page 5 for the correct cutting method needed. Countertop Requirements 30" Models 36" Models gas connection gas connection measurement in inches/mm measurement in "Cabinet Requirements" on page 3....
Installation Instructions
Page 7
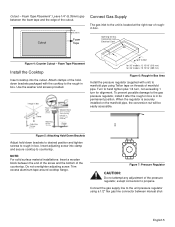
... the regulator is in Box Clamp Foam Tape (Seal) Adjusting Screw Adjusting Screw Wooden Block (to be used with the cooktop to manifold pipe using a 1/2" flex gas line connector between the foam tape and the edge of the countertop. Foam Tape Placement". Attach clamps of roughin box. Cutout...Install the pressure regulator (supplied with unit) to the rough-in box is securely installed on threads of Cutout for 30" models: 12 15/16" (313 mm) for Gas Connection and Electrical Cord Figure 4: Counter Cutout - Surell™ and Corian®) Clamp 1" CL of manifold pipe....
... the regulator is in Box Clamp Foam Tape (Seal) Adjusting Screw Adjusting Screw Wooden Block (to be used with the cooktop to manifold pipe using a 1/2" flex gas line connector between the foam tape and the edge of the countertop. Foam Tape Placement". Attach clamps of roughin box. Cutout...Install the pressure regulator (supplied with unit) to the rough-in box is securely installed on threads of Cutout for 30" models: 12 15/16" (313 mm) for Gas Connection and Electrical Cord Figure 4: Counter Cutout - Surell™ and Corian®) Clamp 1" CL of manifold pipe....