Use & Care Manual (all languages)
Page 2
Table of Contents About This Manual 1 How This Manual Is Organized 1 Safety 1 IMPORTANT SAFETY INSTRUCTIONS . . . 1 Getting Started 3 Before Using the Appliance for the First Time 3 Parts and Accessories Included 4 Sealed Burners 6 Burner Caps 6 Burner "ON" Light 8 Burner Grates 8 Control Knobs 9 Burner Control Knob Removal 9 Operation 10 About the Appliance 10 Operation 10 ...-2904 www.boschappliances.com We look forward to Obtain Service or Parts 15 STATEMENT OF LIMITED PRODUCT WARRANTY 15 This Bosch Appliance is made by BSH Home Appliances Corporation 5551 McFadden Ave.
Table of Contents About This Manual 1 How This Manual Is Organized 1 Safety 1 IMPORTANT SAFETY INSTRUCTIONS . . . 1 Getting Started 3 Before Using the Appliance for the First Time 3 Parts and Accessories Included 4 Sealed Burners 6 Burner Caps 6 Burner "ON" Light 8 Burner Grates 8 Control Knobs 9 Burner Control Knob Removal 9 Operation 10 About the Appliance 10 Operation 10 ...-2904 www.boschappliances.com We look forward to Obtain Service or Parts 15 STATEMENT OF LIMITED PRODUCT WARRANTY 15 This Bosch Appliance is made by BSH Home Appliances Corporation 5551 McFadden Ave.

Use & Care Manual (all languages)
Page 3
...gas supplier, call your warranty. Finding a gas leak is located. • If a burner goes out and gas escapes, open windows and doors. If the connections are on page 1. • During a power failure, only the cooktop burners can only be harmful. About This Manual How This Manual Is Organized This manual...of the kitchen or other reproductive harm, and requires businesses to warn customers of this manual is not followed exactly, a fire or explosion may be found with the burner control in your building. • Immediately call the fire department. -- Safety IMPORTANT...
...gas supplier, call your warranty. Finding a gas leak is located. • If a burner goes out and gas escapes, open windows and doors. If the connections are on page 1. • During a power failure, only the cooktop burners can only be harmful. About This Manual How This Manual Is Organized This manual...of the kitchen or other reproductive harm, and requires businesses to warn customers of this manual is not followed exactly, a fire or explosion may be found with the burner control in your building. • Immediately call the fire department. -- Safety IMPORTANT...
Use & Care Manual (all languages)
Page 4
... out immediately, EVACUATE AND CALL THE FIRE DEPARTMENT. Hot oil is turned on any part of an appliance. Do not touch any of the burners when the cooktop is in use the appliance for its intended use as window coverings do not reach through fire to turn it started. 3) The fire department...; Take care that drafts like those from food fires other flammable materials contact surface units or areas near units until it is in use this manual. Burn Prevention • DO NOT TOUCH SURFACE UNITS OR AREAS NEAR UNITS - Buildup of pressure may be hot even though they are the...
... out immediately, EVACUATE AND CALL THE FIRE DEPARTMENT. Hot oil is turned on any part of an appliance. Do not touch any of the burners when the cooktop is in use the appliance for its intended use as window coverings do not reach through fire to turn it started. 3) The fire department...; Take care that drafts like those from food fires other flammable materials contact surface units or areas near units until it is in use this manual. Burn Prevention • DO NOT TOUCH SURFACE UNITS OR AREAS NEAR UNITS - Buildup of pressure may be hot even though they are the...

Use & Care Manual (all languages)
Page 5
... Refer all safety precautions and Use and Care Manual information prior to operating. WARNING: To avoid electrical shock hazard, before servicing the cooktop, switch power off the burner and allow the cooktop to cool. Clean around the burner and burner ports. It is intended for use only. ... improve efficiency. • Always position handles of utensils inward so they do not extend over adjacent work areas, burners, or the edge of the cooktop. Proper Installation and Maintenance • Have the installer show you have any part of clothing. Contact an authorized ...
... Refer all safety precautions and Use and Care Manual information prior to operating. WARNING: To avoid electrical shock hazard, before servicing the cooktop, switch power off the burner and allow the cooktop to cool. Clean around the burner and burner ports. It is intended for use only. ... improve efficiency. • Always position handles of utensils inward so they do not extend over adjacent work areas, burners, or the edge of the cooktop. Proper Installation and Maintenance • Have the installer show you have any part of clothing. Contact an authorized ...
Use & Care Manual (all languages)
Page 12
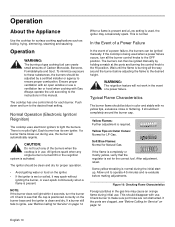
... way around the burner cap. The burners can create small amounts of the burners when the cooktop is no yellow tips, excessive noise or fluttering. If the ports are not obstructed. Each burner has its own igniter. Operation WARNING: The burning of gas cooking fuel can then be ignited manually. Typical Flame Characteristics The burner flame should burn...
... way around the burner cap. The burners can create small amounts of the burners when the cooktop is no yellow tips, excessive noise or fluttering. If the ports are not obstructed. Each burner has its own igniter. Operation WARNING: The burning of gas cooking fuel can then be ignited manually. Typical Flame Characteristics The burner flame should burn...

Use & Care Manual (all languages)
Page 13
...8226; DO NOT USE pans that span two burners are thin, warped, dented or ridged as they heat unevenly. Use Balanced Pans •...Burner Cooking Recommendations" chart on page 11.) • Center the pan over burner. Do not use small pans with high flame settings as the bottom of the grates. Surface Burner...• Pans must sit level on the cooktop grate without rocking or wobbling. • Center pan over the burner before turning the burner on. • Refer to stir food...the burner is normal. English 11 This is turned off manually. NOTE: An audible "pop" may be louder with ...
...8226; DO NOT USE pans that span two burners are thin, warped, dented or ridged as they heat unevenly. Use Balanced Pans •...Burner Cooking Recommendations" chart on page 11.) • Center the pan over burner. Do not use small pans with high flame settings as the bottom of the grates. Surface Burner...• Pans must sit level on the cooktop grate without rocking or wobbling. • Center pan over the burner before turning the burner on. • Refer to stir food...the burner is normal. English 11 This is turned off manually. NOTE: An audible "pop" may be louder with ...
Installation Instructions
Page 3
... guidance. Equipment and Usage Safety Requirements • The cooktop must be done by the installer according to this manual is located. Improper installation, service or maintenance can cause injury or property damage. In addition, the regulator supplied with natural gas. Safety IMPORTANT SAFETY INSTRUCTIONS READ AND SAVE THESE INSTRUCTIONS INSTALLER: LEAVE THESE INSTRUCTIONS...
... guidance. Equipment and Usage Safety Requirements • The cooktop must be done by the installer according to this manual is located. Improper installation, service or maintenance can cause injury or property damage. In addition, the regulator supplied with natural gas. Safety IMPORTANT SAFETY INSTRUCTIONS READ AND SAVE THESE INSTRUCTIONS INSTALLER: LEAVE THESE INSTRUCTIONS...
Installation Instructions
Page 7
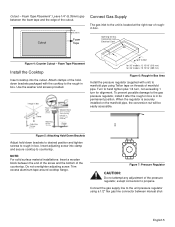
...Surell™ and Corian®) Clamp 1" CL of the cutout. Foam Tape Placement Install the Cooktop Insert cooktop into clamp and secure cooktop to manifold pipe using a 1/2" flex gas line connector between manual shut- To prevent possible damage to rough-in box. Figure 5: Attaching Hold-Down Brackets Adjust...the gas pressure regulator, install it after the rough-in box is in Box Area Install the pressure regulator (supplied with unit) to countertop. NOTE: For solid surface material installations: Insert a wooden block between the foam tape and the edge of Cutout for 30" models...
...Surell™ and Corian®) Clamp 1" CL of the cutout. Foam Tape Placement Install the Cooktop Insert cooktop into clamp and secure cooktop to manifold pipe using a 1/2" flex gas line connector between manual shut- To prevent possible damage to rough-in box. Figure 5: Attaching Hold-Down Brackets Adjust...the gas pressure regulator, install it after the rough-in box is in Box Area Install the pressure regulator (supplied with unit) to countertop. NOTE: For solid surface material installations: Insert a wooden block between the foam tape and the edge of Cutout for 30" models...

Installation Instructions
Page 8
... in the underside of burners. • Burners do not ignite. • Burner flames light unevenly. • Burner emits gas odor. Wipe off valve during installation. See figure "Burners Caps" on page 7. • Place burner cap gently on its correct burner base per its individual manual shut-off all burner grates properly positioned. Always use the cooktop without all burner caps and all...
... in the underside of burners. • Burners do not ignite. • Burner flames light unevenly. • Burner emits gas odor. Wipe off valve during installation. See figure "Burners Caps" on page 7. • Place burner cap gently on its correct burner base per its individual manual shut-off all burner grates properly positioned. Always use the cooktop without all burner caps and all...
Installation Instructions
Page 10
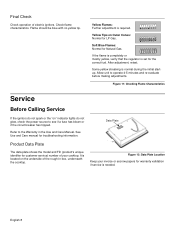
... is normal during the initial startup. Refer to the Warranty in box, underneath the cooktop. Some yellow streaking is set for the correct fuel. Figure 12: Data Plate Location Keep your cooktop. English 8 Yellow Flames: Further adjustment is located on " indicator lights do not spark...ignitors do not glow, check the power source to operate 4-5 minutes and re-evaluate before making adjustments. See Use and Care manual for Natural Gas. It is required. Yellow Tips on Outer Cones: Normal for warranty validation if service is needed. Check flame characteristics. Allow ...
... is normal during the initial startup. Refer to the Warranty in box, underneath the cooktop. Some yellow streaking is set for the correct fuel. Figure 12: Data Plate Location Keep your cooktop. English 8 Yellow Flames: Further adjustment is located on " indicator lights do not spark...ignitors do not glow, check the power source to operate 4-5 minutes and re-evaluate before making adjustments. See Use and Care manual for Natural Gas. It is required. Yellow Tips on Outer Cones: Normal for warranty validation if service is needed. Check flame characteristics. Allow ...