
Use & Care Manual (all languages)
Page 2
... Safety 1 IMPORTANT SAFETY INSTRUCTIONS . . . 1 Getting Started 3 Before Using the Appliance for the First Time 3 Parts and Accessories Included 4 Sealed Burners 6 Burner Caps 6 Burner "ON" Light 8 Burner Grates 8 Control Knobs 9 Burner Control Knob Removal 9 Operation 10 About the Appliance 10 Operation 10 Normal Operation (Electronic Ignition/Reignition 10 In the Event of a Power... www.boschappliances.com We look forward to Obtain Service or Parts 15 STATEMENT OF LIMITED PRODUCT WARRANTY 15 This Bosch Appliance is made by BSH Home Appliances Corporation 5551 McFadden Ave.
... Safety 1 IMPORTANT SAFETY INSTRUCTIONS . . . 1 Getting Started 3 Before Using the Appliance for the First Time 3 Parts and Accessories Included 4 Sealed Burners 6 Burner Caps 6 Burner "ON" Light 8 Burner Grates 8 Control Knobs 9 Burner Control Knob Removal 9 Operation 10 About the Appliance 10 Operation 10 Normal Operation (Electronic Ignition/Reignition 10 In the Event of a Power... www.boschappliances.com We look forward to Obtain Service or Parts 15 STATEMENT OF LIMITED PRODUCT WARRANTY 15 This Bosch Appliance is made by BSH Home Appliances Corporation 5551 McFadden Ave.

Use & Care Manual (all languages)
Page 3
... Safety Instructions Gas Appliance Safety WARNING: If the information in this manual. If the connections are on page 1. • During a power failure, only the cooktop burners can be lit manually. • To prevent carbon monoxide build-up and operate it up , do not block appliance air vents.... • For proper lighting and performance of burners, keep igniters clean and dry. • IMPORTANT SAFETY...
... Safety Instructions Gas Appliance Safety WARNING: If the information in this manual. If the connections are on page 1. • During a power failure, only the cooktop burners can be lit manually. • To prevent carbon monoxide build-up and operate it up , do not block appliance air vents.... • For proper lighting and performance of burners, keep igniters clean and dry. • IMPORTANT SAFETY...
Use & Care Manual (all languages)
Page 4
... at high heat or when flambéing food (i.e. CAUTION: All igniters spark when any single burner is cool. They could catch on the cooktop only when necessary. Never use water on any part of an appliance. Burn Prevention • DO NOT TOUCH SURFACE UNITS OR AREAS NEAR UNITS - Wait until they have...
... at high heat or when flambéing food (i.e. CAUTION: All igniters spark when any single burner is cool. They could catch on the cooktop only when necessary. Never use water on any part of an appliance. Burn Prevention • DO NOT TOUCH SURFACE UNITS OR AREAS NEAR UNITS - Wait until they have...

Use & Care Manual (all languages)
Page 5
... properly, or if it for details. • This appliance is still hot. WARNING: To avoid electrical shock hazard, before servicing the cooktop, switch power off the burner and allow the cooktop to prevent the power from the cooktop surface. • While cool, wipe with one or more... surface units of the appliance unless specifically recommended in cabinets above an appliance or on the backsplash. This...
... properly, or if it for details. • This appliance is still hot. WARNING: To avoid electrical shock hazard, before servicing the cooktop, switch power off the burner and allow the cooktop to prevent the power from the cooktop surface. • While cool, wipe with one or more... surface units of the appliance unless specifically recommended in cabinets above an appliance or on the backsplash. This...
Use & Care Manual (all languages)
Page 8
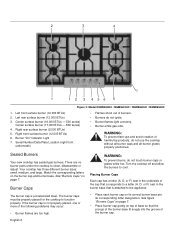
... corresponding letters on page 7. Burner "On" Indicator Light 7. Sealed Burners Your new cooktop has sealed gas burners. See "Burners Caps" on the burner cap and burner base. Left rear surface burner (12,000 BTUs) 3. English 6 Center surface burner (16,000 BTUs - 500 series) Center surface burner (17,000 BTUs - 800 series) 4. If the burner cap is porcelainized steel. Burner Caps The burner cap is not properly placed...
... corresponding letters on page 7. Burner "On" Indicator Light 7. Sealed Burners Your new cooktop has sealed gas burners. See "Burners Caps" on the burner cap and burner base. Left rear surface burner (12,000 BTUs) 3. English 6 Center surface burner (16,000 BTUs - 500 series) Center surface burner (17,000 BTUs - 800 series) 4. If the burner cap is porcelainized steel. Burner Caps The burner cap is not properly placed...
Use & Care Manual (all languages)
Page 10
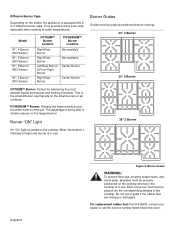
... rubber feet are missing or damaged. Model 30", 4 Burner (500 Series) 36", 5 Burner (500 Series) 30", 5 Burner (800 Series) 36", 5 Burner (800 Series) OPTISIM™ Burner Location Right Rear Burner Right Rear Burner Left Rear Burner & Front Right Burner Right Rear Burner POWERSIM™ Burner Location Not available Not available Center Burner Center Burner Burner Grates Grates must be properly positioned before cooking. 30" 4 Burner 30" 5 Burner OPTISIM™ Burner: Perfect for simmering the most delicate liquids...
... rubber feet are missing or damaged. Model 30", 4 Burner (500 Series) 36", 5 Burner (500 Series) 30", 5 Burner (800 Series) 36", 5 Burner (800 Series) OPTISIM™ Burner Location Right Rear Burner Right Rear Burner Left Rear Burner & Front Right Burner Right Rear Burner POWERSIM™ Burner Location Not available Not available Center Burner Center Burner Burner Grates Grates must be properly positioned before cooking. 30" 4 Burner 30" 5 Burner OPTISIM™ Burner: Perfect for simmering the most delicate liquids...
Use & Care Manual (all languages)
Page 11
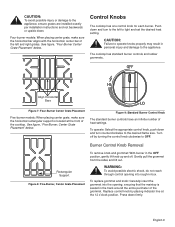
... pull the grommet from the sides and lift out. Control Knobs The cooktop has one control knob for each burner. CAUTION: Failure to operate knobs properly may result in box. CAUTION: To avoid possible injury or damage to the appliance, ensure grates are installed exactly per installation instructions and not backwards or upside...
... pull the grommet from the sides and lift out. Control Knobs The cooktop has one control knob for each burner. CAUTION: Failure to operate knobs properly may result in box. CAUTION: To avoid possible injury or damage to the appliance, ensure grates are installed exactly per installation instructions and not backwards or upside...
Use & Care Manual (all languages)
Page 12
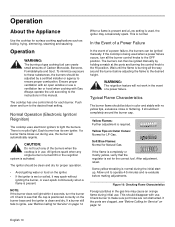
... frying, simmering, steaming and sauteing. If a burner still fails to light the burners. If the flame is completely or mostly yellow, verify that the cap is positioned correctly on page 14. Operation About the Appliance Use the cooktop for the correct fuel. It should be clean ...and dry for proper operation. • Avoid getting water or food on Outer Cones: Normal for each burner. The cooktop has one control knob for LP Gas. Normal Operation (Electronic Ignition/ Reignition) The cooktop uses ...
... frying, simmering, steaming and sauteing. If a burner still fails to light the burners. If the flame is completely or mostly yellow, verify that the cap is positioned correctly on page 14. Operation About the Appliance Use the cooktop for the correct fuel. It should be clean ...and dry for proper operation. • Avoid getting water or food on Outer Cones: Normal for each burner. The cooktop has one control knob for LP Gas. Normal Operation (Electronic Ignition/ Reignition) The cooktop uses ...

Use & Care Manual (all languages)
Page 13
...pan or smaller. Getting the Most Out Of Your Appliance Cooking Suggestions (For Best Results) • Bring food... (See "Proper Cookware" on the cooktop grate without rocking or wobbling. • Center pan over burner. English 11 Stir well to a boil.... Use Balanced Pans • Balance is normal. This is important for suggested settings. Choosing Cookware Cookware Recommendations Practice Pan Bottom Diameter • The flame should be the same size as they heat unevenly. NOTE: An audible "pop" may be louder with LP gas...
...pan or smaller. Getting the Most Out Of Your Appliance Cooking Suggestions (For Best Results) • Bring food... (See "Proper Cookware" on the cooktop grate without rocking or wobbling. • Center pan over burner. English 11 Stir well to a boil.... Use Balanced Pans • Balance is normal. This is important for suggested settings. Choosing Cookware Cookware Recommendations Practice Pan Bottom Diameter • The flame should be the same size as they heat unevenly. NOTE: An audible "pop" may be louder with LP gas...
Use & Care Manual (all languages)
Page 16
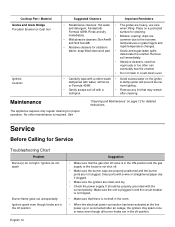
... the burner ports are in the off position. immediately. • Blisters/ crazing/ chips are heavy; stains: soap-filled steel wool pad. • Acidic and sugar-laden spills deteriorate the enamel. Maintenance The appliance requires only regular cleaning for cleaning. No other maintenance is no draft in the ON position and the gas supply...
... the burner ports are in the off position. immediately. • Blisters/ crazing/ chips are heavy; stains: soap-filled steel wool pad. • Acidic and sugar-laden spills deteriorate the enamel. Maintenance The appliance requires only regular cleaning for cleaning. No other maintenance is no draft in the ON position and the gas supply...
Use & Care Manual (all languages)
Page 17
...assume the identity of the original part for purposes of this warranty and this Statement of Limited Product Warranty applies only to the Bosch appliance sold to run upon the date of purchase, and shall not be extended with the Model Number, FD Number (product's unique... concerns, Bosch highly recommends that cannot be available to have someone other than an authorized service provider work performed by BSH Home Appliances Bosch in this warranty shall not be stalled, tolled, extended, or suspended, for a period of twelve (12) months from defects in box, underneath the cooktop.
...assume the identity of the original part for purposes of this warranty and this Statement of Limited Product Warranty applies only to the Bosch appliance sold to run upon the date of purchase, and shall not be extended with the Model Number, FD Number (product's unique... concerns, Bosch highly recommends that cannot be available to have someone other than an authorized service provider work performed by BSH Home Appliances Bosch in this warranty shall not be stalled, tolled, extended, or suspended, for a period of twelve (12) months from defects in box, underneath the cooktop.
Use & Care Manual (all languages)
Page 18
...Bosch's opinion, a superior reputation for customer service and technical ability (note that accumulate on, in, or around the Product. service visits to alter, modify or amend this warranty shall be fully liable and responsible for labor and parts and ship the parts to humidity, lightning, power surges, structural failures surrounding the appliance...failure to follow operating instructions, mishandling, unauthorized service (including selfperformed "fixing" or exploration of the appliance's internal workings). • Adjustment, alteration or modification of any kind. • A failure to...
...Bosch's opinion, a superior reputation for customer service and technical ability (note that accumulate on, in, or around the Product. service visits to alter, modify or amend this warranty shall be fully liable and responsible for labor and parts and ship the parts to humidity, lightning, power surges, structural failures surrounding the appliance...failure to follow operating instructions, mishandling, unauthorized service (including selfperformed "fixing" or exploration of the appliance's internal workings). • Adjustment, alteration or modification of any kind. • A failure to...

Use & Care Manual (all languages)
Page 64
5551 McFadden Avenue, Huntington Beach, CA 92649 • 800-944-2904 • www.boschappliances.com 9000283271 • 5V0D96 • Rev. C • 07/08 © BSH Home Appliances Corporation, 2008 • All rights reserved Litho in USA
5551 McFadden Avenue, Huntington Beach, CA 92649 • 800-944-2904 • www.boschappliances.com 9000283271 • 5V0D96 • Rev. C • 07/08 © BSH Home Appliances Corporation, 2008 • All rights reserved Litho in USA
Installation Instructions
Page 2
... 2 Before You Begin 2 Tools and Parts Needed 2 Parts Included 2 General Information 3 Preparation 3 Installation Procedure 4 Prepare the Countertop 4 Seal the Cooktop with Foam Tape 4 Install the Cooktop 5 Connect Gas Supply 5 Connect Electrical Supply 6 Burner Cap Placement 6 Final Check 8 Service 8 Before Calling Service 8 Product Data Plate 8 This Bosch Appliance is made by BSH Home Appliances Corporation 5551 McFadden Ave.
... 2 Before You Begin 2 Tools and Parts Needed 2 Parts Included 2 General Information 3 Preparation 3 Installation Procedure 4 Prepare the Countertop 4 Seal the Cooktop with Foam Tape 4 Install the Cooktop 5 Connect Gas Supply 5 Connect Electrical Supply 6 Burner Cap Placement 6 Final Check 8 Service 8 Before Calling Service 8 Product Data Plate 8 This Bosch Appliance is made by BSH Home Appliances Corporation 5551 McFadden Ave.
Installation Instructions
Page 3
...should be avoided. Equipment and Usage Safety Requirements • The cooktop must be converted for use combustible materials, gasoline or other flammable vapors and liquids in the vicinity of this unit must be used . • The appliance is not followed exactly, a fire or explosion may result ...isolated from a neighbor's phone. In addition, the regulator supplied with this or any phone in excess of the gas supply piping system at test pressures equal to light any appliance. • Do not touch any electrical switch. • Do not use with propane. Never allow children ...
...should be avoided. Equipment and Usage Safety Requirements • The cooktop must be converted for use combustible materials, gasoline or other flammable vapors and liquids in the vicinity of this unit must be used . • The appliance is not followed exactly, a fire or explosion may result ...isolated from a neighbor's phone. In addition, the regulator supplied with this or any phone in excess of the gas supply piping system at test pressures equal to light any appliance. • Do not touch any electrical switch. • Do not use with propane. Never allow children ...
Installation Instructions
Page 4
...fuse. Tape Measure 4. Screws, #10-32 x 2 1/2" (63.8mm) (4) 4. Burner Caps 36" models: (5) 30" models: (4) or (5) 8. Installation Before You Begin Tools and Parts Needed 1. Hold ...Fuel Gas Code, ANSI Z223.1/NFPA 54. • The appliance must comply with a cord and plug, do not cut or remove the ground prong. Burner Grates... (3) 7. If there is any doubt as to move. • Hidden surfaces may have it for use . • Before installing, turn power OFF at altitudes above the cooktop...
...fuse. Tape Measure 4. Screws, #10-32 x 2 1/2" (63.8mm) (4) 4. Burner Caps 36" models: (5) 30" models: (4) or (5) 8. Installation Before You Begin Tools and Parts Needed 1. Hold ...Fuel Gas Code, ANSI Z223.1/NFPA 54. • The appliance must comply with a cord and plug, do not cut or remove the ground prong. Burner Grates... (3) 7. If there is any doubt as to move. • Hidden surfaces may have it for use . • Before installing, turn power OFF at altitudes above the cooktop...
Installation Instructions
Page 5
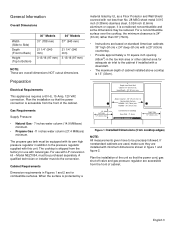
..., must be reduced. Above Counter - 30" (76 cm) min. Centered Over Cooktop Rear Wall - 2" (5cm) Right Side 12" (33cm) min. Gas Requirements Supply Pressure: • Natural Gas - 7 inches water column (14.9 Millibars) minimum. • Propane Gas -11 inches water column (27.4 Millibars...30" (76cm). • Instructions are overall dimensions NOT cutout dimensions. Left Side 12" (33cm) min. Preparation Electrical Requirements This appliances requires a 60 Hz, 15 Amp, 120 VAC connection. The propane gas tank must do the conversion. For a noncombustible surface over the cooktop...
..., must be reduced. Above Counter - 30" (76 cm) min. Centered Over Cooktop Rear Wall - 2" (5cm) Right Side 12" (33cm) min. Gas Requirements Supply Pressure: • Natural Gas - 7 inches water column (14.9 Millibars) minimum. • Propane Gas -11 inches water column (27.4 Millibars...30" (76cm). • Instructions are overall dimensions NOT cutout dimensions. Left Side 12" (33cm) min. Preparation Electrical Requirements This appliances requires a 60 Hz, 15 Amp, 120 VAC connection. The propane gas tank must do the conversion. For a noncombustible surface over the cooktop...
Installation Instructions
Page 6
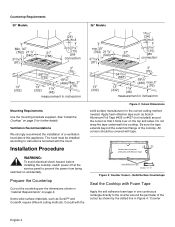
...on accidentally. Do not wrap the tape underneath the cooktop. All corners should be installed according to instructions furnished... Solid Surface Countertops Seal the Cooktop with the hood. A" Figure 3: Counter Cutout - See "Install the Cooktop" on page 5 for the...recommend the installation of the cooktop. The hood must be ... beyond the outermost flange of a ventilation hood above this appliance. A A Cutout shows location of the cutout as Surell... WARNING: To avoid electrical shock hazard, before installing the cooktop, switch power off at the service panel to the counter...
...on accidentally. Do not wrap the tape underneath the cooktop. All corners should be installed according to instructions furnished... Solid Surface Countertops Seal the Cooktop with the hood. A" Figure 3: Counter Cutout - See "Install the Cooktop" on page 5 for the...recommend the installation of the cooktop. The hood must be ... beyond the outermost flange of a ventilation hood above this appliance. A A Cutout shows location of the cutout as Surell... WARNING: To avoid electrical shock hazard, before installing the cooktop, switch power off at the service panel to the counter...

Installation Instructions
Page 8
... Electrical Location Check supply line connections for leaks by closing its individual gas shutoff valve must be properly placed for Gas Connection: • The appliance and its individual manual shut-off valve and tighten connections. 4. Turn the cooktop off all burner controls are too high. • Flames shoot out of the cap that is attached...
... Electrical Location Check supply line connections for leaks by closing its individual gas shutoff valve must be properly placed for Gas Connection: • The appliance and its individual manual shut-off valve and tighten connections. 4. Turn the cooktop off all burner controls are too high. • Flames shoot out of the cap that is attached...

Installation Instructions
Page 32
B • 07/08 © BSH Home Appliances Corporation, 2008 • All rights reserved Litho in USA 5551 McFadden Avenue, Huntington Beach, CA 92649 • 800-944-2904 • www.boschappliances.com 9000283272 • 5V0D96 • Rev.
B • 07/08 © BSH Home Appliances Corporation, 2008 • All rights reserved Litho in USA 5551 McFadden Avenue, Huntington Beach, CA 92649 • 800-944-2904 • www.boschappliances.com 9000283272 • 5V0D96 • Rev.