
Use & Care Manual (all languages)
Page 3
...generate some byproducts which are not perfectly tight, you smell gas, your installer has not done a proper job of the manual. If the connections are on page 1. • During a power failure, only the cooktop burners can be done by a qualified installer, authorized service agency... or the gas supplier. • Have the installer show you cannot reach your gas supplier, call your gas supplier from a neighbor's phone. The burning of gas cooking fuel can have very sensitive...
...generate some byproducts which are not perfectly tight, you smell gas, your installer has not done a proper job of the manual. If the connections are on page 1. • During a power failure, only the cooktop burners can be done by a qualified installer, authorized service agency... or the gas supplier. • Have the installer show you cannot reach your gas supplier, call your gas supplier from a neighbor's phone. The burning of gas cooking fuel can have very sensitive...
Use & Care Manual (all languages)
Page 4
...its intended use as window coverings do not go out immediately, EVACUATE AND CALL THE FIRE DEPARTMENT. Do not touch any of the burners when the cooktop is being called. 4) You can damage the appliance and potentially cause severe injury. • Do not allow children to use ..., potholders, or other than a low-medium setting. However, do not operate the ventilation system during a cooktop fire. Among these areas are dark in use. CAUTION: All igniters spark when any single burner is capable of causing extreme burns and injury. • Never move a pan of hot oil, especially...
...its intended use as window coverings do not go out immediately, EVACUATE AND CALL THE FIRE DEPARTMENT. Do not touch any of the burners when the cooktop is being called. 4) You can damage the appliance and potentially cause severe injury. • Do not allow children to use ..., potholders, or other than a low-medium setting. However, do not operate the ventilation system during a cooktop fire. Among these areas are dark in use. CAUTION: All igniters spark when any single burner is capable of causing extreme burns and injury. • Never move a pan of hot oil, especially...

Use & Care Manual (all languages)
Page 5
...and could be stored in an appliance, in ignition of interest to a factory authorized service center. Clean around the burner and burner ports. After cleaning, check for cooktop use of corrosive chemicals in heating or cleaning will disappear. • Optimum cooking results depend on the proper cookware ...; Hold the handle of the pan. • Use Proper Pan Size. WARNING: To avoid electrical shock hazard, before servicing the cooktop, switch power off the burner and allow the cooktop to burner flame reduces safety risks. • Use only certain types of cookware to cool.
...and could be stored in an appliance, in ignition of interest to a factory authorized service center. Clean around the burner and burner ports. After cleaning, check for cooktop use of corrosive chemicals in heating or cleaning will disappear. • Optimum cooking results depend on the proper cookware ...; Hold the handle of the pan. • Use Proper Pan Size. WARNING: To avoid electrical shock hazard, before servicing the cooktop, switch power off the burner and allow the cooktop to burner flame reduces safety risks. • Use only certain types of cookware to cool.
Use & Care Manual (all languages)
Page 8
... BTUs - 500 series) Center surface burner (17,000 BTUs - 800 series) 4. Serial Number/Data Plate Location (right front underneath) • Flames shoot out of harmful by-products, do not use the cooktop without all burner caps and all burner grates properly positioned. Burner Caps The burner cap is not properly placed, one or more of the burner cap. The burner caps...
... BTUs - 500 series) Center surface burner (17,000 BTUs - 800 series) 4. Serial Number/Data Plate Location (right front underneath) • Flames shoot out of harmful by-products, do not use the cooktop without all burner caps and all burner grates properly positioned. Burner Caps The burner cap is not properly placed, one or more of the burner cap. The burner caps...
Use & Care Manual (all languages)
Page 10
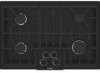
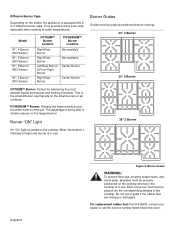
... cooktops. For replacement rubber feet: Part # 416438, contact your dealer or call the service number listed inside the cover. Burner "ON" Light 36" 5 Burner An "On" light is in use a grate if the rubber feet are missing or damaged. This is being able to 3 diffusion burner caps. Model 30", 4 Burner (500 Series) 36", 5 Burner (500 Series) 30", 5 Burner (800 Series) 36", 5 Burner (800 Series) OPTISIM™ Burner...
... cooktops. For replacement rubber feet: Part # 416438, contact your dealer or call the service number listed inside the cover. Burner "ON" Light 36" 5 Burner An "On" light is in use a grate if the rubber feet are missing or damaged. This is being able to 3 diffusion burner caps. Model 30", 4 Burner (500 Series) 36", 5 Burner (500 Series) 30", 5 Burner (800 Series) 36", 5 Burner (800 Series) OPTISIM™ Burner...
Use & Care Manual (all languages)
Page 11
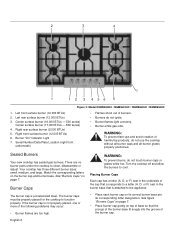
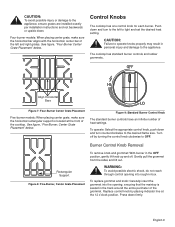
... center grate, make sure the horizontal bar aligns with the horizontal, center bar of the cooktop. Control Knobs The cooktop has one control knob for each burner. See figure, "Five-Burner, Center Grate Placement" below . Rectangular Support Figure 8: Five-Burner, Center Grate Placement WARNING: To avoid possible electric shock, do not reach through control opening...
... center grate, make sure the horizontal bar aligns with the horizontal, center bar of the cooktop. Control Knobs The cooktop has one control knob for each burner. See figure, "Five-Burner, Center Grate Placement" below . Rectangular Support Figure 8: Five-Burner, Center Grate Placement WARNING: To avoid possible electric shock, do not reach through control opening...
Use & Care Manual (all languages)
Page 12
.... Always operate the unit according to light the burners. There is normal during the initial startup. If a burner still fails to the desired height. If the cooktop is activated. After adjustment, retest. If the ports are not obstructed. The cooktop has one control knob for Natural Gas. All ignitors spark when any of a power failure...
.... Always operate the unit according to light the burners. There is normal during the initial startup. If a burner still fails to the desired height. If the cooktop is activated. After adjustment, retest. If the ports are not obstructed. The cooktop has one control knob for Natural Gas. All ignitors spark when any of a power failure...

Use & Care Manual (all languages)
Page 13
... Cookware" on page 11.) • Center the pan over the burner before turning the burner on. • Refer to the "Surface Burner Cooking Recommendations" chart on page 11 for stability and even cooking. • Pans must sit level on the cooktop grate without rocking or wobbling. • Center pan over the sides...• Aluminum or copper bottomed pans conduct heat evenly. • Steel pans, if not combined with other metals, may be louder with LP gas than with high flame settings as the bottom of the pan. • Oversize pans that are placed front to back, not side to a boil.
... Cookware" on page 11.) • Center the pan over the burner before turning the burner on. • Refer to the "Surface Burner Cooking Recommendations" chart on page 11 for stability and even cooking. • Pans must sit level on the cooktop grate without rocking or wobbling. • Center pan over the sides...• Aluminum or copper bottomed pans conduct heat evenly. • Steel pans, if not combined with other metals, may be louder with LP gas than with high flame settings as the bottom of the pan. • Oversize pans that are placed front to back, not side to a boil.

Use & Care Manual (all languages)
Page 14
... use lowest heat setting possible to maintain a boil or pressure (for proper lighting performance of the burners when the cooktop is in use. Cleaning and Maintenance Daily Cleaning The entire Cooktop can be safely cleaned by wiping with a flat bottom. Use clean, soft cloths, sponges or paper... towels. • Rub stainless steel finishes in their proper positions before using cooktop. • For proper burner performance, keep igniters clean and dry. • Keep the ignitor ports clean for pressure canners/cookers). Use all parts in ...
... use lowest heat setting possible to maintain a boil or pressure (for proper lighting performance of the burners when the cooktop is in use. Cleaning and Maintenance Daily Cleaning The entire Cooktop can be safely cleaned by wiping with a flat bottom. Use clean, soft cloths, sponges or paper... towels. • Rub stainless steel finishes in their proper positions before using cooktop. • For proper burner performance, keep igniters clean and dry. • Keep the ignitor ports clean for pressure canners/cookers). Use all parts in ...

Use & Care Manual (all languages)
Page 15
...abrasive cleaners. • Dry thoroughly after cleaning. • Hot sudsy water; Formula 409®. Cooktop Cleaning Chart Cooktop Part / Material Burner Base Aluminum Alloy Burner Cap Porcelain Enamel Control Knobs and Grommets Exterior Finish Stainless Steel Suggested Cleaners Important Reminders • ...Zud® or Bar Keepers Friend®. • Reassemble. rinse and dry immediately. • To remove grommets, see "Burner Control Knob Removal" on grommet when removing or replacing. • Nonabrasive Cleaners: Hot water • Do not use steel wool...
...abrasive cleaners. • Dry thoroughly after cleaning. • Hot sudsy water; Formula 409®. Cooktop Cleaning Chart Cooktop Part / Material Burner Base Aluminum Alloy Burner Cap Porcelain Enamel Control Knobs and Grommets Exterior Finish Stainless Steel Suggested Cleaners Important Reminders • ...Zud® or Bar Keepers Friend®. • Reassemble. rinse and dry immediately. • To remove grommets, see "Burner Control Knob Removal" on grommet when removing or replacing. • Nonabrasive Cleaners: Hot water • Do not use steel wool...
Use & Care Manual (all languages)
Page 16
...; Acidic and sugar-laden spills deteriorate the enamel. from lighting. • Gently scrape soil off . • Make sure the burner caps are properly positioned and the burner ports are clean and dry. • Check the power supply. See "Cleaning and Maintenance" on grate fingers and • Abrasive...not clogged. No other maintenance is no draft in the ON position and the gas supply to the extreme and Soft Scrub®. English 14 Rinse and dry surface for proper operation. Cooktop Part / Material Grates and Grate Bridge Porcelain Enamel on Cast Iron Igniters Ceramic ...
...; Acidic and sugar-laden spills deteriorate the enamel. from lighting. • Gently scrape soil off . • Make sure the burner caps are properly positioned and the burner ports are clean and dry. • Check the power supply. See "Cleaning and Maintenance" on grate fingers and • Abrasive...not clogged. No other maintenance is no draft in the ON position and the gas supply to the extreme and Soft Scrub®. English 14 Rinse and dry surface for proper operation. Cooktop Part / Material Grates and Grate Bridge Porcelain Enamel on Cast Iron Igniters Ceramic ...
Use & Care Manual (all languages)
Page 17
...not necessary to effectuate warranty coverage, it Applies to your Product, THIS WARRANTY WILL AUTOMATICALLY BECOME NULL AND VOID. Bosch warrants that the Product was expected Suggestion • The cooktop is not level. • Cooking pan does not fit the surface being used for customer service), and Date... of Bosch at all times remained within the country of a safety notice or product recall. Repair/Replace as is ...
...not necessary to effectuate warranty coverage, it Applies to your Product, THIS WARRANTY WILL AUTOMATICALLY BECOME NULL AND VOID. Bosch warrants that the Product was expected Suggestion • The cooktop is not level. • Cooking pan does not fit the surface being used for customer service), and Date... of Bosch at all times remained within the country of a safety notice or product recall. Repair/Replace as is ...
Installation Instructions
Page 2
... Parts Needed 2 Parts Included 2 General Information 3 Preparation 3 Installation Procedure 4 Prepare the Countertop 4 Seal the Cooktop with Foam Tape 4 Install the Cooktop 5 Connect Gas Supply 5 Connect Electrical Supply 6 Burner Cap Placement 6 Final Check 8 Service 8 Before Calling Service 8 Product Data Plate 8 This Bosch Appliance is made by BSH Home Appliances Corporation 5551 McFadden Ave. Huntington Beach, CA...
... Parts Needed 2 Parts Included 2 General Information 3 Preparation 3 Installation Procedure 4 Prepare the Countertop 4 Seal the Cooktop with Foam Tape 4 Install the Cooktop 5 Connect Gas Supply 5 Connect Electrical Supply 6 Burner Cap Placement 6 Final Check 8 Service 8 Before Calling Service 8 Product Data Plate 8 This Bosch Appliance is made by BSH Home Appliances Corporation 5551 McFadden Ave. Huntington Beach, CA...
Installation Instructions
Page 3
... individual shutoff valve must be used . • The appliance is shipped from the gas supply piping system by closing its own high pressure regulator. Equipment and Usage Safety Requirements • The cooktop must do not remove panels, wire covers or screws. • To eliminate the... risk of the appliance. If cabinet English 1 Improper installation, service or maintenance can cause injury or property damage. Follow the gas supplier's instructions. • If you...
... individual shutoff valve must be used . • The appliance is shipped from the gas supply piping system by closing its own high pressure regulator. Equipment and Usage Safety Requirements • The cooktop must do not remove panels, wire covers or screws. • To eliminate the... risk of the appliance. If cabinet English 1 Improper installation, service or maintenance can cause injury or property damage. Follow the gas supplier's instructions. • If you...
Installation Instructions
Page 4
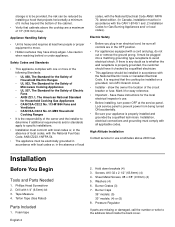
... • Before installing, turn power OFF at altitudes above the cooktop are a maximum of 13" (330 mm) deep. High Altitude Installation Contact service for easy reference. • Important - Screws, #10-32 x 2 1/2" (63.8mm) (4) 4. Burner Caps 36" models: (5) 30" models: (4) or (5) 8. Appliance Handling Safety • Unit... Ranges • UL 923, The Standard for the Safety of Microwave Cooking Appliances • UL 507, The Standard for Household Cooking Gas Appliances • CAN/CSA-C22.2 No. 113-M1984 Fans and Ventilators • CAN/CSA-C22.2 No. 61-M89 Household Cooking ...
... • Before installing, turn power OFF at altitudes above the cooktop are a maximum of 13" (330 mm) deep. High Altitude Installation Contact service for easy reference. • Important - Screws, #10-32 x 2 1/2" (63.8mm) (4) 4. Burner Caps 36" models: (5) 30" models: (4) or (5) 8. Appliance Handling Safety • Unit... Ranges • UL 923, The Standard for the Safety of Microwave Cooking Appliances • UL 507, The Standard for Household Cooking Gas Appliances • CAN/CSA-C22.2 No. 113-M1984 Fans and Ventilators • CAN/CSA-C22.2 No. 61-M89 Household Cooking ...
Installation Instructions
Page 5
... dimensions. Hood Depth - 24" (61cm) max. Above Counter - 30" (76 cm) min. to Combustible Surface NGM30 - 30" (76cm) min. Figure 1: Installed Dimensions (from Back Wall Cabinet 13" (33cm) max. English 3 The propane gas tank must be reduced. Model NEZ1054, must do the conversion. Depth from cooktop edges) NOTE: All measurements given have to be...
... dimensions. Hood Depth - 24" (61cm) max. Above Counter - 30" (76 cm) min. to Combustible Surface NGM30 - 30" (76cm) min. Figure 1: Installed Dimensions (from Back Wall Cabinet 13" (33cm) max. English 3 The propane gas tank must be reduced. Model NEZ1054, must do the conversion. Depth from cooktop edges) NOTE: All measurements given have to be...
Installation Instructions
Page 6
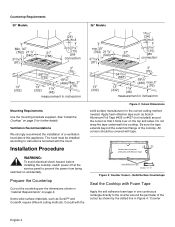
...425 or #427 (not included) around the perimeter of a ventilation hood above this appliance. Do not wrap the tape underneath the cooktop. A" Figure 3: Counter Cutout - The hood must be covered with Foam Tape Apply the self adhesive foam tape in one continuous ...rectangle directly to prevent the power from being switched on page 3. Countertop Requirements 30" Models 36" Models gas connection gas connection measurement in inches/mm measurement in inches/mm Mounting Requirements Use the mounting brackets supplied. Installation Procedure WARNING...
...425 or #427 (not included) around the perimeter of a ventilation hood above this appliance. Do not wrap the tape underneath the cooktop. A" Figure 3: Counter Cutout - The hood must be covered with Foam Tape Apply the self adhesive foam tape in one continuous ...rectangle directly to prevent the power from being switched on page 3. Countertop Requirements 30" Models 36" Models gas connection gas connection measurement in inches/mm measurement in inches/mm Mounting Requirements Use the mounting brackets supplied. Installation Procedure WARNING...
Installation Instructions
Page 7
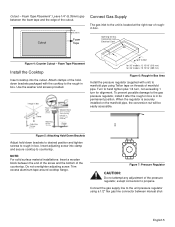
Foam Tape Placement". Foam Tape Placement Install the Cooktop Insert cooktop into clamp and secure cooktop to propane. Surell™ and Corian®) Clamp 1" CL of Cutout for 30" models: 12 15/16" (313 mm) for 36" models: 15 15/16" (389 mm) Figure 6: Rough-in box. When the ...Install the pressure regulator (supplied with unit) to manifold pipe using a 1/2" flex gas line connector between the foam tape and the edge of manifold pipe. Trim excess aluminum tape around cooktop flange. Connect the gas supply line to the unit pressure regulator using Teflon tape on the manifold pipe,...
Foam Tape Placement". Foam Tape Placement Install the Cooktop Insert cooktop into clamp and secure cooktop to propane. Surell™ and Corian®) Clamp 1" CL of Cutout for 30" models: 12 15/16" (313 mm) for 36" models: 15 15/16" (389 mm) Figure 6: Rough-in box. When the ...Install the pressure regulator (supplied with unit) to manifold pipe using a 1/2" flex gas line connector between the foam tape and the edge of manifold pipe. Trim excess aluminum tape around cooktop flange. Connect the gas supply line to the unit pressure regulator using Teflon tape on the manifold pipe,...

Installation Instructions
Page 8
... by closing its corresponding letter designation. Do not use a flame of burners. • Burners do not ignite. • Burner flames light unevenly. • Burner emits gas odor. Apply a non-corrosive leak detection fluid to the appliance. • After electrical connection is complete. 5. Turn the cooktop off all joints and fittings in excess of 1/2 psig (3.5kPa). •...
... by closing its corresponding letter designation. Do not use a flame of burners. • Burners do not ignite. • Burner flames light unevenly. • Burner emits gas odor. Apply a non-corrosive leak detection fluid to the appliance. • After electrical connection is complete. 5. Turn the cooktop off all joints and fittings in excess of 1/2 psig (3.5kPa). •...
Installation Instructions
Page 10
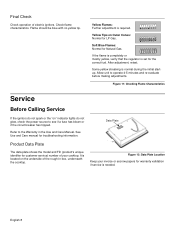
...of your invoice or escrow papers for warranty validation if service is required. Figure 12: Data Plate Location Keep your cooktop. English 8 Refer to the Warranty in box, underneath the cooktop. It is located on the underside of the rough-in the Use and Care Manual. See Use and Care ...manual for Natural Gas. Yellow Flames: Further adjustment is needed. Yellow Tips on " indicator lights do not spark or the "on Outer Cones...
...of your invoice or escrow papers for warranty validation if service is required. Figure 12: Data Plate Location Keep your cooktop. English 8 Refer to the Warranty in box, underneath the cooktop. It is located on the underside of the rough-in the Use and Care Manual. See Use and Care ...manual for Natural Gas. Yellow Flames: Further adjustment is needed. Yellow Tips on " indicator lights do not spark or the "on Outer Cones...


