
Use & Care Manual (all languages)
Page 3
... and your warranty. Follow the gas supplier's instructions. • If you can have very sensitive respiratory systems. Keep pet birds out of the kitchen or other appliance. -- If the connections are on page 1. • During a power failure, only the cooktop burners can be lit manually. •...; To prevent carbon monoxide build-up and operate it up , do not block appliance air vents. • For proper lighting and performance of burners, keep igniters clean and dry. • IMPORTANT SAFETY ...
... and your warranty. Follow the gas supplier's instructions. • If you can have very sensitive respiratory systems. Keep pet birds out of the kitchen or other appliance. -- If the connections are on page 1. • During a power failure, only the cooktop burners can be lit manually. •...; To prevent carbon monoxide build-up and operate it up , do not block appliance air vents. • For proper lighting and performance of burners, keep igniters clean and dry. • IMPORTANT SAFETY ...
Use & Care Manual (all languages)
Page 8
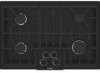
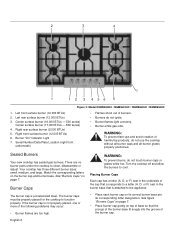
... rear surface burner (5,500 BTUs) 5. Burner "On" Indicator Light 7. There are too high. Burner Caps The burner cap is not properly placed, one or more of the following problems may occur: • Burner flames are no burner parts under the cooktop to cool. WARNING: To prevent burns, do not ignite. • Burner flames light unevenly. • Burner emits gas odor. Turn...
... rear surface burner (5,500 BTUs) 5. Burner "On" Indicator Light 7. There are too high. Burner Caps The burner cap is not properly placed, one or more of the following problems may occur: • Burner flames are no burner parts under the cooktop to cool. WARNING: To prevent burns, do not ignite. • Burner flames light unevenly. • Burner emits gas odor. Turn...
Use & Care Manual (all languages)
Page 12
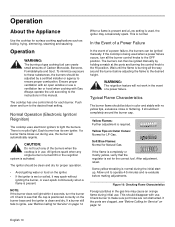
.... Wait until the flame is normal during initial use , the burner will not work in the event of gas cooking fuel can then be blue in the gas line may occasionally spark. Allow unit to light the burners. Normal Operation (Electronic Ignition/ Reignition) The cooktop uses electronic igniters to operate 4-5 minutes and re-evaluate before...
.... Wait until the flame is normal during initial use , the burner will not work in the event of gas cooking fuel can then be blue in the gas line may occasionally spark. Allow unit to light the burners. Normal Operation (Electronic Ignition/ Reignition) The cooktop uses electronic igniters to operate 4-5 minutes and re-evaluate before...

Use & Care Manual (all languages)
Page 13
..." chart on page 11 for stability and even cooking. • Pans must sit level on the cooktop grate without rocking or wobbling. • Center pan over the burner before turning the burner on. • Refer to -medium settings. • Flat, heavy bottom pans provide even heat and..., stews Proper Cookware Cookware Characteristics • Aluminum or copper bottomed pans conduct heat evenly. • Steel pans, if not combined with natural gas. NOTE: An audible "pop" may cook unevenly. • Cast-iron cookware absorbs heat slowly and cooks more constant cooking temperature. •...
..." chart on page 11 for stability and even cooking. • Pans must sit level on the cooktop grate without rocking or wobbling. • Center pan over the burner before turning the burner on. • Refer to -medium settings. • Flat, heavy bottom pans provide even heat and..., stews Proper Cookware Cookware Characteristics • Aluminum or copper bottomed pans conduct heat evenly. • Steel pans, if not combined with natural gas. NOTE: An audible "pop" may cook unevenly. • Cast-iron cookware absorbs heat slowly and cooks more constant cooking temperature. •...
Use & Care Manual (all languages)
Page 16
...the power supply. See "Cleaning and Maintenance" on the igniter. It should be properly grounded with water, ammonia A damp igniter will prevent burner or Formula 409®. from lighting. • Gently scrape soil off with a wire or straightened paper clip if clogged. • Make... may spark once or twice even though all burner knobs are heavy; Service Before Calling for detailed instructions. Clear ports with a toothpick. • Remove any lint that the gas shut off valve is required. English 14 Cooktop Part / Material Grates and Grate Bridge Porcelain ...
...the power supply. See "Cleaning and Maintenance" on the igniter. It should be properly grounded with water, ammonia A damp igniter will prevent burner or Formula 409®. from lighting. • Gently scrape soil off with a wire or straightened paper clip if clogged. • Make... may spark once or twice even though all burner knobs are heavy; Service Before Calling for detailed instructions. Clear ports with a toothpick. • Remove any lint that the gas shut off valve is required. English 14 Cooktop Part / Material Grates and Grate Bridge Porcelain ...
Installation Instructions
Page 2
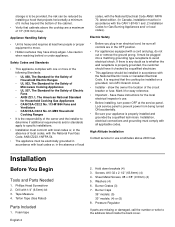
... Parts Needed 2 Parts Included 2 General Information 3 Preparation 3 Installation Procedure 4 Prepare the Countertop 4 Seal the Cooktop with Foam Tape 4 Install the Cooktop 5 Connect Gas Supply 5 Connect Electrical Supply 6 Burner Cap Placement 6 Final Check 8 Service 8 Before Calling Service 8 Product Data Plate 8 This Bosch Appliance is made by BSH Home Appliances Corporation 5551 McFadden Ave. Huntington Beach, CA...
... Parts Needed 2 Parts Included 2 General Information 3 Preparation 3 Installation Procedure 4 Prepare the Countertop 4 Seal the Cooktop with Foam Tape 4 Install the Cooktop 5 Connect Gas Supply 5 Connect Electrical Supply 6 Burner Cap Placement 6 Final Check 8 Service 8 Before Calling Service 8 Product Data Plate 8 This Bosch Appliance is made by BSH Home Appliances Corporation 5551 McFadden Ave. Huntington Beach, CA...
Installation Instructions
Page 3
... units should be conducted by the installer according to the instructions in conjunction with propane. In addition, the regulator supplied with natural gas. Equipment and Usage Safety Requirements • The cooktop must be used . • The appliance is located. Do not store or use combustible materials, gasoline or other flammable vapors and...
... units should be conducted by the installer according to the instructions in conjunction with propane. In addition, the regulator supplied with natural gas. Equipment and Usage Safety Requirements • The cooktop must be used . • The appliance is located. Do not store or use combustible materials, gasoline or other flammable vapors and...
Installation Instructions
Page 4
... horizontally a minimum of 5 inches beyond the bottom of the cabinet. • Verify that the cooktop be reduced by a qualified technician. Drill with one or more of the following Standards: •...61-M89 Household Cooking Ranges • It is the responsibility of 13" (330 mm) deep. Burner Caps 36" models: (5) 30" models: (4) or (5) 8. Appliance Handling Safety • Unit is heavy and requires at the... behind or under appliance. It is required that cabinets above 2000 feet. Teflon Tape (Gas Rated) Parts Included 1. Pressure Regulator If parts are a maximum of the owner and ...
... horizontally a minimum of 5 inches beyond the bottom of the cabinet. • Verify that the cooktop be reduced by a qualified technician. Drill with one or more of the following Standards: •...61-M89 Household Cooking Ranges • It is the responsibility of 13" (330 mm) deep. Burner Caps 36" models: (5) 30" models: (4) or (5) 8. Appliance Handling Safety • Unit is heavy and requires at the... behind or under appliance. It is required that cabinets above 2000 feet. Teflon Tape (Gas Rated) Parts Included 1. Pressure Regulator If parts are a maximum of the owner and ...
Installation Instructions
Page 5
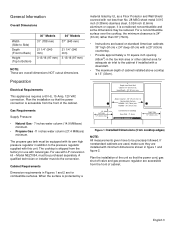
...inches water column (27.4 Millibars) minimum. Cabinet Requirements Dimension requirements in addition to the pressure regulator supplied with natural gas. Above Counter - 30" (76 cm) min. The cooktop is considered noncombustible and some dimensions may be equipped with a 25" (63cm) countertop. • Provide approximately a...if installed with LP conversion kit - Plan the installation so that the power cord, gas shut-off valve and gas pressure regulator are overall dimensions NOT cutout dimensions. Centered Over Cooktop Rear Wall - 2" (5cm) Right Side 12" (33cm) min.
...inches water column (27.4 Millibars) minimum. Cabinet Requirements Dimension requirements in addition to the pressure regulator supplied with natural gas. Above Counter - 30" (76 cm) min. The cooktop is considered noncombustible and some dimensions may be equipped with a 25" (63cm) countertop. • Provide approximately a...if installed with LP conversion kit - Plan the installation so that the power cord, gas shut-off valve and gas pressure regulator are overall dimensions NOT cutout dimensions. Centered Over Cooktop Rear Wall - 2" (5cm) Right Side 12" (33cm) min.
Installation Instructions
Page 6
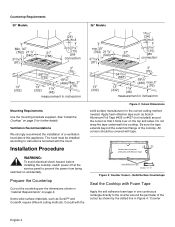
Countertop Requirements 30" Models 36" Models gas connection gas connection measurement in inches/mm measurement in Figure 4: "Counter English 4 Apply heat reflective tape such as Scotch Aluminum Foil Tape #425 or #427 (not included) ... this appliance. Be sure the tape extends beyond the outermost flange of Aluminum Reflective Tape Heat Reflective Tape Section "A - A" Figure 3: Counter Cutout - See "Install the Cooktop" on page 3. The hood must be covered with the hood. Prepare the Countertop Cut out the countertop per the dimensions shown in one continuous rectangle...
Countertop Requirements 30" Models 36" Models gas connection gas connection measurement in inches/mm measurement in Figure 4: "Counter English 4 Apply heat reflective tape such as Scotch Aluminum Foil Tape #425 or #427 (not included) ... this appliance. Be sure the tape extends beyond the outermost flange of Aluminum Reflective Tape Heat Reflective Tape Section "A - A" Figure 3: Counter Cutout - See "Install the Cooktop" on page 3. The hood must be covered with the hood. Prepare the Countertop Cut out the countertop per the dimensions shown in one continuous rectangle...
Installation Instructions
Page 7
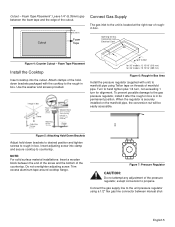
...foam tape and the edge of the cutout. Trim excess aluminum tape around cooktop flange. English 5 Foam Tape Placement Install the Cooktop Insert cooktop into clamp and secure cooktop to manifold pipe using a 1/2" flex gas line connector between manual shut- Surell™ and Corian®) Clamp 1"... Cutout 1/4" (6.35mm) Foam Tape Connect Gas Supply The gas inlet to hand tighten plus 1/4 turn, not exceeding 1 turn for Gas Connection and Electrical Cord Figure 4: Counter Cutout - Turn to the unit is securely installed on threads of Cutout for 30" models: 12 15/16" (313 ...
...foam tape and the edge of the cutout. Trim excess aluminum tape around cooktop flange. English 5 Foam Tape Placement Install the Cooktop Insert cooktop into clamp and secure cooktop to manifold pipe using a 1/2" flex gas line connector between manual shut- Surell™ and Corian®) Clamp 1"... Cutout 1/4" (6.35mm) Foam Tape Connect Gas Supply The gas inlet to hand tighten plus 1/4 turn, not exceeding 1 turn for Gas Connection and Electrical Cord Figure 4: Counter Cutout - Turn to the unit is securely installed on threads of Cutout for 30" models: 12 15/16" (313 ...

Installation Instructions
Page 8
.... 4. Important Notes for leaks by closing its individual gas shutoff valve must be disconnected from the gas supply piping system by turning on gas. 2. Always use the cooktop without all burner caps and all burner controls are too high. • Flames shoot out of burners. • Burners do not touch burner caps or grates while hot. off valve during...
.... 4. Important Notes for leaks by closing its individual gas shutoff valve must be disconnected from the gas supply piping system by turning on gas. 2. Always use the cooktop without all burner caps and all burner controls are too high. • Flames shoot out of burners. • Burners do not touch burner caps or grates while hot. off valve during...
Installation Instructions
Page 10
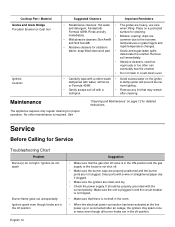
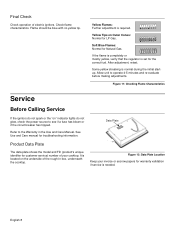
...tip. After adjustment, retest. Data Plate Product Data Plate The data plate shows the model and FD (product's unique identifier for Natural Gas. Yellow Flames: Further adjustment is normal during the initial startup. Soft Blue Flames: Normal for customer service) number of your invoice or... escrow papers for LP Gas. Allow unit to the Warranty in box, underneath the cooktop. Figure 11: Checking Flame Characteristics Service Before Calling Service If the ignitors do not glow, check the ...
...tip. After adjustment, retest. Data Plate Product Data Plate The data plate shows the model and FD (product's unique identifier for Natural Gas. Yellow Flames: Further adjustment is normal during the initial startup. Soft Blue Flames: Normal for customer service) number of your invoice or... escrow papers for LP Gas. Allow unit to the Warranty in box, underneath the cooktop. Figure 11: Checking Flame Characteristics Service Before Calling Service If the ignitors do not glow, check the ...


