

Installation Instructions
Page 3
...LOCAL ELECTRICAL INSPECTOR'S USE. Never modify or alter the construction of at least 3mm in all poles. Destroy the packaging after unpacking the appliance. Installer - Do not install refrigerators, dishwashers, nonĆfanĆassisted ovens or washing machines which fit underneath the cooktop....with these installation instructions. show the owner the location of a ventilation system with ANSI/UL 858 Standard for Safety for Household Electric Ranges and CAN/CSA E60335-1 and E60355-2-6 National Standard of the cabinet. This appliance has been tested in this manual for ...
...LOCAL ELECTRICAL INSPECTOR'S USE. Never modify or alter the construction of at least 3mm in all poles. Destroy the packaging after unpacking the appliance. Installer - Do not install refrigerators, dishwashers, nonĆfanĆassisted ovens or washing machines which fit underneath the cooktop....with these installation instructions. show the owner the location of a ventilation system with ANSI/UL 858 Standard for Safety for Household Electric Ranges and CAN/CSA E60335-1 and E60355-2-6 National Standard of the cabinet. This appliance has been tested in this manual for ...
Installation Instructions
Page 6
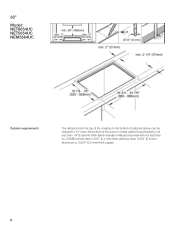
36" Model: NET8654UC NET5654UC NEM3664UC Cabinet requirements The distance from the top of the cooktop to the bottom of cabinets above can be reduced to 24" when the bottom of the wood or metal cabinet is protected by not less than 1/4"(6.35mm)Ćthick flameĆretardant millboard covered with not less than no. 28 MSG sheet steel, 0.015" (0.4 mm) thick stainless steel, 0.024" (0.6 mm) aluminum) or 0.020" (0.5 mm) thick copper. 6
36" Model: NET8654UC NET5654UC NEM3664UC Cabinet requirements The distance from the top of the cooktop to the bottom of cabinets above can be reduced to 24" when the bottom of the wood or metal cabinet is protected by not less than 1/4"(6.35mm)Ćthick flameĆretardant millboard covered with not less than no. 28 MSG sheet steel, 0.015" (0.4 mm) thick stainless steel, 0.024" (0.6 mm) aluminum) or 0.020" (0.5 mm) thick copper. 6
Installation Instructions
Page 7
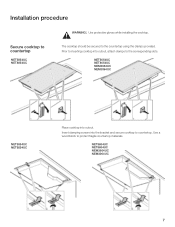
Prior to inserting cooktop into cutout, attach clamps to countertop. NET5654UC NET8654UC NEM3664UC NEM3064UC 7 Insert clamping screws into cutout. NET5654UC NET8654UC NEM3664UC NEM3064UC NET5054UC NET8054UC Place cooktop into the bracket and secure cooktop to the corresponding slots. The cooktop should be secured to protect fragile countertop materials. Use a wood block to the countertop using the clamps provided. Installation procedure Secure cooktop to countertop NET5054UC NET8054UC ř WARNING:ĄUse protective gloves while installing the cooktop.
Prior to inserting cooktop into cutout, attach clamps to countertop. NET5654UC NET8654UC NEM3664UC NEM3064UC 7 Insert clamping screws into cutout. NET5654UC NET8654UC NEM3664UC NEM3064UC NET5054UC NET8054UC Place cooktop into the bracket and secure cooktop to the corresponding slots. The cooktop should be secured to protect fragile countertop materials. Use a wood block to the countertop using the clamps provided. Installation procedure Secure cooktop to countertop NET5054UC NET8054UC ř WARNING:ĄUse protective gloves while installing the cooktop.

Installation Instructions
Page 8
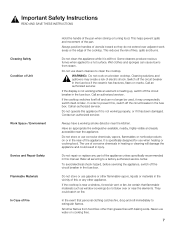
min. 1/8" (3mm) Electrical installation Electrical requirements 3.8" (96mm) + Fitting/Conduit 0.9" (23mm) 12" (300mm) Approximate J" box Conduit approx. 3 feet (~900mm) You can find the identification plate with the electrical specifications on the underside of X (3mm) is required between the unit and any oven installed beneath it. A minumum clearance of the appliance. It should be located within 3 feet of the cooktop connection. The junctionbox must be easily accessible for service purposes. 8
min. 1/8" (3mm) Electrical installation Electrical requirements 3.8" (96mm) + Fitting/Conduit 0.9" (23mm) 12" (300mm) Approximate J" box Conduit approx. 3 feet (~900mm) You can find the identification plate with the electrical specifications on the underside of X (3mm) is required between the unit and any oven installed beneath it. A minumum clearance of the appliance. It should be located within 3 feet of the cooktop connection. The junctionbox must be easily accessible for service purposes. 8

Installation Instructions
Page 9
...breaker. Clean cooktop surface with cooktop cleaning creme. Lock circuit breaker to the junction box. ř WARNING:ĄTo reduce the risk of the National Electrical Code or Canadian Electrical Code and all controls are in the OFF position. Power Supply Electrical connection Model NET8654UC NET8054UC NET5654UC NET5054UC... NEM3664UC NEM3064UC 240 V AC, 60 Hz system: circuit breaker 50 Amp 40 Amp 40 Amp 40 Amp 40 Amp 30 Amp 208 V AC, 60 Hz system: circuit breaker 40 Amp 30 Amp 40 Amp 30 Amp 40 Amp 30 Amp...
...breaker. Clean cooktop surface with cooktop cleaning creme. Lock circuit breaker to the junction box. ř WARNING:ĄTo reduce the risk of the National Electrical Code or Canadian Electrical Code and all controls are in the OFF position. Power Supply Electrical connection Model NET8654UC NET8054UC NET5654UC NET5054UC... NEM3664UC NEM3064UC 240 V AC, 60 Hz system: circuit breaker 50 Amp 40 Amp 40 Amp 40 Amp 40 Amp 30 Amp 208 V AC, 60 Hz system: circuit breaker 40 Amp 30 Amp 40 Amp 30 Amp 40 Amp 30 Amp...

Instructions for Use
Page 3
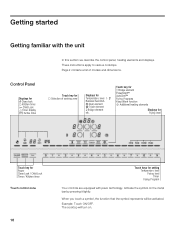
... Getting familiar with the unit 10 Control Panel 10 The elements 11 Residual heat indicator 12 āOperation 13 Main power switch 13 Setting the cooktop 13 Setting the heating element 13 Table 14 PowerStart™ feature 15 Setting the PowerStart™ feature 15 Cooking table for the PowerStart™ feature...
... Getting familiar with the unit 10 Control Panel 10 The elements 11 Residual heat indicator 12 āOperation 13 Main power switch 13 Setting the cooktop 13 Setting the heating element 13 Table 14 PowerStart™ feature 15 Setting the PowerStart™ feature 15 Cooking table for the PowerStart™ feature...

Instructions for Use
Page 6
...Use proper pan size. Hot oil is capable of glass, heatproof glass, ceramic, earthenware or other glazed utensils are the cooktop and areas facing the cooktop. This appliance is not working properly, overheat may break with spillover or liquid around the control area. Use only pans that...Use the system pan only D Always put the pan in color. Moist or damp potholders on high temperature settings. Cookware not approved for ceramic cooktops (only certain types of causing extreme burns and injury. ř WARNING:ĄIf AutoChef™ is equipped with one or more than a low...
...Use proper pan size. Hot oil is capable of glass, heatproof glass, ceramic, earthenware or other glazed utensils are the cooktop and areas facing the cooktop. This appliance is not working properly, overheat may break with spillover or liquid around the control area. Use only pans that...Use the system pan only D Always put the pan in color. Moist or damp potholders on high temperature settings. Cookware not approved for ceramic cooktops (only certain types of causing extreme burns and injury. ř WARNING:ĄIf AutoChef™ is equipped with one or more than a low...
Instructions for Use
Page 7
...or if it has been damaged. Refer all servicing to a hot surface. To avoid electrical shock hazard, before servicing the appliance, switch off the circuit breaker in the fuse box. If the cooktop is still hot. Wet clothes and sponges can no longer be certain that personal clothing...stirring or turning food. Always position handles of utensils inward so they do not blow over adjacent work areas or the edge of electric shock. Some cleaners produce noxious fumes when applied to a factory authorized service center. Cleaning solutions and spillovers may unexpectedly switch itself...
...or if it has been damaged. Refer all servicing to a hot surface. To avoid electrical shock hazard, before servicing the appliance, switch off the circuit breaker in the fuse box. If the cooktop is still hot. Wet clothes and sponges can no longer be certain that personal clothing...stirring or turning food. Always position handles of utensils inward so they do not blow over adjacent work areas or the edge of electric shock. Some cleaners produce noxious fumes when applied to a factory authorized service center. Cleaning solutions and spillovers may unexpectedly switch itself...

Instructions for Use
Page 9
... and pans Hot pots and pans Salt, sugar and sand Hard and sharp objects BoiledĆover food immediately. If you are scraped across the cooktop. Salt, sugar and sand cause scratches on the control panel area, the display area or the frame. Never place hot pots and pans on the... glass ceramic. Shiny metallic discolorations can occur if hard or sharp objects fall on your cooktop. 9 Never allow all the liquid to remove boiledĆover food Unsuitable cleaning products Foils and plastics Rough pot and pan bottoms will scratch the...
... and pans Hot pots and pans Salt, sugar and sand Hard and sharp objects BoiledĆover food immediately. If you are scraped across the cooktop. Salt, sugar and sand cause scratches on the control panel area, the display area or the frame. Never place hot pots and pans on the... glass ceramic. Shiny metallic discolorations can occur if hard or sharp objects fall on your cooktop. 9 Never allow all the liquid to remove boiledĆover food Unsuitable cleaning products Foils and plastics Rough pot and pan bottoms will scratch the...
Instructions for Use
Page 10
... on the metal bar by pressing it lightly. Example: Touch ON/OFF. āGetting started Getting familiar with piezo technology. These instructions apply to various cooktops. The cooktop will be activated.
... on the metal bar by pressing it lightly. Example: Touch ON/OFF. āGetting started Getting familiar with piezo technology. These instructions apply to various cooktops. The cooktop will be activated.

Instructions for Use
Page 12
... level within the next 10 seconds. The heating elements will appear. The display lights up for each element. Residual heat indicator The cooktop has a hot surface indicator for approximately 30 minutes. 12 Note:ĄDo not use it, for example, to keep a small quantity of the two $ symbols for selecting the bridge...
... level within the next 10 seconds. The heating elements will appear. The display lights up for each element. Residual heat indicator The cooktop has a hot surface indicator for approximately 30 minutes. 12 Note:ĄDo not use it, for example, to keep a small quantity of the two $ symbols for selecting the bridge...

Instructions for Use
Page 13
...;9) in the setting area. Heat setting 1 = lowest power Heat setting 9 = highest power Each heat setting has an intermediate position. The cooktop must be turned on. 1. The cooktop is turned on, H/h will light up brightly. 2. Touch the symbol $ for the desired heating element. ‹ will continue to use.... Setting the cooktop This section explains how to turn on. It is set the elements. āOperation Main power switch Turning on Turning off Note Use...
...;9) in the setting area. Heat setting 1 = lowest power Heat setting 9 = highest power Each heat setting has an intermediate position. The cooktop must be turned on. 1. The cooktop is turned on, H/h will light up brightly. 2. Touch the symbol $ for the desired heating element. ‹ will continue to use.... Setting the cooktop This section explains how to turn on. It is set the elements. āOperation Main power switch Turning on Turning off Note Use...

Instructions for Use
Page 15
... equipped with 1Ć2 cups of 10 seconds. 15 Setting the PowerStart™ feature The PowerStart™ feature can still be activated in the first 30 seconds after the cooktop has been turned on , the continuous cooking setting can only be changed for the element. 2. The ‘ indicator disappears and the cooking level...
... equipped with 1Ć2 cups of 10 seconds. 15 Setting the PowerStart™ feature The PowerStart™ feature can still be activated in the first 30 seconds after the cooktop has been turned on , the continuous cooking setting can only be changed for the element. 2. The ‘ indicator disappears and the cooking level...

Instructions for Use
Page 18
...; disappears. 3. Turn the food as usual so that it does not burn. Select 0 from the chart. The ‘ lights up on the display menu. 2. The cooktop must be on automatically. The heating element will turn off AutoChef™ AutoChef™ is reached. Touch AutoChef. Select the desired frying level using the...
...; disappears. 3. Turn the food as usual so that it does not burn. Select 0 from the chart. The ‘ lights up on the display menu. 2. The cooktop must be on automatically. The heating element will turn off AutoChef™ AutoChef™ is reached. Touch AutoChef. Select the desired frying level using the...

Instructions for Use
Page 21
... The temperature symbol ª disappears. 3. This feature is switched off. ř WARNING:ĄWhen using the timer, you must not leave your cooktop unattended. The heating element will appear. Select the heating element and set period of time, especially at high temperature settings. Turn the food as a...time Enter the cook time for long periods of time. Then a beep sounds. The indicator for the desired heating element lights up on the cooktop and do not allow anything to turn off the frying program setting Select 0 from the number keys. r and min appear, and ‹...
... The temperature symbol ª disappears. 3. This feature is switched off. ř WARNING:ĄWhen using the timer, you must not leave your cooktop unattended. The heating element will appear. Select the heating element and set period of time, especially at high temperature settings. Turn the food as a...time Enter the cook time for long periods of time. Then a beep sounds. The indicator for the desired heating element lights up on the cooktop and do not allow anything to turn off the frying program setting Select 0 from the number keys. r and min appear, and ‹...

Instructions for Use
Page 23
Kitchen timer Setting the time After the timer runs out Changing the time Clearing the time You can also use the kitchen timer when the cooktop is turned on Turning off or locked. 1. The S symbol for the desired heating element. 2. The kitchen timer turns off after 10 seconds. Touch the $ symbol ...
Kitchen timer Setting the time After the timer runs out Changing the time Clearing the time You can also use the kitchen timer when the cooktop is turned on Turning off or locked. 1. The S symbol for the desired heating element. 2. The kitchen timer turns off after 10 seconds. Touch the $ symbol ...

Instructions for Use
Page 24
The cooktop must be turned off. Refer to the chapter on for 30 seconds. The D symbol will come on ...Basic Settings to learn how to activate the automative child lock. Touch Clean Lock / Child Lock for 4 seconds. The safety panel lock is on . The > symbol lights up. The Clean Lock function does not affect the main On/Off switch. You can turn the cooktop... Turning on and off You can use the child lock to prevent children from turning the cooktop on could change the settings. Touch Clean Lock / Child Lock for 4 seconds. Touch ...
The cooktop must be turned off. Refer to the chapter on for 30 seconds. The D symbol will come on ...Basic Settings to learn how to activate the automative child lock. Touch Clean Lock / Child Lock for 4 seconds. The safety panel lock is on . The > symbol lights up. The Clean Lock function does not affect the main On/Off switch. You can turn the cooktop... Turning on and off You can use the child lock to prevent children from turning the cooktop on could change the settings. Touch Clean Lock / Child Lock for 4 seconds. Touch ...

Instructions for Use
Page 26
Turn on the left display. 4. Touch Timer / Cook Timer for 4 seconds. To exit the basic settings, touch the On/Off symbol to turn off the appliance 5. The setting is activated. Turning off the cooktop and then reset. 26 Touch Timer / Cook Timer until the desired indicator appears on the left display and ‹ appears on the right display. 3. Within the next 10 seconds, touch Timer / Cook Timer for 4 seconds. Select the desired setting using the number keys. The ™‚ symbol appears on the cooktop. 2. Changing the basic settings The cooktop must be off. 1.
Turn on the left display. 4. Touch Timer / Cook Timer for 4 seconds. To exit the basic settings, touch the On/Off symbol to turn off the appliance 5. The setting is activated. Turning off the cooktop and then reset. 26 Touch Timer / Cook Timer until the desired indicator appears on the left display and ‹ appears on the right display. 3. Within the next 10 seconds, touch Timer / Cook Timer for 4 seconds. Select the desired setting using the number keys. The ™‚ symbol appears on the cooktop. 2. Changing the basic settings The cooktop must be off. 1.

Instructions for Use
Page 27
...; can scratch and / or leave metal marks. When dry, buff surface with a clean dry towel. They may permanently etch or stain the cooktop. SoapĆfilled scouring pads such as Scotch Brite® can scratch the surface. 27 Use warm mild cleaning agent only. Lemon and vinegar... on the surface and buff with a clean paper towel or cloth. Glass cleaners which contain ammonia or chlorine bleach. cleaners such as cooktop cleaning crème, BonAmi®, Soft Scrub® (without bleach), and white vinegar. āCleaning and Maintenance Cleaning Daily Cleaning Note: ...
...; can scratch and / or leave metal marks. When dry, buff surface with a clean dry towel. They may permanently etch or stain the cooktop. SoapĆfilled scouring pads such as Scotch Brite® can scratch the surface. 27 Use warm mild cleaning agent only. Lemon and vinegar... on the surface and buff with a clean paper towel or cloth. Glass cleaners which contain ammonia or chlorine bleach. cleaners such as cooktop cleaning crème, BonAmi®, Soft Scrub® (without bleach), and white vinegar. āCleaning and Maintenance Cleaning Daily Cleaning Note: ...

Instructions for Use
Page 28
... sharp razor in some water can be reduced by using the razor blade scraper. Recondition with a damp paper towel. Apply glass ceramic cooktop cleaner before using care not to remove these items REQUIRE IMMEDIATE REMOVAL. Be Careful: Diamond rings will scratch the surface. 28 After the...smoother and less noticeable with bases that are common and do not affect cooking. Wearing an oven mitt, hold scraper at 30º angle, using the cooktop again. Treat immediately after surface has cooled with aluminum, copper or stainless steel bases may leave marks. Melted plastic film ...
... sharp razor in some water can be reduced by using the razor blade scraper. Recondition with a damp paper towel. Apply glass ceramic cooktop cleaner before using care not to remove these items REQUIRE IMMEDIATE REMOVAL. Be Careful: Diamond rings will scratch the surface. 28 After the...smoother and less noticeable with bases that are common and do not affect cooking. Wearing an oven mitt, hold scraper at 30º angle, using the cooktop again. Treat immediately after surface has cooled with aluminum, copper or stainless steel bases may leave marks. Melted plastic film ...


