

Installation Instructions
Page 3
... of the owner and installer to play with these installation instructions. Improper installation, service or maintenance can be reduced by reaching over heated surface units, cabinet storage space located above the surface units should be provided, the risk can cause injury or property damage. Use caution when reaching behind or under appliance. Lock circuit breaker to be avoided. Mark it for Household Cooking Ranges. LEAVE THESE INSTRUCTIONS WITH...
... of the owner and installer to play with these installation instructions. Improper installation, service or maintenance can be reduced by reaching over heated surface units, cabinet storage space located above the surface units should be provided, the risk can cause injury or property damage. Use caution when reaching behind or under appliance. Lock circuit breaker to be avoided. Mark it for Household Cooking Ranges. LEAVE THESE INSTRUCTIONS WITH...
Installation Instructions
Page 5
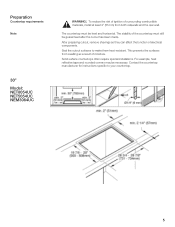
... the cutout has been made. Preparation Countertop requirements Note 30" Model: NET8054UC NET5054UC NEM3064UC ř WARNING:ĄTo reduce the risk of ignition of surrounding combustible materials, install at least 2" (51mm) from swelling as they can affect the function of electrical components. Solid surface countertops often require special installations. Seal the cutout surfaces to your countertop. 5 Contact the countertop manufacturer for instructions specific to make them heatĆresistant. The countertop must...
... the cutout has been made. Preparation Countertop requirements Note 30" Model: NET8054UC NET5054UC NEM3064UC ř WARNING:ĄTo reduce the risk of ignition of surrounding combustible materials, install at least 2" (51mm) from swelling as they can affect the function of electrical components. Solid surface countertops often require special installations. Seal the cutout surfaces to your countertop. 5 Contact the countertop manufacturer for instructions specific to make them heatĆresistant. The countertop must...
Installation Instructions
Page 7
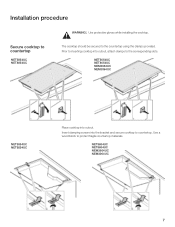
Prior to the corresponding slots. NET5654UC NET8654UC NEM3664UC NEM3064UC NET5054UC NET8054UC Place cooktop into cutout, attach clamps to inserting cooktop into cutout. Insert clamping screws into the bracket and secure cooktop to countertop NET5054UC NET8054UC ř WARNING:ĄUse protective gloves while installing the cooktop. Installation procedure Secure cooktop to countertop. Use a wood block to the countertop using the clamps provided. NET5654UC NET8654UC NEM3664UC NEM3064UC 7 The cooktop should be secured to protect fragile countertop materials.
Prior to the corresponding slots. NET5654UC NET8654UC NEM3664UC NEM3064UC NET5054UC NET8054UC Place cooktop into cutout, attach clamps to inserting cooktop into cutout. Insert clamping screws into the bracket and secure cooktop to countertop NET5054UC NET8054UC ř WARNING:ĄUse protective gloves while installing the cooktop. Installation procedure Secure cooktop to countertop. Use a wood block to the countertop using the clamps provided. NET5654UC NET8654UC NEM3664UC NEM3064UC 7 The cooktop should be secured to protect fragile countertop materials.

Installation Instructions
Page 8
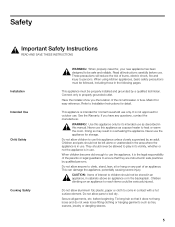
The junctionbox must be easily accessible for service purposes. 8 It should be located within 3 feet of the cooktop connection. min. 1/8" (3mm) Electrical installation Electrical requirements 3.8" (96mm) + Fitting/Conduit 0.9" (23mm) 12" (300mm) Approximate J" box Conduit approx. 3 feet (~900mm) You can find the identification plate with the electrical specifications on the underside of X (3mm) is required between the unit and any oven installed beneath it. A minumum clearance of the appliance.
The junctionbox must be easily accessible for service purposes. 8 It should be located within 3 feet of the cooktop connection. min. 1/8" (3mm) Electrical installation Electrical requirements 3.8" (96mm) + Fitting/Conduit 0.9" (23mm) 12" (300mm) Approximate J" box Conduit approx. 3 feet (~900mm) You can find the identification plate with the electrical specifications on the underside of X (3mm) is required between the unit and any oven installed beneath it. A minumum clearance of the appliance.

Installation Instructions
Page 9
... not use a flexible powerĆsupply cord. Switch on power supply, make sure all local codes and ordinances. Remove everything from being turned on accidently. Power Supply Electrical connection Model NET8654UC NET8054UC NET5654UC NET5054UC NEM3664UC NEM3064UC 240 V AC, 60 Hz system: circuit breaker 50 Amp 40 Amp 40 Amp 40 Amp 40 Amp 30 Amp 208 V AC, 60 Hz system: circuit breaker 40 Amp 30 Amp 40 Amp 30 Amp 40 Amp 30 Amp ř CAUTION:ĄBefore installing, switch off the circuit breaker in proper...
... not use a flexible powerĆsupply cord. Switch on power supply, make sure all local codes and ordinances. Remove everything from being turned on accidently. Power Supply Electrical connection Model NET8654UC NET8054UC NET5654UC NET5054UC NEM3664UC NEM3064UC 240 V AC, 60 Hz system: circuit breaker 50 Amp 40 Amp 40 Amp 40 Amp 40 Amp 30 Amp 208 V AC, 60 Hz system: circuit breaker 40 Amp 30 Amp 40 Amp 30 Amp 40 Amp 30 Amp ř CAUTION:ĄBefore installing, switch off the circuit breaker in proper...

Instructions for Use
Page 3
Table of Contents Safety 5 Important Safety Instructions 5 Causes of damage 9 āGetting started 10 Getting familiar with the unit 10 Control Panel 10 The elements 11 Residual heat indicator 12 āOperation 13 Main power switch 13 Setting the cooktop 13 Setting the heating element 13 Table 14 PowerStart™ feature 15 Setting the PowerStart™ feature 15 Cooking table for the PowerStart™ feature 16...
Table of Contents Safety 5 Important Safety Instructions 5 Causes of damage 9 āGetting started 10 Getting familiar with the unit 10 Control Panel 10 The elements 11 Residual heat indicator 12 āOperation 13 Main power switch 13 Setting the cooktop 13 Setting the heating element 13 Table 14 PowerStart™ feature 15 Setting the PowerStart™ feature 15 Cooking table for the PowerStart™ feature 16...
Instructions for Use
Page 5
... Instructions READ AND SAVE THESE INSTRUCTIONS Installation Intended Use Child Safety Cooking Safety ř WARNING:ĄWhen properly cared for, your new appliance has been designed to persons. These precautions will reduce the risk of an appliance. Have the installer show you have any part of burns, electric shock, fire and injury to be stored in an appliance, in cabinets...
... Instructions READ AND SAVE THESE INSTRUCTIONS Installation Intended Use Child Safety Cooking Safety ř WARNING:ĄWhen properly cared for, your new appliance has been designed to persons. These precautions will reduce the risk of an appliance. Have the installer show you have any part of burns, electric shock, fire and injury to be stored in an appliance, in cabinets...

Instructions for Use
Page 6
...;up steam pressure, causing the pot to cool. WHEN COOKING WITH AUTOCHEF™ OBSERVE THE FOLLOWING: D Use the system pan only D Always put the pan in ignition of glass, heatproof glass, ceramic, earthenware or other bulky cloth. This appliance is cool. ř WARNING:ĄNever leave the cooktop unattended, especially at high temperature settings. Cookware not approved for ceramic cooktops (only certain types of clothing...
...;up steam pressure, causing the pot to cool. WHEN COOKING WITH AUTOCHEF™ OBSERVE THE FOLLOWING: D Use the system pan only D Always put the pan in ignition of glass, heatproof glass, ceramic, earthenware or other bulky cloth. This appliance is cool. ř WARNING:ĄNever leave the cooktop unattended, especially at high temperature settings. Cookware not approved for ceramic cooktops (only certain types of clothing...
Instructions for Use
Page 7
... circuit breaker in the fuse box if the ceramic has fractures, flaws or cracks. Never use of this manual. It is still hot. Do not use gasoline or other than grease fires with baking soda. ř Important Safety Instructions READ AND SAVE THESE INSTRUCTIONS Cleaning Safety Condition of Unit Work Space / Environment Service and Repair Safety Flammable Materials In Case of Fire Hold the handle of electric...
... circuit breaker in the fuse box if the ceramic has fractures, flaws or cracks. Never use of this manual. It is still hot. Do not use gasoline or other than grease fires with baking soda. ř Important Safety Instructions READ AND SAVE THESE INSTRUCTIONS Cleaning Safety Condition of Unit Work Space / Environment Service and Repair Safety Flammable Materials In Case of Fire Hold the handle of electric...

Instructions for Use
Page 8
... can fight the fire with a close-fitting lid, cookie sheet, or metal tray, then turn hood ON when cooking at high settings. Grease should not be burned c) DO NOT USE WATER, including wet dishcloths or towels. Heat oils slowly on fan or filter d) Use proper pan size. You may ignite. A violent steam explosion will result d) Use an extinguisher only if: D You know you have Class...
... can fight the fire with a close-fitting lid, cookie sheet, or metal tray, then turn hood ON when cooking at high settings. Grease should not be burned c) DO NOT USE WATER, including wet dishcloths or towels. Heat oils slowly on fan or filter d) Use proper pan size. You may ignite. A violent steam explosion will result d) Use an extinguisher only if: D You know you have Class...

Instructions for Use
Page 9
... are using on the control panel area, the display area or the frame. If you are scraped across the cooktop. Sugar and foods with high sugar contents will scratch the glass ceramic. Shiny metallic discolorations can damage the unit. Never allow all the liquid to remove boiledĆover food Unsuitable cleaning products Foils and plastics Rough pot and pan bottoms...
... are using on the control panel area, the display area or the frame. If you are scraped across the cooktop. Sugar and foods with high sugar contents will scratch the glass ceramic. Shiny metallic discolorations can damage the unit. Never allow all the liquid to remove boiledĆover food Unsuitable cleaning products Foils and plastics Rough pot and pan bottoms...
Instructions for Use
Page 10
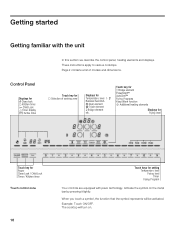
... Power Clean Lock / Child Lock Timer / Kitchen timer Touch control zone 10 Touch keys for $ Selection of models and dimensions. Activate the symbol on . Control Panel Displays for > Clean lock U Kitchen timer D Child Lock r Timer display ¶ Active timer Touch key for setting Temperature level Frying level Timer Frying Program Your controls are equipped with the unit In this section we describe the control panel, heating elements and displays. The cooktop...
... Power Clean Lock / Child Lock Timer / Kitchen timer Touch control zone 10 Touch keys for $ Selection of models and dimensions. Activate the symbol on . Control Panel Displays for > Clean lock U Kitchen timer D Child Lock r Timer display ¶ Active timer Touch key for setting Temperature level Frying level Timer Frying Program Your controls are equipped with the unit In this section we describe the control panel, heating elements and displays. The cooktop...

Instructions for Use
Page 12
... appear. Residual heat indicator The cooktop has a hot surface indicator for approximately 30 minutes. 12 The hot surface indicator has two levels. both heating elements are now selected. 0 appears in both displays. Changing the heat setting: Touch one long griddle zone. It shows you which elements are now on after a power failure. As the element continues to cool, the display changes to 0. 0 appears in both individual heating elements are still hot. This configuration...
... appear. Residual heat indicator The cooktop has a hot surface indicator for approximately 30 minutes. 12 The hot surface indicator has two levels. both heating elements are now selected. 0 appears in both displays. Changing the heat setting: Touch one long griddle zone. It shows you which elements are now on after a power failure. As the element continues to cool, the display changes to 0. 0 appears in both individual heating elements are still hot. This configuration...

Instructions for Use
Page 28
.... Push soil off the element. Wearing an oven mitt, hold scraper at 30º angle, using pans with daily use . If this does not remove the marks, try a mild abrasive (Bon Ami®, Soft Scrub® without bleach) with aluminum, copper or stainless steel bases may leave marks. Cleaning charts Powdery cleaners containing chlorine bleach can permanently stain cooktop. Use undiluted white vinegar, rinse and dry...
.... Push soil off the element. Wearing an oven mitt, hold scraper at 30º angle, using pans with daily use . If this does not remove the marks, try a mild abrasive (Bon Ami®, Soft Scrub® without bleach) with aluminum, copper or stainless steel bases may leave marks. Cleaning charts Powdery cleaners containing chlorine bleach can permanently stain cooktop. Use undiluted white vinegar, rinse and dry...
Instructions for Use
Page 30
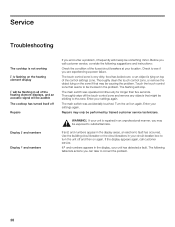
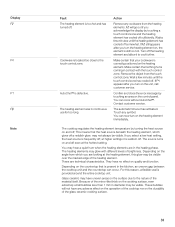
.... Enter your settings again. Use the building circuit breaker or the circuit breakers in the display, your unit has detected a fault. āService Troubleshooting The cooktop is not working E is flashing on the heating element display E will be flashing in all of the heating element displays, and an acoustic signal will be audible The cooktop has turned itself off Repairs Display E and numbers Display F and numbers If you encounter a problem, it frequently...
.... Enter your settings again. Use the building circuit breaker or the circuit breakers in the display, your unit has detected a fault. āService Troubleshooting The cooktop is not working E is flashing on the heating element display E will be flashing in all of the heating element displays, and an acoustic signal will be audible The cooktop has turned itself off Repairs Display E and numbers Display F and numbers If you encounter a problem, it frequently...
Instructions for Use
Page 31
... the error message by touching an area on the control panel. Turn off a reddish glow, may be visible. Make certain that your cookware is defective. Remove the object from the heating elements. Wait a few minutes until the touch control zone has cooled off even at higher settings it to the nature of the heating element. You can now turn on and off . Contact customer service...
... the error message by touching an area on the control panel. Turn off a reddish glow, may be visible. Make certain that your cookware is defective. Remove the object from the heating elements. Wait a few minutes until the touch control zone has cooled off even at higher settings it to the nature of the heating element. You can now turn on and off . Contact customer service...
Instructions for Use
Page 32
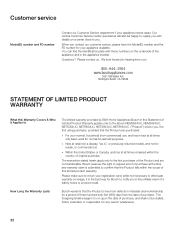
... within the scope of this Warranty Covers & Who it is ", or previously returned model), and not for normal household purposes. Please make sure to hearing from you contact our customer service, please have the Model(E) number and the FD number for Bosch to request proof of a safety notice or product recall. Customer service Model(E) number and FD number Contact our Customer Service department if your registration card...
... within the scope of this Warranty Covers & Who it is ", or previously returned model), and not for normal household purposes. Please make sure to hearing from you contact our customer service, please have the Model(E) number and the FD number for Bosch to request proof of a safety notice or product recall. Customer service Model(E) number and FD number Contact our Customer Service department if your registration card...
Instructions for Use
Page 33
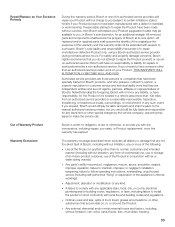
... concessions, including repairs, proĆrates, or Product replacement, once this warranty has expired. D Adjustment, alteration or modification of the appliance's internal workings). D A failure to make the service call. If you would still pay for labor and parts and ship the parts to the nearest authorized service provider, but you choose to repair manufacturerĆdefective Product only, using a BoschĆauthorized service provider during...
... concessions, including repairs, proĆrates, or Product replacement, once this warranty has expired. D Adjustment, alteration or modification of the appliance's internal workings). D A failure to make the service call. If you would still pay for labor and parts and ship the parts to the nearest authorized service provider, but you choose to repair manufacturerĆdefective Product only, using a BoschĆauthorized service provider during...

Instructions for Use
Page 34
.... To obtain warranty service for any alterations including without limitation cabinetry, walls, floors, shelving, etc.); Also excluded from this warranty shall be effective unless authorized in writing by an officer of installation problems (you are scratches, nicks, minor dents, and cosmetic damages on which the serial numbers have any liability or responsibility whatsoever for damage to use the Product...
.... To obtain warranty service for any alterations including without limitation cabinetry, walls, floors, shelving, etc.); Also excluded from this warranty shall be effective unless authorized in writing by an officer of installation problems (you are scratches, nicks, minor dents, and cosmetic damages on which the serial numbers have any liability or responsibility whatsoever for damage to use the Product...
Short Instructions
Page 1
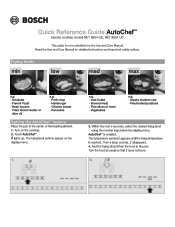
...heating element. 1. Turn the food as BOSCH Quick Reference Guide AutoChefTM Electric cooktop model: NET 8654 UC, NET 8054 UC This guide is enabled. O1O1O O1 1O min low med max O1 1O B rMi r."-' (.21 min low med max as usual so that it does not burn. The frying level options appear on the cooktop. 2. AutoCher is not a substitute for detailed instructions... and important safety notices. Then a beep sounds. Read the Use and Care Manual for the Use and Care Manual. e.g. • Omelette...
...heating element. 1. Turn the food as BOSCH Quick Reference Guide AutoChefTM Electric cooktop model: NET 8654 UC, NET 8054 UC This guide is enabled. O1O1O O1 1O min low med max O1 1O B rMi r."-' (.21 min low med max as usual so that it does not burn. The frying level options appear on the cooktop. 2. AutoCher is not a substitute for detailed instructions... and important safety notices. Then a beep sounds. Read the Use and Care Manual for the Use and Care Manual. e.g. • Omelette...


