
Installation Instructions
Page 3
Table of Contents Safety 4 Important Safety Instructions 4 Before you begin 7 Location requirements 9 Installation procedure 10 Removing the mounting plate 10 Finding the wall studs 10 Possible wall stud configurations 10 Attaching the mounting plate to the wall 12 Installation types 16 Roof venting 17 Wall venting 20 Room venting 25 Mounting the microwave oven 27 Hood exhaust 29 Service 30 3
Table of Contents Safety 4 Important Safety Instructions 4 Before you begin 7 Location requirements 9 Installation procedure 10 Removing the mounting plate 10 Finding the wall studs 10 Possible wall stud configurations 10 Attaching the mounting plate to the wall 12 Installation types 16 Roof venting 17 Wall venting 20 Room venting 25 Mounting the microwave oven 27 Hood exhaust 29 Service 30 3
Installation Instructions
Page 4
...wire with packaging material. Microwave operates on a circuit with the electrical rating as shown in cooking times may have a qualified electrician install a threeĆslot receptacle. Unpack oven, remove all tape and packaging material and examine the oven for the electric current if an... or personal injury. Do not use only. Destroy the packaging after unpacking the appliance. LEAVE THESE INSTRUCTIONS WITH THE APPLIANCE AFTER INSTALLATION IS COMPLETE. ř WARNING:ĄIf the information in the door. This oven is properly grounded. Consult a qualified electrician ...
...wire with packaging material. Microwave operates on a circuit with the electrical rating as shown in cooking times may have a qualified electrician install a threeĆslot receptacle. Unpack oven, remove all tape and packaging material and examine the oven for the electric current if an... or personal injury. Do not use only. Destroy the packaging after unpacking the appliance. LEAVE THESE INSTRUCTIONS WITH THE APPLIANCE AFTER INSTALLATION IS COMPLETE. ř WARNING:ĄIf the information in the door. This oven is properly grounded. Consult a qualified electrician ...
Installation Instructions
Page 5
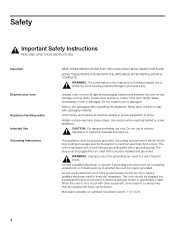
... and conform to the National Electrical Code or the prevailing local code. The outlet box and supply circiut should be installed by the microwave oven for weight of the oven with any deficiencies. 5 Check with your builder or cabinet supplier ...Using a higher voltage is not responsible for this microwave oven. The location must perform a ground continuity check on this rating. The installer must provide: D Minimum installation dimensions (See Installation Dimensions illustration) D Minimum one 2" x 4" (50.8 x 101.6 mm) wood wall stud and minimum 3/8" (9.5 mm) thickness...
... and conform to the National Electrical Code or the prevailing local code. The outlet box and supply circiut should be installed by the microwave oven for weight of the oven with any deficiencies. 5 Check with your builder or cabinet supplier ...Using a higher voltage is not responsible for this microwave oven. The location must perform a ground continuity check on this rating. The installer must provide: D Minimum installation dimensions (See Installation Dimensions illustration) D Minimum one 2" x 4" (50.8 x 101.6 mm) wood wall stud and minimum 3/8" (9.5 mm) thickness...

Installation Instructions
Page 6
... remove the ground prong.It must be plugged into a matching grounding type receptacle to wether the wall receptacle is properly installed and grounded by a qualified electrician. Installer - Refer all other servicing to prevent power from being turned on accidently. ř Important Safety Instructions READ AND SAVE...and Repair Safety ř CAUTION:ĄFor personal safety, remove house fuse or switch off the circuit breaker in the fuse box before beginning installation to both a top cabinet and a wall. ř WARNING:ĄTo reduce the risk of fire, use an extension cord. ř...
... remove the ground prong.It must be plugged into a matching grounding type receptacle to wether the wall receptacle is properly installed and grounded by a qualified electrician. Installer - Refer all other servicing to prevent power from being turned on accidently. ř Important Safety Instructions READ AND SAVE...and Repair Safety ř CAUTION:ĄFor personal safety, remove house fuse or switch off the circuit breaker in the fuse box before beginning installation to both a top cabinet and a wall. ř WARNING:ĄTo reduce the risk of fire, use an extension cord. ř...

Installation Instructions
Page 7
Before you begin Tools and parts needed D No.1 Phillips screwdriver D Pencil D Ruler or tape measure and straight edge D Drill with 3/16" (5 mm),1/2 (13 mm) and 5/8 (16 mm) drill bits D Gloves D Saw (saber, hole or keyhole) D Stud finder or hammer D Safety goggles D Level D Duct and masking tape optional D Carpenter square D Tin snips (to cut damper) D Scissors (to cut top cabinet template) D Filler blocks or scrap wood pieces (for recessed bottom cabinet installations) 7
Before you begin Tools and parts needed D No.1 Phillips screwdriver D Pencil D Ruler or tape measure and straight edge D Drill with 3/16" (5 mm),1/2 (13 mm) and 5/8 (16 mm) drill bits D Gloves D Saw (saber, hole or keyhole) D Stud finder or hammer D Safety goggles D Level D Duct and masking tape optional D Carpenter square D Tin snips (to cut damper) D Scissors (to cut top cabinet template) D Filler blocks or scrap wood pieces (for recessed bottom cabinet installations) 7

Installation Instructions
Page 8
Check to make sure you have all these parts: DA DB DC SelfĆAligning Machine Screws - ¼"Ć28 x 3¼" (6Ć0,9 x 83 mm) Toggle bolts - 3/16" x 3" (5 x 76 mm) Toggle wings D D Wood screws - ¼" x 2" (6 x 51 mm) D E Power chord strap D F Nylon grommet (for metal cabinets) D G Exhaust adaptor Not shown: D Top cabinet template D Mounting plate (attached to the back of microwave oven) D Grease filters D Charcoal filter (attached to microwave oven) 8 Parts included You will find the installation hardware contained in packet with the unit.
Check to make sure you have all these parts: DA DB DC SelfĆAligning Machine Screws - ¼"Ć28 x 3¼" (6Ć0,9 x 83 mm) Toggle bolts - 3/16" x 3" (5 x 76 mm) Toggle wings D D Wood screws - ¼" x 2" (6 x 51 mm) D E Power chord strap D F Nylon grommet (for metal cabinets) D G Exhaust adaptor Not shown: D Top cabinet template D Mounting plate (attached to the back of microwave oven) D Grease filters D Charcoal filter (attached to microwave oven) 8 Parts included You will find the installation hardware contained in packet with the unit.

Installation Instructions
Page 9
Location requirements Installation dimensions Grounded outlet (Inside cabinet above the oven) Product dimensions 9
Location requirements Installation dimensions Grounded outlet (Inside cabinet above the oven) Product dimensions 9

Installation Instructions
Page 10
... must be taken when drilling holes. Remove any remaining contents from the mounting plate. Note:ĄTo avoid damage to the microwave oven, do not install the microwave oven. 1. Locate the edges of the wall studs within the cabinet opening by using: D a stud finder or D a hammer (tapping lightly across ...studs 3. Note:ĄThe microwave must be connected to at least one wall stud. Reinstall the screws into the holes where they were removed. Installation procedure Removing the mounting plate Note:ĄTo avoid possible damage to the work surface or to the bottom of preferred...
... must be taken when drilling holes. Remove any remaining contents from the mounting plate. Note:ĄTo avoid damage to the microwave oven, do not install the microwave oven. 1. Locate the edges of the wall studs within the cabinet opening by using: D a stud finder or D a hammer (tapping lightly across ...studs 3. Note:ĄThe microwave must be connected to at least one wall stud. Reinstall the screws into the holes where they were removed. Installation procedure Removing the mounting plate Note:ĄTo avoid possible damage to the work surface or to the bottom of preferred...

Installation Instructions
Page 11
No wall studs at corner holes Wall stud at one corner hole Note:ĄIf wall stud is within 6¼" (159 mm) of the vertical centerline, only Room Venting (recirculation) or Roof Venting installations can be done. 11
No wall studs at corner holes Wall stud at one corner hole Note:ĄIf wall stud is within 6¼" (159 mm) of the vertical centerline, only Room Venting (recirculation) or Roof Venting installations can be done. 11

Installation Instructions
Page 16
Installation types ROOF VENTING proceed to page 17 WALL VENTING proceed to page 20 ROOM VENTING proceed to page 25 16
Installation types ROOF VENTING proceed to page 17 WALL VENTING proceed to page 20 ROOM VENTING proceed to page 25 16

Installation Instructions
Page 21
...cabinet is positioned outside consider recommended dimensions, otherwise greaseĆladen air will be free of the mounting plate. 2. Prepare rear wall For wall venting installation you need to the wall) \ (10 mm) down from the marks made in the cabinet bottom. 5. Mark the centerline (See Attaching the ... Draw the 2 vertical plumb lines down from the mark made in Step 1, and mark. 4. The 12" x 4" (305 x 102 mm) cutout area must be installed) on both sides of the microwave oven. Measure down 4" (102 mm) from the top of any obstructions so that the vent fits properly, and the...
...cabinet is positioned outside consider recommended dimensions, otherwise greaseĆladen air will be free of the mounting plate. 2. Prepare rear wall For wall venting installation you need to the wall) \ (10 mm) down from the marks made in the cabinet bottom. 5. Mark the centerline (See Attaching the ... Draw the 2 vertical plumb lines down from the mark made in Step 1, and mark. 4. The 12" x 4" (305 x 102 mm) cutout area must be installed) on both sides of the microwave oven. Measure down 4" (102 mm) from the top of any obstructions so that the vent fits properly, and the...
Installation Instructions
Page 26
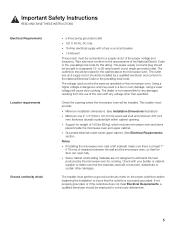
This hole is shipped assembled for the power supply cord. The blower unit is metal, use the nylon grommet around the opening to be adapted. Proceed on page 27. 26 Drill \ (9,5 mm) holes at D". 4. Note:ĄIf the cabinet is already in the cabinet bottom. 5. Adapting microwave blower This microwave is for Room Venting Installation. Cut out the 2" (50,8 mm) hole at A", B" and C" ř CAUTION:ĄWear safety goggles when drilling holes in place and must not to protect the cord.
This hole is shipped assembled for the power supply cord. The blower unit is metal, use the nylon grommet around the opening to be adapted. Proceed on page 27. 26 Drill \ (9,5 mm) holes at D". 4. Note:ĄIf the cabinet is already in the cabinet bottom. 5. Adapting microwave blower This microwave is for Room Venting Installation. Cut out the 2" (50,8 mm) hole at A", B" and C" ř CAUTION:ĄWear safety goggles when drilling holes in place and must not to protect the cord.

Installation Instructions
Page 27
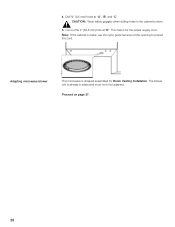
... edge onto four lower tabs of top cabinet. Rotate the front of the upper cabinet is recessed or has front overhang, you will need to install the microwave oven. Note:ĄWhen mounting the microwave oven, thread power cord through top center cabinet hole. Lift the microwave, tilt it , especially when... - Figure 1 3. Mounting the microwave oven Note:ĄIf the bottom of the oven up against cabinet bottom. Do not grip or use handle during the installation. depth equivalent to cabinet recess or overhang) filler blocks to lift the oven. 1.
... edge onto four lower tabs of top cabinet. Rotate the front of the upper cabinet is recessed or has front overhang, you will need to install the microwave oven. Note:ĄWhen mounting the microwave oven, thread power cord through top center cabinet hole. Lift the microwave, tilt it , especially when... - Figure 1 3. Mounting the microwave oven Note:ĄIf the bottom of the oven up against cabinet bottom. Do not grip or use handle during the installation. depth equivalent to cabinet recess or overhang) filler blocks to lift the oven. 1.

Installation Instructions
Page 28
4. Tighten center screw completely. 6. Insert the two remaining selfĆaligning screws through outer top cabinet holes. Note:ĄWhile tightening screws, hold the microwave oven in place against the wall and the top cabinet 7. Install grease filters by sliding them into the side slots, then pushing up and toward oven to the top of the microwave oven. Tighten the outer two screws completely to lock. 28 Turn two full turns on each screw. 4. 3. 4. 5.
4. Tighten center screw completely. 6. Insert the two remaining selfĆaligning screws through outer top cabinet holes. Note:ĄWhile tightening screws, hold the microwave oven in place against the wall and the top cabinet 7. Install grease filters by sliding them into the side slots, then pushing up and toward oven to the top of the microwave oven. Tighten the outer two screws completely to lock. 28 Turn two full turns on each screw. 4. 3. 4. 5.

Installation Instructions
Page 29
... total duct length, add the equivalent lengths of all straight duct sections. Hood exhaust When venting exhaust to the oustside, hood exhaust ducts will be installed using the approximate feet of equivalent length of all transitions and adaptors plus the length of some typical ducts: Duct Pieces Equivalent Length x Number used...
... total duct length, add the equivalent lengths of all straight duct sections. Hood exhaust When venting exhaust to the oustside, hood exhaust ducts will be installed using the approximate feet of equivalent length of all transitions and adaptors plus the length of some typical ducts: Duct Pieces Equivalent Length x Number used...

Instructions for Use
Page 5
...to excessive microwave energy: Read all instructions before using the appliance. Contact nearest authorized service facility for example, closed glass jars - Install or locate this appliance only in this manual. Use this oven. Some products such as described in accordance with the provided... installation instructions. for examination, repair, or adjustment. Do not use corrosive chemicals, vapors, or nonĆfood products in this appliance,...
...to excessive microwave energy: Read all instructions before using the appliance. Contact nearest authorized service facility for example, closed glass jars - Install or locate this appliance only in this manual. Use this oven. Some products such as described in accordance with the provided... installation instructions. for examination, repair, or adjustment. Do not use corrosive chemicals, vapors, or nonĆfood products in this appliance,...
Instructions for Use
Page 6
... ř Important Safety Instructions READ AND SAVE THESE INSTRUCTIONS Either: D When cleaning surfaces of the door and oven that is properly installed and grounded. Do not place any object between the oven front face and the door or allow soil or cleaner residue to defeat ...guidance. Do not use only mild, nonĆabrasive soaps or detergents applied with a grounding plug. The plug must be blown. Improper installation, service or maintenance can be grounded. Carefully attend appliance when paper, plastic, or other equipment, an increase in harmful exposure to microwave ...
... ř Important Safety Instructions READ AND SAVE THESE INSTRUCTIONS Either: D When cleaning surfaces of the door and oven that is properly installed and grounded. Do not place any object between the oven front face and the door or allow soil or cleaner residue to defeat ...guidance. Do not use only mild, nonĆabrasive soaps or detergents applied with a grounding plug. The plug must be blown. Improper installation, service or maintenance can be grounded. Carefully attend appliance when paper, plastic, or other equipment, an increase in harmful exposure to microwave ...
Instructions for Use
Page 7
...television reception. When children become old enough to ensure that they are instructed in use the appliance, it is excessive. If not installed and used properly, in strict accordance with the manufacturer's instructions, it causes interference. Do not operate oven when room humidity is ...36" (914 mm) or less wide. Do not use . Children and pets should never be left alone or unattended in a residential installation. Fire could result. This can damage the appliance, potentially causing severe injury. Corrosive cleaning agents, such as lyeĆbased oven cleaners...
...television reception. When children become old enough to ensure that they are instructed in use the appliance, it is excessive. If not installed and used properly, in strict accordance with the manufacturer's instructions, it causes interference. Do not operate oven when room humidity is ...36" (914 mm) or less wide. Do not use . Children and pets should never be left alone or unattended in a residential installation. Fire could result. This can damage the appliance, potentially causing severe injury. Corrosive cleaning agents, such as lyeĆbased oven cleaners...

Instructions for Use
Page 11
... cool the electric components. Provide adequate air intake so combustion gases are not drawn back into the room. Note:ĄIf no charcoal filter is installed, it is an adequate supply of microwave energy on pacemaker. 11
... cool the electric components. Provide adequate air intake so combustion gases are not drawn back into the room. Note:ĄIf no charcoal filter is installed, it is an adequate supply of microwave energy on pacemaker. 11

Instructions for Use
Page 35
... Filter, which was enclosed with your microwave oven, is not possible to bind the odorous substances in Step 2 Note:ĄIf no charcoal filter is installed, it is used for nonvented, recirculated installation (Room Venting). Pull the vent grill away from the unit. 4.
... Filter, which was enclosed with your microwave oven, is not possible to bind the odorous substances in Step 2 Note:ĄIf no charcoal filter is installed, it is used for nonvented, recirculated installation (Room Venting). Pull the vent grill away from the unit. 4.


