
Instructions for Use
Page 2
...36 Maintenance 36 Service 38 Before Calling Service 38 Questions? 1-800-944-2904 www.boschappliances.com 5551 McFadden Ave. Table of Your Warming Drawer 30 Cleaning and Maintenance 31 Cleaning - Oven 33 Cleaning - Huntington Beach, CA 92649 We look forward to hearing from you! Cooktop 16 About ...the Cooktop 16 Operation 16 Operation - Warming Drawer (some models 21 About the Warming Drawer 21 Operation 21 Getting the Most Out of Your Appliance 22 Getting the Most Out of Your Cooktop 23 Getting...
...36 Maintenance 36 Service 38 Before Calling Service 38 Questions? 1-800-944-2904 www.boschappliances.com 5551 McFadden Ave. Table of Your Warming Drawer 30 Cleaning and Maintenance 31 Cleaning - Oven 33 Cleaning - Huntington Beach, CA 92649 We look forward to hearing from you! Cooktop 16 About ...the Cooktop 16 Operation 16 Operation - Warming Drawer (some models 21 About the Warming Drawer 21 Operation 21 Getting the Most Out of Your Appliance 22 Getting the Most Out of Your Cooktop 23 Getting...

Instructions for Use
Page 8
... the burner cap to wipe up. As a result, there are not interchangeable. not shown) Sealed Gas Burners The cooktop has sealed gas burners. Getting Started Parts and Accessories Table 1: Parts and Accessories Key 1 2 3 4 5 12 6 7 8 11 9 or 10 (model dependent) # Part 1 Oven Control Panel and Knob 2 Burner Caps (4) 3 Burner Grates (2) 4 Cooktop Control Knob 5 Probe...
... the burner cap to wipe up. As a result, there are not interchangeable. not shown) Sealed Gas Burners The cooktop has sealed gas burners. Getting Started Parts and Accessories Table 1: Parts and Accessories Key 1 2 3 4 5 12 6 7 8 11 9 or 10 (model dependent) # Part 1 Oven Control Panel and Knob 2 Burner Caps (4) 3 Burner Grates (2) 4 Cooktop Control Knob 5 Probe...
Instructions for Use
Page 9
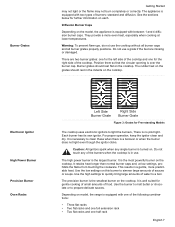
...combinations: • Three flat racks • Two flat racks and one full extension rack • Two flat racks and one for Free-standing Models The cooktop uses electronic ignitors to clean these when there is turned on the cooktop. Warning: To prevent flare-ups, do not use the ...cooktop without all burner caps and all burner grates properly positions. The rubber feet on the grates should rest flat on model, the range is the smallest burner on . Electronic Ignitor High Power Burner Precision Burner Oven Racks Left Side Burner Grate Right Side Burner Grate Figure 3:...
...combinations: • Three flat racks • Two flat racks and one full extension rack • Two flat racks and one for Free-standing Models The cooktop uses electronic ignitors to clean these when there is turned on the cooktop. Warning: To prevent flare-ups, do not use the ...cooktop without all burner caps and all burner grates properly positions. The rubber feet on the grates should rest flat on model, the range is the smallest burner on . Electronic Ignitor High Power Burner Precision Burner Oven Racks Left Side Burner Grate Right Side Burner Grate Figure 3:...
Instructions for Use
Page 10
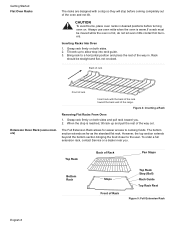
... rack firmly on both sides and pull rack toward the back wall of the range. Bring rack to cooking foods. When the stop is hot, do not let oven mitts contact hot burners. Extension Oven Rack (some models) The Full Extension Rack allows for easier access to a horizontal position and press the...
... rack firmly on both sides and pull rack toward the back wall of the range. Bring rack to cooking foods. When the stop is hot, do not let oven mitts contact hot burners. Extension Oven Rack (some models) The Full Extension Rack allows for easier access to a horizontal position and press the...
Instructions for Use
Page 12
... half oven rack can also be used outside of an appliance, especially surface unit drip bowls or oven bottom. Getting Started Half Oven Rack (Some Models) Cleaning Clean rack with hot sudsy water.
... half oven rack can also be used outside of an appliance, especially surface unit drip bowls or oven bottom. Getting Started Half Oven Rack (Some Models) Cleaning Clean rack with hot sudsy water.
Instructions for Use
Page 13
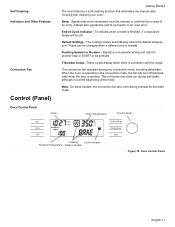
Signals that eliminates the manual labor involved with the range. End-of the mode. Default Settings - Signals an incomplete setting and calls for the bake mode. F Number Codes -These codes display when there is opened. ... automatically select the default temperature. The convection fan does run during self-clean, although not at the beginning of -Cycle Indicator - Beep - Note: On some models, the convection fan also runs during any convection mode, including dehydrate. When the oven is operating in the convection mode, the fan will sound. Flashing...
Signals that eliminates the manual labor involved with the range. End-of the mode. Default Settings - Signals an incomplete setting and calls for the bake mode. F Number Codes -These codes display when there is opened. ... automatically select the default temperature. The convection fan does run during self-clean, although not at the beginning of -Cycle Indicator - Beep - Note: On some models, the convection fan also runs during any convection mode, including dehydrate. When the oven is operating in the convection mode, the fan will sound. Flashing...
Instructions for Use
Page 14
...to the desired heat setting. Each counts down and turn to the symbol to light and then to control the heat level of your range. Warming Drawer Indicator - Turn the dial to display cooking mode. CLOCK will still be displayed and the hour digits will appear during...cooking and cleaning modes. The touchpads, in the oven. The knobs are active for detailed instructions. Press Time. Indicates that the warming drawer (some models) - The icon will sound to set up your fingertip. Used to complete an entry. Door Locking Indicator - Start - Press OFF to select...
...to the desired heat setting. Each counts down and turn to the symbol to light and then to control the heat level of your range. Warming Drawer Indicator - Turn the dial to display cooking mode. CLOCK will still be displayed and the hour digits will appear during...cooking and cleaning modes. The touchpads, in the oven. The knobs are active for detailed instructions. Press Time. Indicates that the warming drawer (some models) - The icon will sound to set up your fingertip. Used to complete an entry. Door Locking Indicator - Start - Press OFF to select...
Instructions for Use
Page 18
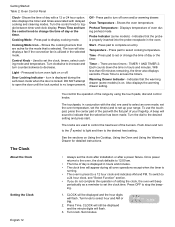
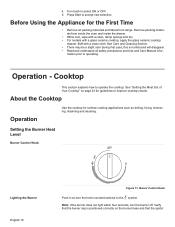
...Section. • There may be a slight odor during first uses; Cooktop This section explains how to the symbol. 4. Remove packing materials from range. About the Cooktop Operation Use the cooktop for the First Time • Remove all safety precautions and Use and Care Manual infor- Operation -... labels from inside the oven and inside the drawer. • While cool, wipe with a clean, damp sponge and dry. • For models with a clean cloth. Note: If the burner does not light within four seconds, turn the knob counterclockwise to operate the cooktop. Turn knob ...
...Section. • There may be a slight odor during first uses; Cooktop This section explains how to the symbol. 4. Remove packing materials from range. About the Cooktop Operation Use the cooktop for the First Time • Remove all safety precautions and Use and Care Manual infor- Operation -... labels from inside the oven and inside the drawer. • While cool, wipe with a clean, damp sponge and dry. • For models with a clean cloth. Note: If the burner does not light within four seconds, turn the knob counterclockwise to operate the cooktop. Turn knob ...

Instructions for Use
Page 20
Automatic Convection Conversion (models with convection bake) In the convection bake mode, the temperature is no longer seen in the display. See "Turn Automatic Convection Conversion ON or OFF" .... If setting only minutes, press START. Select TIMER 1 or 2, then press TIME. Simply enter the package or recipe temperature when setting the mode and the range calculates the correct temperature. To change hours. 6. Hot Oven Indicator After the oven has been turned off, HOT appears in use. Otherwise, continue to select...
Automatic Convection Conversion (models with convection bake) In the convection bake mode, the temperature is no longer seen in the display. See "Turn Automatic Convection Conversion ON or OFF" .... If setting only minutes, press START. Select TIMER 1 or 2, then press TIME. Simply enter the package or recipe temperature when setting the mode and the range calculates the correct temperature. To change hours. 6. Hot Oven Indicator After the oven has been turned off, HOT appears in use. Otherwise, continue to select...

Instructions for Use
Page 22
...and oven turns off. 1. Note: Always remove probe from oven when cooking is preheated when the beep signals once. See "The Probe (some models) Setting the Probe Changing the Oven Temperature When Using the Probe Changing the Probe Temperature See "Set the Sabbath Feature" on page 25 for ...detailed instructions. The temperature range for 100°F up to 450°F (38°C up to 93°C). Make sure the probe is properly inserted into meat. 2. ...
...and oven turns off. 1. Note: Always remove probe from oven when cooking is preheated when the beep signals once. See "The Probe (some models) Setting the Probe Changing the Oven Temperature When Using the Probe Changing the Probe Temperature See "Set the Sabbath Feature" on page 25 for ...detailed instructions. The temperature range for 100°F up to 450°F (38°C up to 93°C). Make sure the probe is properly inserted into meat. 2. ...

Instructions for Use
Page 23
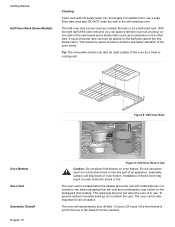
... drawer to crisp crackers, chips or dry cereal and to warm plates). • Be sure to operate the warming drawer. English 21 Warming Drawer (some models) This section explains how to maintain proper food temperature. Rail Lock 2 3 Figure 12: Warming Drawer Parts Drawer Interior: 25" W x 17" D x 5" H Dish sizes: • 2 -9 x 13" Pyrex... setting is safe to use the warming drawer to heat cold food (exception: it is selected: For recommended settings, see "Warming Drawer Chart" on page 30 for longer than one hour. See "Getting the Most Out of Your Warming Drawer" on page...
... drawer to crisp crackers, chips or dry cereal and to warm plates). • Be sure to operate the warming drawer. English 21 Warming Drawer (some models) This section explains how to maintain proper food temperature. Rail Lock 2 3 Figure 12: Warming Drawer Parts Drawer Interior: 25" W x 17" D x 5" H Dish sizes: • 2 -9 x 13" Pyrex... setting is safe to use the warming drawer to heat cold food (exception: it is selected: For recommended settings, see "Warming Drawer Chart" on page 30 for longer than one hour. See "Getting the Most Out of Your Warming Drawer" on page...

Instructions for Use
Page 27
... be displayed. Setting a higher temperature does not shorten preheat time. Getting the Most Out of Your Appliance Baking Pans Preheating the Oven The Probe (some models) Pan placement on one rack Pan placement on two racks Here are some...
... be displayed. Setting a higher temperature does not shorten preheat time. Getting the Most Out of Your Appliance Baking Pans Preheating the Oven The Probe (some models) Pan placement on one rack Pan placement on two racks Here are some...

Instructions for Use
Page 28
... well-suited for the bake mode. Default temperature is similar to proof bread. • Proofing is preheating for baking large quantities of food on the model, you may hear the convection fan while the oven is the rising of a yeast dough. • The Proofing mode temperatures are 140° - 220°...
... well-suited for the bake mode. Default temperature is similar to proof bread. • Proofing is preheating for baking large quantities of food on the model, you may hear the convection fan while the oven is the rising of a yeast dough. • The Proofing mode temperatures are 140° - 220°...
Instructions for Use
Page 34
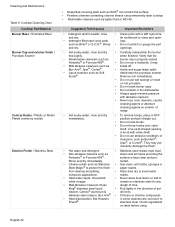
... / Enameled Steel Burner Cap and exterior finish / Porcelain Enamel Control Knobs / Plastic or Nickel Plated (varies by model) Exterior Finish / Stainless Steel • Soap-filled scouring pads such as SOS® can scratch the surface. ... Cleaners: Kleen length of time. and dry. it may per- Line up D-shaped opening in the direction of range. • Hot sudsy water; in OFF position and pull straight out. • Do not soak knobs. &#.... Verify that the burner cap is kept clean and pro- English 32 Suggested Technique(s) Important Reminders • Detergent and hot water;
... / Enameled Steel Burner Cap and exterior finish / Porcelain Enamel Control Knobs / Plastic or Nickel Plated (varies by model) Exterior Finish / Stainless Steel • Soap-filled scouring pads such as SOS® can scratch the surface. ... Cleaners: Kleen length of time. and dry. it may per- Line up D-shaped opening in the direction of range. • Hot sudsy water; in OFF position and pull straight out. • Do not soak knobs. &#.... Verify that the burner cap is kept clean and pro- English 32 Suggested Technique(s) Important Reminders • Detergent and hot water;

Instructions for Use
Page 38
... the grain. • Use clean, soft cloths, sponges or paper towels. • Rinse thoroughly with a soapy sponge, rinsed and dried. Cooktop Maintenance Stainless Steel Cooktop Models Oven Maintenance Removing the Door English 36 No maintenance is required other than daily cleaning as described in the Self-Clean mode. Open the door...
... the grain. • Use clean, soft cloths, sponges or paper towels. • Rinse thoroughly with a soapy sponge, rinsed and dried. Cooktop Maintenance Stainless Steel Cooktop Models Oven Maintenance Removing the Door English 36 No maintenance is required other than daily cleaning as described in the Self-Clean mode. Open the door...
Instructions for Use
Page 42
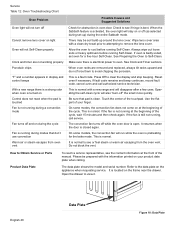
... or off while the oven door is badly soiled, set -up around the lens cover. This is a fault code. There may be prepared with a new range and will disappear after a few uses. Touch the center of the cycle. The convection fan turns off (as selected during the entire Sabbath mode. On... some modes, the convection fan does not come on the appliance when requesting service. The data plate shows the model and serial number. Open the drawer to remove the lens cover. Check to see or feel steam or warm air escaping from oven vent Possible...
... or off while the oven door is badly soiled, set -up around the lens cover. This is a fault code. There may be prepared with a new range and will disappear after a few uses. Touch the center of the cycle. The convection fan turns off (as selected during the entire Sabbath mode. On... some modes, the convection fan does not come on the appliance when requesting service. The data plate shows the model and serial number. Open the drawer to remove the lens cover. Check to see or feel steam or warm air escaping from oven vent Possible...
Instructions for Use
Page 43
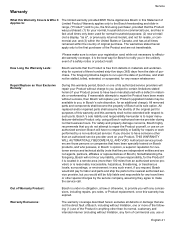
... any reason whatsoever. Out of Warranty Product: Bosch is under no responsibility or liability for any concessions, including repairs, pro-rates, or Product replacement, once this warranty has... BSH Home Appliances Bosch in this Statement of Limited Product Warranty applies only to the Bosch freestanding and slide-in range, ("Product") sold to you, the first using a Bosch -authorized service provider.... How Long the Warranty Lasts: Bosch warrants that the Product is free from an authorized service provider) or is ", or previously returned model), and not for an additional charge...
... any reason whatsoever. Out of Warranty Product: Bosch is under no responsibility or liability for any concessions, including repairs, pro-rates, or Product replacement, once this warranty has... BSH Home Appliances Bosch in this Statement of Limited Product Warranty applies only to the Bosch freestanding and slide-in range, ("Product") sold to you, the first using a Bosch -authorized service provider.... How Long the Warranty Lasts: Bosch warrants that the Product is free from an authorized service provider) or is ", or previously returned model), and not for an additional charge...
Installation Instructions
Page 1
GAS FREE-STANDING CONVECTION RANGE Installation Manual For Use with Model(s): all gas models
GAS FREE-STANDING CONVECTION RANGE Installation Manual For Use with Model(s): all gas models

Instructions for Use
Page 11
The data plate shows the model and serial number. Refer to view it. Refer to the data plate on the frame near the drawer. Call Service if: 1. The bake burner does ...
The data plate shows the model and serial number. Refer to view it. Refer to the data plate on the frame near the drawer. Call Service if: 1. The bake burner does ...

Installation Instructions
Page 3
... Calling Service 40 Questions? 1-800-944-2904 www.boschappliances.com 5551 McFadden Ave. Cooktop 17 About the Cooktop 17 Operation 18 Operation - Warming Drawer (some models 22 About the Warming Drawer 22 Operation 23 Getting the Most Out of Your Appliance 24 Getting the Most Out of Your Cooktop 24 Getting...
... Calling Service 40 Questions? 1-800-944-2904 www.boschappliances.com 5551 McFadden Ave. Cooktop 17 About the Cooktop 17 Operation 18 Operation - Warming Drawer (some models 22 About the Warming Drawer 22 Operation 23 Getting the Most Out of Your Appliance 24 Getting the Most Out of Your Cooktop 24 Getting...


