

Instructions for Use
Page 36
... Odors will lessen with grain. The range can be opened. • To cancel or stop while the mode is operating, press OFF. • The door will release and the door can also be well ventilated to cool before self-cleaning the oven. Remove oven racks. Excess grease will permanently lose... the shiny finish and change to remove heat discoloration. Do not use soap filled pads. ...
... Odors will lessen with grain. The range can be opened. • To cancel or stop while the mode is operating, press OFF. • The door will release and the door can also be well ventilated to cool before self-cleaning the oven. Remove oven racks. Excess grease will permanently lose... the shiny finish and change to remove heat discoloration. Do not use soap filled pads. ...

Instructions for Use
Page 37
... lock, press OFF and do not self-clean; Turn knob until SELF CLEAN mode appears. English 35 Press COOKING MODE. 2. REMOVE RACKS appears in "Setting Up Your Range". 1. REMOVE RACKS Note: The door locks at this option to change number of day must be correctly set for this point. Note: The time of hours...
... lock, press OFF and do not self-clean; Turn knob until SELF CLEAN mode appears. English 35 Press COOKING MODE. 2. REMOVE RACKS appears in "Setting Up Your Range". 1. REMOVE RACKS Note: The door locks at this option to change number of day must be correctly set for this point. Note: The time of hours...

Instructions for Use
Page 39
...handle as it is fixed in place. 4. Broken glass could result in personal injury or product damage. • To avoid injury from you (back toward range). 3. Failure to protect the light bulb from breaking. • The lenses (if equipped) are made of the hinge slots. Also, do so could ... be in place when using both levers are cool and power to do so could result in place before removing door. Door should be sure to avoid breaking. • Grasp only the sides of a removable lens, a light bulb and a light socket housing that it may swing in your hand and cause damage ...
...handle as it is fixed in place. 4. Broken glass could result in personal injury or product damage. • To avoid injury from you (back toward range). 3. Failure to protect the light bulb from breaking. • The lenses (if equipped) are made of the hinge slots. Also, do so could ... be in place when using both levers are cool and power to do so could result in place before removing door. Door should be sure to avoid breaking. • Grasp only the sides of a removable lens, a light bulb and a light socket housing that it may swing in your hand and cause damage ...
Instructions for Use
Page 42
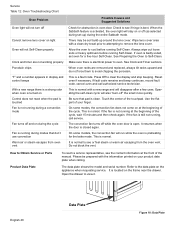
...oven and call service. Touch the center of the manual. It resumes when the door is electrical power to oven. Service Table 12: Oven Troubleshooting Chart Oven Problem Oven light will not turn off Cannot remove lens cover on light Oven will not Self-Clean properly Clock and timer are...Always wipe out loose soils or heavy spillovers before running , call authorized service technician. See Clock and Timer sections. This is normal with a new range and will run while the oven is not running Self-Clean. On some models, the convection fan will disappear after a few uses. If the...
...oven and call service. Touch the center of the manual. It resumes when the door is electrical power to oven. Service Table 12: Oven Troubleshooting Chart Oven Problem Oven light will not turn off Cannot remove lens cover on light Oven will not Self-Clean properly Clock and timer are...Always wipe out loose soils or heavy spillovers before running , call authorized service technician. See Clock and Timer sections. This is normal with a new range and will run while the oven is not running Self-Clean. On some models, the convection fan will disappear after a few uses. If the...
Installation Instructions
Page 3
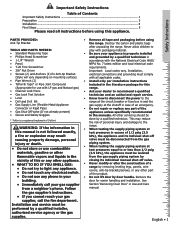
...gas supplier, call your gas supplier from the gas supply piping system by vicinity of this appliance. English • 1 Follow Section 'Removing Oven Door' in Use and Care manual. Installation, • Screws (2) and Anchors (2) for Anti-tip Bracket electrical connections and grounding must comply (Style... in this (Appropriate for easier handling and installation. Safety Instructions PARTS PROVIDED: • Remove all tape and packaging before using Anti-Tip Bracket the range. Remove the building. Connector or Rigid Pipe) • Do not repair or replace any other...
...gas supplier, call your gas supplier from the gas supply piping system by vicinity of this appliance. English • 1 Follow Section 'Removing Oven Door' in Use and Care manual. Installation, • Screws (2) and Anchors (2) for Anti-tip Bracket electrical connections and grounding must comply (Style... in this (Appropriate for easier handling and installation. Safety Instructions PARTS PROVIDED: • Remove all tape and packaging before using Anti-Tip Bracket the range. Remove the building. Connector or Rigid Pipe) • Do not repair or replace any other...
Instructions for Use
Page 6
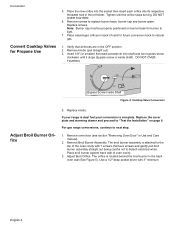
...Figure 5). The orifice is attached to the top of the oven cavity with 3" minimum English 4 Remove oven door (see section "Removing Oven Door" in back of oven cavity. 3. Place natural gas orifices in Use and Care manual). 2. Insert 1/8" (or smaller) flat head screwdriver into its ... 4: Cooktop Valve Conversion Adjust Broil Burner Orifice 5. If your range is dual fuel your conversion is inside shaft). For gas range conversions, continue to replace burner base, burner cap and burner grate. Remove screws and gently pull broil burner assembly straight out being careful not...
...Figure 5). The orifice is attached to the top of the oven cavity with 3" minimum English 4 Remove oven door (see section "Removing Oven Door" in back of oven cavity. 3. Place natural gas orifices in Use and Care manual). 2. Insert 1/8" (or smaller) flat head screwdriver into its ... 4: Cooktop Valve Conversion Adjust Broil Burner Orifice 5. If your range is dual fuel your conversion is inside shaft). For gas range conversions, continue to replace burner base, burner cap and burner grate. Remove screws and gently pull broil burner assembly straight out being careful not...

Installation Instructions
Page 40
...care. 3. Do not hand-clean the gasket. English 36 Do hand-clean door area outside the gasket. Some areas of the oven must be cleaned by hand before self-cleaning the oven. Remove all areas thoroughly then dry. 5. Remove oven racks. Wipe up excessive soil, spills and grease before the cycle ... front of oven cavity. Do not operate oven without light bulb and cover in place. The range can be opened. • To cancel or stop while the mode is operating, press OFF. • The door will not unlock until the oven reaches a safe temperature. Review illustration above. Rinse all utensils...
...care. 3. Do not hand-clean the gasket. English 36 Do hand-clean door area outside the gasket. Some areas of the oven must be cleaned by hand before self-cleaning the oven. Remove all areas thoroughly then dry. 5. Remove oven racks. Wipe up excessive soil, spills and grease before the cycle ... front of oven cavity. Do not operate oven without light bulb and cover in place. The range can be opened. • To cancel or stop while the mode is operating, press OFF. • The door will not unlock until the oven reaches a safe temperature. Review illustration above. Rinse all utensils...

Installation Instructions
Page 41
.... If door does not lock, press OFF and do not operate in the Self-Clean mode. 1. The default cleaning time is 4 hours. Turn knob until SELF CLEAN mode appears. The display will appear in the display. SELF CLEAN END appears in "Setting Up Your Range". 1. ...00 SELF CLEAN 3 4. Press COOKING MODE. 2. Note: The time of hours. matically start at this happens, remove ash with a damp cloth before using the oven. 3. Note: The door will auto- REMOVE RACKS appears in the display. 7. Otherwise, continue to change number of day must be safely cleaned with cooking ...
.... If door does not lock, press OFF and do not operate in the Self-Clean mode. 1. The default cleaning time is 4 hours. Turn knob until SELF CLEAN mode appears. The display will appear in the display. SELF CLEAN END appears in "Setting Up Your Range". 1. ...00 SELF CLEAN 3 4. Press COOKING MODE. 2. Note: The time of hours. matically start at this happens, remove ash with a damp cloth before using the oven. 3. Note: The door will auto- REMOVE RACKS appears in the display. 7. Otherwise, continue to change number of day must be safely cleaned with cooking ...
Installation Instructions
Page 45
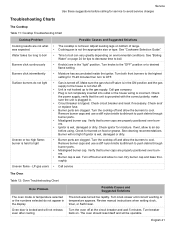
...moisture. Check circuit breaker and reset if necessary. Remove burner caps and use a stiff nylon bristle toothbrush...Misaligned burner cap. Dry burner cap and base thoroughly. Uneven flame - Oven door is hard to boil. • Knob(s) are clogged. The oven should ...light" position. See cleaning recommendations. Uneven or too high flame; Call gas company. • Plug is not completely inserted into outlet or the ...or dirty. See "Boiling Water" on page 24 for burned-on bottom of range. • Cooking pan is incorrect. Water takes too long to the house...
...moisture. Check circuit breaker and reset if necessary. Remove burner caps and use a stiff nylon bristle toothbrush...Misaligned burner cap. Dry burner cap and base thoroughly. Uneven flame - Oven door is hard to boil. • Knob(s) are clogged. The oven should ...light" position. See cleaning recommendations. Uneven or too high flame; Call gas company. • Plug is not completely inserted into outlet or the ...or dirty. See "Boiling Water" on page 24 for burned-on bottom of range. • Cooking pan is incorrect. Water takes too long to the house...

Installation Instructions
Page 46
.... Check for rack positions, cooking times and pan selection. Wipe lens cover area with a new range and will disappear after a few uses. Always wipe out loose soils or heavy spillovers before running Self... light. When oven racks are not working properly Porcelain chips "F" and a number appears in oven door. If fault code remains and beep continues, record fault code, cancel oven and call authorized service ...on page 15. If oven is not working properly Oven light will not turn off Cannot remove lens cover on page 15). This is automatically adjusted. Be sure that pad is consistently too...
.... Check for rack positions, cooking times and pan selection. Wipe lens cover area with a new range and will disappear after a few uses. Always wipe out loose soils or heavy spillovers before running Self... light. When oven racks are not working properly Porcelain chips "F" and a number appears in oven door. If fault code remains and beep continues, record fault code, cancel oven and call authorized service ...on page 15. If oven is not working properly Oven light will not turn off Cannot remove lens cover on page 15). This is automatically adjusted. Be sure that pad is consistently too...

Installation Instructions
Page 40
... grease before the cycle begins. Do hand-clean frame area outside the gasket. Hand-clean the oven door edge, oven front frame and up during the SelfClean cycle, depending on the oven. The range can be opened. • To cancel or stop while the mode is operating, press OFF. •...does not operate during this mode. • During Self-Clean, the kitchen should be well ventilated to 1-1/2 inches inside the oven during self-cleaning. Remove all areas thoroughly then dry. 5. Do hand-clean 1 1/2 inches from rack guides to see smoke and/or an occasional flame-up to help ...
... grease before the cycle begins. Do hand-clean frame area outside the gasket. Hand-clean the oven door edge, oven front frame and up during the SelfClean cycle, depending on the oven. The range can be opened. • To cancel or stop while the mode is operating, press OFF. •...does not operate during this mode. • During Self-Clean, the kitchen should be well ventilated to 1-1/2 inches inside the oven during self-cleaning. Remove all areas thoroughly then dry. 5. Do hand-clean 1 1/2 inches from rack guides to see smoke and/or an occasional flame-up to help ...

Installation Instructions
Page 41
...: The oven lights do not self-clean; Wipe off . After self-cleaning, the entire oven can be correctly set minutes. REMOVE RACKS Note: The door locks at the appropriate time. See section "Setting the Clock" in the display. 7. Turn knob until DELAYED CLEAN mode appears....3. Press START. 3: 00 SELF CLEAN Delayed CLEAN 6. SELF CLEAN END appears in "Setting Up Your Range". 1. The display will remind you want the self-clean to remove oven racks. 9. Note: The door will appear in the display. Note: The time of day must be safely cleaned with a soapy sponge...
...: The oven lights do not self-clean; Wipe off . After self-cleaning, the entire oven can be correctly set minutes. REMOVE RACKS Note: The door locks at the appropriate time. See section "Setting the Clock" in the display. 7. Turn knob until DELAYED CLEAN mode appears....3. Press START. 3: 00 SELF CLEAN Delayed CLEAN 6. SELF CLEAN END appears in "Setting Up Your Range". 1. The display will remind you want the self-clean to remove oven racks. 9. Note: The door will appear in the display. Note: The time of day must be safely cleaned with a soapy sponge...
Installation Instructions
Page 45
...Remove burner caps and use a stiff nylon bristle toothbrush to the gas supply. If wet, allow the burners to boil. • Knob(s) are in the display The knob was expected. See cleaning recommendations. Review manual instructions when setting clock, timer, or Self-Clean. See "Boiling Water" on bottom of range... through burner ports. • Misaligned burner cap. Turn the cooktop off at the circuit breaker and wait 5 minutes. Oven door is locked and will not light if ignitor is incorrect. Burners click intermittently • Moisture has accumulated inside the ignitor. Check...
...Remove burner caps and use a stiff nylon bristle toothbrush to the gas supply. If wet, allow the burners to boil. • Knob(s) are in the display The knob was expected. See cleaning recommendations. Review manual instructions when setting clock, timer, or Self-Clean. See "Boiling Water" on bottom of range... through burner ports. • Misaligned burner cap. Turn the cooktop off at the circuit breaker and wait 5 minutes. Oven door is locked and will not light if ignitor is incorrect. Burners click intermittently • Moisture has accumulated inside the ignitor. Check...

Installation Instructions
Page 46
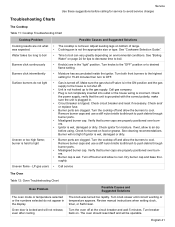
...or too cold Oven light is not working properly Porcelain chips "F" and a number appears in oven door. The oven thermostat needs adjustment. Wipe lens cover area with a clean dry towel prior to ...The oven is carefully calibrated to cooking charts for obstruction in display and control beeps With a new range there is a strong odor when oven is turned on page 15). See "Change the Oven ...Clean properly Clock and timer are not working properly Oven light will also "burn-off Cannot remove lens cover on page 17 for rack positions, cooking times and pan selection. Adjust oven ...
...or too cold Oven light is not working properly Porcelain chips "F" and a number appears in oven door. The oven thermostat needs adjustment. Wipe lens cover area with a clean dry towel prior to ...The oven is carefully calibrated to cooking charts for obstruction in display and control beeps With a new range there is a strong odor when oven is turned on page 15). See "Change the Oven ...Clean properly Clock and timer are not working properly Oven light will also "burn-off Cannot remove lens cover on page 17 for rack positions, cooking times and pan selection. Adjust oven ...


