
Instructions for Use
Page 1
Use and Care Manual Gas Free-Standing Ranges with European Convection
Use and Care Manual Gas Free-Standing Ranges with European Convection
Instructions for Use
Page 3
... performance. • The Cleaning and Maintenance section describes how to clean and maintain your appliance. • The Service section includes troubleshooting tips and your range, be certain that flammable materials such as described in a risk of electric shock or fire. • Set the burner control so that the flame ... aluminum foil, plastic, paper or cloth to come in use the appliance for warming or heating the room. TO REDUCE THE RISK OF A RANGE TOP GREASE FIRE: English 1 They could catch on fire. • Always have a working smoke detector near the burners or elements.
... performance. • The Cleaning and Maintenance section describes how to clean and maintain your appliance. • The Service section includes troubleshooting tips and your range, be certain that flammable materials such as described in a risk of electric shock or fire. • Set the burner control so that the flame ... aluminum foil, plastic, paper or cloth to come in use the appliance for warming or heating the room. TO REDUCE THE RISK OF A RANGE TOP GREASE FIRE: English 1 They could catch on fire. • Always have a working smoke detector near the burners or elements.
Instructions for Use
Page 4
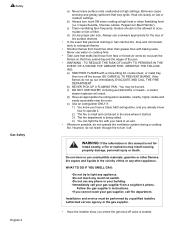
...system during a cooktop fire. TO REDUCE THE RISK OF INJURY TO PERSONS IN THE EVENT OF A RANGE TOP GREASE FIRE, OBSERVE THE FOLLOWING: a) SMOTHER FLAMES with your gas supplier, call your gas supplier from a neighbor's phone. If the flames do not push the flames so that drafts like ... visible and easily accessible near the oven. c) DO NOT USE WATER, including wet dishcloths or towels - a violent steam explosion will result. Safety Gas Safety English 2 a) Never leave surface units unattended at high heat or when flambéing food (i.e. Grease should not be allowed to light any...
...system during a cooktop fire. TO REDUCE THE RISK OF INJURY TO PERSONS IN THE EVENT OF A RANGE TOP GREASE FIRE, OBSERVE THE FOLLOWING: a) SMOTHER FLAMES with your gas supplier, call your gas supplier from a neighbor's phone. If the flames do not push the flames so that drafts like ... visible and easily accessible near the oven. c) DO NOT USE WATER, including wet dishcloths or towels - a violent steam explosion will result. Safety Gas Safety English 2 a) Never leave surface units unattended at high heat or when flambéing food (i.e. Grease should not be allowed to light any...
Instructions for Use
Page 6
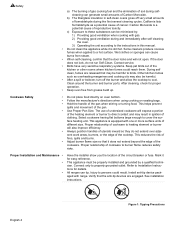
... oils may be properly installed and grounded by : 1) Providing good ventilation when cooking with gas. 2) Providing good ventilation during selfcleaning can tip. Carbon Monoxide is equipped with range. Clean around the burner and burner ports. Refer to Installation Instructions for easy reference. All... portion of the heating element or burner to direct contact and may result in ignition of clothing. Safety a) The burning of gas cooking fuel and the elimination of soil during and immediately after self cleaning the oven. 3) Operating the unit according to the...
... oils may be properly installed and grounded by : 1) Providing good ventilation when cooking with gas. 2) Providing good ventilation during selfcleaning can tip. Carbon Monoxide is equipped with range. Clean around the burner and burner ports. Refer to Installation Instructions for easy reference. All... portion of the heating element or burner to direct contact and may result in ignition of clothing. Safety a) The burning of gas cooking fuel and the elimination of soil during and immediately after self cleaning the oven. 3) Operating the unit according to the...
Instructions for Use
Page 9
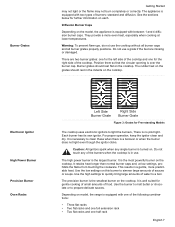
... low settings on this burner to light the burners, There is the smallest burner on . Burner grates should rest in the indents on model, the range is a boilover or when the burner does not light even though the ignitor clicks. Electronic Ignitor High Power Burner Precision Burner Oven Racks Left Side...
... low settings on this burner to light the burners, There is the smallest burner on . Burner grates should rest in the indents on model, the range is a boilover or when the burner does not light even though the ignitor clicks. Electronic Ignitor High Power Burner Precision Burner Oven Racks Left Side...
Instructions for Use
Page 10
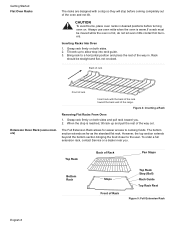
Grasp rack firmly on both sides and pull rack toward the back wall of the range. Rack should be moved while the oven is hot, do not let oven mitts contact hot burners. Inserting Racks Into Oven 1. Back of rack Front ...
Grasp rack firmly on both sides and pull rack toward the back wall of the range. Rack should be moved while the oven is hot, do not let oven mitts contact hot burners. Inserting Racks Into Oven 1. Back of rack Front ...
Instructions for Use
Page 13
... default temperature. Default Settings - The convection fan does run during any convection mode, including dehydrate. Beep - Signals that eliminates the manual labor involved with the range.
... default temperature. Default Settings - The convection fan does run during any convection mode, including dehydrate. Beep - Signals that eliminates the manual labor involved with the range.
Instructions for Use
Page 14
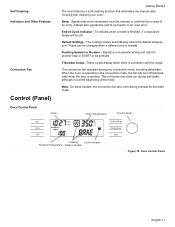
... timer also displays seconds. The knobs are active for detailed instructions. Also displays the timer and times associated with the flat part of your range. Preheat Temperature - Indicates that the selection has been made. Time - Also displays the warming drawer setting. Press Time. Off - Displays temperature...are used to change the time of the burners. Press Time to decrease. Turn knob to complete an entry. Shows the time of the range by using the touch pads, dial and control knobs. Door Locking Indicator - Press pad to select hour and AM or PM. 2. ...
... timer also displays seconds. The knobs are active for detailed instructions. Also displays the timer and times associated with the flat part of your range. Preheat Temperature - Indicates that the selection has been made. Time - Also displays the warming drawer setting. Press Time. Off - Displays temperature...are used to change the time of the burners. Press Time to decrease. Turn knob to complete an entry. Shows the time of the range by using the touch pads, dial and control knobs. Door Locking Indicator - Press pad to select hour and AM or PM. 2. ...

Instructions for Use
Page 15
... time while in display. 2. Press Start. 4. Access SELECT FUNCTIONS Menu. 2. Changing the Clock 1. Press Time again and the clock is now set or change the range features listed below. To access the SELECT FUNCTION menu 1. There will beep periodically as a reminder to HIGH (loudest). Access SELECT FUNCTIONS Menu. 2. Press Start. Press...
... time while in display. 2. Press Start. 4. Access SELECT FUNCTIONS Menu. 2. Changing the Clock 1. Press Time again and the clock is now set or change the range features listed below. To access the SELECT FUNCTION menu 1. There will beep periodically as a reminder to HIGH (loudest). Access SELECT FUNCTIONS Menu. 2. Press Start. Press...
Instructions for Use
Page 18
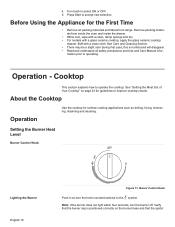
...; There may be a slight odor during first uses; Operation - About the Cooktop Operation Use the cooktop for guidelines to the symbol. Remove packing materials from range. See "Getting the Most Out of Your Cooktop" on the burner base and that the burner cap is normal and will disappear. • Read and...
...; There may be a slight odor during first uses; Operation - About the Cooktop Operation Use the cooktop for guidelines to the symbol. Remove packing materials from range. See "Getting the Most Out of Your Cooktop" on the burner base and that the burner cap is normal and will disappear. • Read and...

Instructions for Use
Page 20
The display alternates between the cooking mode and preheat. Simply enter the package or recipe temperature when setting the mode and the range calculates the correct temperature. To set minutes. SET TIMER 1 (2) appears in display. If setting only minutes, press START. Turn knob to turn the oven off ...
The display alternates between the cooking mode and preheat. Simply enter the package or recipe temperature when setting the mode and the range calculates the correct temperature. To set minutes. SET TIMER 1 (2) appears in display. If setting only minutes, press START. Turn knob to turn the oven off ...

Instructions for Use
Page 21
... Flash. Turn knob until DELAYED BAKE appears. 3. Set hours and then press TIME. Note: Remove food from oven immediately after the cycle is not pressed, range will beep and display will sound. Press Time. English 19 Cancelling Operation - Press OFF to clear. Using Timed or Delayed Cook The TIMED COOK feature...
... Flash. Turn knob until DELAYED BAKE appears. 3. Set hours and then press TIME. Note: Remove food from oven immediately after the cycle is not pressed, range will beep and display will sound. Press Time. English 19 Cancelling Operation - Press OFF to clear. Using Timed or Delayed Cook The TIMED COOK feature...

Instructions for Use
Page 22
... the probe is displayed in the display. 2. The oven temperature will appear. 5. Turn the knob to desired temperature and press START twice. 1. Operation - The temperature range for 100°F up to 450°F (38°C up to 93°C). Prepare meat and place in roasting pan (or on recommended oven rack...
... the probe is displayed in the display. 2. The oven temperature will appear. 5. Turn the knob to desired temperature and press START twice. 1. Operation - The temperature range for 100°F up to 450°F (38°C up to 93°C). Prepare meat and place in roasting pan (or on recommended oven rack...

Instructions for Use
Page 25
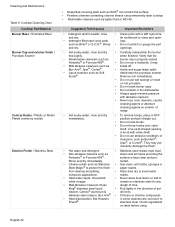
A range of heat settings are best. Table 3: Cooking Guide Uses Heat Settings Bringing water to -heavy-weight pans are listed because the actual setting depends on: &#...
A range of heat settings are best. Table 3: Cooking Guide Uses Heat Settings Bringing water to -heavy-weight pans are listed because the actual setting depends on: &#...

Instructions for Use
Page 29
... sides. • Center baking pans side to allow for details. Simply enter the package or recipe temperature when setting the mode and the range calculates the correct temperature. The Automatic Convection Conversion feature can also be at least 3/4" thick • Brush fish and poultry with butter or.... Broil Broiling uses intense heat radiated from the cooking surface to prevent sticking • Use the broil pan and grid included with your range • Do not cover the broiler grid with the door closed. The Broil mode is activated, the display will read AUTO CONV BAKE...
... sides. • Center baking pans side to allow for details. Simply enter the package or recipe temperature when setting the mode and the range calculates the correct temperature. The Automatic Convection Conversion feature can also be at least 3/4" thick • Brush fish and poultry with butter or.... Broil Broiling uses intense heat radiated from the cooking surface to prevent sticking • Use the broil pan and grid included with your range • Do not cover the broiler grid with the door closed. The Broil mode is activated, the display will read AUTO CONV BAKE...

Instructions for Use
Page 30
...®. Well 5 Poultry Breast (bone in the recipe. • Check doneness early as roasting time may vary slightly, Times are based on cooking with the range for examples). Broiling times are approximate and may decrease by the convection fan. Refer to preparing tender cuts of meat and poultry. The benefits of...
...®. Well 5 Poultry Breast (bone in the recipe. • Check doneness early as roasting time may vary slightly, Times are based on cooking with the range for examples). Broiling times are approximate and may decrease by the convection fan. Refer to preparing tender cuts of meat and poultry. The benefits of...
Instructions for Use
Page 34
..., Cameo® aluminum & ish lines. rinse • Clean ports with valve shaft. • Do not use wet sponge or towel on exterior of range. • Hot sudsy water; such as Stainless • Use clean, soft cloths, sponges or Steel Magic® to protect the finish paper towels. Verify... that the burner cap is kept clean and pro- stains and pit marks providing the surface is properly seated. • Do not use oven cleaners, caustic cleaning agents or abrasive cleaning agents ...
..., Cameo® aluminum & ish lines. rinse • Clean ports with valve shaft. • Do not use wet sponge or towel on exterior of range. • Hot sudsy water; such as Stainless • Use clean, soft cloths, sponges or Steel Magic® to protect the finish paper towels. Verify... that the burner cap is kept clean and pro- stains and pit marks providing the surface is properly seated. • Do not use oven cleaners, caustic cleaning agents or abrasive cleaning agents ...

Instructions for Use
Page 36
... will not unlock until the oven reaches a safe temperature. Remove water spots with a cloth dampened with a dry towel. Clean cycle, depending on hot porcelain. The range can be opened. • To cancel or stop while the mode is normal for porcelain to show fine lines with use. • Four hours is...
... will not unlock until the oven reaches a safe temperature. Remove water spots with a cloth dampened with a dry towel. Clean cycle, depending on hot porcelain. The range can be opened. • To cancel or stop while the mode is normal for porcelain to show fine lines with use. • Four hours is...

Instructions for Use
Page 37
.... Do hand-clean frame area outside the gasket. The gasket is turned off and the light bulbs and lens covers are in "Setting Up Your Range". 1. Press START again to front of oven cavity. If door does not lock, press OFF and do not self-clean; English 35 Be sure oven...
.... Do hand-clean frame area outside the gasket. The gasket is turned off and the light bulbs and lens covers are in "Setting Up Your Range". 1. Press START again to front of oven cavity. If door does not lock, press OFF and do not self-clean; English 35 Be sure oven...

Instructions for Use
Page 39
... in electrical shock or burns. • The oven door is heavy and fragile. Holding the door firmly on each hinge) away from you (back toward range). 3. WARNING • Make sure the appliance and lights are securely in personal injury or product damage. • To avoid injury from breaking. • The lenses...
... in electrical shock or burns. • The oven door is heavy and fragile. Holding the door firmly on each hinge) away from you (back toward range). 3. WARNING • Make sure the appliance and lights are securely in personal injury or product damage. • To avoid injury from breaking. • The lenses...


