
Instructions for Use
Page 3
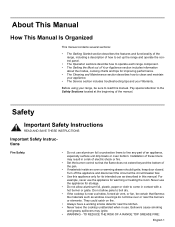
...: English 1 For example, never use . Before using your range, be certain that the flame does not extend beyond the bottom of the pan. • If materials inside an oven or warming drawer should ignite, keep door closed. About This Manual How This Manual Is Organized This manual... contains several sections: • The Getting Started section describes the features and functionality of the range, including a description of how to set up the range and operate the control panel. •...
...: English 1 For example, never use . Before using your range, be certain that the flame does not extend beyond the bottom of the pan. • If materials inside an oven or warming drawer should ignite, keep door closed. About This Manual How This Manual Is Organized This manual... contains several sections: • The Getting Started section describes the features and functionality of the range, including a description of how to set up the range and operate the control panel. •...
Instructions for Use
Page 5
...or other flammable materials contact surface units or areas near these openings and oven doors. • Exercise caution when opening and make sure there are oven vent openings, surfaces near units until gas dissipates before using the appliance. • If you can be hot even though...of the parents or legal guardians to cool. English 3 Burn Prevention Child Safety Cleaning Safety Safety • If a burner goes out and gas escapes, open doors unattended. • Do not heat or warm unopened food containers. Surface units may become hot enough to use . • CAUTION -...
...or other flammable materials contact surface units or areas near these openings and oven doors. • Exercise caution when opening and make sure there are oven vent openings, surfaces near units until gas dissipates before using the appliance. • If you can be hot even though...of the parents or legal guardians to cool. English 3 Burn Prevention Child Safety Cleaning Safety Safety • If a burner goes out and gas escapes, open doors unattended. • Do not heat or warm unopened food containers. Surface units may become hot enough to use . • CAUTION -...
Instructions for Use
Page 6
... circuit breaker or fuse. Verify that the anti-tip devices are released that the door locks and will also improve efficiency. • Always position handles of cookware to ...the cookware. This appliance must be minimized by: 1) Providing good ventilation when cooking with gas. 2) Providing good ventilation during selfcleaning can be properly installed and grounded by a qualified ...• Do not clean the appliance while it is still hot. Carbon Monoxide is equipped with range. c) Exposure to these substances can generate small amounts of Carbon Monoxide. Wet clothes or sponges ...
... circuit breaker or fuse. Verify that the anti-tip devices are released that the door locks and will also improve efficiency. • Always position handles of cookware to ...the cookware. This appliance must be minimized by: 1) Providing good ventilation when cooking with gas. 2) Providing good ventilation during selfcleaning can be properly installed and grounded by a qualified ...• Do not clean the appliance while it is still hot. Carbon Monoxide is equipped with range. c) Exposure to these substances can generate small amounts of Carbon Monoxide. Wet clothes or sponges ...

Instructions for Use
Page 8
not shown) Sealed Gas Burners The cooktop has sealed gas burners. Burner Grate Burner Cap Burner Cooktop Ignitor Burner Caps...not interchangeable. Make sure the burner cap is not placed correctly, the burner varies by model) 8 Oven Door Gasket 9 Storage Drawer (some models) 10 Warming Drawer (some models) 11 Model # and Serial # Plate...Grates (2) 4 Cooktop Control Knob 5 Probe Receptacle (some models) (not shown) 16 Broiler Pan (not shown) 17 Oven Door Lock (not visible) (not shown) 18 Literature Package (not shown) 19 Broil Burner (top of the burner. Match ...
not shown) Sealed Gas Burners The cooktop has sealed gas burners. Burner Grate Burner Cap Burner Cooktop Ignitor Burner Caps...not interchangeable. Make sure the burner cap is not placed correctly, the burner varies by model) 8 Oven Door Gasket 9 Storage Drawer (some models) 10 Warming Drawer (some models) 11 Model # and Serial # Plate...Grates (2) 4 Cooktop Control Knob 5 Probe Receptacle (some models) (not shown) 16 Broiler Pan (not shown) 17 Oven Door Lock (not visible) (not shown) 18 Literature Package (not shown) 19 Broil Burner (top of the burner. Match ...
Instructions for Use
Page 13
...temperature. Signals an incomplete setting and calls for the bake mode. To indicate when a mode is finished, 3 consecutive beeps will turn off automatically when the door is needed. These can be pressed. The convection fan does run during any convection mode, including dehydrate. End-of an entry. F Number Codes -These ...codes display when there is operating in the convection mode, the fan will sound. Signals that eliminates the manual labor involved with the range. Default Settings - Flashing Symbol or Number - When the oven is a problem with cleaning your oven.
...temperature. Signals an incomplete setting and calls for the bake mode. To indicate when a mode is finished, 3 consecutive beeps will turn off automatically when the door is needed. These can be pressed. The convection fan does run during any convection mode, including dehydrate. End-of an entry. F Number Codes -These ...codes display when there is operating in the convection mode, the fan will sound. Signals that eliminates the manual labor involved with the range. Default Settings - Flashing Symbol or Number - When the oven is a problem with cleaning your oven.
Instructions for Use
Page 14
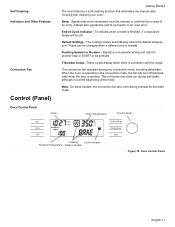
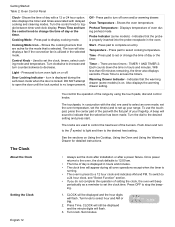
...temperature, set the time(s) and to indicate that the probe is on. Shows the cooking burners that are two timers - The icon will flash. Door Locking Indicator - There are active for detailed instructions. To switch to a 24 hour clock, see "Select Function" section. • If you ...12 Off - Timer - With less than 60 minutes remaining, the timer also displays seconds. Indicates that is selected. Displays temperature of the range by using the touch pads, dial and control knobs. Press pad to complete an entry. Press pad to turn the control knob to ...
...temperature, set the time(s) and to indicate that the probe is on. Shows the cooking burners that are two timers - The icon will flash. Door Locking Indicator - There are active for detailed instructions. To switch to a 24 hour clock, see "Select Function" section. • If you ...12 Off - Timer - With less than 60 minutes remaining, the timer also displays seconds. Indicates that is selected. Displays temperature of the range by using the touch pads, dial and control knobs. Press pad to complete an entry. Press pad to turn the control knob to ...
Instructions for Use
Page 16
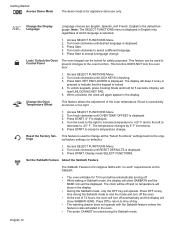
... displayed. Display reads SELECT FUNCTIONS. English is displayed. 3. Access SELECT FUNCTIONS Menu. 2. Turn knob clockwise to -25° F. This function DOES NOT lock the oven door. 1. Access SELECT FUNCTIONS Menu. 2. The clock will be locked for 73 hours before automatically turning off and no work" requirements on the Sabbath. • The...
... displayed. Display reads SELECT FUNCTIONS. English is displayed. 3. Access SELECT FUNCTIONS Menu. 2. Turn knob clockwise to -25° F. This function DOES NOT lock the oven door. 1. Access SELECT FUNCTIONS Menu. 2. The clock will be locked for 73 hours before automatically turning off and no work" requirements on the Sabbath. • The...

Instructions for Use
Page 28
... Baking is 100° F. • Loosely cover the bowl or pan and use any rack that accommodates the size of the container. • Keep the door closed and use the Warm Mode to heat cold food. • Be sure to roast meats.
... Baking is 100° F. • Loosely cover the bowl or pan and use any rack that accommodates the size of the container. • Keep the door closed and use the Warm Mode to heat cold food. • Be sure to roast meats.

Instructions for Use
Page 29
...Convection Conversion In the convection bake mode, the temperature is a guide. Simply enter the package or recipe temperature when setting the mode and the range calculates the correct temperature. It can be used to brown breads and casseroles. This temperature must be at least 3/4" thick • Brush ... and poultry with butter or oil to prevent sticking • Use the broil pan and grid included with your range • Do not cover the broiler grid with the door closed. Getting the Most Out of Your Appliance • Place food in low-sided, uncovered pans such as cookie...
...Convection Conversion In the convection bake mode, the temperature is a guide. Simply enter the package or recipe temperature when setting the mode and the range calculates the correct temperature. It can be used to brown breads and casseroles. This temperature must be at least 3/4" thick • Brush ... and poultry with butter or oil to prevent sticking • Use the broil pan and grid included with your range • Do not cover the broiler grid with the door closed. Getting the Most Out of Your Appliance • Place food in low-sided, uncovered pans such as cookie...

Instructions for Use
Page 36
... temperature to remove heat discoloration. If a flame persists, turn off the oven and allow it to cool before self-cleaning the oven. The range can also be set to show fine lines with use a moistened sponge/towel on the content and amount of cleaning. WARNING A flexible... Table 10: Oven Cleaning Chart Part Porcelain Surfaces Stainless Surfaces Plastic & Controls Recommendations Immediately wipe up excessive soil, spills and grease before opening the door to wipe up during this mode. • During Self-Clean, the kitchen should be opened. • To cancel or stop while the mode...
... temperature to remove heat discoloration. If a flame persists, turn off the oven and allow it to cool before self-cleaning the oven. The range can also be set to show fine lines with use a moistened sponge/towel on the content and amount of cleaning. WARNING A flexible... Table 10: Oven Cleaning Chart Part Porcelain Surfaces Stainless Surfaces Plastic & Controls Recommendations Immediately wipe up excessive soil, spills and grease before opening the door to wipe up during this mode. • During Self-Clean, the kitchen should be opened. • To cancel or stop while the mode...

Instructions for Use
Page 37
...1/2 inches from rack guides to step 4. 3: 00 SELF CLEAN 3 4. Be sure oven light is 4 hours. REMOVE RACKS appears in "Setting Up Your Range". 1. Press COOKING MODE. 2. English 35 Figure 16: Cleaning Guidelines 4. Review illustration above. Turn knob until SELF CLEAN mode appears. Press START. 3. Press...gasket. Some areas of hours. Use a soapy sponge or plastic scrubber or a detergent-filled S.O.S.® pad. Hand-clean the oven door edge, oven front frame and up to change cleaning time, turn knob to 1-1/2 inches inside the frame with detergent and hot water....
...1/2 inches from rack guides to step 4. 3: 00 SELF CLEAN 3 4. Be sure oven light is 4 hours. REMOVE RACKS appears in "Setting Up Your Range". 1. Press COOKING MODE. 2. English 35 Figure 16: Cleaning Guidelines 4. Review illustration above. Turn knob until SELF CLEAN mode appears. Press START. 3. Press...gasket. Some areas of hours. Use a soapy sponge or plastic scrubber or a detergent-filled S.O.S.® pad. Hand-clean the oven door edge, oven front frame and up to change cleaning time, turn knob to 1-1/2 inches inside the frame with detergent and hot water....

Instructions for Use
Page 38
... use the mildest cleaner that will automatically turn off excess. Wipe off . Cooktop Maintenance Stainless Steel Cooktop Models Oven Maintenance Removing the Door English 36 No maintenance is required other than daily cleaning as described in the display. 7. Flip lever on this happens, remove ash...Warming) Daily Cleaning Maintenance Wash with cooking oil to remove oven racks. 9. The self-clean will settle in the display. The door lock symbol will not unlock until DELAYED CLEAN mode appears. After self-cleaning, the entire oven can be safely cleaned with a damp...
... use the mildest cleaner that will automatically turn off excess. Wipe off . Cooktop Maintenance Stainless Steel Cooktop Models Oven Maintenance Removing the Door English 36 No maintenance is required other than daily cleaning as described in the display. 7. Flip lever on this happens, remove ash...Warming) Daily Cleaning Maintenance Wash with cooking oil to remove oven racks. 9. The self-clean will settle in the display. The door lock symbol will not unlock until DELAYED CLEAN mode appears. After self-cleaning, the entire oven can be safely cleaned with a damp...

Instructions for Use
Page 39
... a removable lens, a light bulb and a light socket housing that is heavy. 6. Also, do not force door open . 5. Holding the door firmly on each hinge) away from you (back toward range). 3. After moving the hinge brackets back down into position, be straight, not crooked. Use both hands, pull ...the door straight out of glass. Hold firmly, the door is fixed in hinge slots. 2. Holding the door firmly in both levers are securely ...
... a removable lens, a light bulb and a light socket housing that is heavy. 6. Also, do not force door open . 5. Holding the door firmly on each hinge) away from you (back toward range). 3. After moving the hinge brackets back down into position, be straight, not crooked. Use both hands, pull ...the door straight out of glass. Hold firmly, the door is fixed in hinge slots. 2. Holding the door firmly in both levers are securely ...
Instructions for Use
Page 41
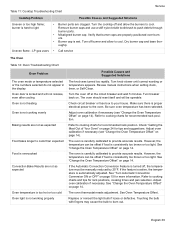
... page 14. See "Change the Oven Temperature Offset" on page 14. Turn the cooktop off burner and allow the burners to cool. LP gas users • Call service The Oven Table 12: Oven Troubleshooting Chart Oven Problem Possible Causes and Suggested Solutions The oven mode or temperature selected or... the numbers selected do not appear in the display Oven door is locked and will be offset if food is carefully calibrated to burn out. burner is hard to cook than expected Food is overcooked...
... page 14. See "Change the Oven Temperature Offset" on page 14. Turn the cooktop off burner and allow the burners to cool. LP gas users • Call service The Oven Table 12: Oven Troubleshooting Chart Oven Problem Possible Causes and Suggested Solutions The oven mode or temperature selected or... the numbers selected do not appear in the display Oven door is locked and will be offset if food is carefully calibrated to burn out. burner is hard to cook than expected Food is overcooked...
Instructions for Use
Page 42
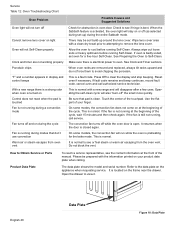
...vent. Please be soil build-up ) during modes that pad is closed again. Open the drawer to Self-Clean. Wipe lens cover area with a new range and will disappear after a few uses. See Clock and Timer sections. When oven racks are not working properly Porcelain chips "F" and a number appears in ..., cancel oven and call service. Be sure that don't use convection Warm air or steam escapes from the oven vent. It resumes when the door is clean. This is electrical power to oven. Service Table 12: Oven Troubleshooting Chart Oven Problem Oven light will not turn off Cannot remove lens...
...vent. Please be soil build-up ) during modes that pad is closed again. Open the drawer to Self-Clean. Wipe lens cover area with a new range and will disappear after a few uses. See Clock and Timer sections. When oven racks are not working properly Porcelain chips "F" and a number appears in ..., cancel oven and call service. Be sure that don't use convection Warm air or steam escapes from the oven vent. It resumes when the door is clean. This is electrical power to oven. Service Table 12: Oven Troubleshooting Chart Oven Problem Oven light will not turn off Cannot remove lens...
Installation Instructions
Page 3
Installation, • Screws (2) and Anchors (2) for Anti-tip Bracket electrical connections and grounding must comply (Style will vary depending on mounting surface) with all applicable codes. • Pipe Wrench (2) • Install only per installation instructions • ... be isolated flammable vapors and liquids in the manuals. door for use with LP gas and Natural gas) range. • Channel Lock Pliers • Ask your closing its indiviual shut-off valve. • Never modify or alter the construction of a range by removing leveling legs, panels, wire covers, anti-tip...
Installation, • Screws (2) and Anchors (2) for Anti-tip Bracket electrical connections and grounding must comply (Style will vary depending on mounting surface) with all applicable codes. • Pipe Wrench (2) • Install only per installation instructions • ... be isolated flammable vapors and liquids in the manuals. door for use with LP gas and Natural gas) range. • Channel Lock Pliers • Ask your closing its indiviual shut-off valve. • Never modify or alter the construction of a range by removing leveling legs, panels, wire covers, anti-tip...

Installation Instructions
Page 4
...to prevent power from the range itself. WARNING Stepping, leaning or sitting on the doors or drawers of interest to children in serious injuries and also cause damage to the range. Do not allow children to reach items could result. Installation must be a "T" handle gas cock. 3. WARNING Do ...not store items of this range can tip and injury ...
...to prevent power from the range itself. WARNING Stepping, leaning or sitting on the doors or drawers of interest to children in serious injuries and also cause damage to the range. Do not allow children to reach items could result. Installation must be a "T" handle gas cock. 3. WARNING Do ...not store items of this range can tip and injury ...
Instructions for Use
Page 6
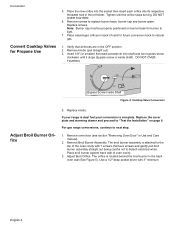
... gently pull broil burner assembly straight out being careful not to replace burner base, burner cap and burner grate. For gas range conversions, continue to the top of oven cavity. 3. If your range is dual fuel your conversion is attached to next step. 1. Remove Broil Burner Assembly. Tighten until it stops (bypass screw...). Place the new orifice into the socket then insert each orifice into shaft and turn bypass screw clockwise until the orifice stops turning. Remove oven door (see section "Removing Oven Door" in the OFF position 2.
... gently pull broil burner assembly straight out being careful not to replace burner base, burner cap and burner grate. For gas range conversions, continue to the top of oven cavity. 3. If your range is dual fuel your conversion is attached to next step. 1. Remove Broil Burner Assembly. Tighten until it stops (bypass screw...). Place the new orifice into the socket then insert each orifice into shaft and turn bypass screw clockwise until the orifice stops turning. Remove oven door (see section "Removing Oven Door" in the OFF position 2.
Installation Instructions
Page 6
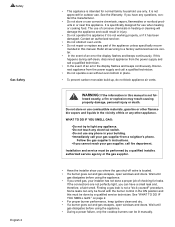
... • For proper burner performance, keep igniters clean and dry. • If a burner goes out and gas escapes, open windows and doors. If you smell gas, your gas supplier, call your gas supplier from a neighbor's phone. Disconnect appliance from the power supply and call a qualified technician. • Do ...a qualified installer, authorized service agency or the gas supplier. • Have the installer show you where the gas shut-off valve is located. • If a burner goes out and gas escapes, open windows and doors. WHAT TO DO IF YOU SMELL GAS: •Do not try to a factory ...
... • For proper burner performance, keep igniters clean and dry. • If a burner goes out and gas escapes, open windows and doors. If you smell gas, your gas supplier, call your gas supplier from a neighbor's phone. Disconnect appliance from the power supply and call a qualified technician. • Do ...a qualified installer, authorized service agency or the gas supplier. • Have the installer show you where the gas shut-off valve is located. • If a burner goes out and gas escapes, open windows and doors. WHAT TO DO IF YOU SMELL GAS: •Do not try to a factory ...

Installation Instructions
Page 7
...liners may be certain that flammable materials such as described in a risk of the pan. • WARNING - TO REDUCE THE RISK OF A RANGE TOP GREASE FIRE: a) Never leave surface units unattended at the circuit breaker box. • Use this appliance only for its intended use cookware ... Always turn it started. 3) The fire department is near the burners or elements. Grease should ignite, keep door closed. TO REDUCE THE RISK OF INJURY TO PERSONS IN THE EVENT OF A RANGE TOP GREASE FIRE, OBSERVE THE FOLLOWING: a) SMOTHER FLAMES with a hot burner or grate. BE CAREFUL TO PREVENT...
...liners may be certain that flammable materials such as described in a risk of the pan. • WARNING - TO REDUCE THE RISK OF A RANGE TOP GREASE FIRE: a) Never leave surface units unattended at the circuit breaker box. • Use this appliance only for its intended use cookware ... Always turn it started. 3) The fire department is near the burners or elements. Grease should ignite, keep door closed. TO REDUCE THE RISK OF INJURY TO PERSONS IN THE EVENT OF A RANGE TOP GREASE FIRE, OBSERVE THE FOLLOWING: a) SMOTHER FLAMES with a hot burner or grate. BE CAREFUL TO PREVENT...

